Getting Started with The database/sql Package

This article was written by an external contributor.

The database/sql package is a standard library that provides an interface for interacting with SQL databases. The package enables applications to query and update databases and provides a portable interface that works with various SQL databases. The database/sql package is typically used in conjunction with a database driver, which provides a concrete interface implementation allowing you to abstract the database options behind convenient methods.
This hands-on tutorial will show you how to get started with the database/sql package by teaching you how to:
- Create a GoLand project.
- Set up the database.
- Implement basic queries and transactions using Go and GoLand.
- How to construct error messages.
Getting started with the database/sql package
Getting started with databases in Go is straightforward. However, your local machine must meet certain prerequisites.
Prerequisites
Before getting started, you should make sure that you have installed all the required tools and have the appropriate resources to complete the tutorial:
- Go: If you haven’t already, download and install Go on your local machine.
- MySQL server: Go supports popular relational database management systems such as MySQL, Oracle, Postgres, SQL Server, SQLite, and more. However, in this tutorial, you’ll use MySQL. Download the appropriate MySQL Community Server for your operating system here. For instructions on how to set up MySQL, refer to MySQL Getting Started.
- Important note: Depending on your chosen installation method, the MySQL server may start automatically and run in the background until you stop it. Likewise, it may be the case that you have to start the MySQL service manually after installing the service.
- MySQL db: You’ll need an empty database ready to use. This tutorial refers to the database as
recordings, but you can use whatever name you like. You can find information on creating a DB in MySQL here. - GoLand IDE: You can download GoLand for macOS, Linux, or Windows here.
- Tutorial repository: You can clone the repository that contains the code used during the tutorial to an appropriate location.
Once the prerequisites are met, you can launch GoLand and start your first project.
Creating a new project in GoLand
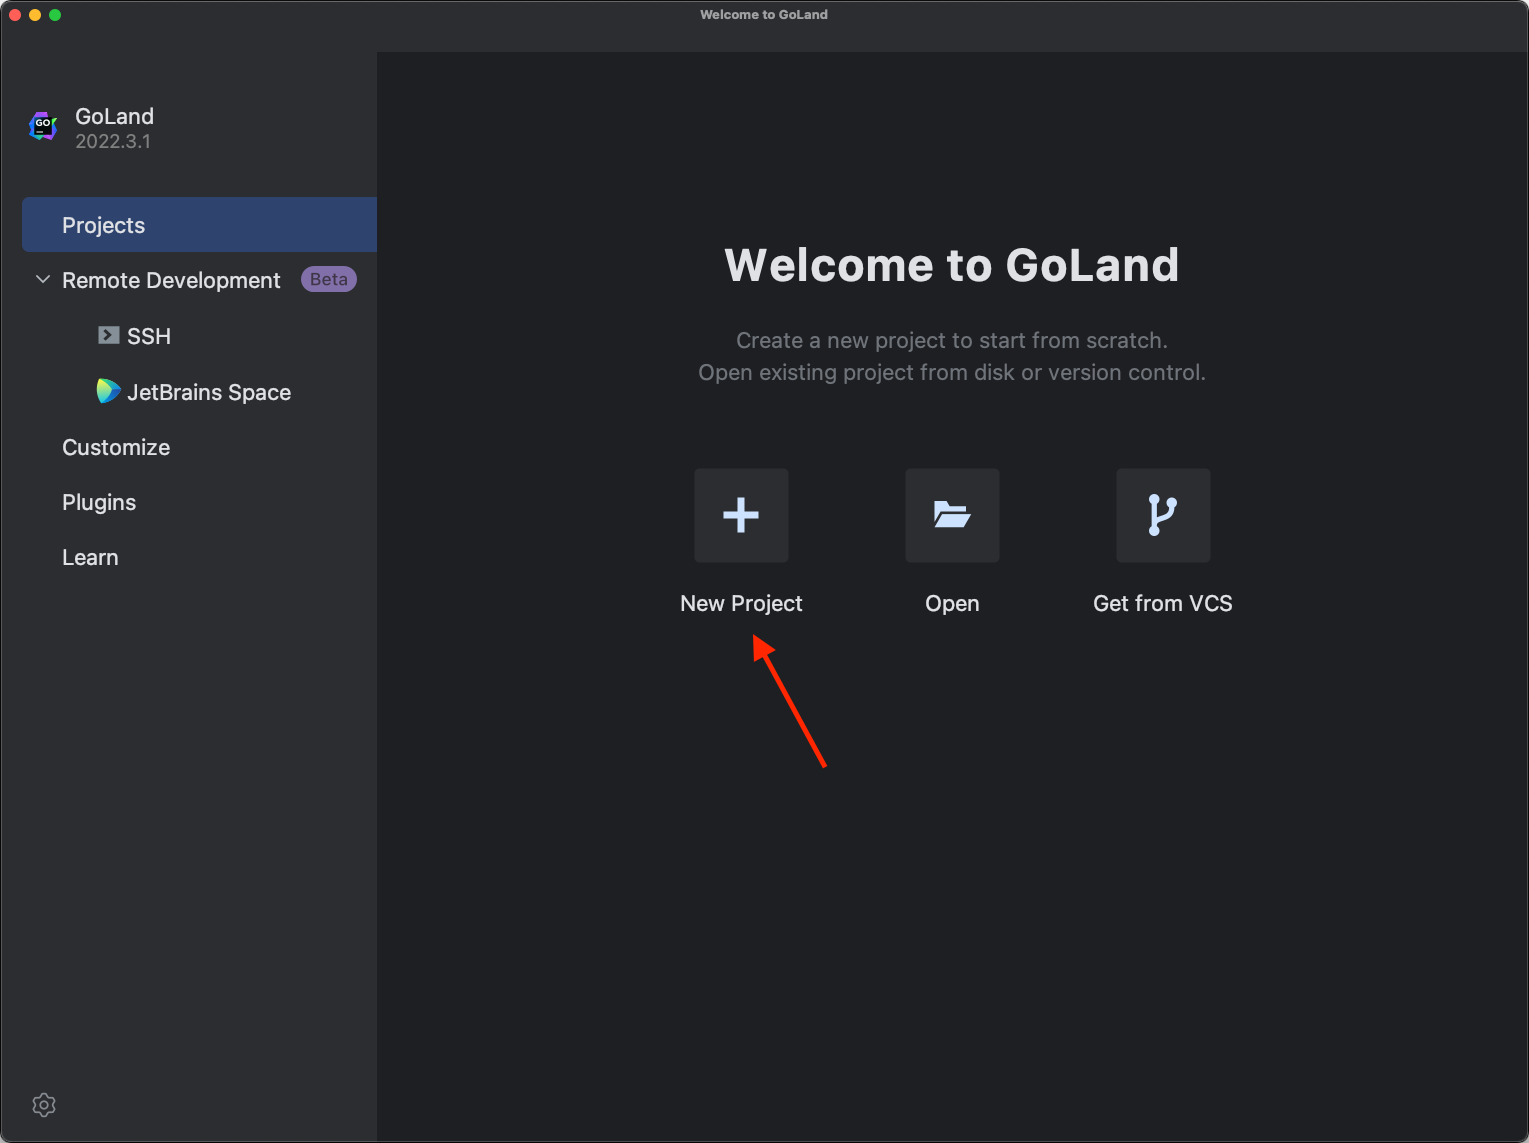
The first step is to create a new project in GoLand. To do this, press the New Project button on the Welcome screen.
Next, you will be presented with a screen similar to the following:
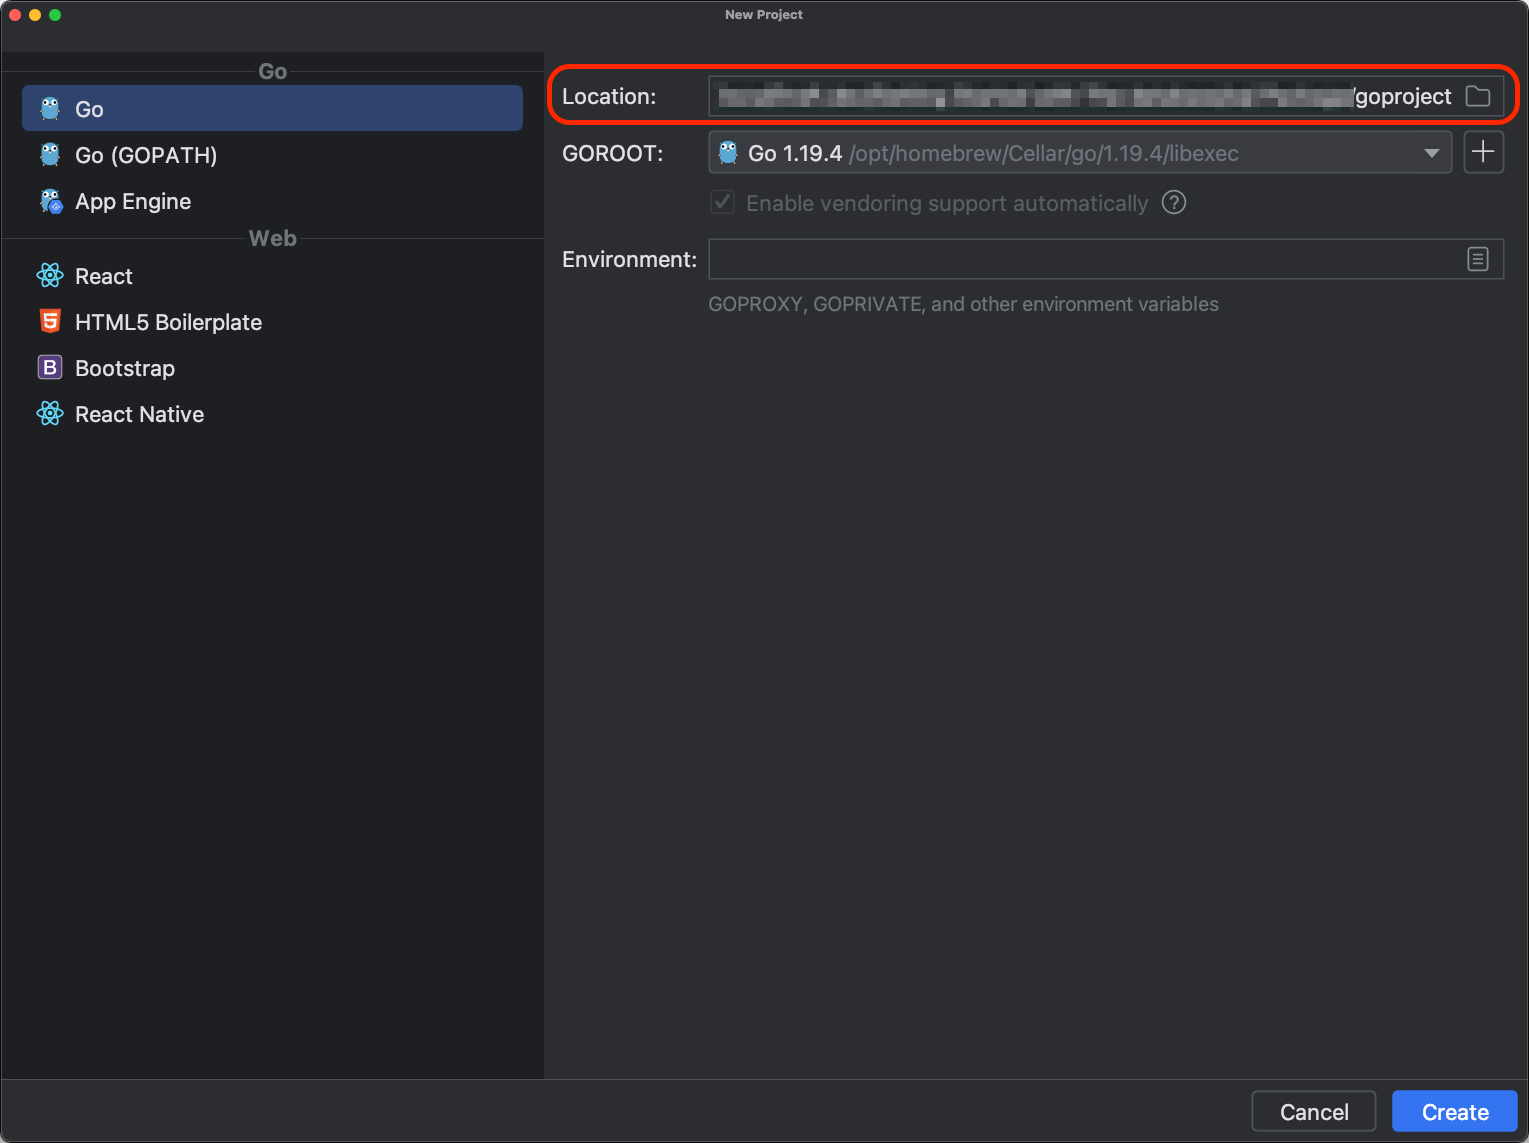
You’ll notice several fields on this screen:
- Location. Use this field to choose a suitable location for your project. However, for this tutorial, you must choose the repository’s location.
- GOROOT. This field is prefilled if you have installed Go in the default location for your OS. If not, select the correct Go root location.
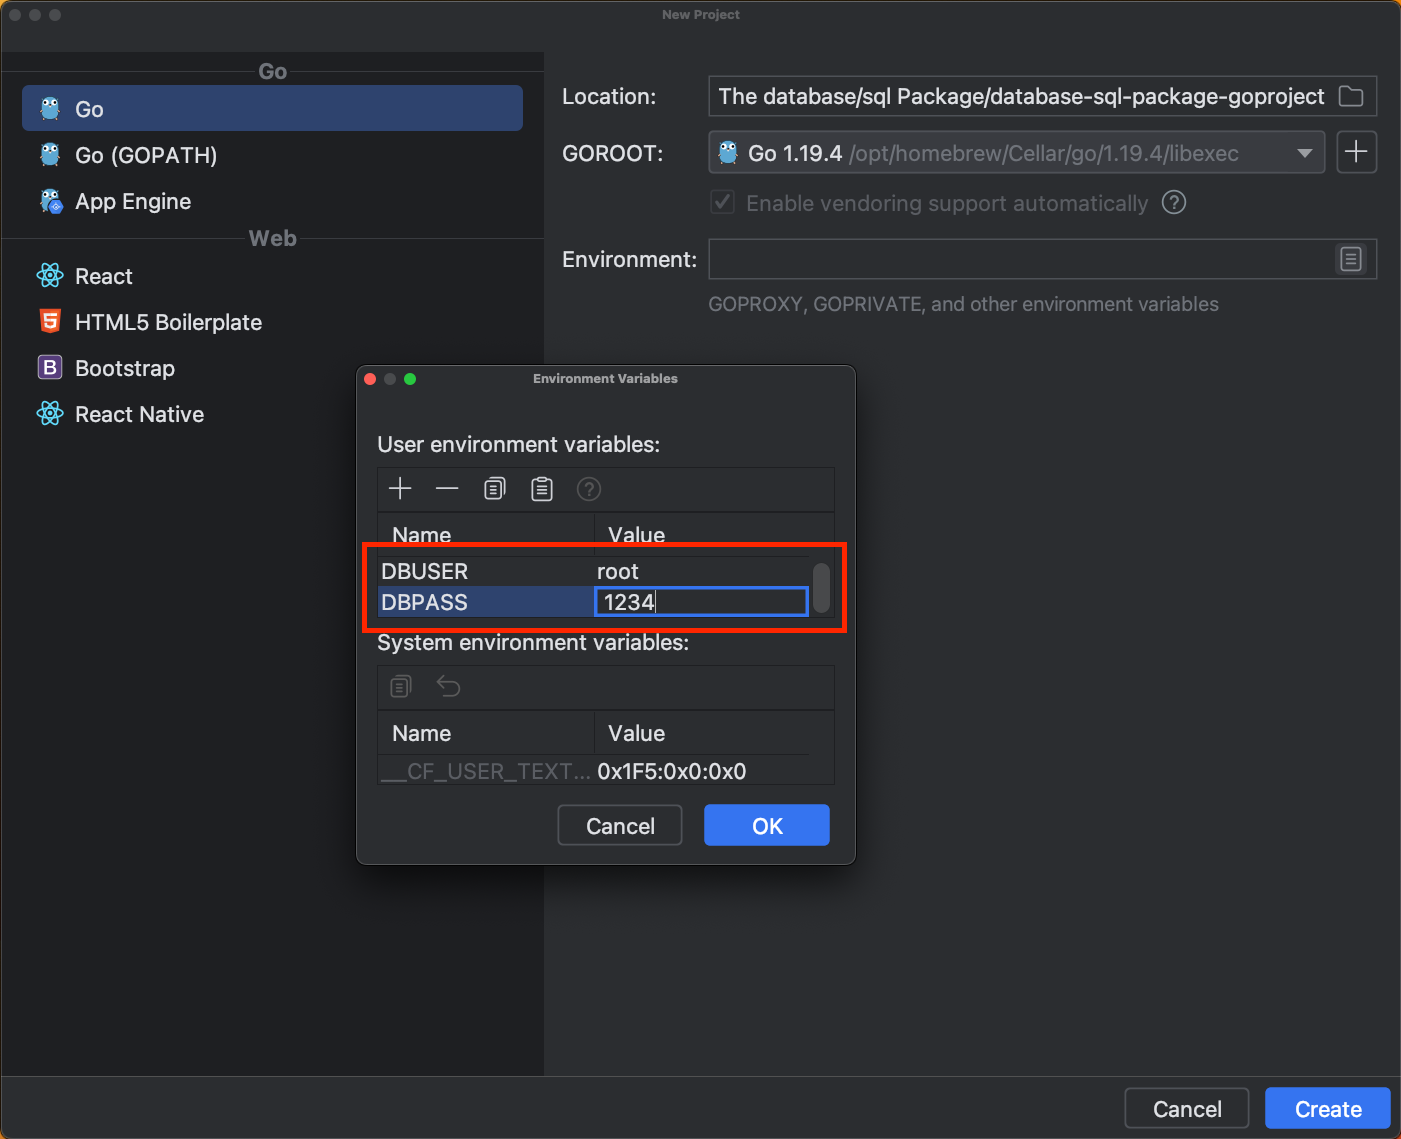
- Environment. This is an optional field that allows you to declare environmental variables such as GOPROXY or GOPRIVATE. In this tutorial, you use this field to declare MySQL environment variables
DBUSERandDBPASSthat you’ll need later to connect with the database. To do this, you must enter the corresponding key-value pairs as shown below.
Be sure to enter the correct values. For this tutorial, the following values are used:
Once you create a project, GoLand automatically creates the go.mod file for you.
Configuring MySQL data sources
Managing databases in GoLand is very easy; all you have to do is make sure your data source is configured properly.
To configure the data source, first, click on the database icon in the right menu of GoLand, and then click the plus sign (+) or on the configuration icon, followed by the plus sign, and choose MySQL from the list of available databases.
On the next screen, enter your username and password to connect to MySQL. Next, enter the name of the database, and click Test Connection.
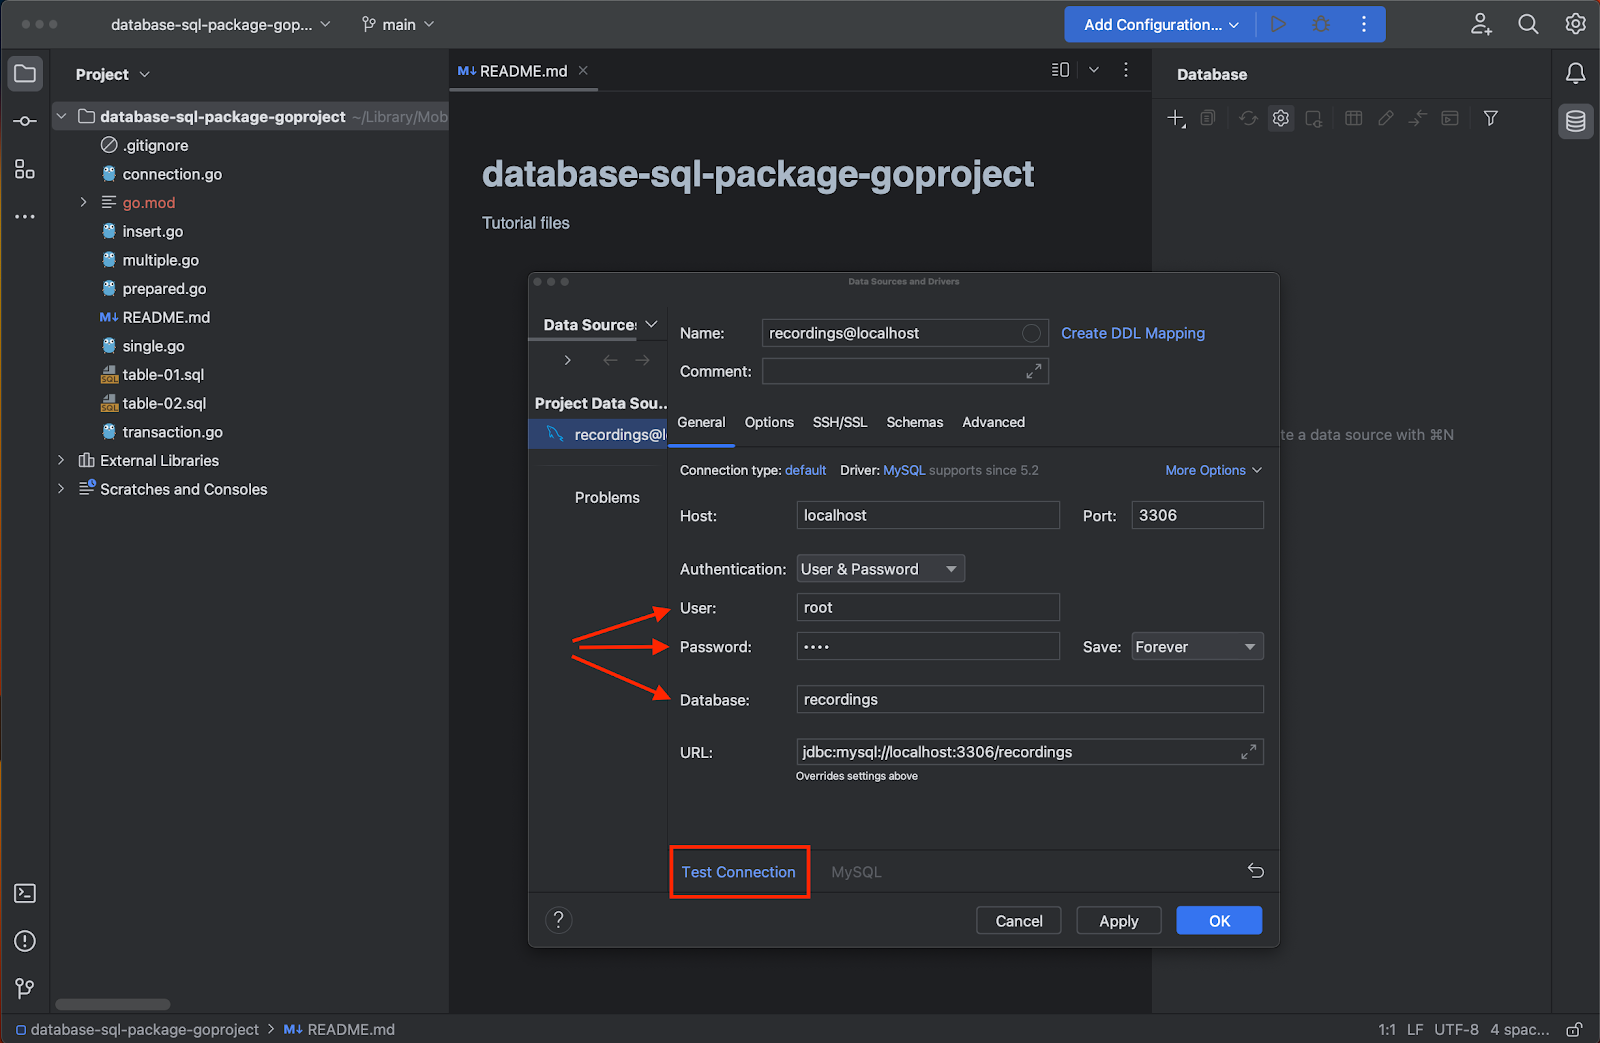
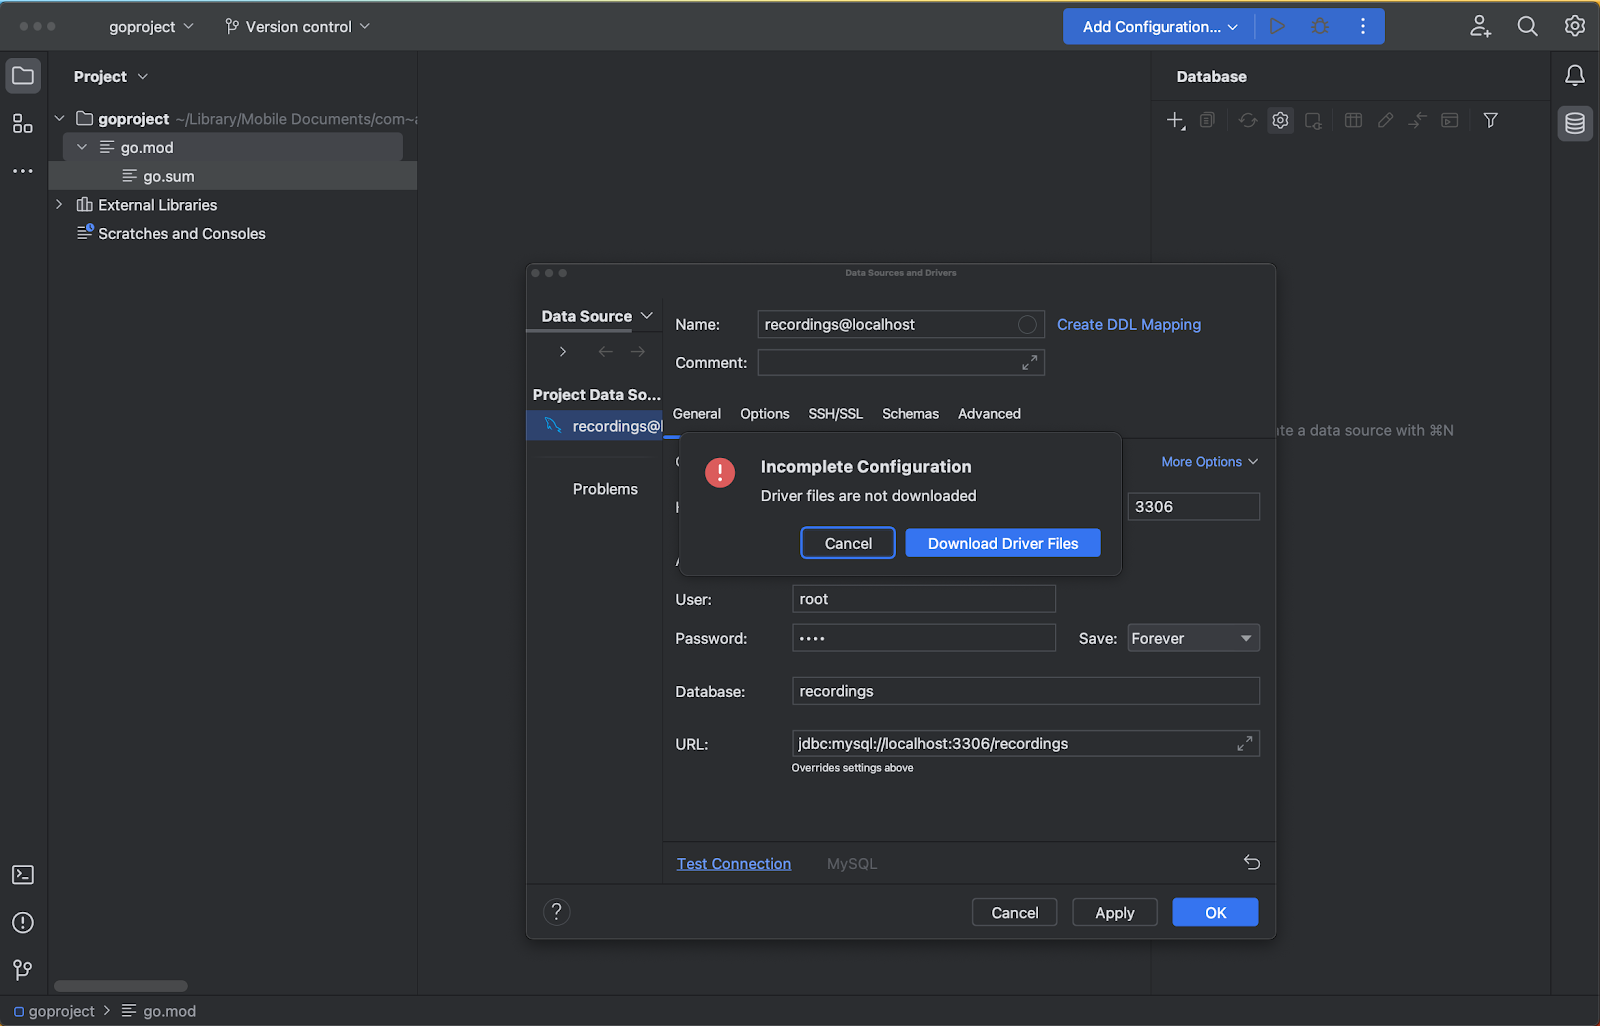
If you haven’t previously configured MySQL, you may get an error message. In that case, click Download Driver Files, and GoLand will take care of the rest.
Once the connection has been successfully tested, click on the OK button to continue.

On the next screen, a MySQL console automatically appears, as well as a notification suggesting to configure SQL dialect. You can either set MySQL as the default dialect or click configure to choose some other dialect.

Now that your data source is set up, you can run commands from the MySQL console. However, this will not be necessary if you have SQL scripts, as in this tutorial.
Setting up database tables using SQL scripts
You can easily run SQL scripts with GoLand. To do this, simply right-click on the corresponding file and select Run from the dropdown list. Try running the table-01.sql script. Before executing the script, you must assign a data target for it, in this case, the recordings database. The script’s output will automatically display when the Run button is pressed.
The displayed script should look as follows:
DROP TABLE IF EXISTS album;
CREATE TABLE album (
                       id         INT AUTO_INCREMENT NOT NULL,
                       title      VARCHAR(128) NOT NULL,
                       artist     VARCHAR(255) NOT NULL,
                       price      DECIMAL(5,2) NOT NULL,
                       quantity   INT UNSIGNED,
                       PRIMARY KEY (`id`)
);


INSERT INTO album
(title, artist, price, quantity)
VALUES
    ('Blue Train', 'John Coltrane', 56.99, 5),
    ('Giant Steps', 'John Coltrane', 63.99, 62),
    ('Jeru', 'Gerry Mulligan', 17.99, 0),
    ('Sarah Vaughan', 'Sarah Vaughan', 34.98, 127);
In the above SQL script:
- The first line drops the album table. This makes it easy to run the script as many times as necessary without worrying about errors for recreating an existing table.
- Lines 2 to 7 have to do with the creation of the album table as well as the corresponding fields.
- Line 8 sets
idas the primary key. - The rest of the script populates the table with dummy data using the
INSERTstatement.
Next, repeat the procedure to run the second SQL script, table-02.sql.
The following code corresponds to the second SQL script:
DROP TABLE IF EXISTS album_trx;
CREATE TABLE album_trx (
                             trx_id    INT AUTO_INCREMENT NOT NULL,
                             trx_check     INT UNSIGNED,
                             PRIMARY KEY (`trx_id`)
);
As you can see, this is a simpler script that creates a table that only has 2 fields. You’ll use this table in the transactions section.
Up to this point, you have configured GoLand to connect to the local MySQL service, and thanks to this, you have easily created and prepopulated tables using SQL scripts. Similarly, in the next section, you’ll see how easy it is to use the database/sql package in GoLand.
Connecting to the database using database/sql
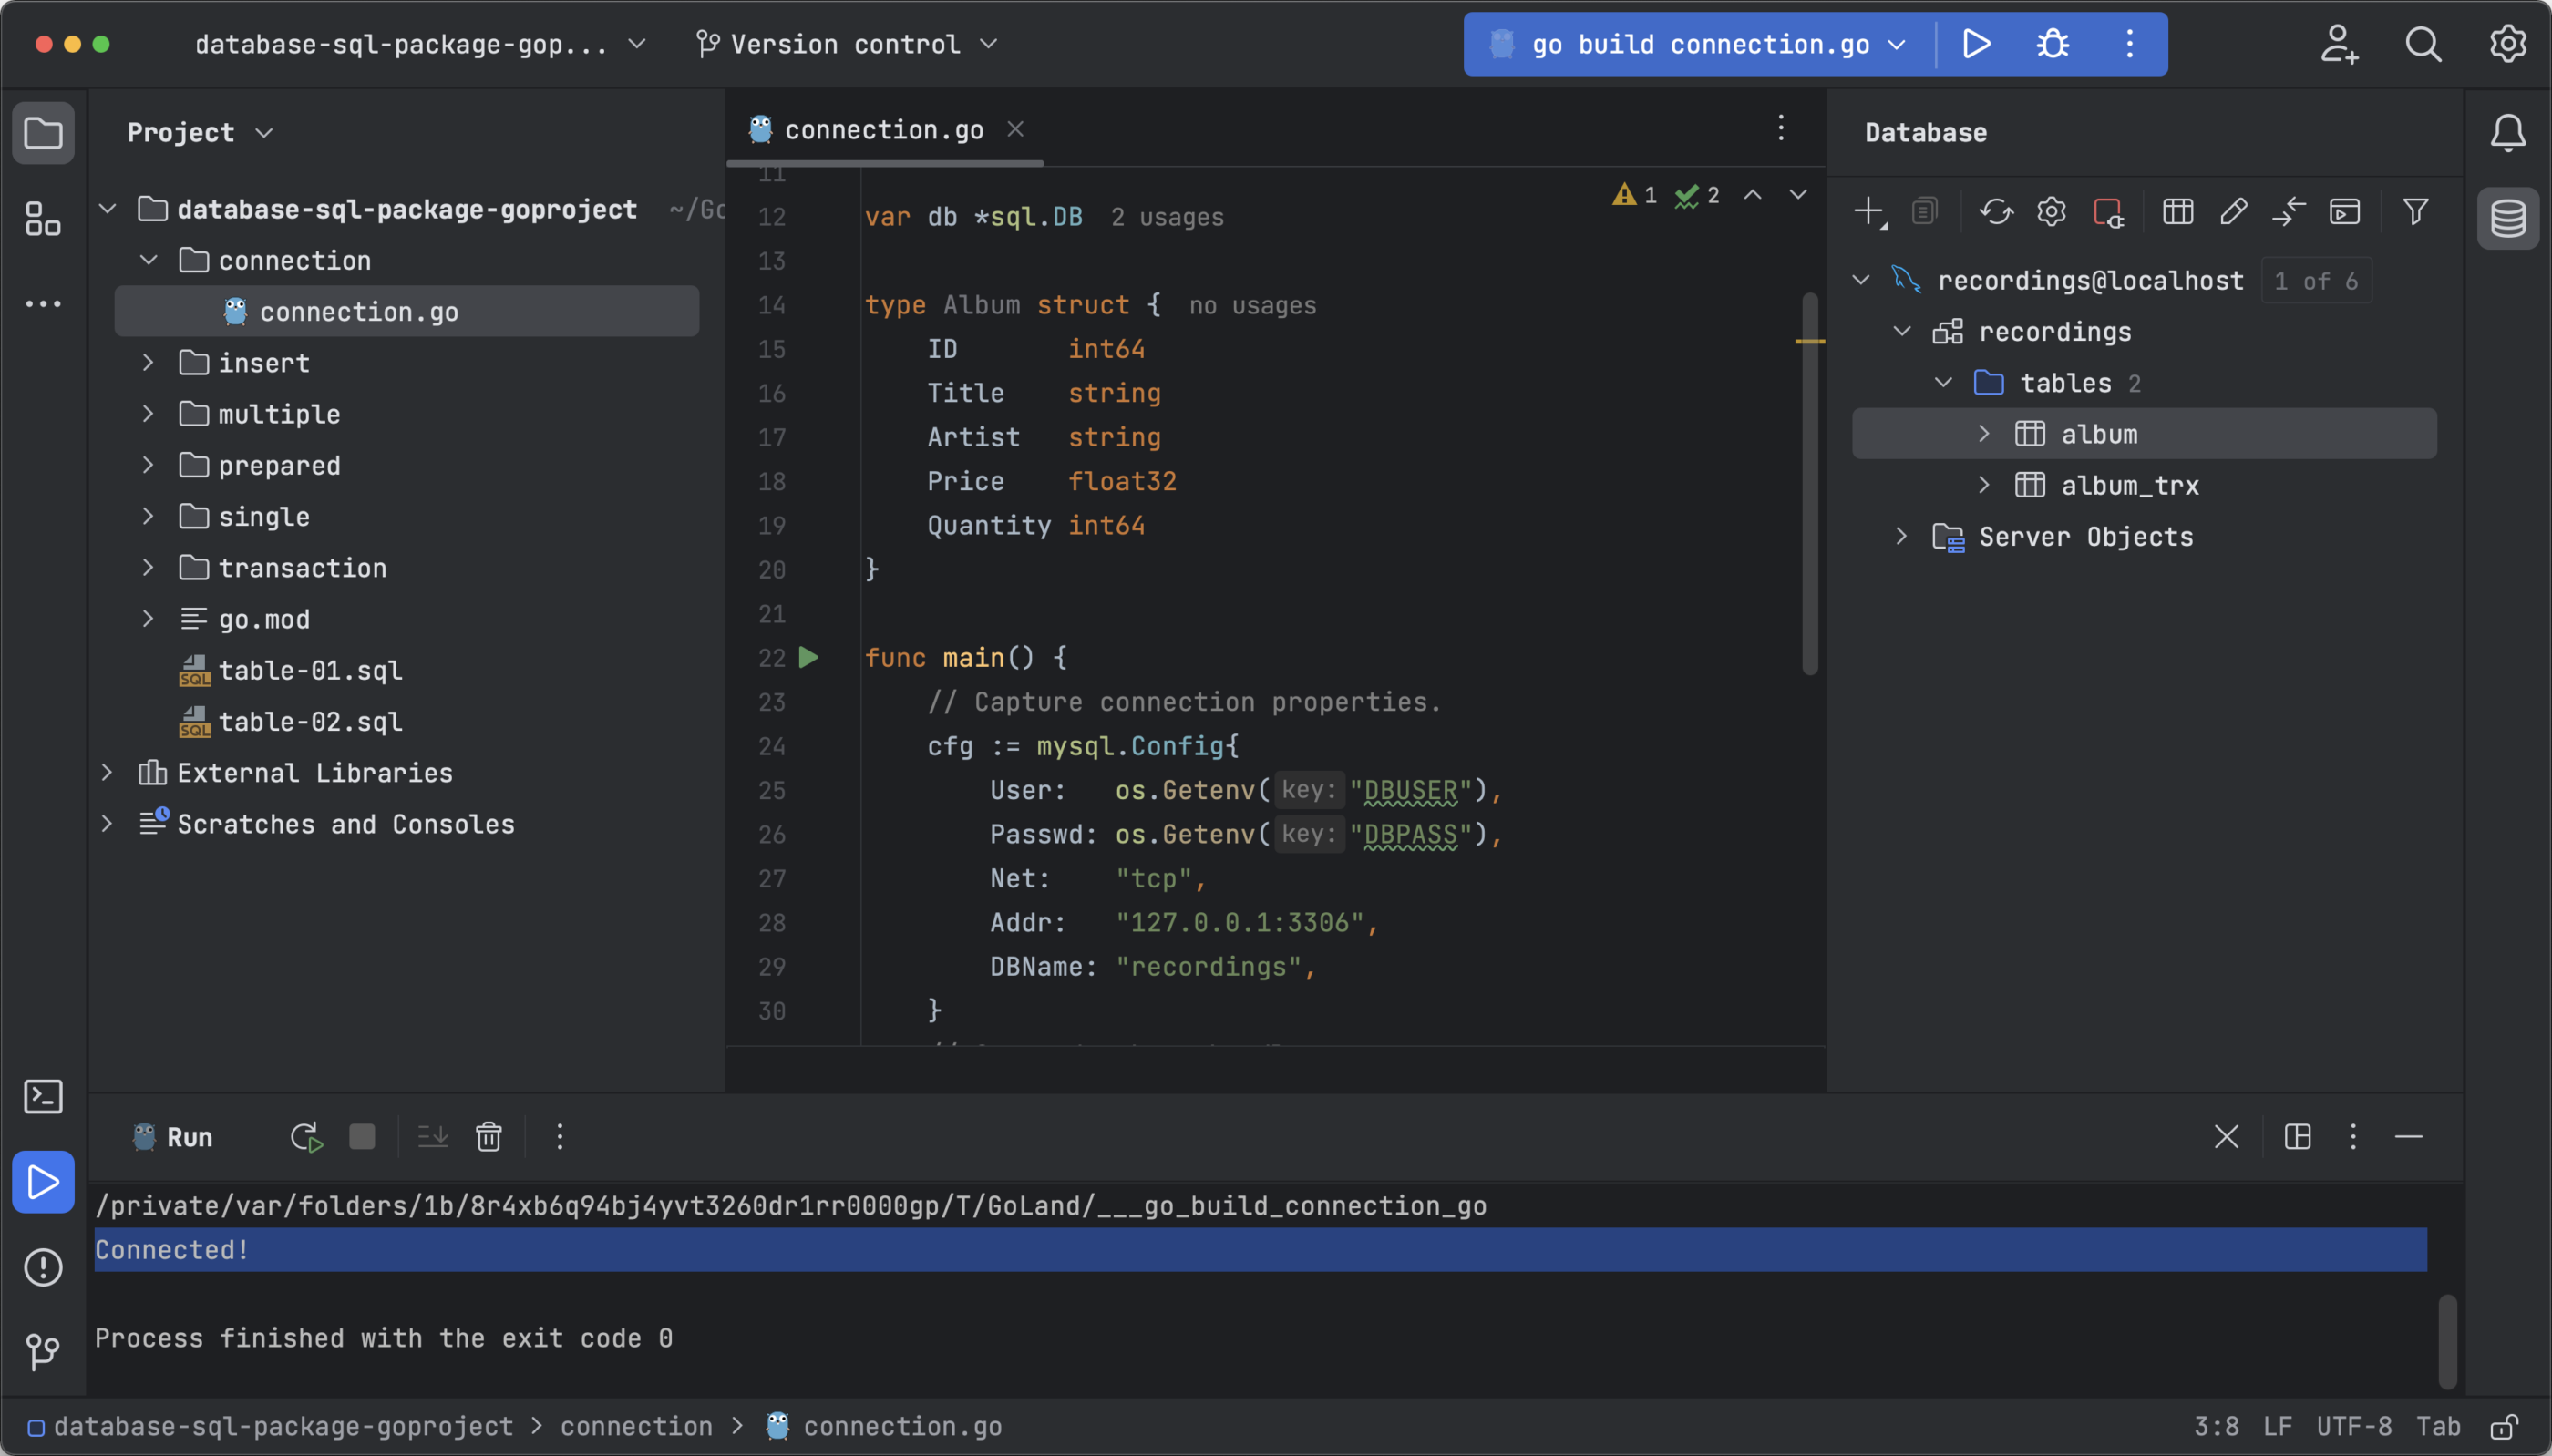
The database/sql package makes it very simple to manage databases using Go, as can be seen from the connection.go code:
package main
import (
    "database/sql"
    "fmt"
    "github.com/go-sql-driver/mysql"
    "log"
    "os"
)
var db *sql.DB
type Album struct {
    ID       int64
    Title    string
    Artist   string
    Price    float32
    Quantity int64
}
func main() {
    // Capture connection properties.
    cfg := mysql.Config{
        User:   os.Getenv("DBUSER"),
        Passwd: os.Getenv("DBPASS"),
        Net:    "tcp",
        Addr:   "127.0.0.1:3306",
        DBName: "recordings",
    }
    // Get a database handle.
    var err error
    db, err = sql.Open("mysql", cfg.FormatDSN())
    if err != nil {
        log.Fatal(err)
    }
    pingErr := db.Ping()
    if pingErr != nil {
        log.Fatal(pingErr)
    }
    fmt.Println("Connected!")
}
Let’s review the code. First, import the necessary packages:
- database/sql – As mentioned, provides a generic interface around SQL (or SQL-like) databases.
- fmt – Is a package that implements formatted I/O with functions analogous to C’s printf and scanf.
- github.com/go-sql-driver/mysql – The implementation of database/sql for MySQL (database driver).
- log – A standard library that provides logging capabilities.
- os – The package that provides platform-independent interface to operating system functionality.
*var db sql.DB – This line is key. The db variable is declared using the sql.DB struct, which functions as the database connection pool. As mentioned in the introduction, this allows you to conveniently abstract database options.
type Album struct {...} – This is the definition of the Album table structure that will hold row data from the database.
func main() – This function takes advantage of the sql.DB struct declared above and makes use of the database/sql package and the MySQL driver.
The connection data is captured using the DSN (Data Source Name) format. The syntax is:
db, err := sql.Open("mysql", "user:password@/dbname")
To simplify the code, the cfg variable that collects the properties of the connection is declared (including the environmental you previously configured in GoLand), and it’s later used to get the database handle using the DSN format shown above. The final portion of func main handles possible errors, something we’ll talk about in a later section.
Running this file is as simple as right-clicking on it and selecting Run ‘go build connection.go’ from the dropdown list.
As expected, the output shows the message Connected!.
Now that you can connect to the database, you can start performing operations like inserting new rows or querying for rows.
Inserting new rows
Let’s review the code of insert.go, which inserts a new row:
package main
import (
    "database/sql"
    "fmt"
    "github.com/go-sql-driver/mysql"
    "log"
    "os"
)
var db *sql.DB
type Album struct {
    ID       int64
    Title    string
    Artist   string
    Price    float32
    Quantity int64
}
func main() {
    // Capture connection properties.
    cfg := mysql.Config{
        User:   os.Getenv("DBUSER"),
        Passwd: os.Getenv("DBPASS"),
        Net:    "tcp",
        Addr:   "127.0.0.1:3306",
        DBName: "recordings",
    }
    // Get a database handle.
    var err error
    db, err = sql.Open("mysql", cfg.FormatDSN())
    if err != nil {
        log.Fatal(err)
    }
    pingErr := db.Ping()
    if pingErr != nil {
        log.Fatal(pingErr)
    }
    fmt.Println("Connected!")
    albID, err := addAlbum(Album{
        Title:    "The Modern Sound of Betty Carter",
        Artist:   "Betty Carter",
        Price:    49.99,
        Quantity: 10,
    })
    if err != nil {
        log.Fatal(err)
    }
    fmt.Printf("ID of added album: %v\n", albID)
}
// addAlbum adds the specified album to the database,
// returning the album ID of the new entry
func addAlbum(alb Album) (int64, error) {
    result, err := db.Exec("INSERT INTO album (title, artist, price, quantity) VALUES (?, ?, ?, ?)", alb.Title, alb.Artist, alb.Price, alb.Quantity)
    if err != nil {
        return 0, fmt.Errorf("addAlbum: %v", err)
    }
    id, err := result.LastInsertId()
    if err != nil {
        return 0, fmt.Errorf("addAlbum: %v", err)
    }
    return id, nil
}
This code block is very similar to the previous one, except that it inserts a new row into the album table. Run the code by right-clicking on the file and selecting Run ‘go build insert.go’.
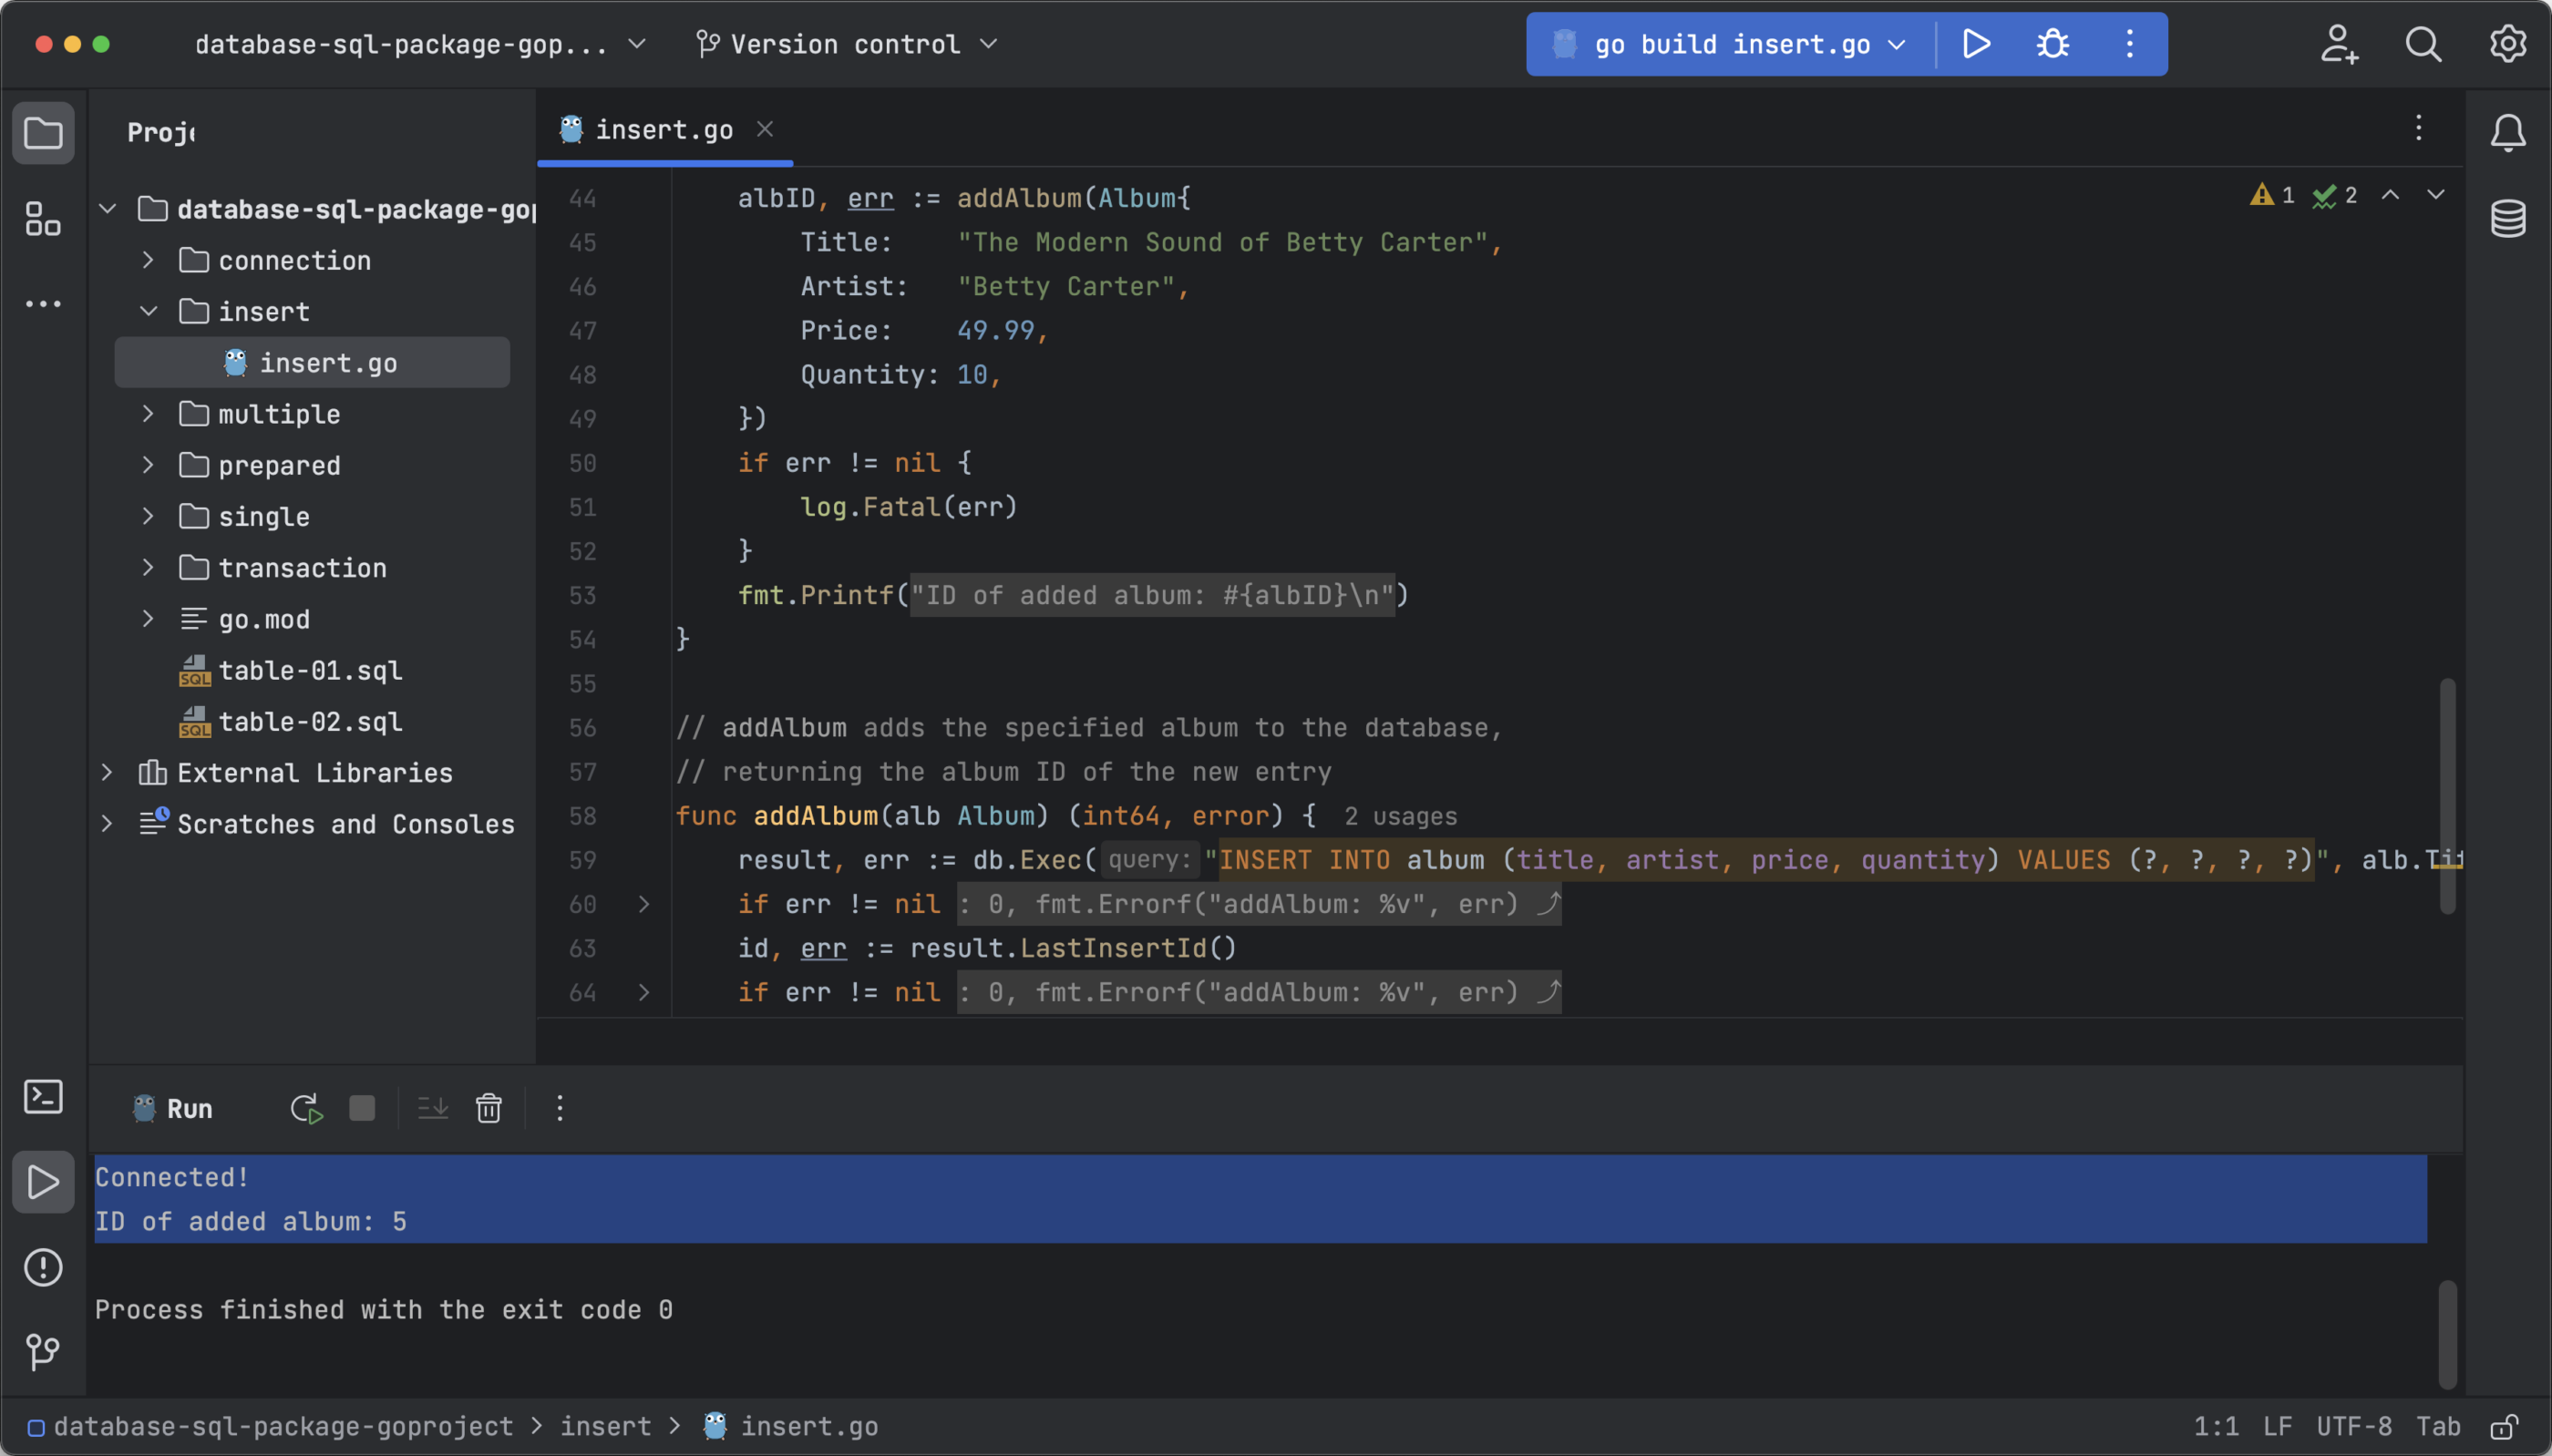
As expected, the output is:
Connected!
ID of added album: 5
As you can see, managing the database connection using database/sql is straightforward. You define a database handle, and then you can use SQL commands, functions, and conditionals to manage the database. Let’s reinforce what you’ve learned by querying a single row in the database.
Querying a single row
As before, let’s first review the code of single.go, which queries a single row:
package main
import (
    "database/sql"
    "fmt"
    "github.com/go-sql-driver/mysql"
    "log"
    "os"
)
var db *sql.DB
type Album struct {
    ID       int64
    Title    string
    Artist   string
    Price    float32
    Quantity int64
}
func main() {
    // Capture connection properties.
    cfg := mysql.Config{
        User:   os.Getenv("DBUSER"),
        Passwd: os.Getenv("DBPASS"),
        Net:    "tcp",
        Addr:   "127.0.0.1:3306",
        DBName: "recordings",
    }
    // Get a database handle.
    var err error
    db, err = sql.Open("mysql", cfg.FormatDSN())
    if err != nil {
        log.Fatal(err)
    }
    pingErr := db.Ping()
    if pingErr != nil {
        log.Fatal(pingErr)
    }
    fmt.Println("Connected!")
    // Hard-code ID 2 here to test the query.
    alb, err := albumByID(2)
    if err != nil {
        log.Fatal(err)
    }
    fmt.Printf("Album found: %v\n", alb)
}
// albumByID queries for the album with the specified ID.
func albumByID(id int64) (Album, error) {
    // An album to hold data from the returned row.
    var alb Album
    row := db.QueryRow("SELECT * FROM album WHERE id = ?", id)
    if err := row.Scan(&alb.ID, &alb.Title, &alb.Artist, &alb.Price, &alb.Quantity); err != nil {
        if err == sql.ErrNoRows {
            return alb, fmt.Errorf("albumsById %d: no such album", id)
        }
        return alb, fmt.Errorf("albumsById %d: %v", id, err)
    }
    return alb, nil
}
Several blocks of code are worth highlighting here.
First, line 44 with the comment // Hard-code ID 2 here to test the query. as its header, calls albumByID(2) to query which album corresponds to ID number 2.
The second block corresponds to the albumByID function. This function uses SELECT * FROM album WHERE id = ? to query the data for an album with a specific ID. Then if conditionals are used to display an error message in case the ID does not exist.
Run the code to verify that everything works as expected.

The output should be the following:
Connected!
Album found: {2 Giant Steps John Coltrane 63.99 62}
Querying multiple rows
To learn how to query multiple rows in Go with database/sql, you’ll use multiple.go. The logic behind querying multiple rows is similar to querying a single row.
The albumsByArtist function finds all albums whose artist is hardcoded in the main function. Then, if there are matches, it prints them in the output, and if there are not, it prints an empty string.
Run multiple.go by right-clicking on the file and selecting Run ‘go build multiple.go’.
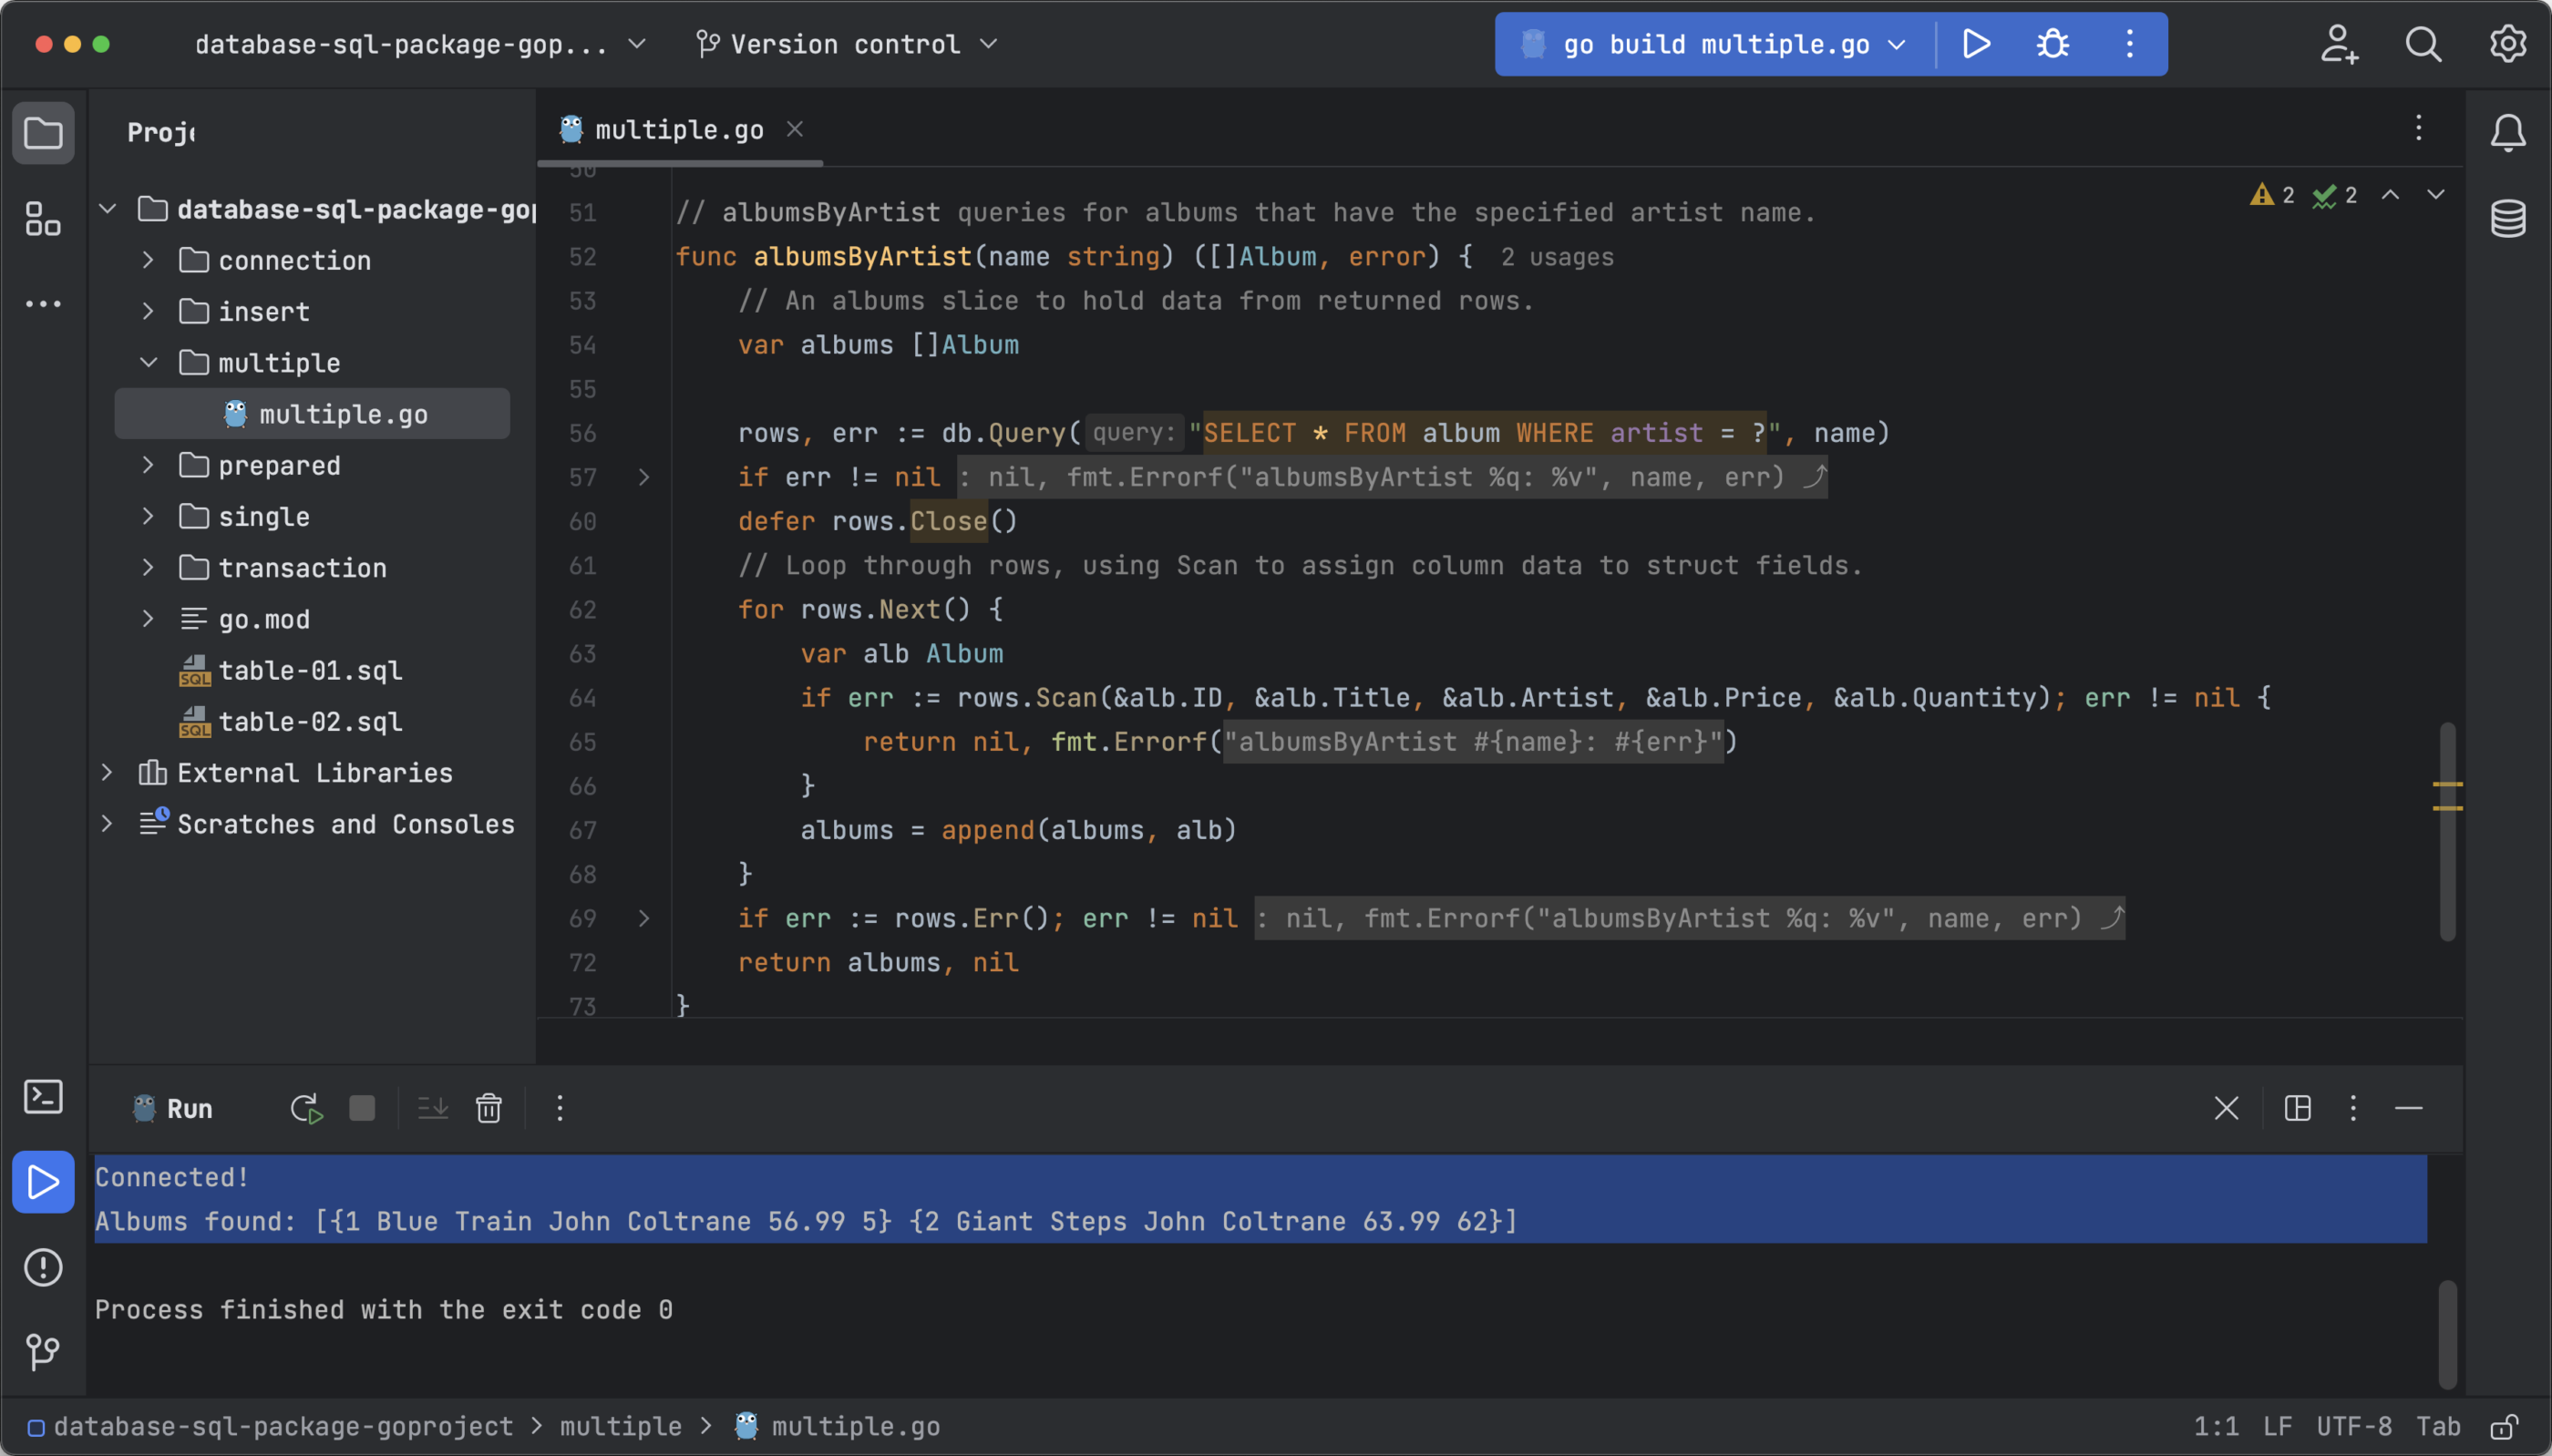
The output should be:
Connected!
Albums found: [{1 Blue Train John Coltrane 56.99 5} {2 Giant Steps John Coltrane 63.99 62}]
Now that you’ve learned how to perform single and multiple-row queries, it’s time to perform more advanced operations such as prepared statements.
Using prepared statements
According to the Go documentation:
“A prepared statement is SQL that is parsed and saved by the DBMS, typically containing placeholders but with no actual parameter values. Later, the statement can be executed with a set of parameter values.”
In practice, prepared statements are useful to avoid re-creating statements every time your code performs the same database operation, thus improving performance.
If you’re curious about what a prepared statement looks like, check out the prepared.go file.
package main
import (
    "database/sql"
    "fmt"
    "github.com/go-sql-driver/mysql"
    "log"
    "os"
)
var db *sql.DB
type Album struct {
    ID       int64
    Title    string
    Artist   string
    Price    float32
    Quantity int64
}
func main() {
    // Capture connection properties.
    cfg := mysql.Config{
        User:   os.Getenv("DBUSER"),
        Passwd: os.Getenv("DBPASS"),
        Net:    "tcp",
        Addr:   "127.0.0.1:3306",
        DBName: "recordings",
    }
    // Get a database handle.
    var err error
    db, err = sql.Open("mysql", cfg.FormatDSN())
    if err != nil {
        log.Fatal(err)
    }
    pingErr := db.Ping()
    if pingErr != nil {
        log.Fatal(pingErr)
    }
    fmt.Println("Connected!")
    // Hard-code ID 2 here to test the query.
    Album, err := albumByID(2)
    if err != nil {
        log.Fatal(err)
    }
    fmt.Printf("Album found: %v\n", Album)
}
// AlbumByID retrieves the specified album.
func albumByID(id int) (Album, error) {
    // Define a prepared statement. You'd typically define the statement
    // elsewhere and save it for use in functions such as this one.
    stmt, err := db.Prepare("SELECT * FROM album WHERE id = ?")
    if err != nil {
        log.Fatal(err)
    }
    var album Album
    // Execute the prepared statement, passing in an id value for the
    // parameter whose placeholder is ?
    err = stmt.QueryRow(id).Scan(&album.ID, &album.Title, &album.Artist, &album.Price, &album.Quantity)
    if err != nil {
        if err == sql.ErrNoRows {
            // Handle the case of no rows returned.
        }
        return album, err
    }
    return album, nil
}
As you can see, the code is very similar to the one used to query a single row. The difference lies in the albumByID function, which now uses prepared statements. The first section of the function defines the prepared statement using sql.Stmt to prepare the SQL statement (db.Prepare) and then executes it in the second portion when called (stmt.QueryRow).
Check the result by running the code:
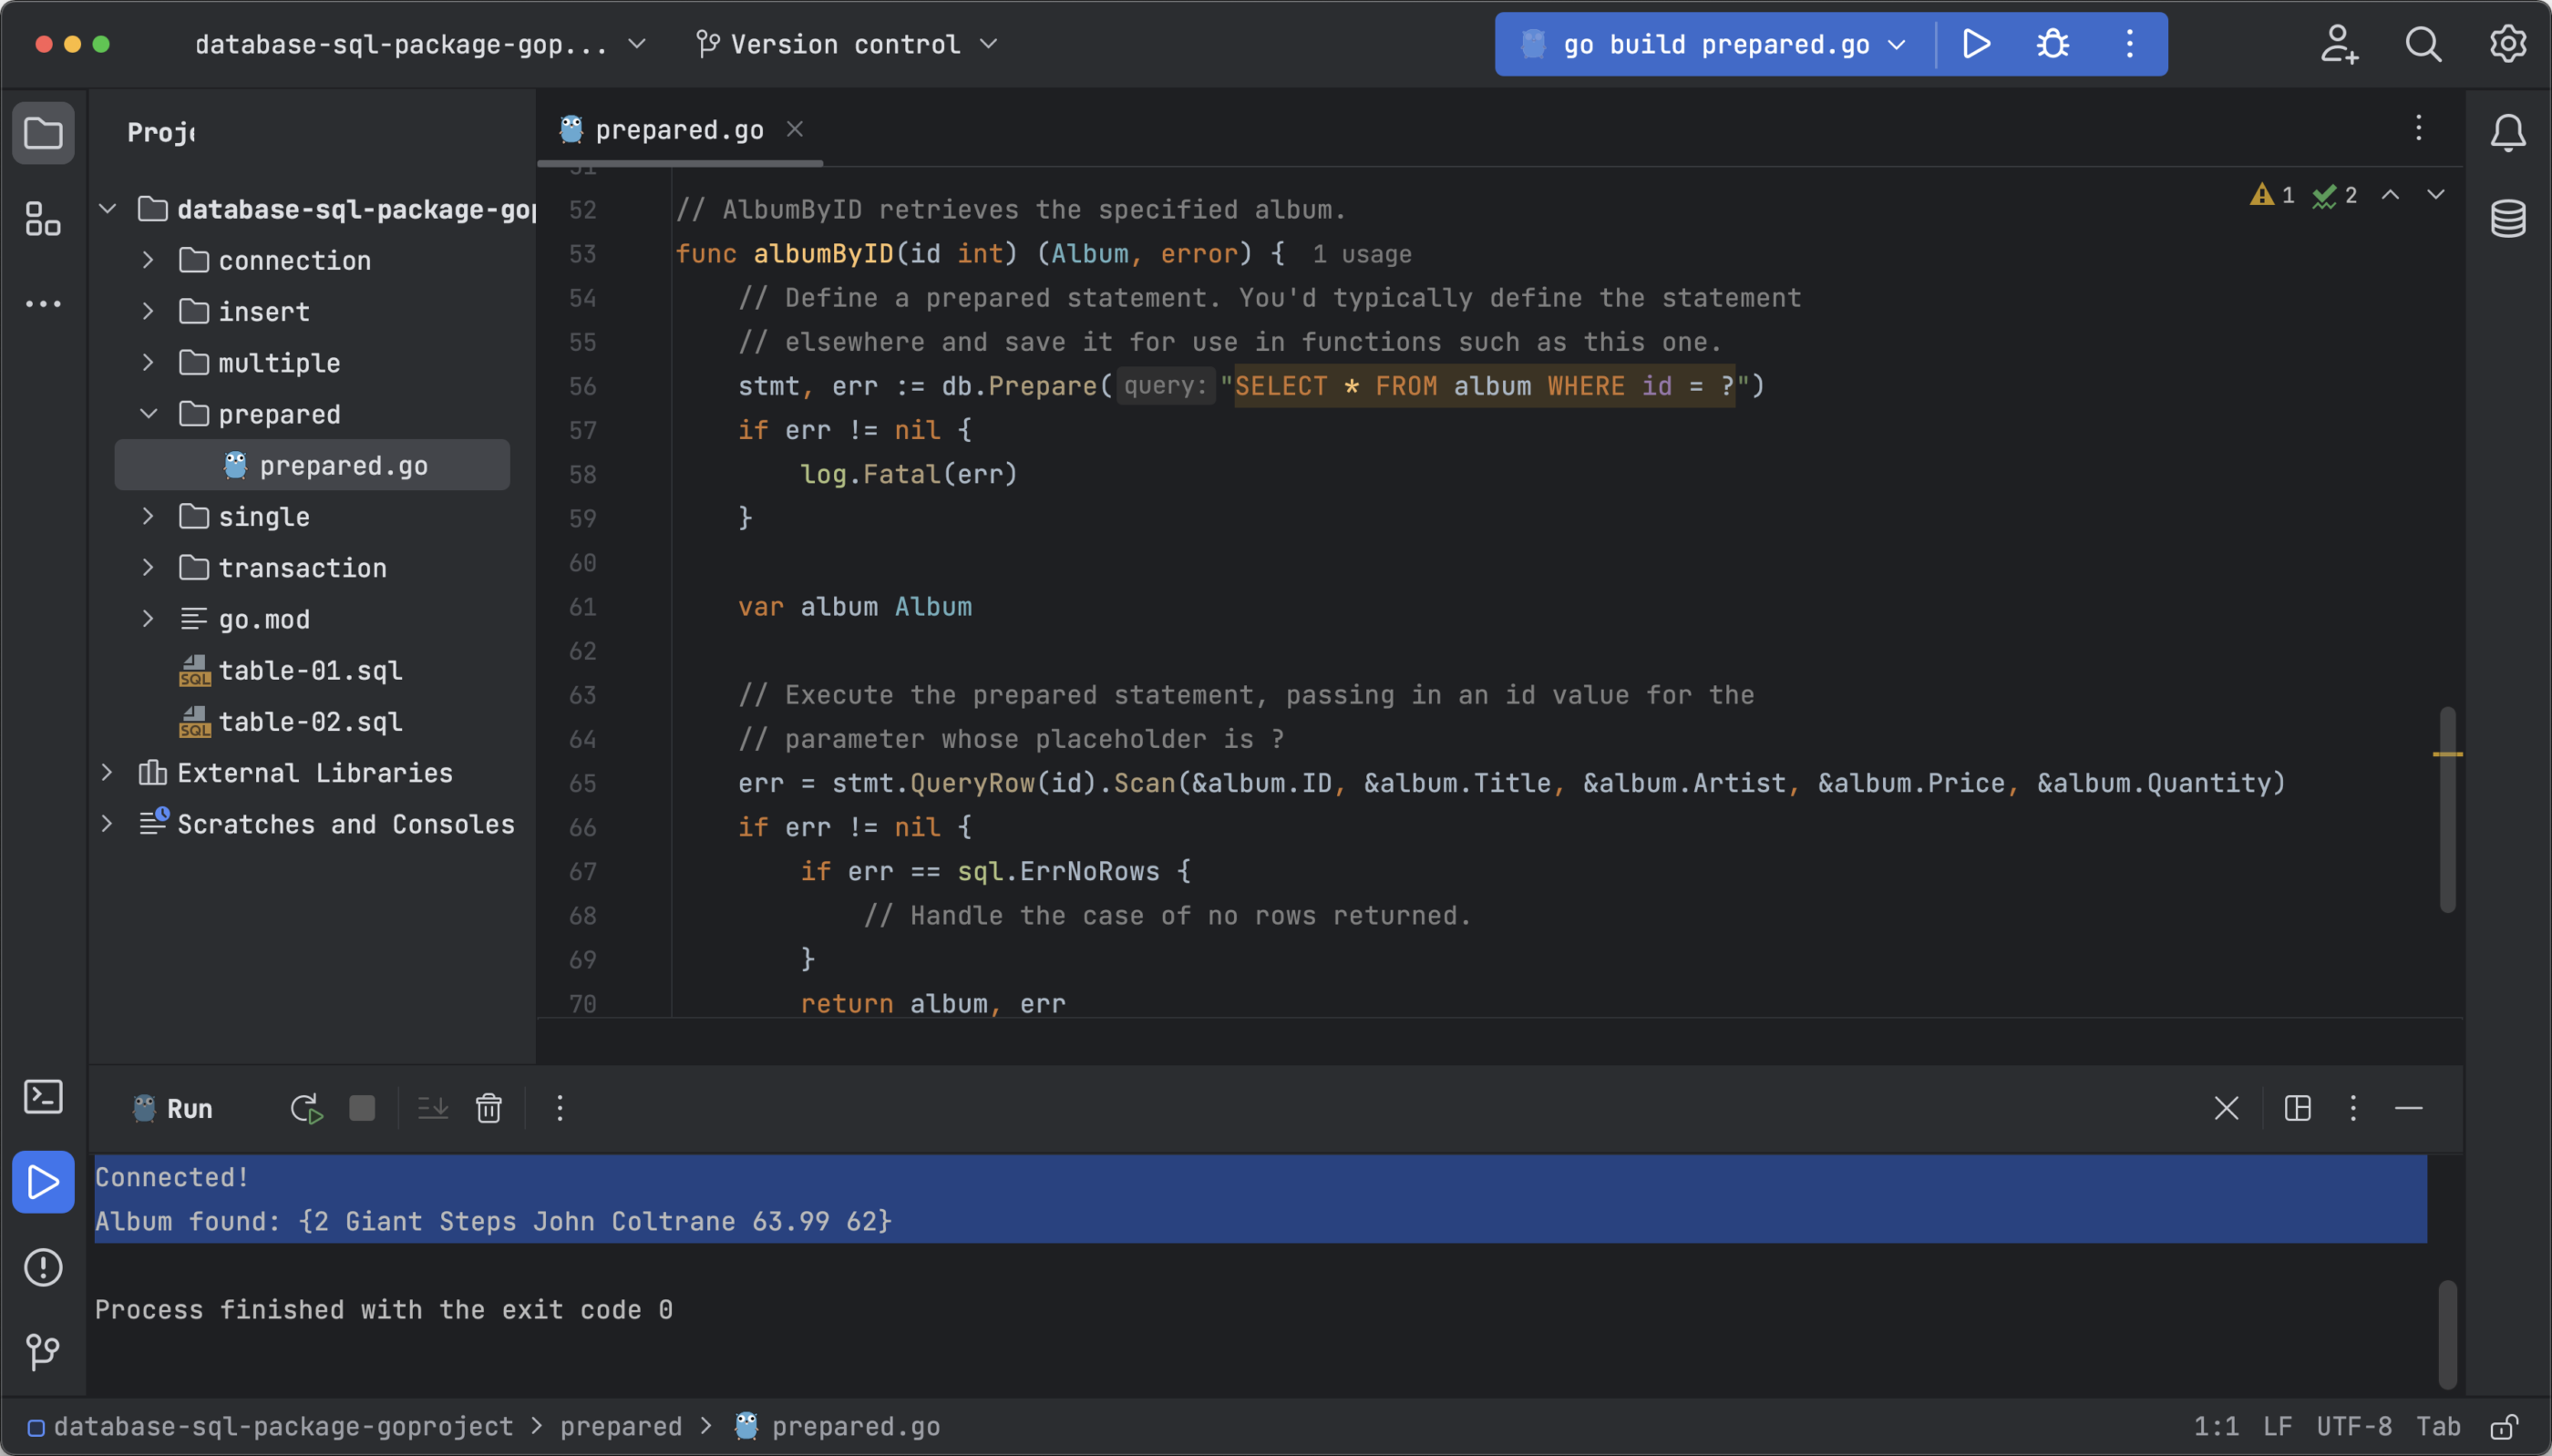
At first glance, the result is the same as the previous example (Querying a single row), but under the hood, resources are being saved that can make a difference when working with databases with thousands of rows. To learn more about prepared statements, read the documentation here.
Working with transactions
Transactions allow you to perform all kinds of operations, such as inserting, updating, querying, or deleting table rows. What makes transactions useful is their ability to group multiple operations (queries) together so that they are only executed if they all pass the specified conditions. Otherwise, no operation is performed.
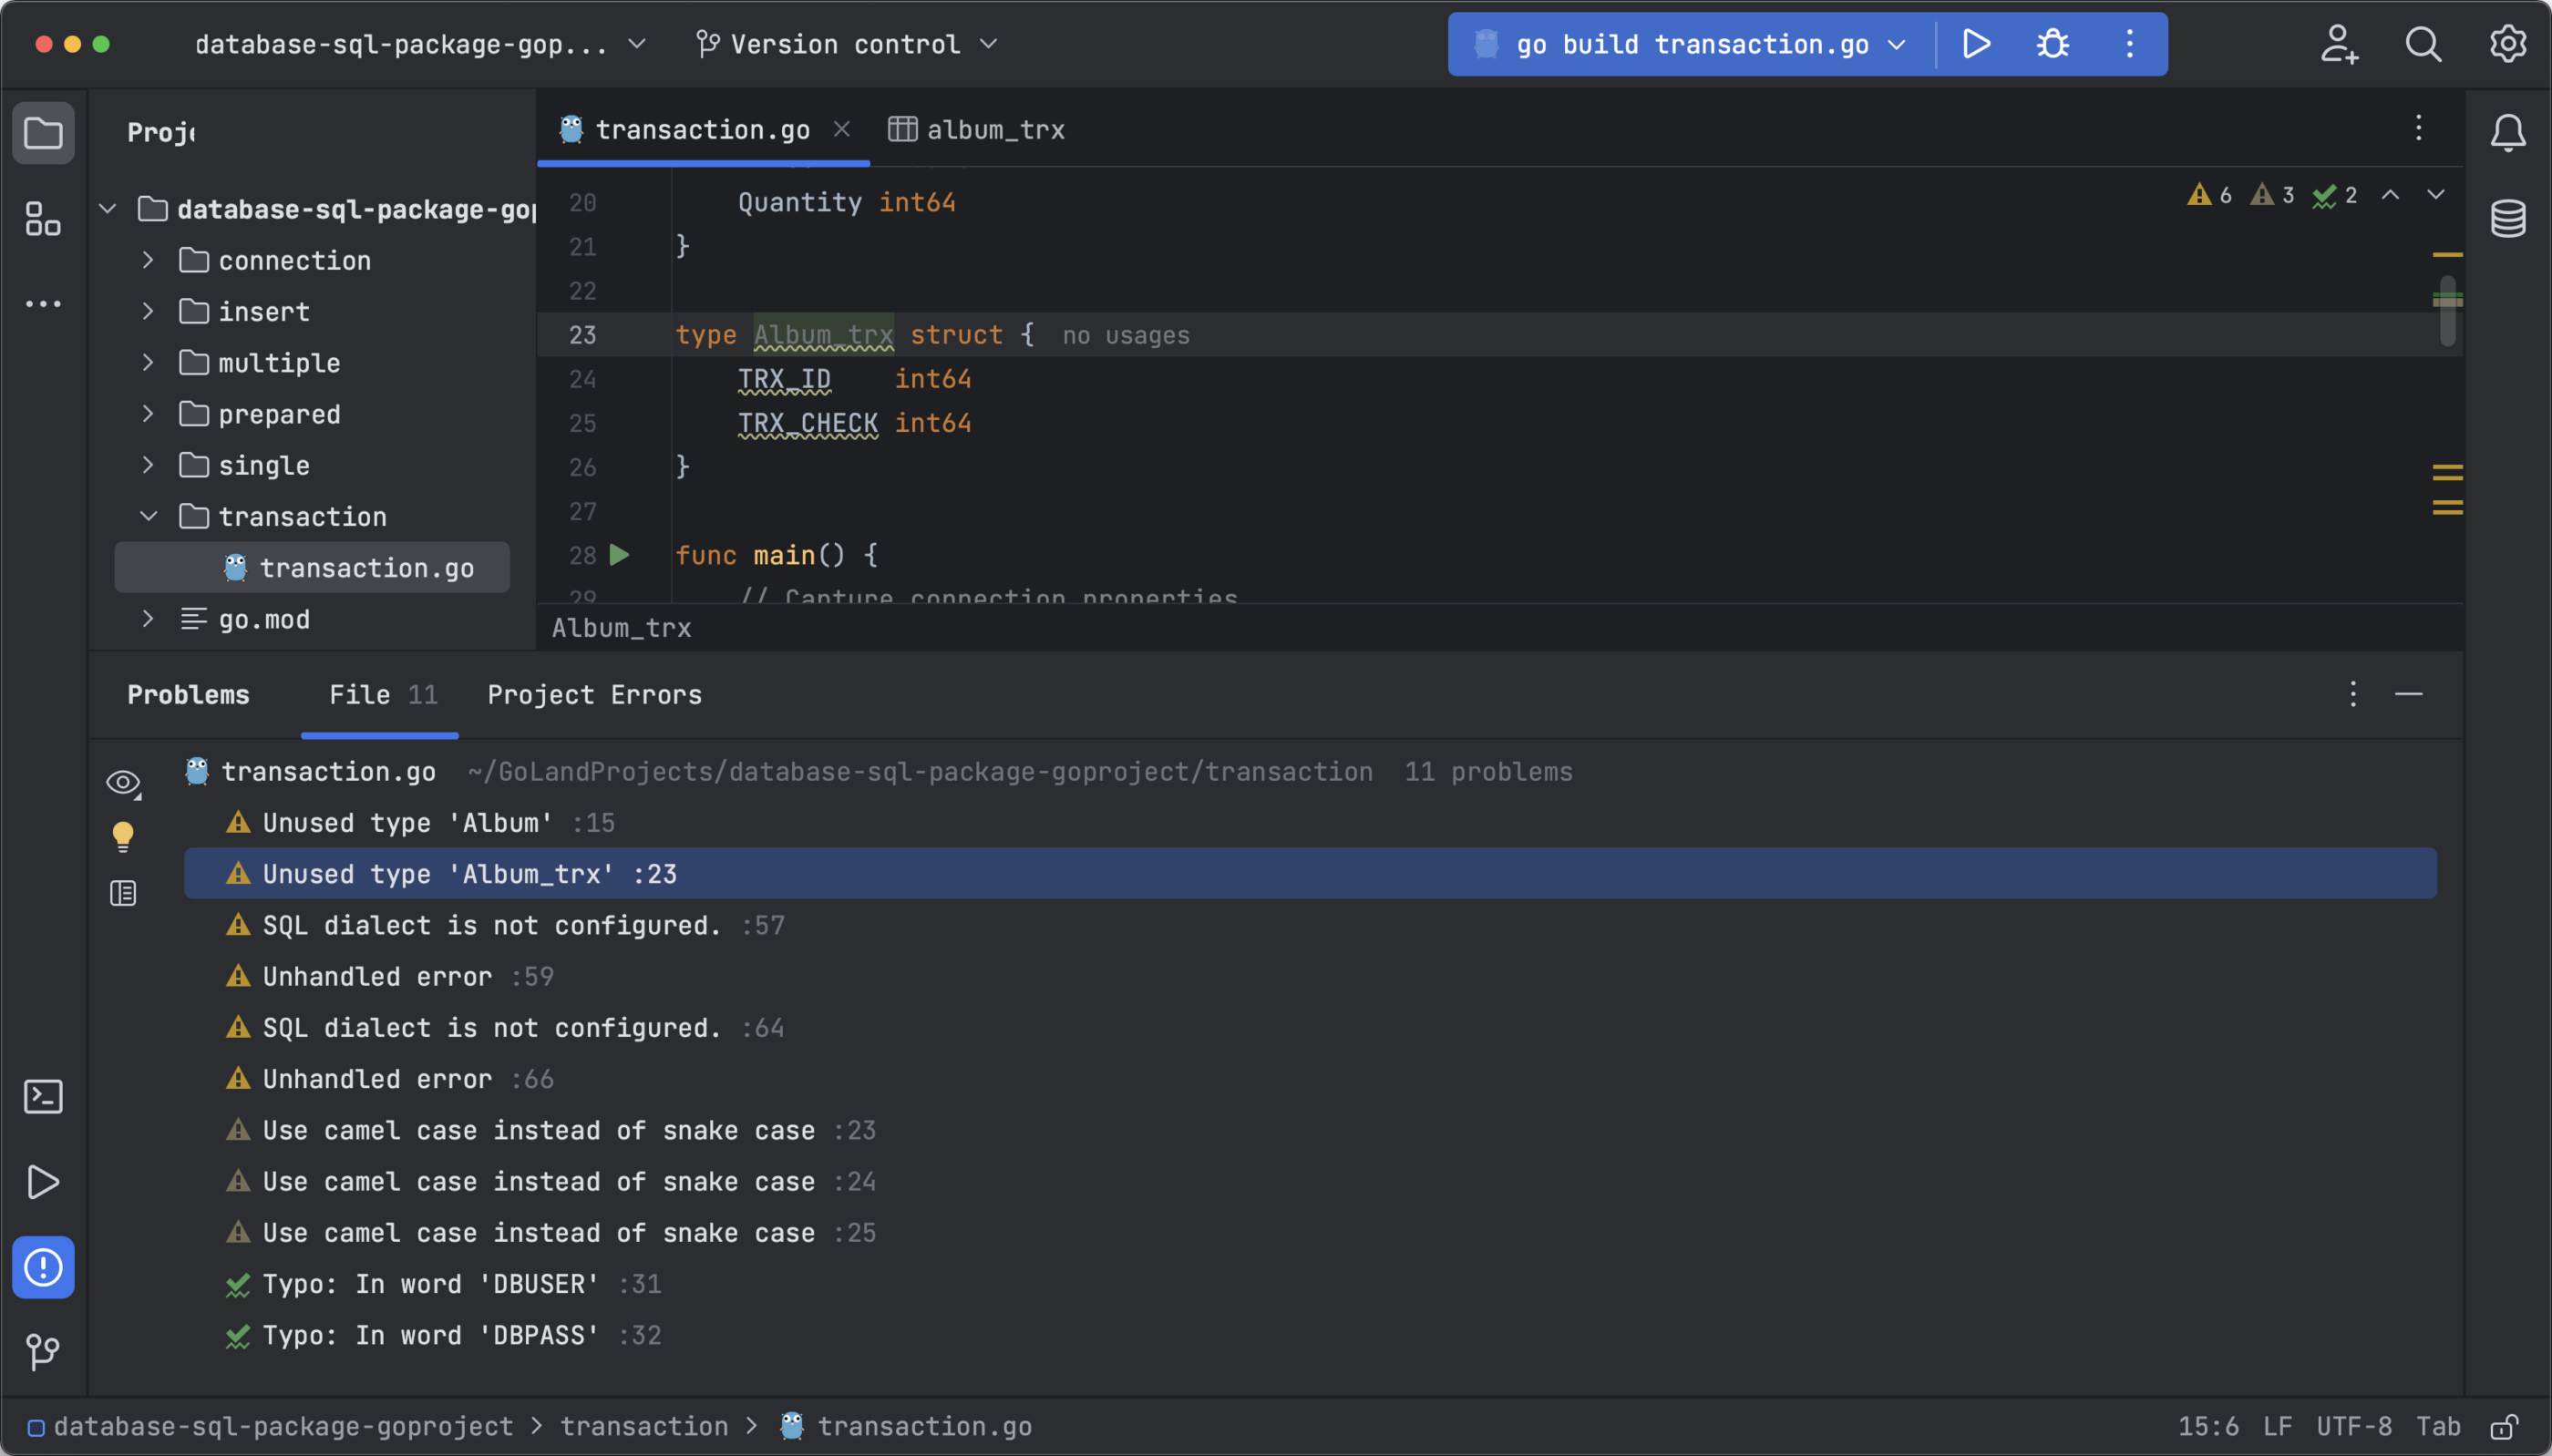
To understand this concept, let’s review transaction.go:
package main
import (
    "context"
    "database/sql"
    "fmt"
    "github.com/go-sql-driver/mysql"
    "log"
    "os"
)
var db *sql.DB
type Album struct {
    ID       int64
    Title    string
    Artist   string
    Price    float32
    Quantity int64
}
type Album_trx struct {
    TRX_ID    int64
    TRX_CHECK int64
}
func main() {
    // Capture connection properties.
    cfg := mysql.Config{
        User:   os.Getenv("DBUSER"),
        Passwd: os.Getenv("DBPASS"),
        Net:    "tcp",
        Addr:   "127.0.0.1:3306",
        DBName: "recordings",
    }
    // Get a database handle.
    var err error
    db, err = sql.Open("mysql", cfg.FormatDSN())
    if err != nil {
        log.Fatal(err)
    }
    pingErr := db.Ping()
    if pingErr != nil {
        log.Fatal(pingErr)
    }
    fmt.Println("Connected!")
    // Start the transaction
    ctx := context.Background()
    tx, err := db.BeginTx(ctx, nil)
    if err != nil {
        log.Fatal(err)
    }
    // First query
    _, err = tx.ExecContext(ctx, "INSERT INTO album (title, artist, price, quantity) VALUES ('Master of Puppets', 'Metallica', '49', '1')")
    if err != nil {
        tx.Rollback()
        return
    }
    // Second query
    _, err = tx.ExecContext(ctx, "INSERT INTO album_trx (trx_check) VALUES (-1)")
    if err != nil {
        tx.Rollback()
        fmt.Println("Transaction declined")
        return
    }
    // If no errors, commit the transaction
    err = tx.Commit()
    if err != nil {
        log.Fatal(err)
    }
    fmt.Println("Transaction accepted!")
}
The structure is similar to the one discussed during the tutorial, with the exception of the final portion, which contains 2 queries. According to the documentation, you can execute database transactions using an sql.Tx, which represents a transaction.
Let’s review the code to understand how these transactions work, starting from the comment // Start the transaction. This code creates a context (ctx) which is used to start a transaction using the DB.BeginTx method. Next, there are 2 queries that use the tx.ExecContext method.
If the transaction is successful, the first query simply inserts a new row in the album table. Note that in case of error, the tx.Rollback() method prevents the operation from executing.
In this example, the second query is used to show the logic behind the transactions. Note that it also uses the INSERT statement to add a new row, in this case, to the album_trx control table. However, the value is negative, and since the field trx_check does not accept negative values (it is defined as INT UNSIGNED), this query will not proceed.
As a result, the conditional will trigger the tx.Rollback() method meaning that the Transaction declined error message will be displayed on the terminal. Moreover, regardless of whether the first query passed without errors, none of the tables will be updated.
Check the behavior of the transaction by running the code.
As expected, the transaction was declined.
Now, edit the line _, err = tx.ExecContext(ctx, "INSERT INTO album_trx (trx_check) VALUES (-1)") changing the value -1 for 1 and run the code again.
You can easily check if the tables were modified by clicking on the database icon, expanding the database tables, and then double-clicking on each table name.
The same principle shown in this tutorial can be used to create complex operations with multiple checks that affect multiple tables simultaneously. One query failing is enough to bring down the transaction.
Handling errors in Go
Errors can happen for a variety of reasons. For example, you might get an error if you try to use a variable that hasn’t been declared, you try to divide by 0, or because of a typo. Fortunately, to handle code errors in Go, you can use the built-in error-handling functions.
These functions have been used extensively in the tutorial but just haven’t been elaborated on. Let’s review how error messages are managed when getting a MySQL database handle:
 // Get a database handle.
    var err error
    db, err = sql.Open("mysql", cfg.FormatDSN())
    if err != nil {
        log.Fatal(err)
    }
    pingErr := db.Ping()
    if pingErr != nil {
        log.Fatal(pingErr)
    }
    fmt.Println("Connected!")
In this code:
- The first line declares the variables
erranderrorand initializes them to zero. - The second line uses the
database/sqlpackage to connect to the database via the Go MySQL Driver. - In the third line, a conditional is used. If an error occurs during authentication (boolean is not null), then
log.Fatal(err)is used to store a log. Conversely, if there is no error, the next code block is executed. - The last block of code tests the connection to the database using
Ping(). If an error occurs,log.Fatal(pingErr)stores it in the log, but if not,fmt.Println("Connected!")is used to print the success message.
As you can see, constructing error messages using packages like fmtlog
As easily as you can build error messages into your code, you can debug problems in your code with GoLand. You can open any of the tutorial files to find several error message examples.
Conclusion
This tutorial explained how to implement the database/sql package to access a database in Go, perform different types of queries, insert data, and perform transactions. Additionally, error handling in Go has been briefly reviewed. Moreover, during the tutorial, you have seen how convenient GoLand is for writing and running code. You can learn more about the tools that JetBrains offers for developers here.