IntelliJ IDEA
IntelliJ IDEA – the Leading IDE for Professional Development in Java and Kotlin
Sharing Your Project on GitHub

In this blog, we’re going to look at how to share code that we’ve written on our local machine to a repository on GitHub.
This blog post covers the same material as the video with some additional tips and tricks. This provides an easy way for people to skim the content quickly if they prefer reading to watching, and to give the reader/watcher code samples and links to additional information.
There are a few ways to use IntelliJ IDEA to publish code that we’ve written on GitHub. In this blog, we will go over two approaches. The first is the quickest where you create your local and remote repository in one step. The second approach is multi-step which can be used when you want to create a local Git repository for your project separately from publishing any code publicly on GitHub.
Sharing Your Project on GitHub (Quick Approach)
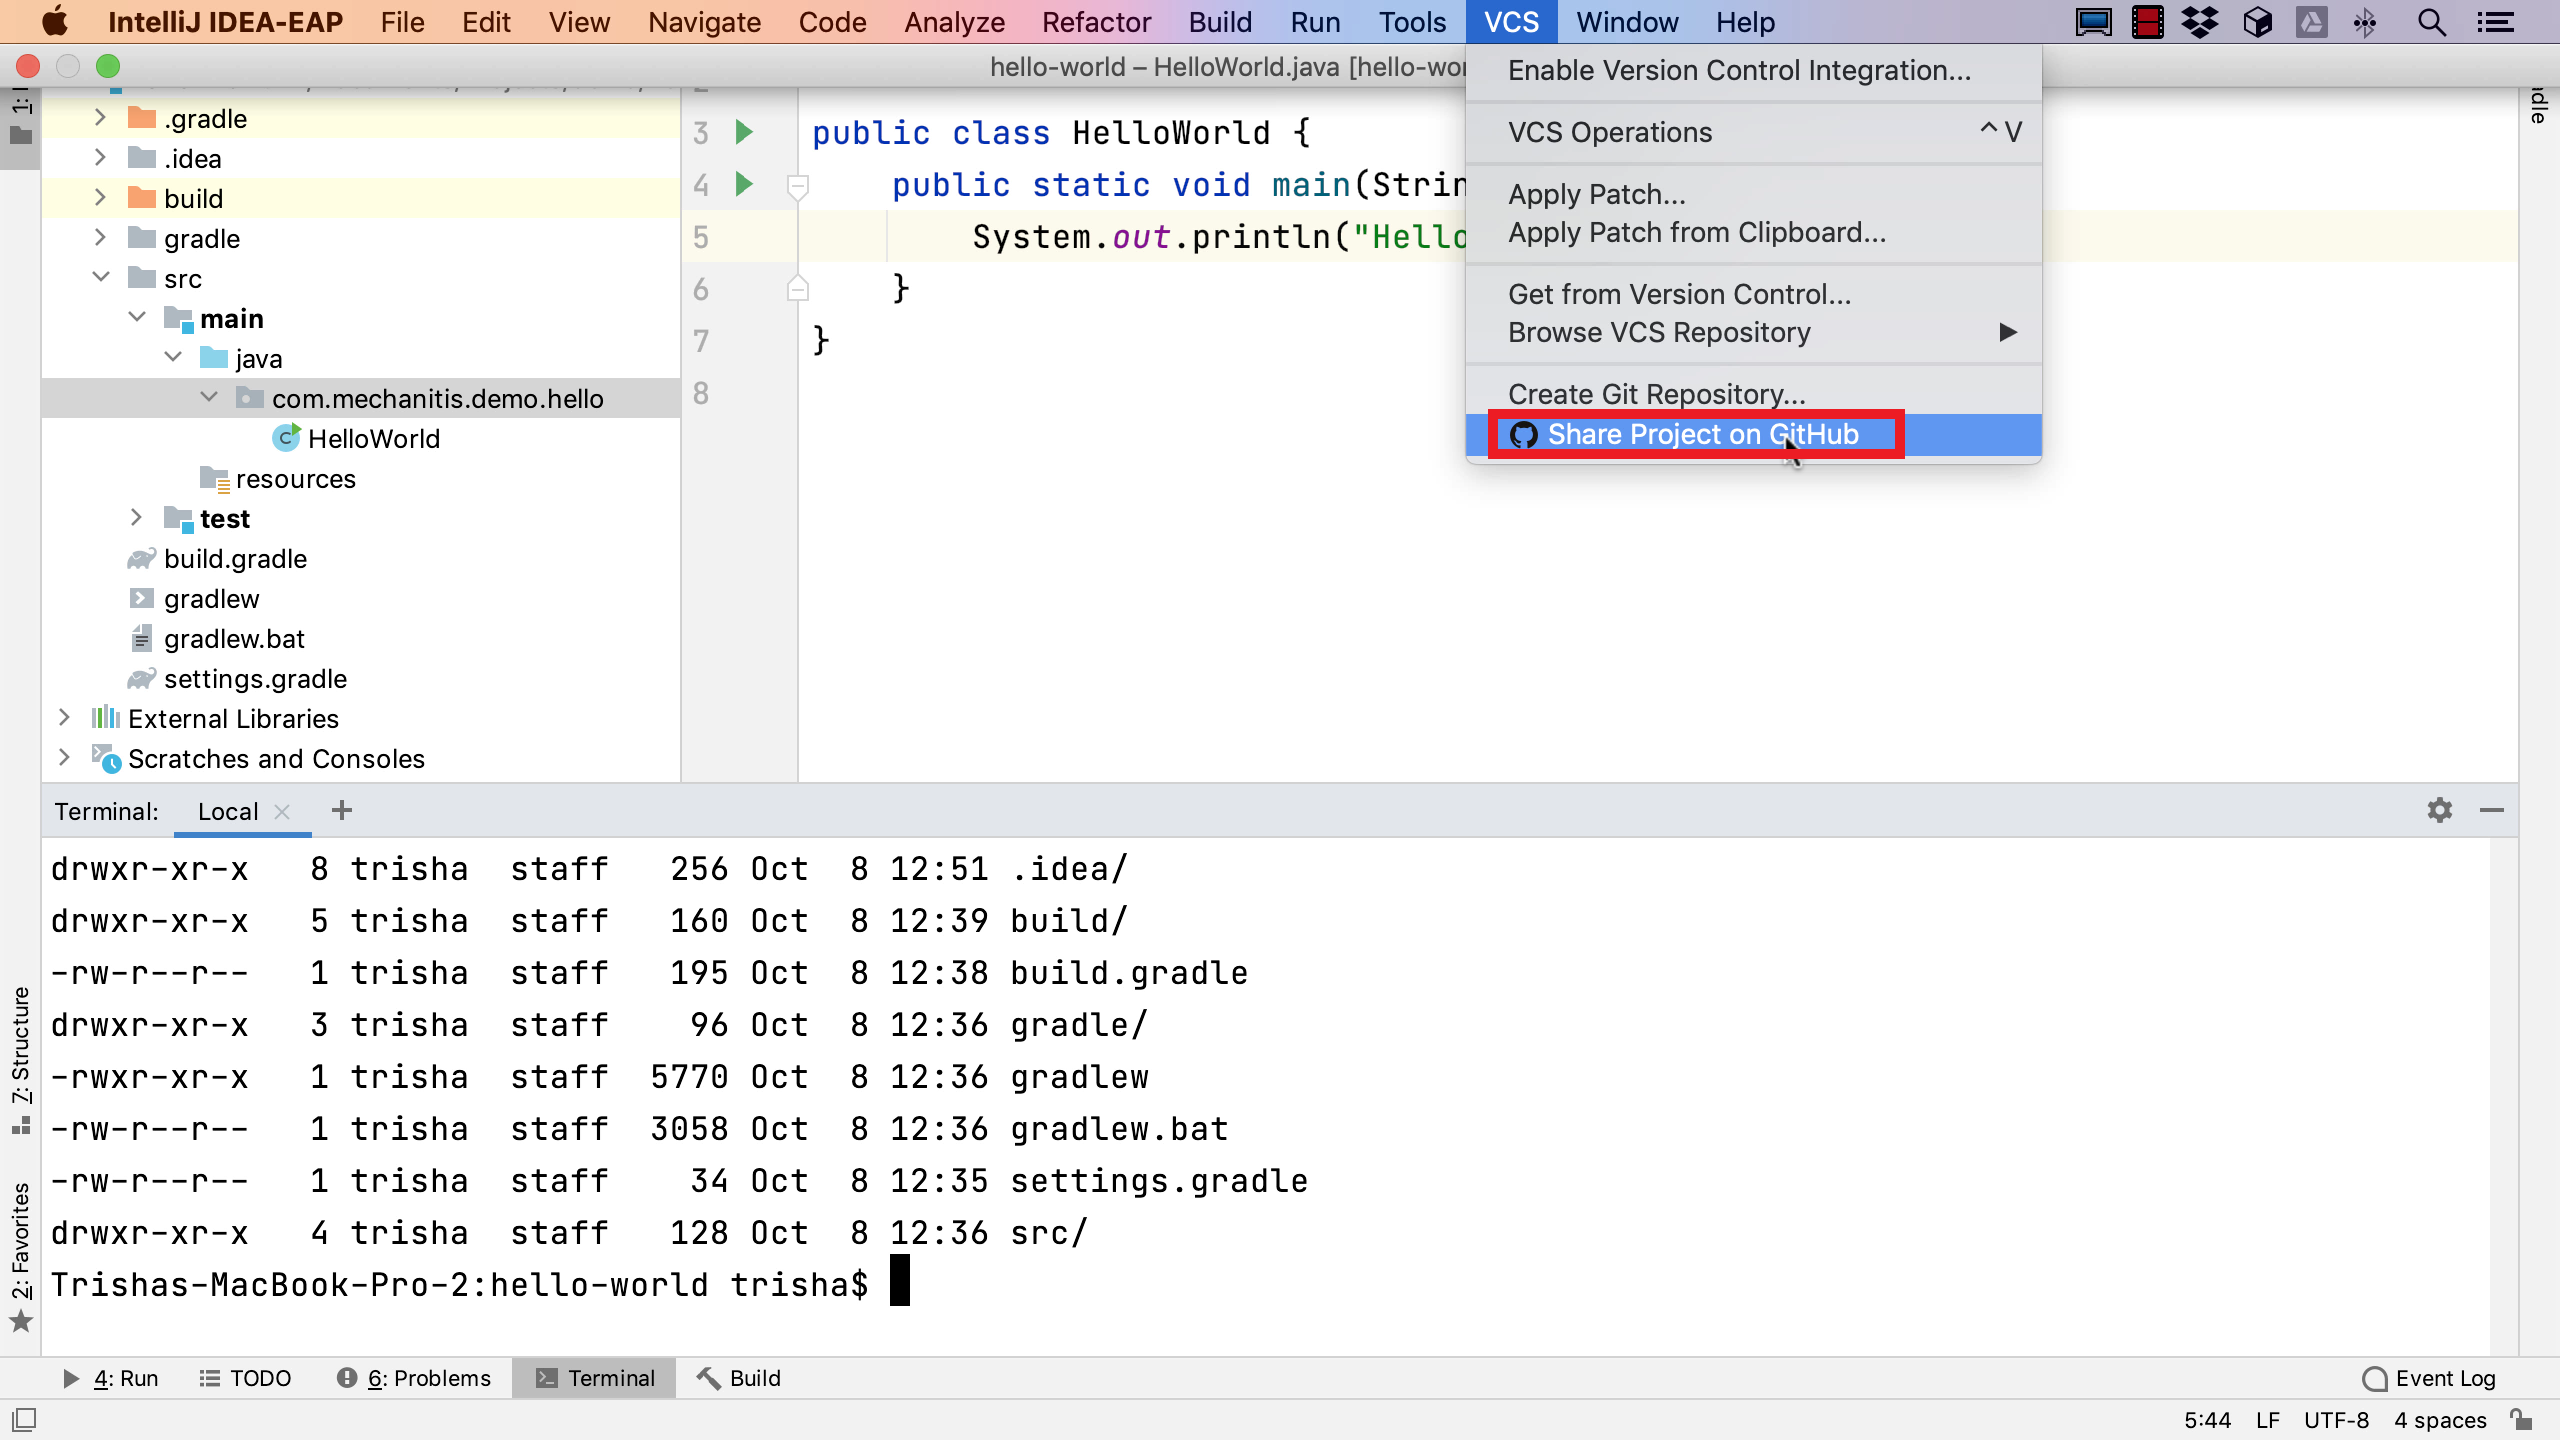
Let’s assume we’ve created an IntelliJ IDEA project containing the code we want to share on GitHub. In this tutorial, we use a sample Hello World application that we know works because we’ve seen it run successfully. It’s not currently set up with any source control, which we can see in IntelliJ IDEA because there’s no option for opening a Git window, and if we list the project’s files in the Terminal window, we can see there’s no .git folder in the project. We can use IntelliJ IDEA to share this project on GitHub, we can go to the VCS menu and select Share project on GitHub.
If we’re not already logged in to GitHub via IntelliJ IDEA, we’ll be shown a log in dialog where we can enter our GitHub username and password. This also provides the option to log in using a token from GitHub, but even if we don’t select that option, if we log in with our username and password here IntelliJ IDEA will generate a GitHub token and use that to log in. If you don’t already have a GitHub account, you can use the Sign up for GitHub link in IntelliJ IDEA to create one. If you log in with your username and password, and have two-factor authentication enabled for GitHub, IntelliJ IDEA will pop up an additional dialog asking you to input your authentication code.
Tip: if you have multiple GitHub accounts, you can add your GitHub accounts by going to the IDE Preferences -> Version Control -> GitHub. Use the add button to add your accounts.
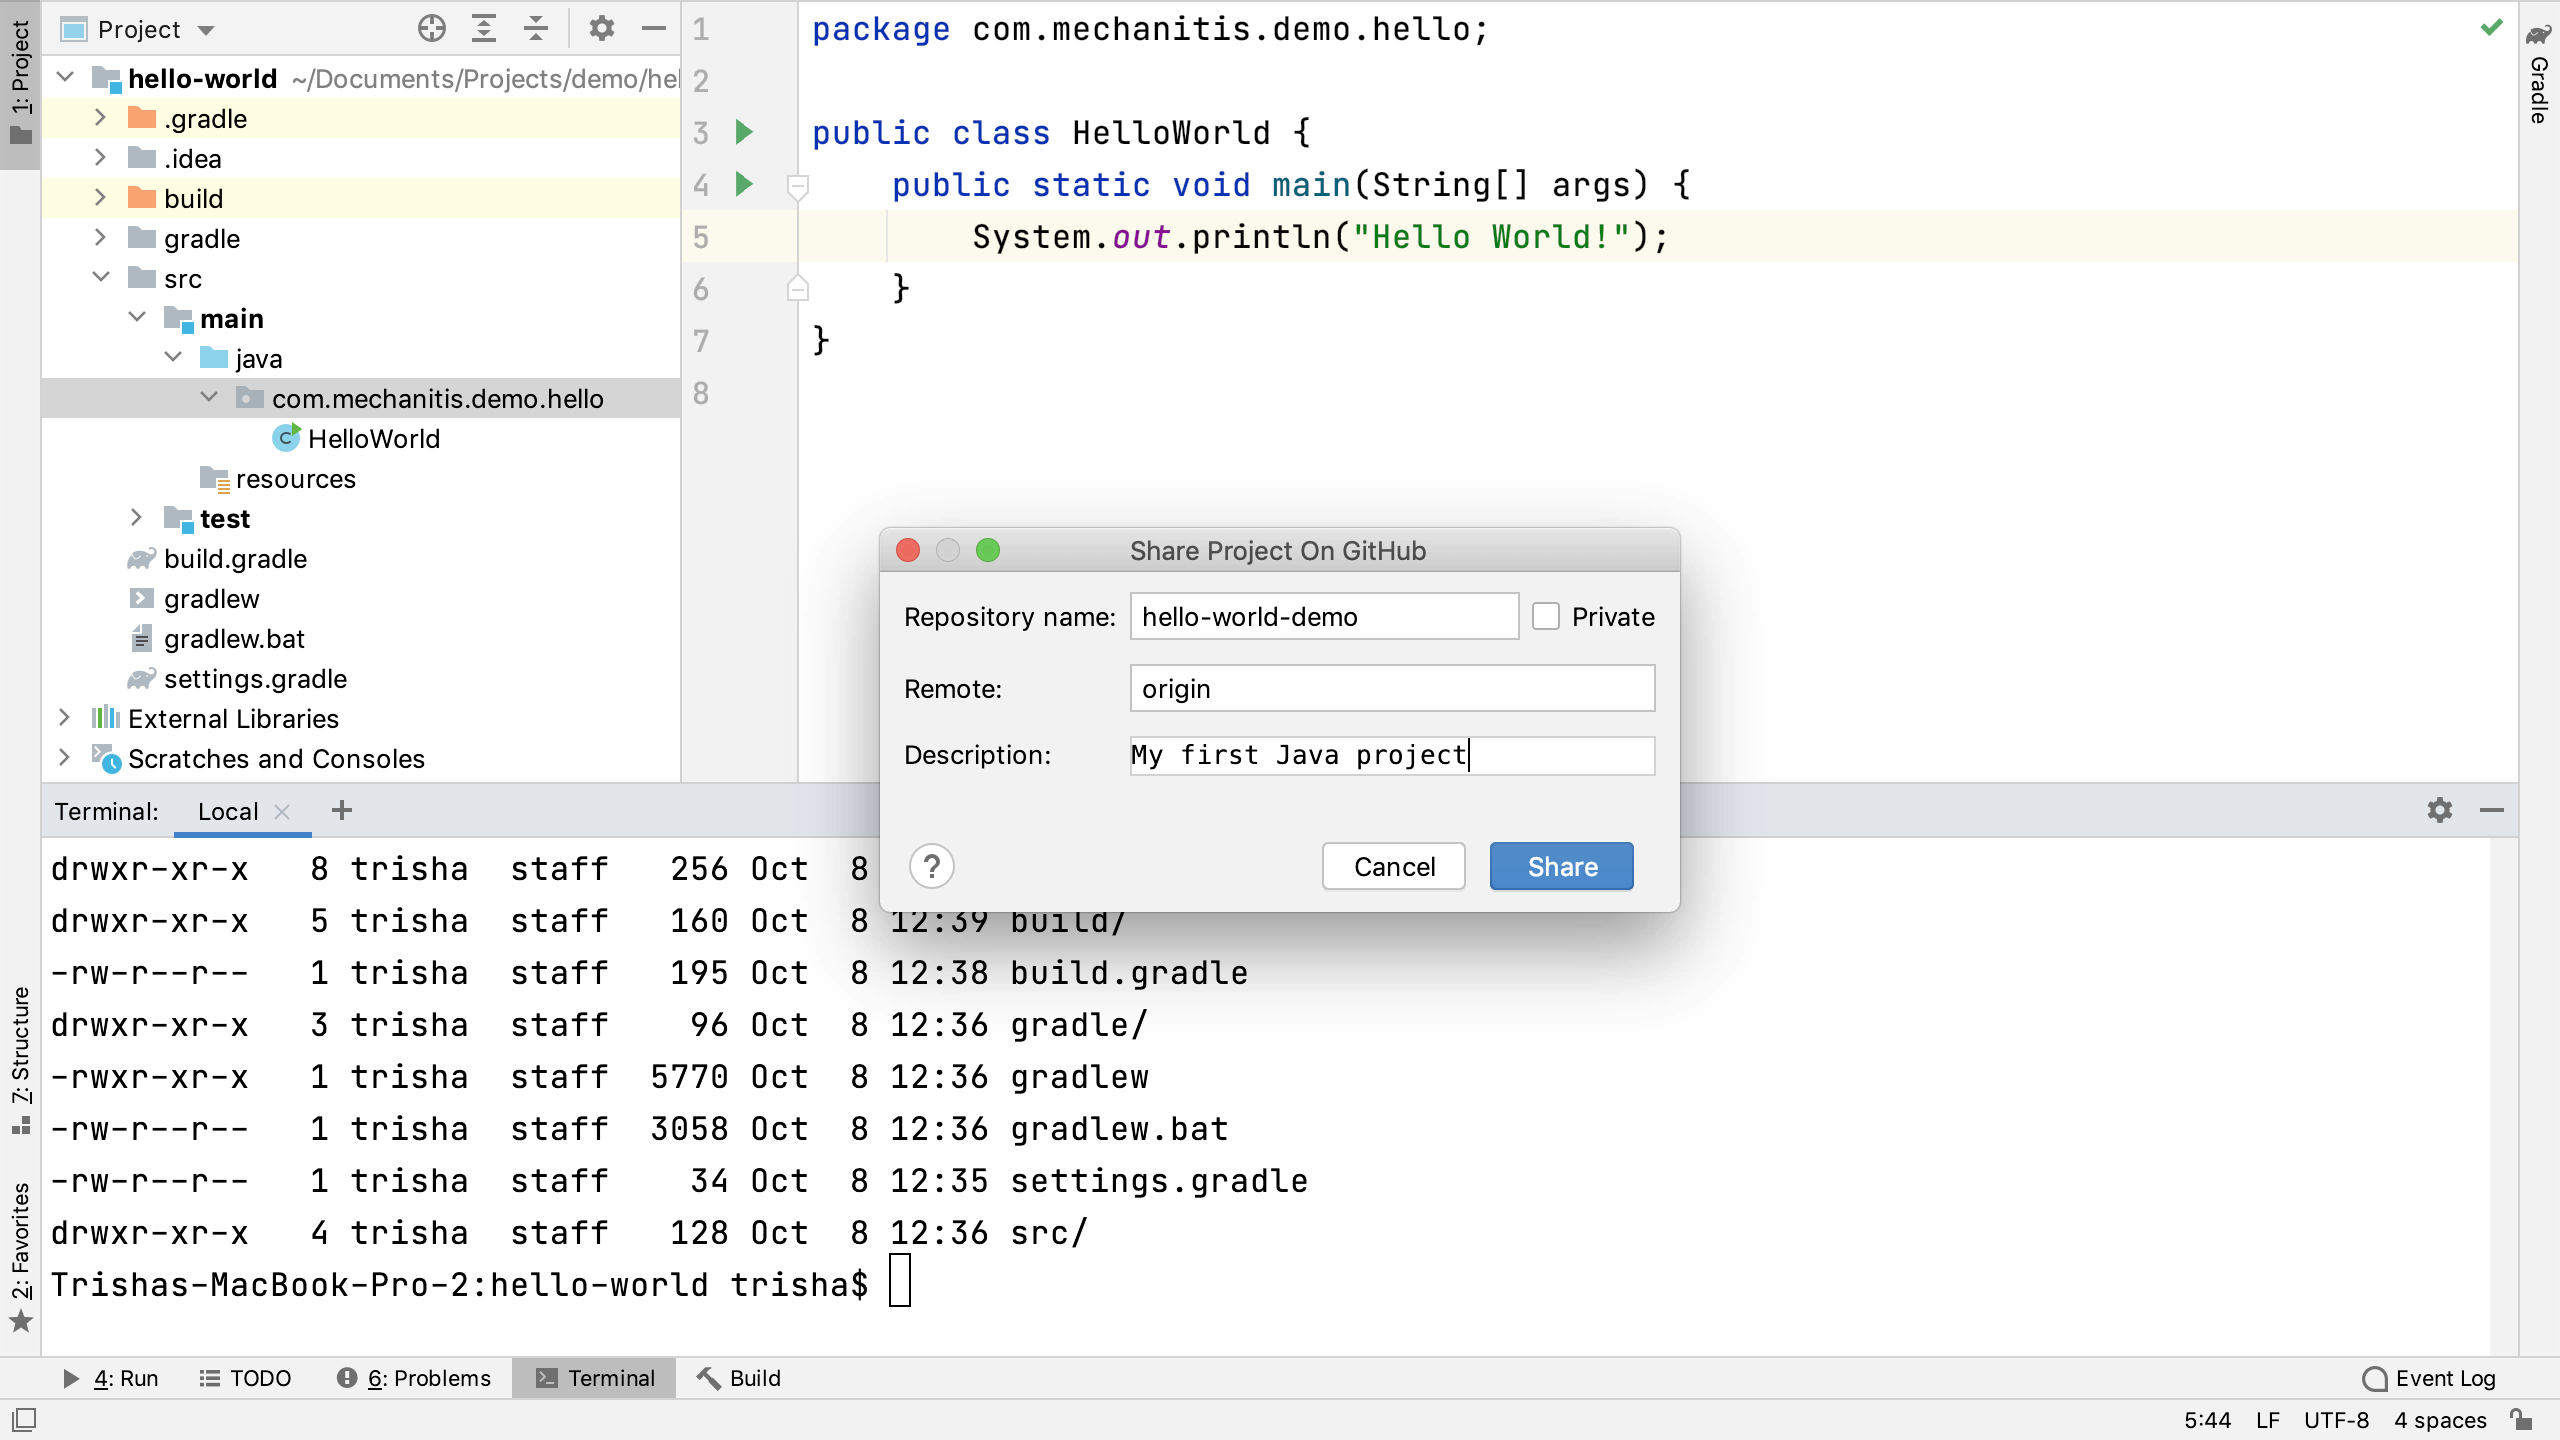
Once we’re successfully logged in, IntelliJ IDEA will ask us what we want to call the repository that we’re about to create on GitHub. This defaults to the project name, but we can pick any name for this repository, as long as it follows GitHub’s guidelines. For my Hello World project, I will call our repository hello-world-demo, as repositories have to have a unique name and I’m sure there’s already a repository called hello-world on my GitHub account. You can make this repository private if you like. I like to make my repositories public, unless there’s a compelling reason to make them private. You can rename the remote if you like, but I will accept the default here. I will also add a description too. This isn’t mandatory, but it helps people who want to understand what the project is for.
When we press Enter or click Share, IntelliJ IDEA will go ahead and create that repository on our GitHub profile. The IDE will ask us which files we want to put into this first commit. We could commit everything, but generally we don’t need to add the .gradle folder (if we’re using the Gradle wrapper), and we don’t need to add the build folder, which is where IntelliJ IDEA puts the compiler output like class files.
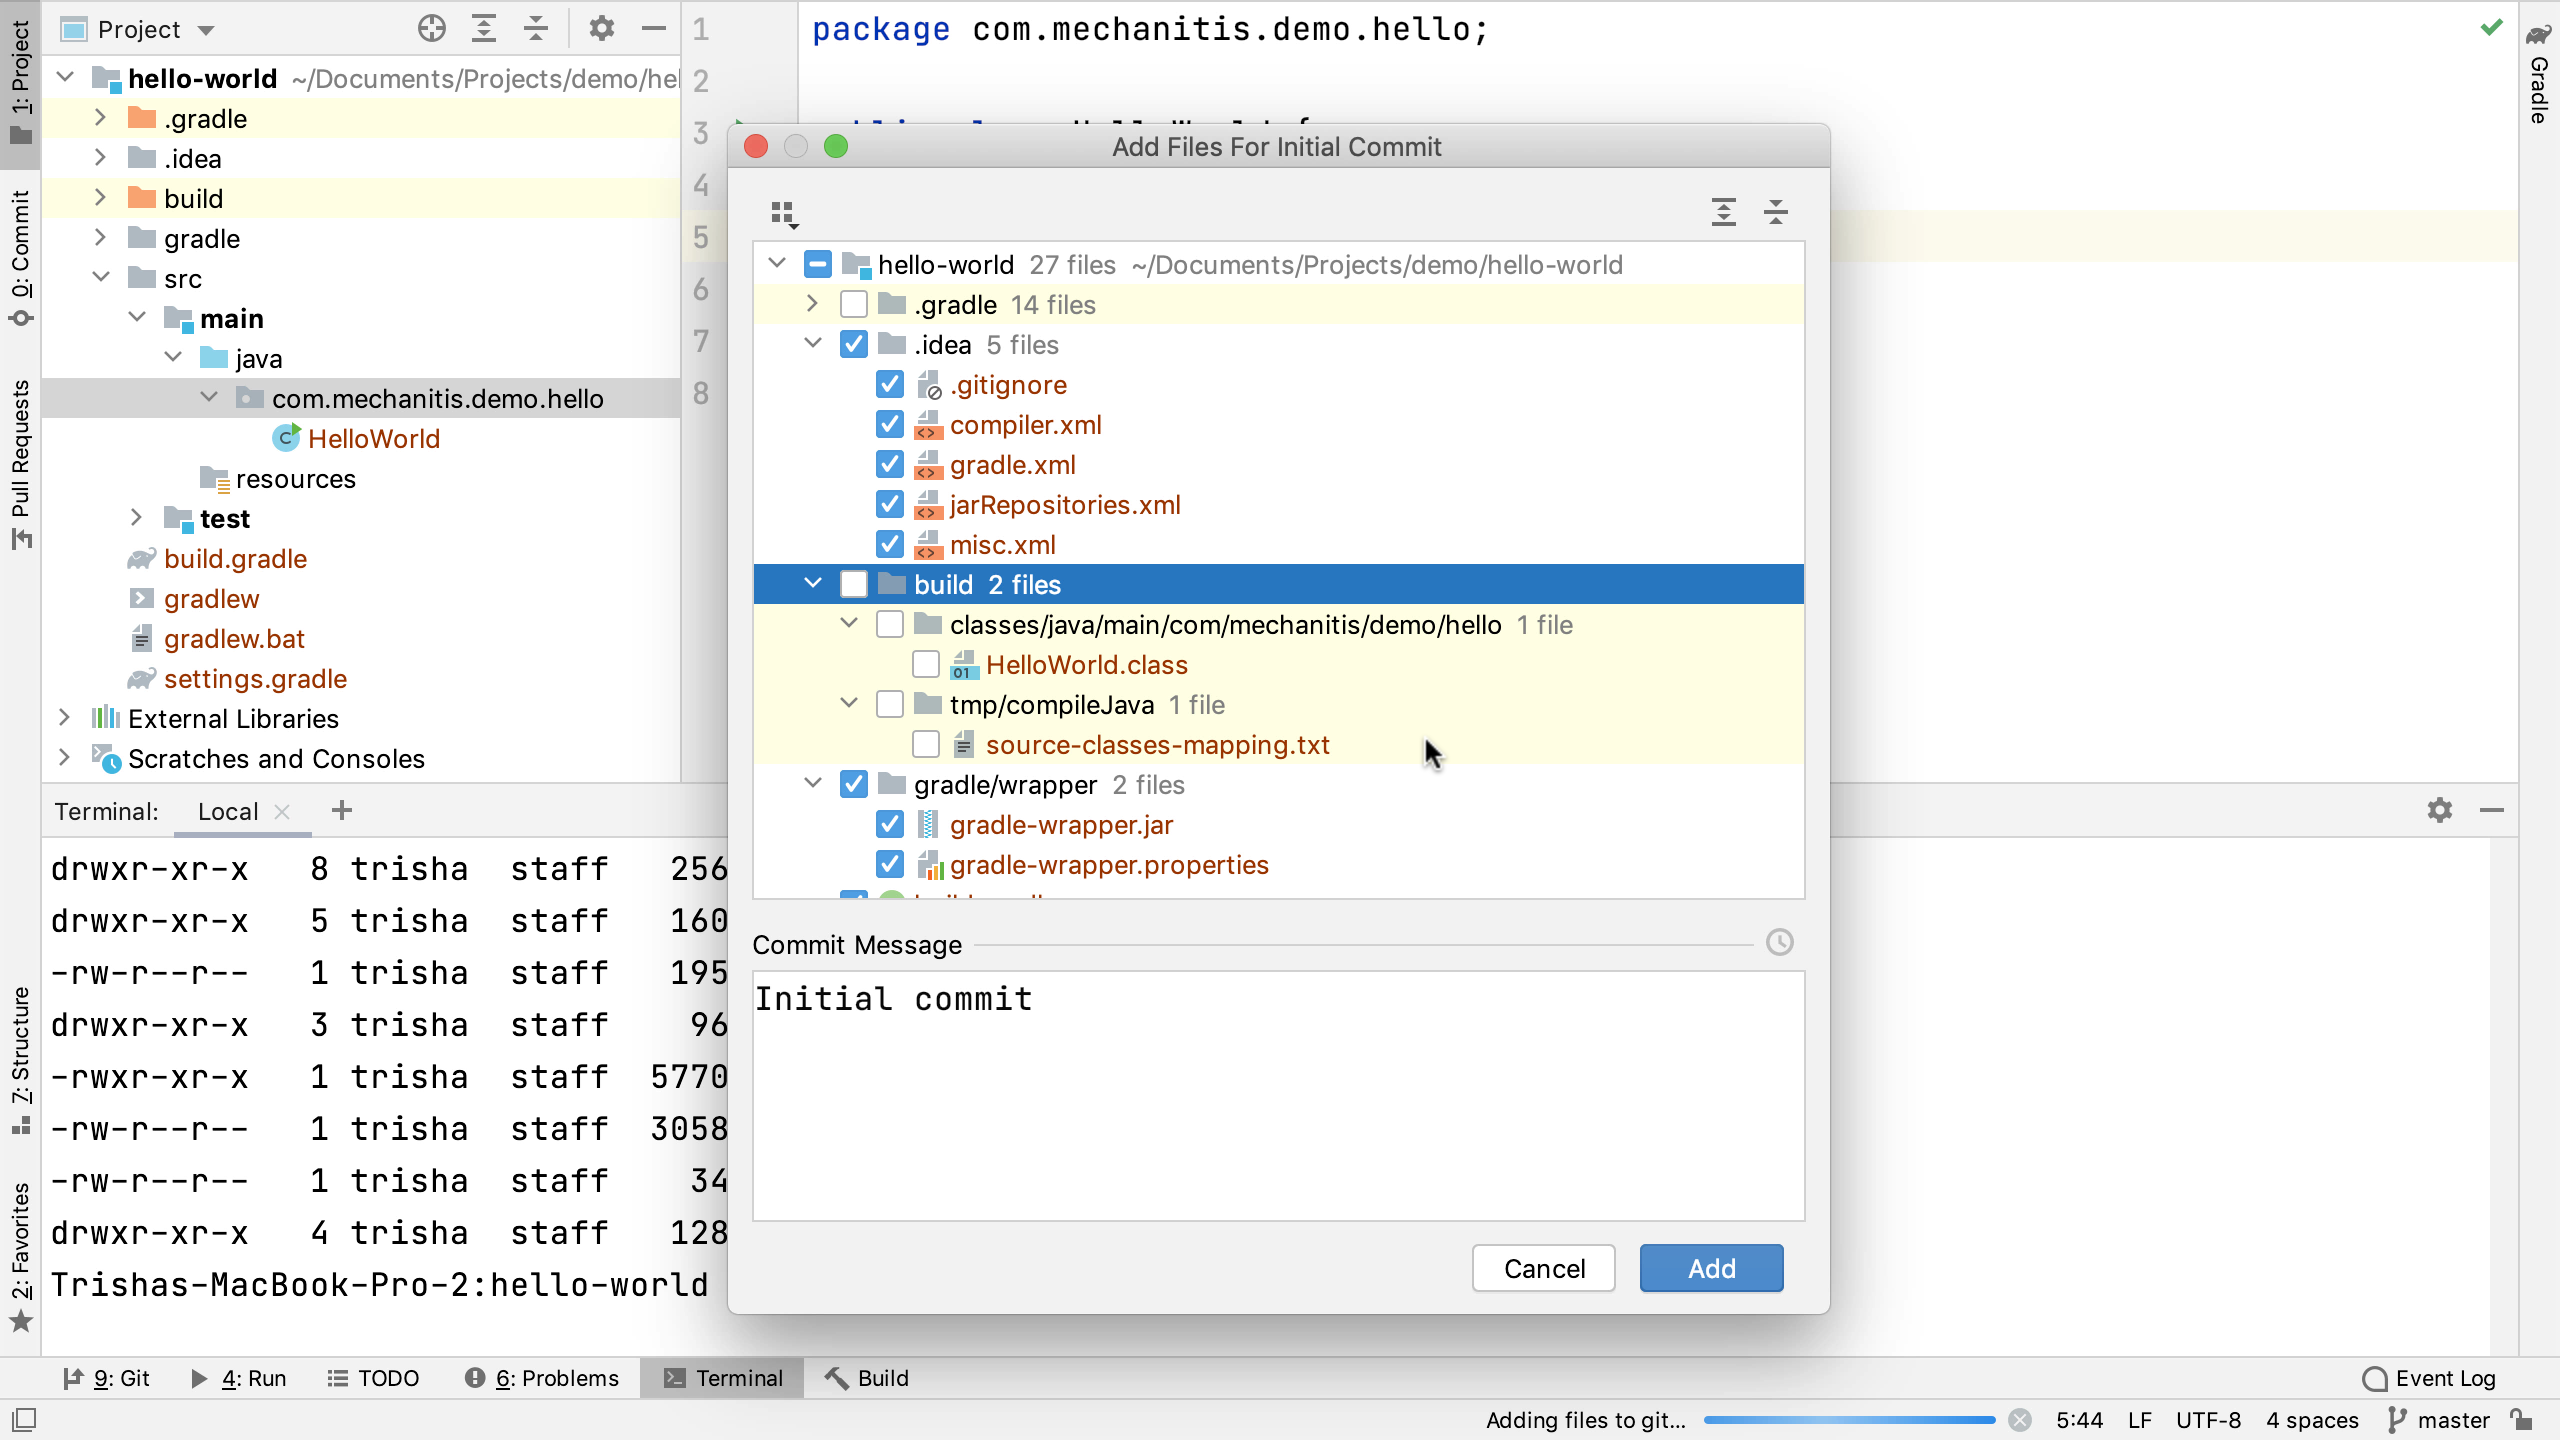
Everything else looks good to commit, we’ll use the default commit message and click Enter to commit it.
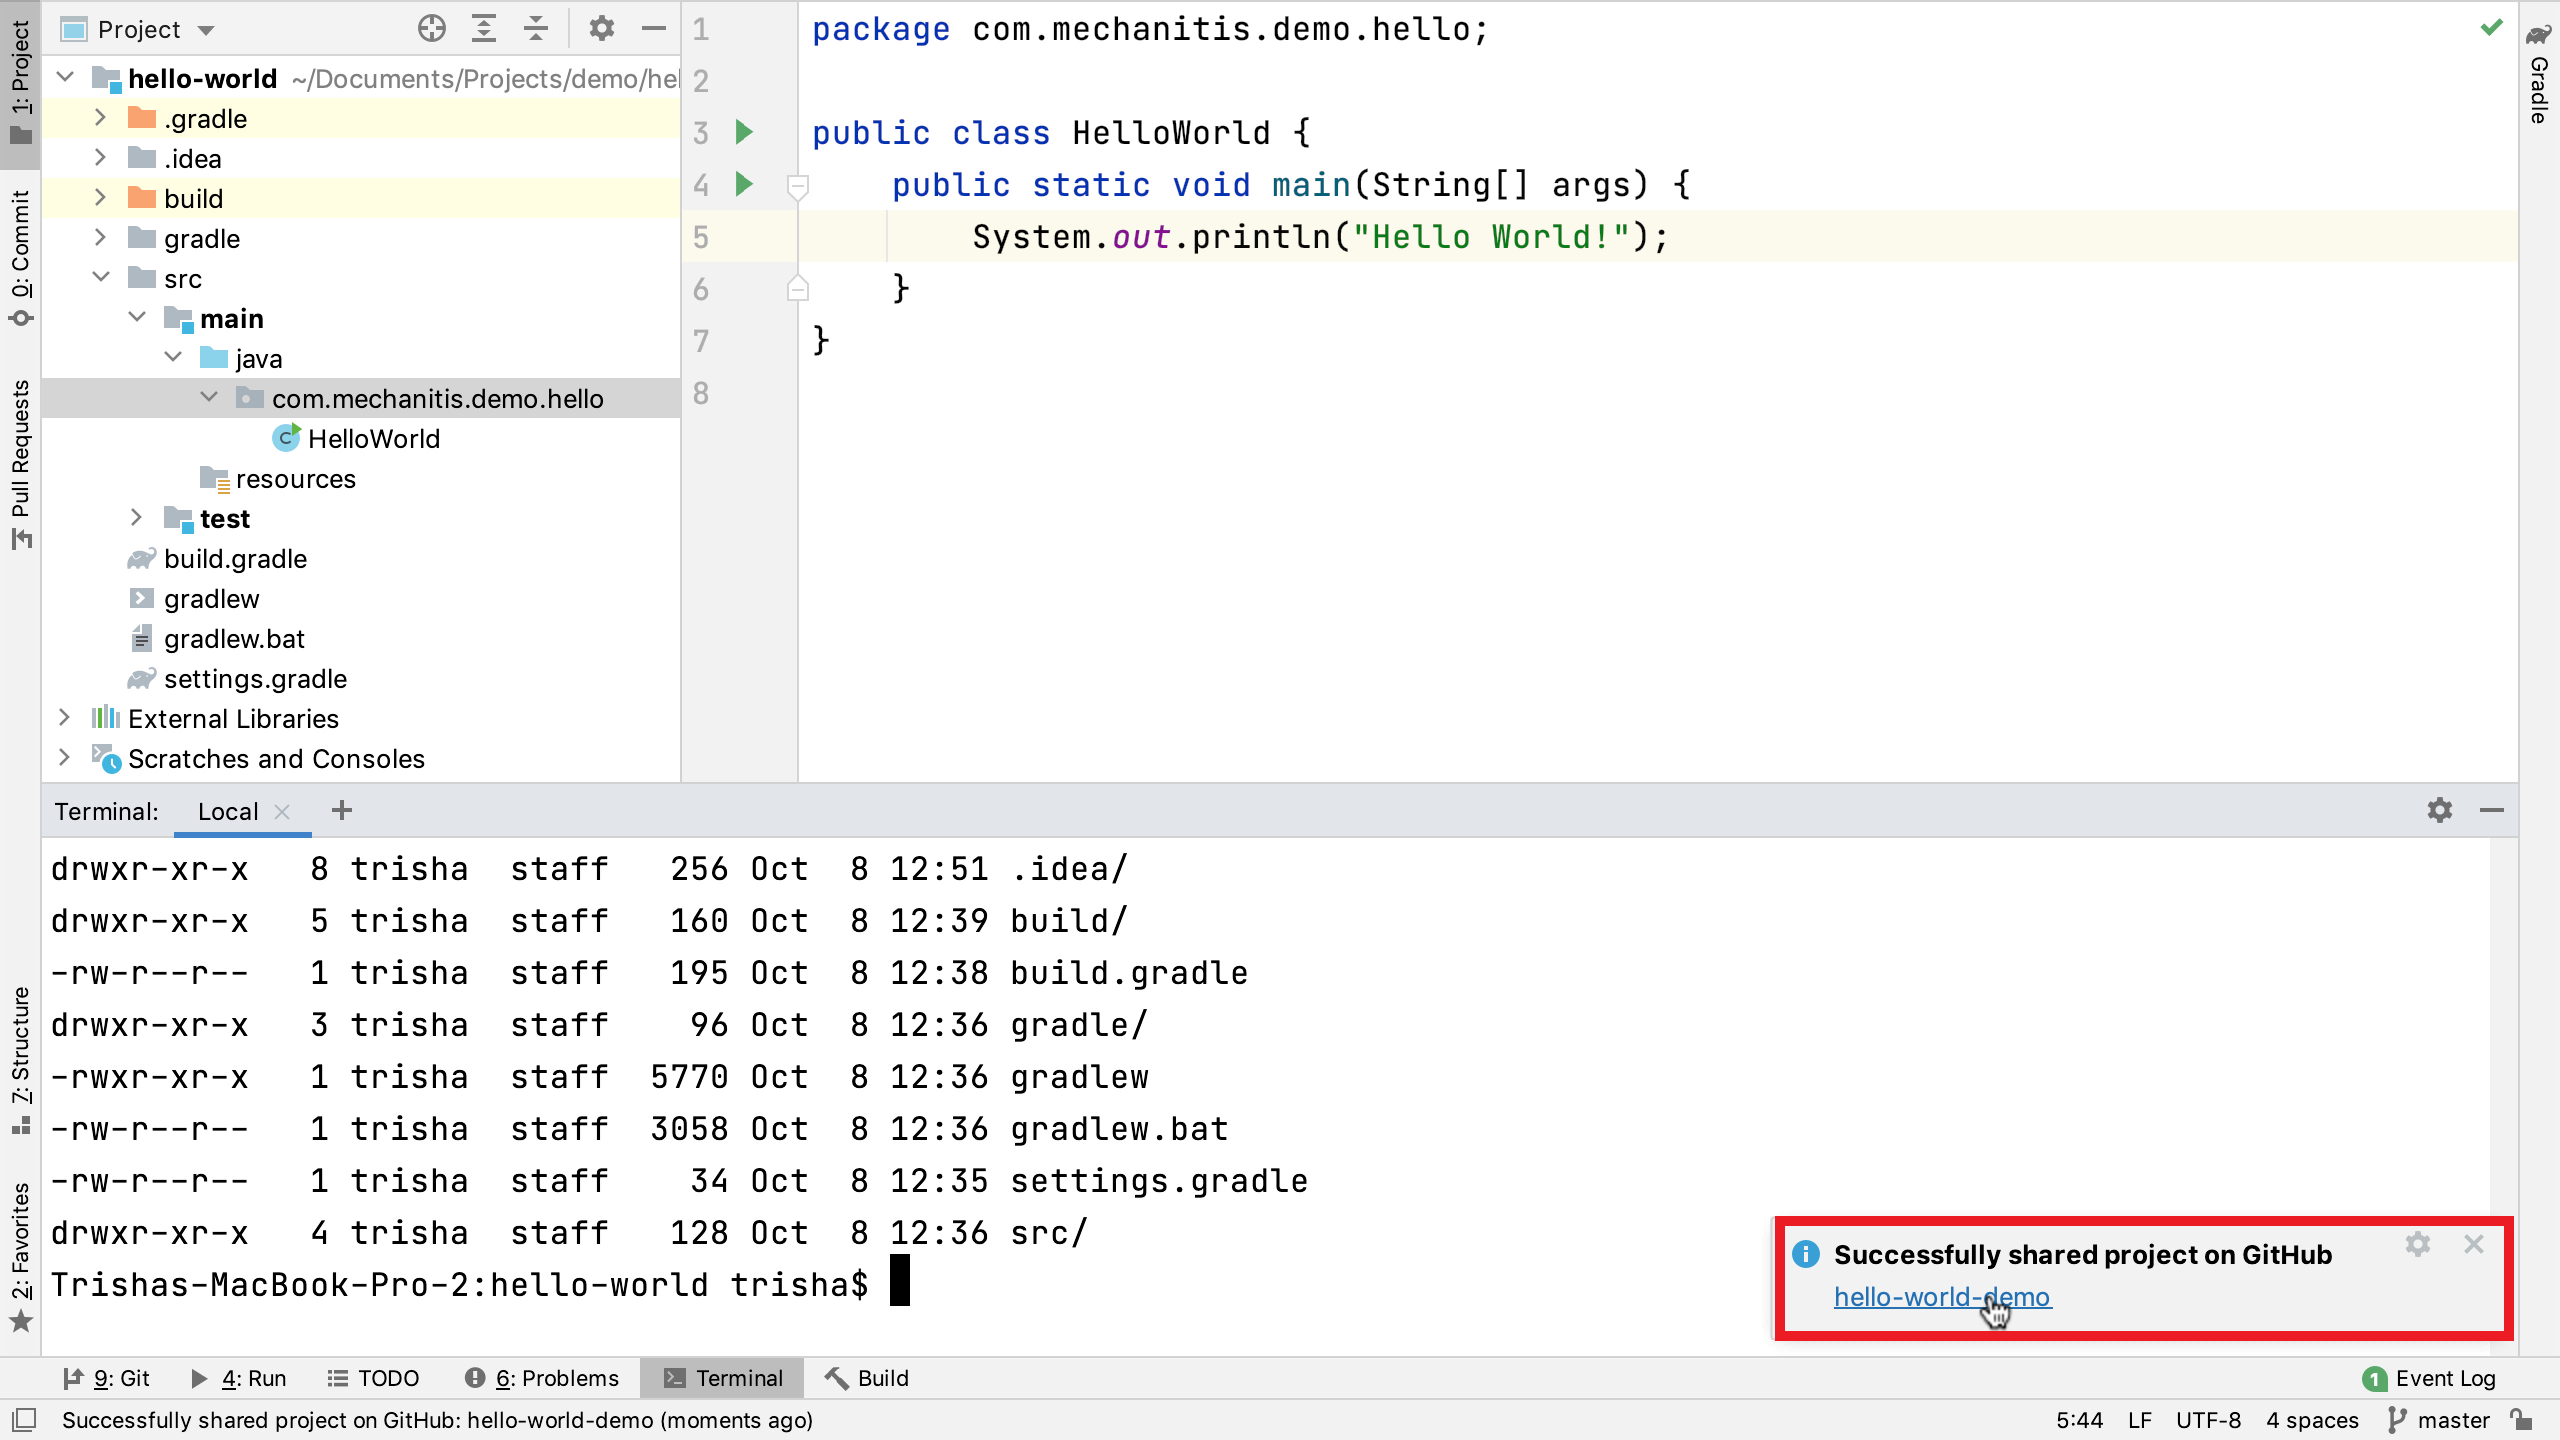
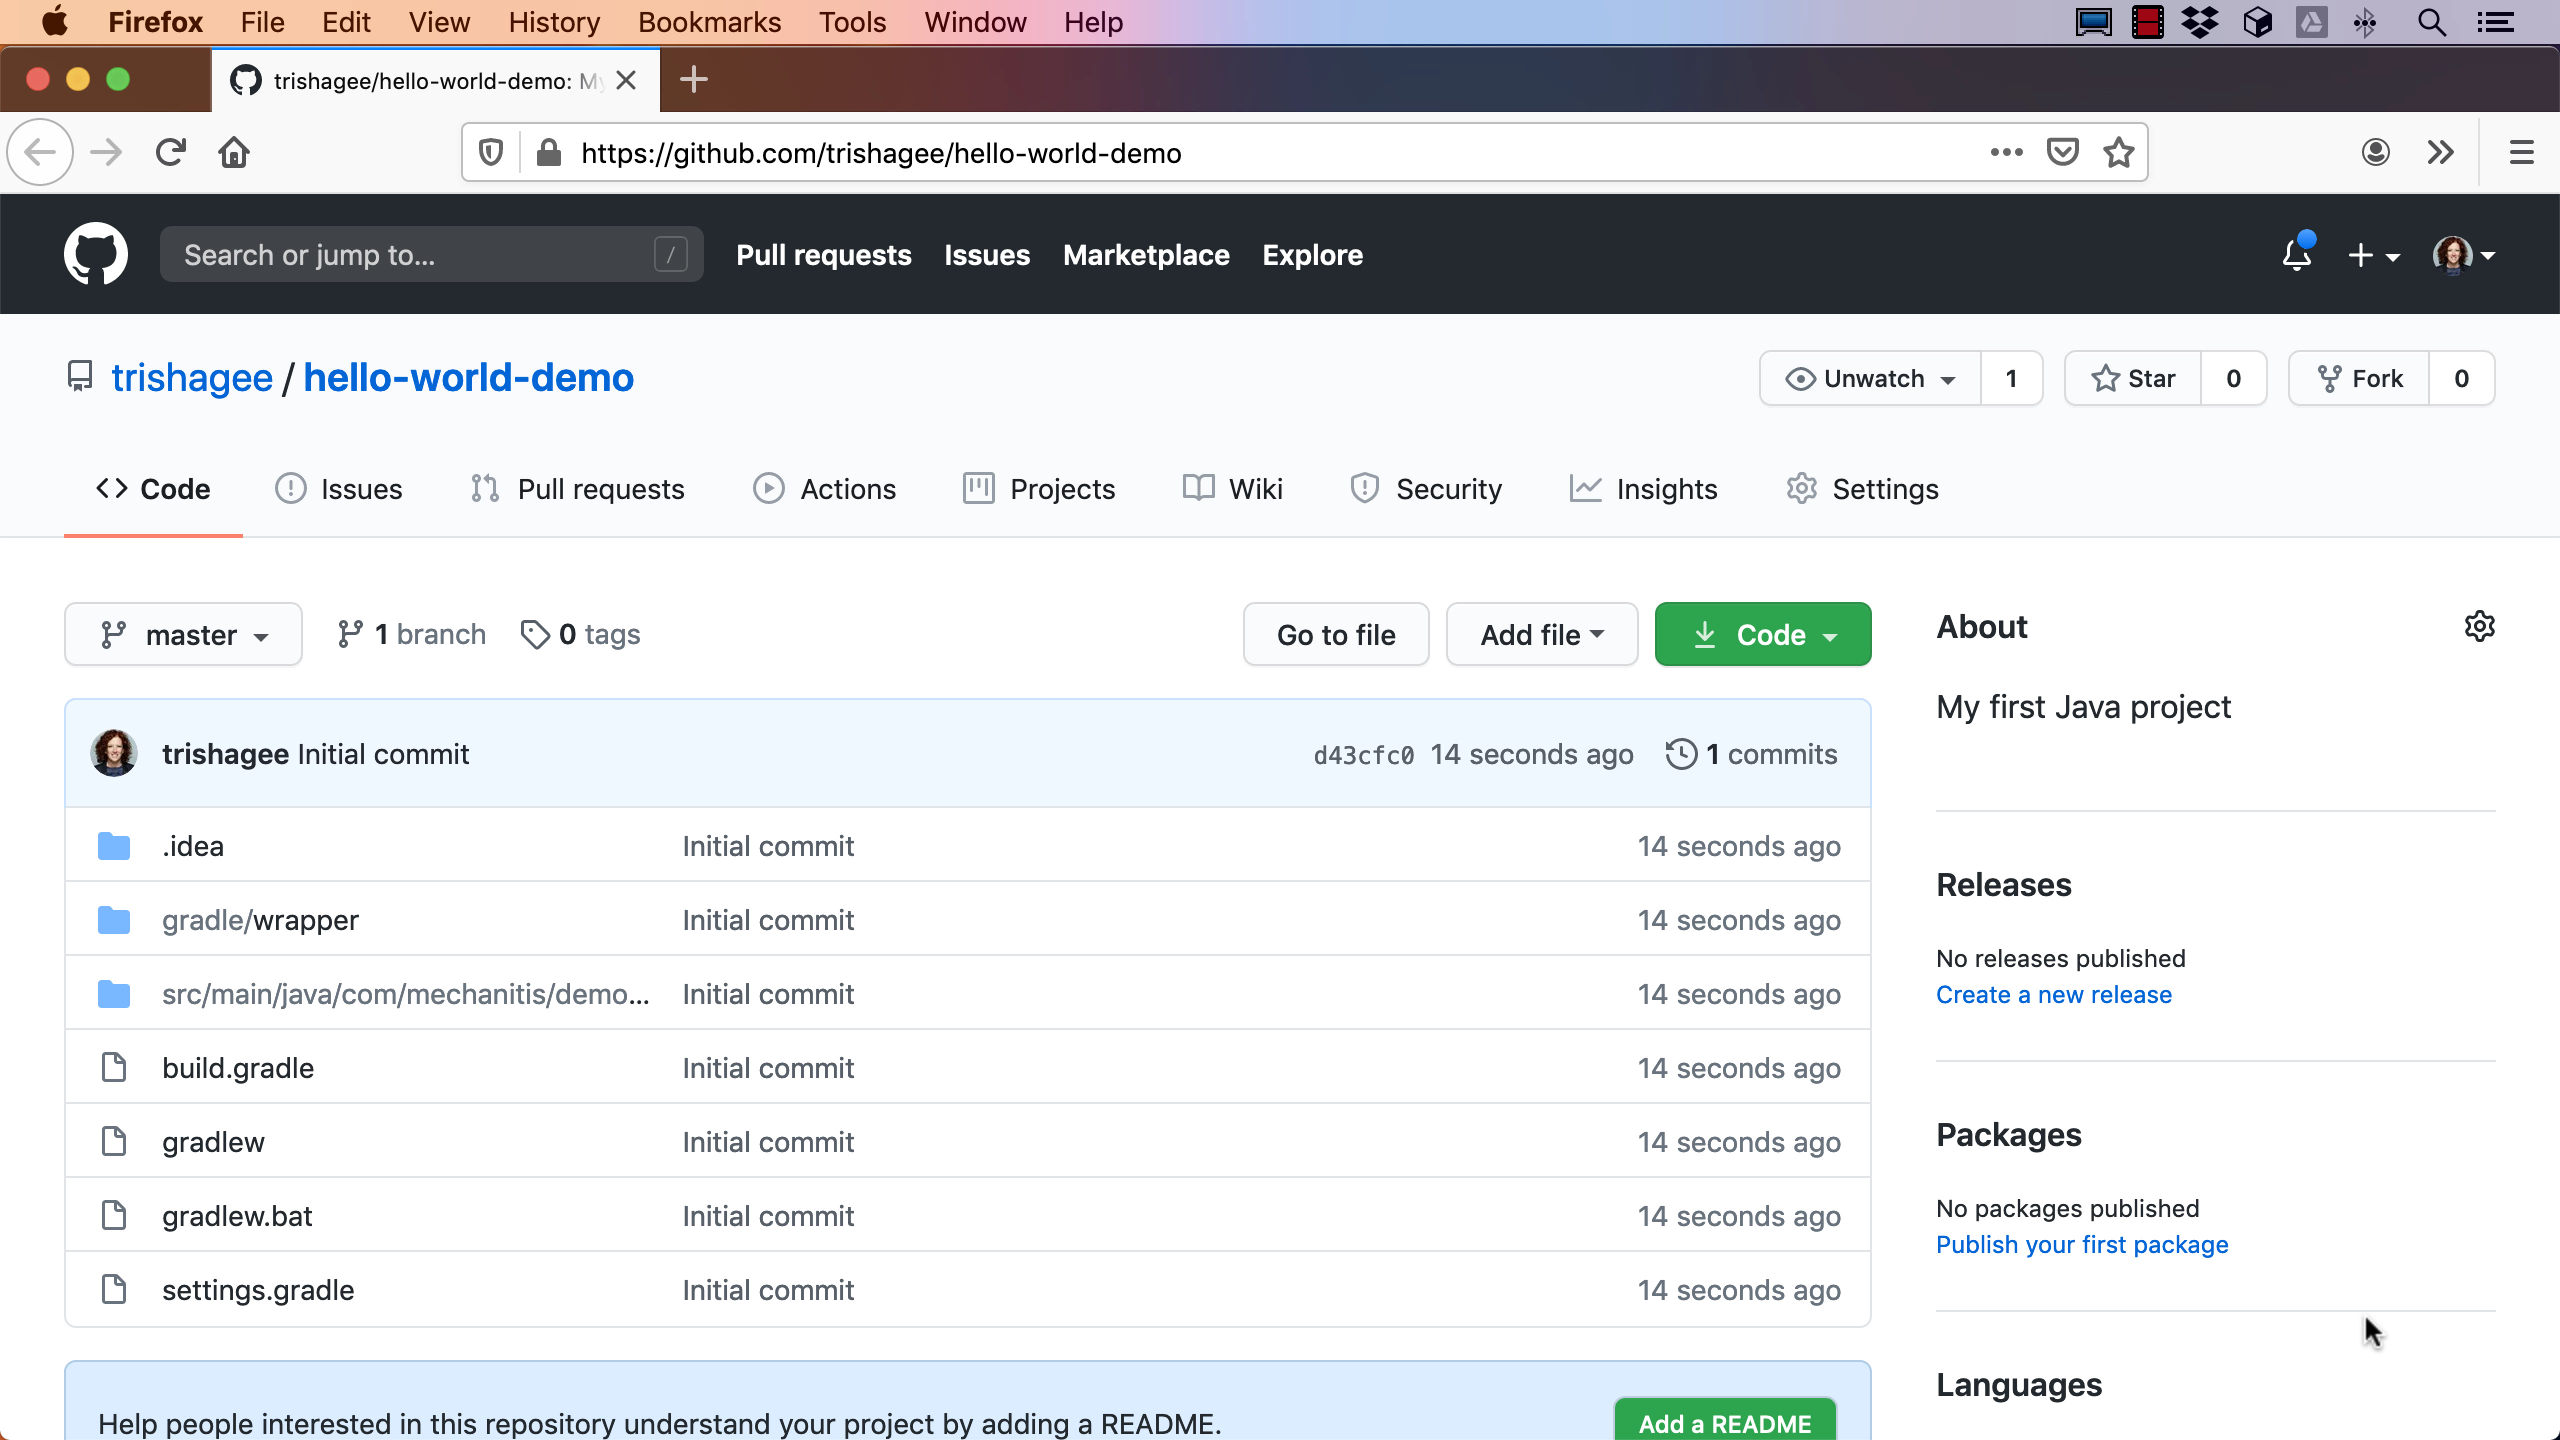
Under the covers, IntelliJ IDEA is creating a local Git repository for the project and then pushing it to your GitHub profile as a new repository with the details we just entered. When this process is finished, IntelliJ IDEA will pop up a balloon and we can click on the link to see the repository in GitHub in a browser. We can see the repository, the code, the commit message, and the description.
Sharing Your Project on GitHub (Multi-step Approach)
The first approach assumed we want to do everything in a single step. Often we’ll want to create a local Git repository for our project well before we want to publish our code publicly on GitHub.
Let’s assume we have a more complex project than Hello World and that we’re still in the process of writing the code. We don’t want to publish our project on GitHub just yet, but we do want to enable source control for it as we want to do small commits locally while we evolve the code. We often want to save our project’s progress each step of the way, for example, once the tests are passing. So, first, we will create a local Git repository for this IntelliJ IDEA project.
We start with a project that is not currently under any source control, so there’s no Git or VCS tool window. To use Git as the version control for an IntelliJ IDEA project, go to the VCS menu and select Enable Version Control Integration.
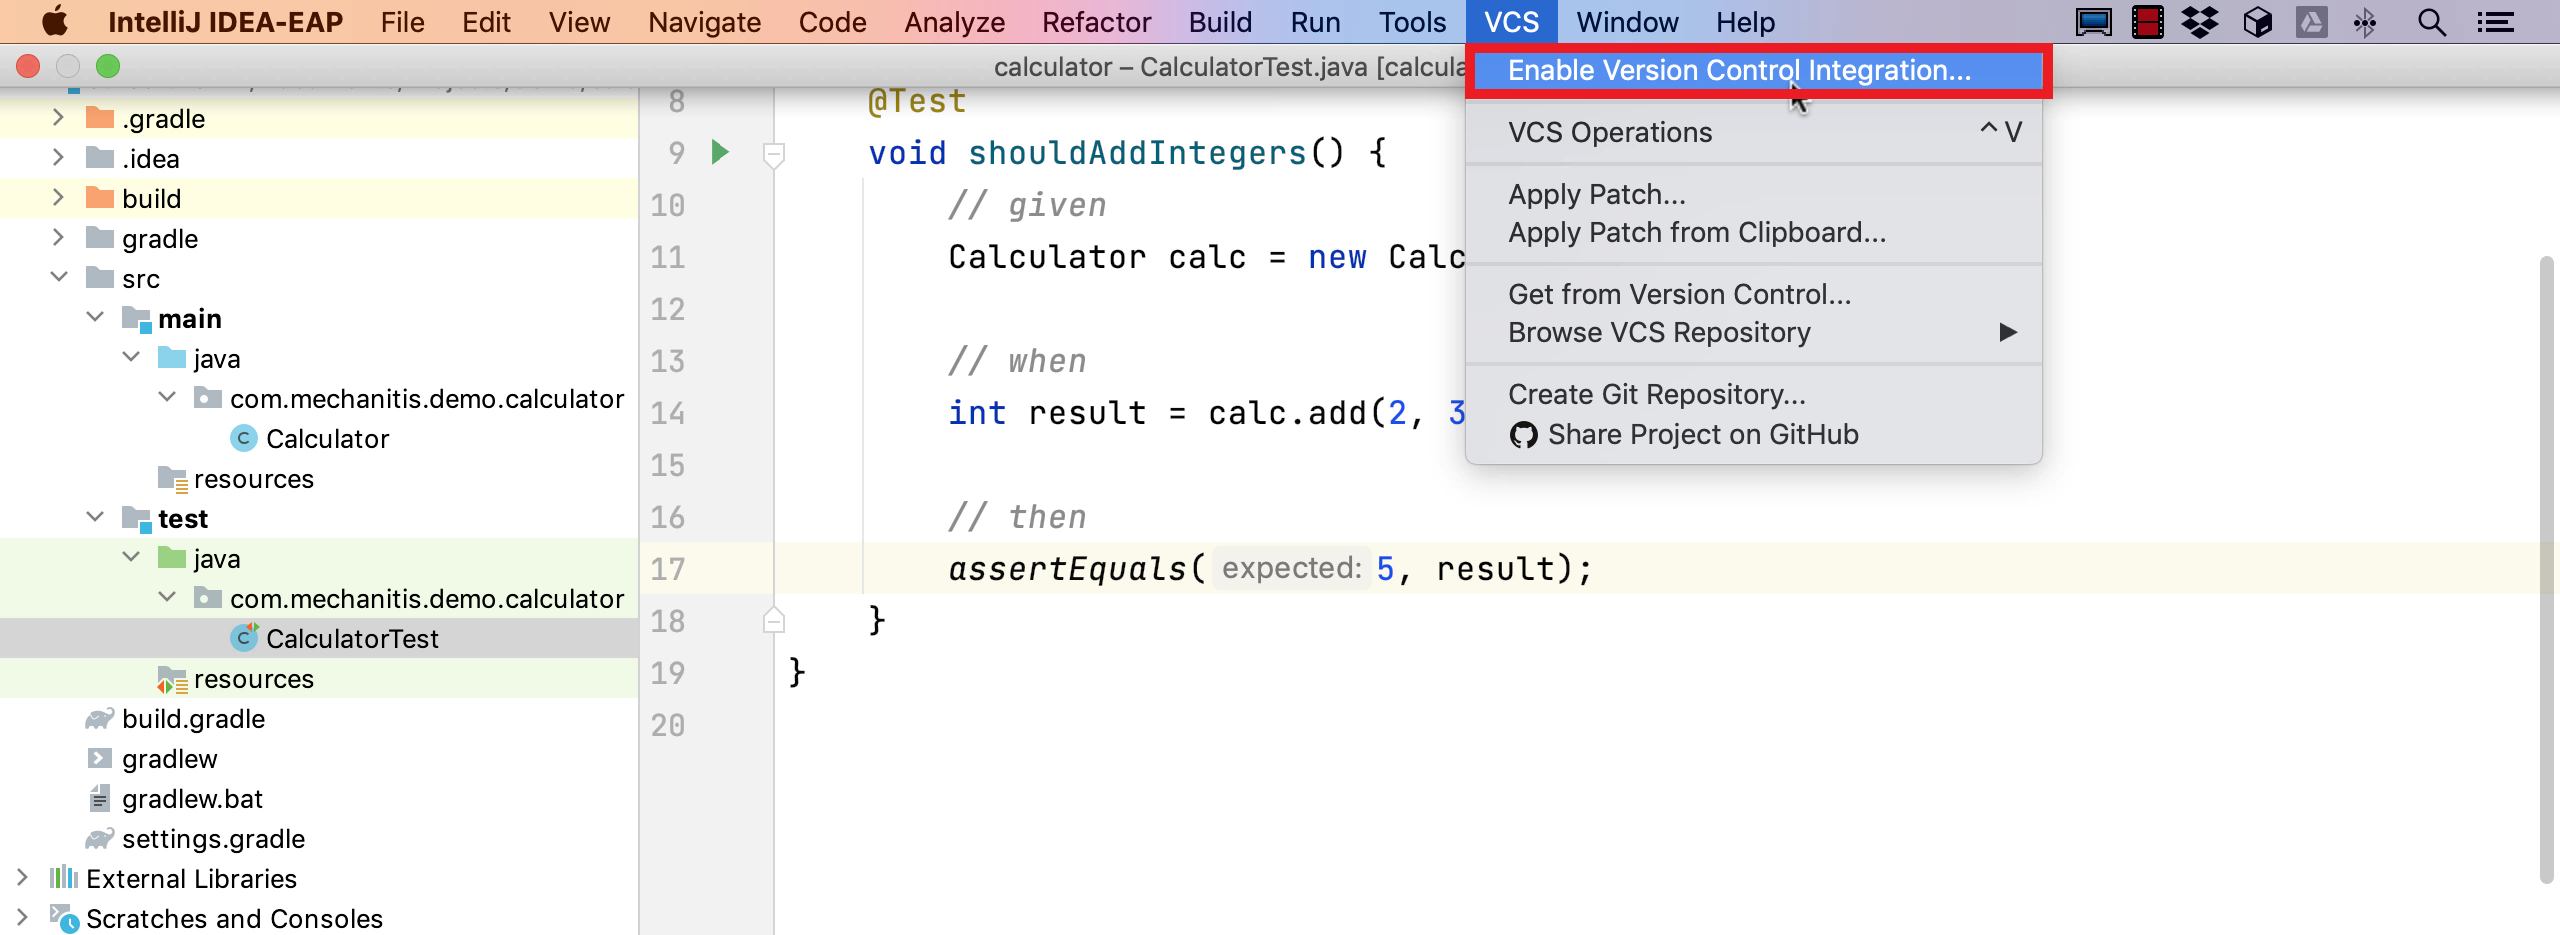
IntelliJ IDEA supports multiple version control systems, but for this example we want to choose Git. IntelliJ IDEA creates a Git repository in the root directory of the project. We also now have access to the Git tool window. If we open this, we can see the Console tab which shows the Git commands that have been run and their result, or we can switch to the visual Log tab. Using IntelliJ IDEA’s terminal to list the project’s files, we can also see that we now have a .git folder in the root of our project.
Now we’ve enabled Git, but we haven’t added anything to source control yet. We can see that our files are shown in red, which means as far as Git is concerned, these are new files that are not yet added to Git, so they’re not in source control. Let’s select which files we want to be in source control, and make our first commit.
We can open the commit window using Ctrl+K on Windows/Linux or ⌘K on macOS. The tutorial uses the Commit Tool Window, which was added in IntelliJ IDEA 2020.1. If you’re still using the old commit dialog, you can switch to the commit tool window in Preferences -> Version Control -> Commit -> Use non-modal commit interface.
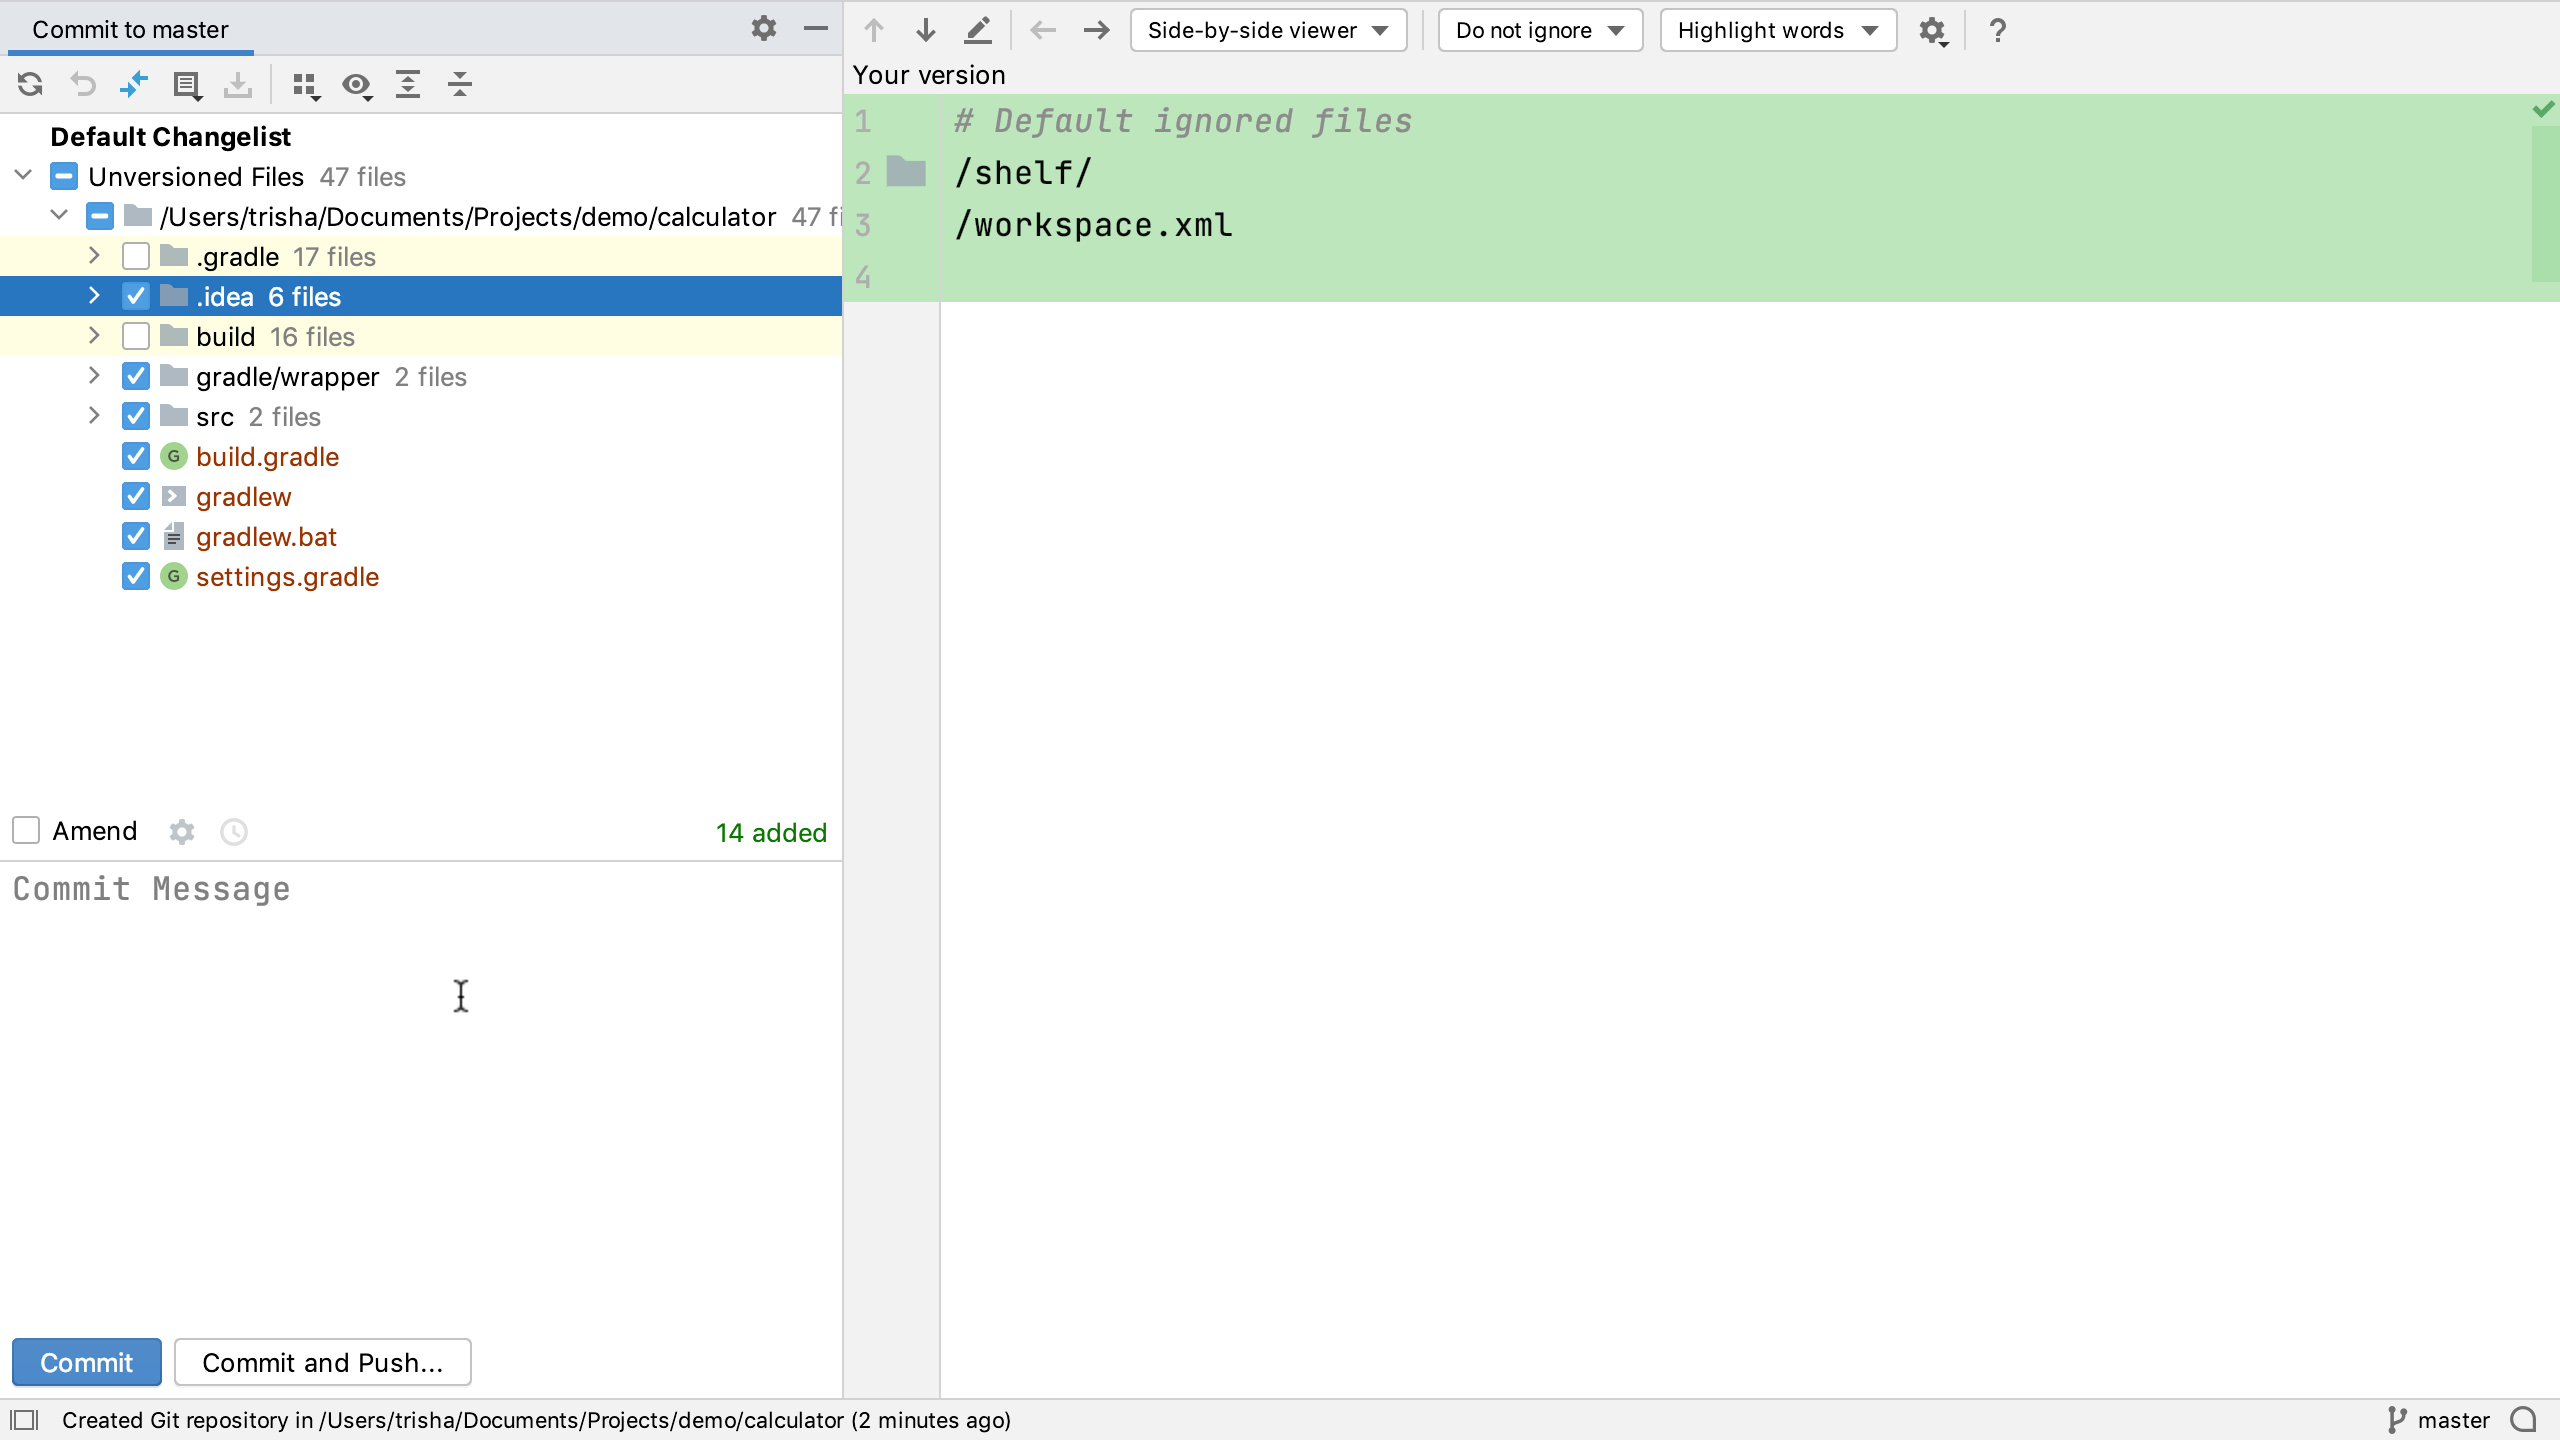
If we open up the unversioned files list in this commit window we can see all the files in our project are listed because none of them have been added to Git yet. We probably don’t want to add everything to Git, there are some directories and files, like build output files, that we don’t need to put under source control. Seeing all the files in a single list like this might not be helpful, so we could opt to group the files, for example by directory or module.
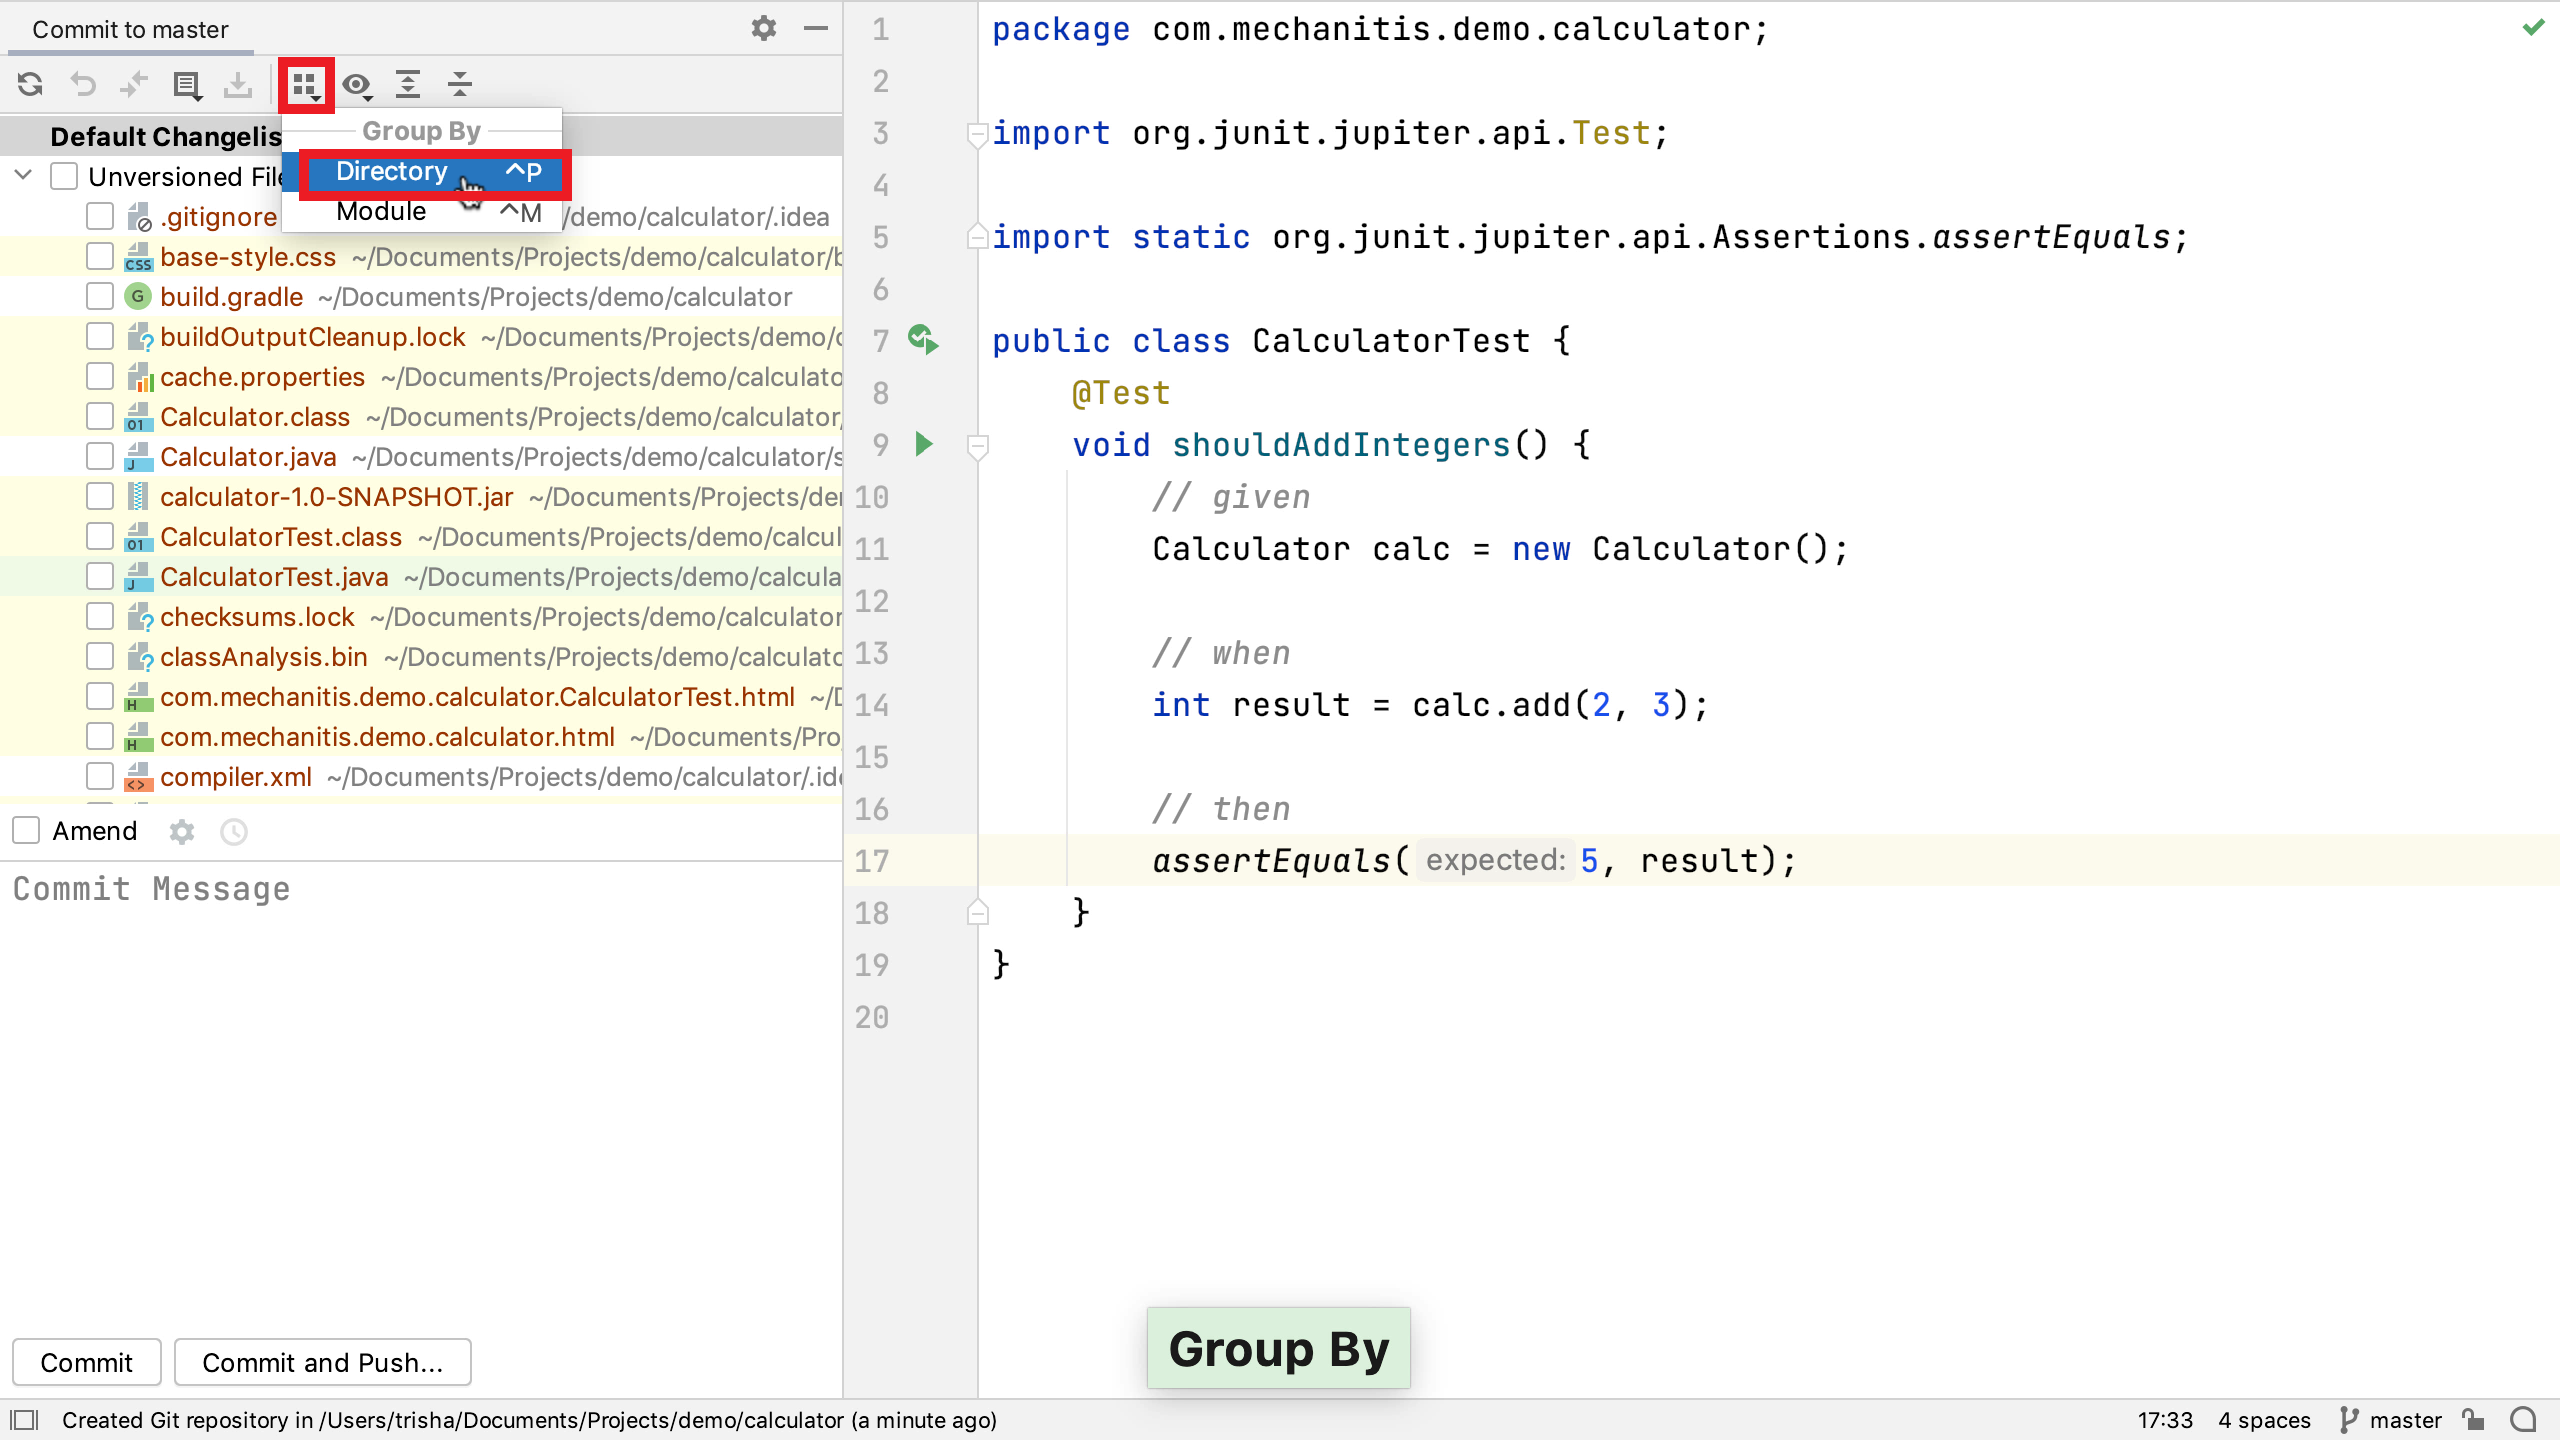
With this view I can see there are two directories that I don’t want to add to Git, because they’re build directories. I do want to add the gradle wrapper directory, my source, and the files in the root of my project. If I open up the .idea folder, I can see all IntelliJ IDEA’s settings files. Each team will have their own idea of which settings should be saved into source control, if any. IntelliJ IDEA automatically adds a .gitignore file to this directory with default folders and files to exclude from source control. We could add other files to this .gitignore file if there are other specific IDE settings that we don’t want to include. However, I’m going to add all the other settings files to Git.
Add a description for this commit describing what functionality these changes do. When we commit this, we get a balloon saying this was successful. When we go back to the Git window, the Log tab shows us this commit. We can see the files that were changed in this commit and the commit message. We can hide the Git window by pressing Alt+9 or ⌘9 again.
So far we’ve been committing all these changes to our local Git repository. If you open the Log tab, we can see this project only has local branches, which means all the code and the commit history is only saved on this local computer. Once you finished setting up your project and are ready to share it and its history publicly on GitHub, go to Git -> GitHub -> Share Project on GitHub.
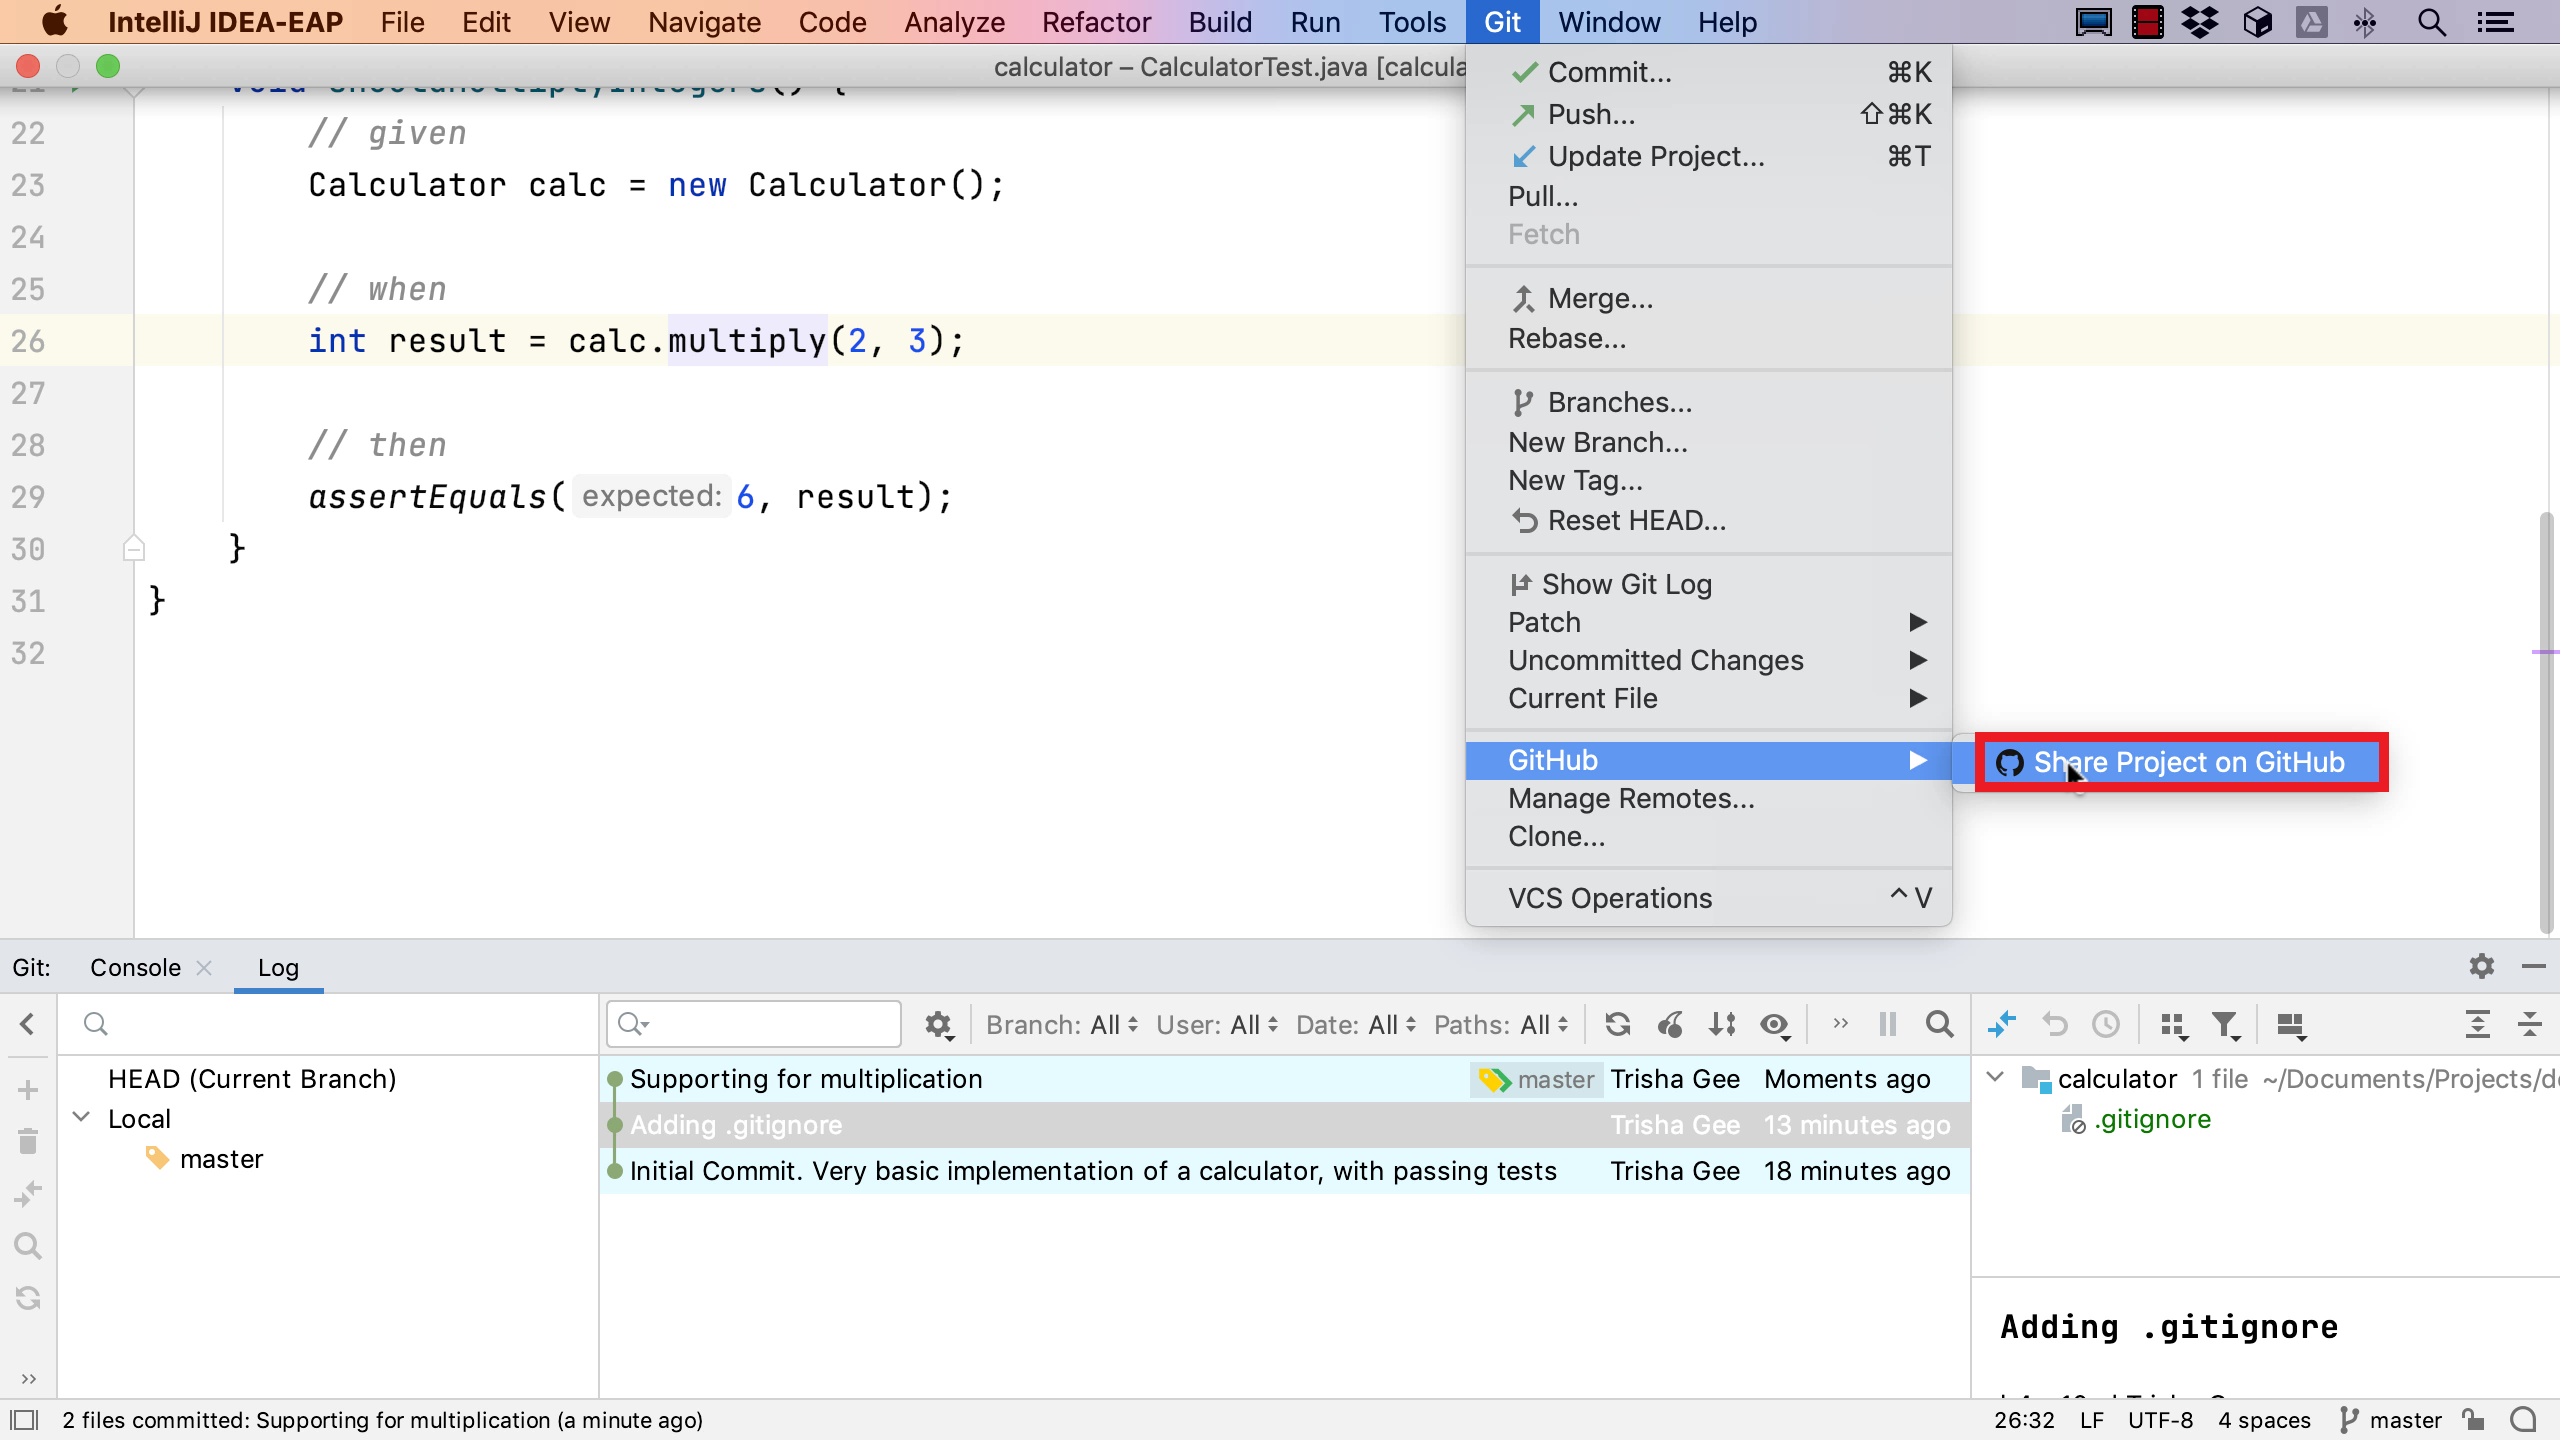
We recommend not waiting too long to push your project to GitHub since putting the project on a remote server like GitHub means that the code is safely backed up to another location.
If you’re already logged in to GitHub via IntelliJ IDEA, you don’t need to re-authenticate. We need to give the repository a name, this needs to be a unique repository name for the GitHub account it will live in. We can rename the remote here if we like, or leave it as origin. We can optionally add a description to help others understand what this project is. When we press Enter or Share, IntelliJ IDEA will create a new repository on GitHub under the account and push this code to that repository. The balloon notification shows when this is complete, so we can click on the link and see the new repository on GitHub in a browser. We can see the code on the project, and the three commits that we made locally are now available on GitHub.
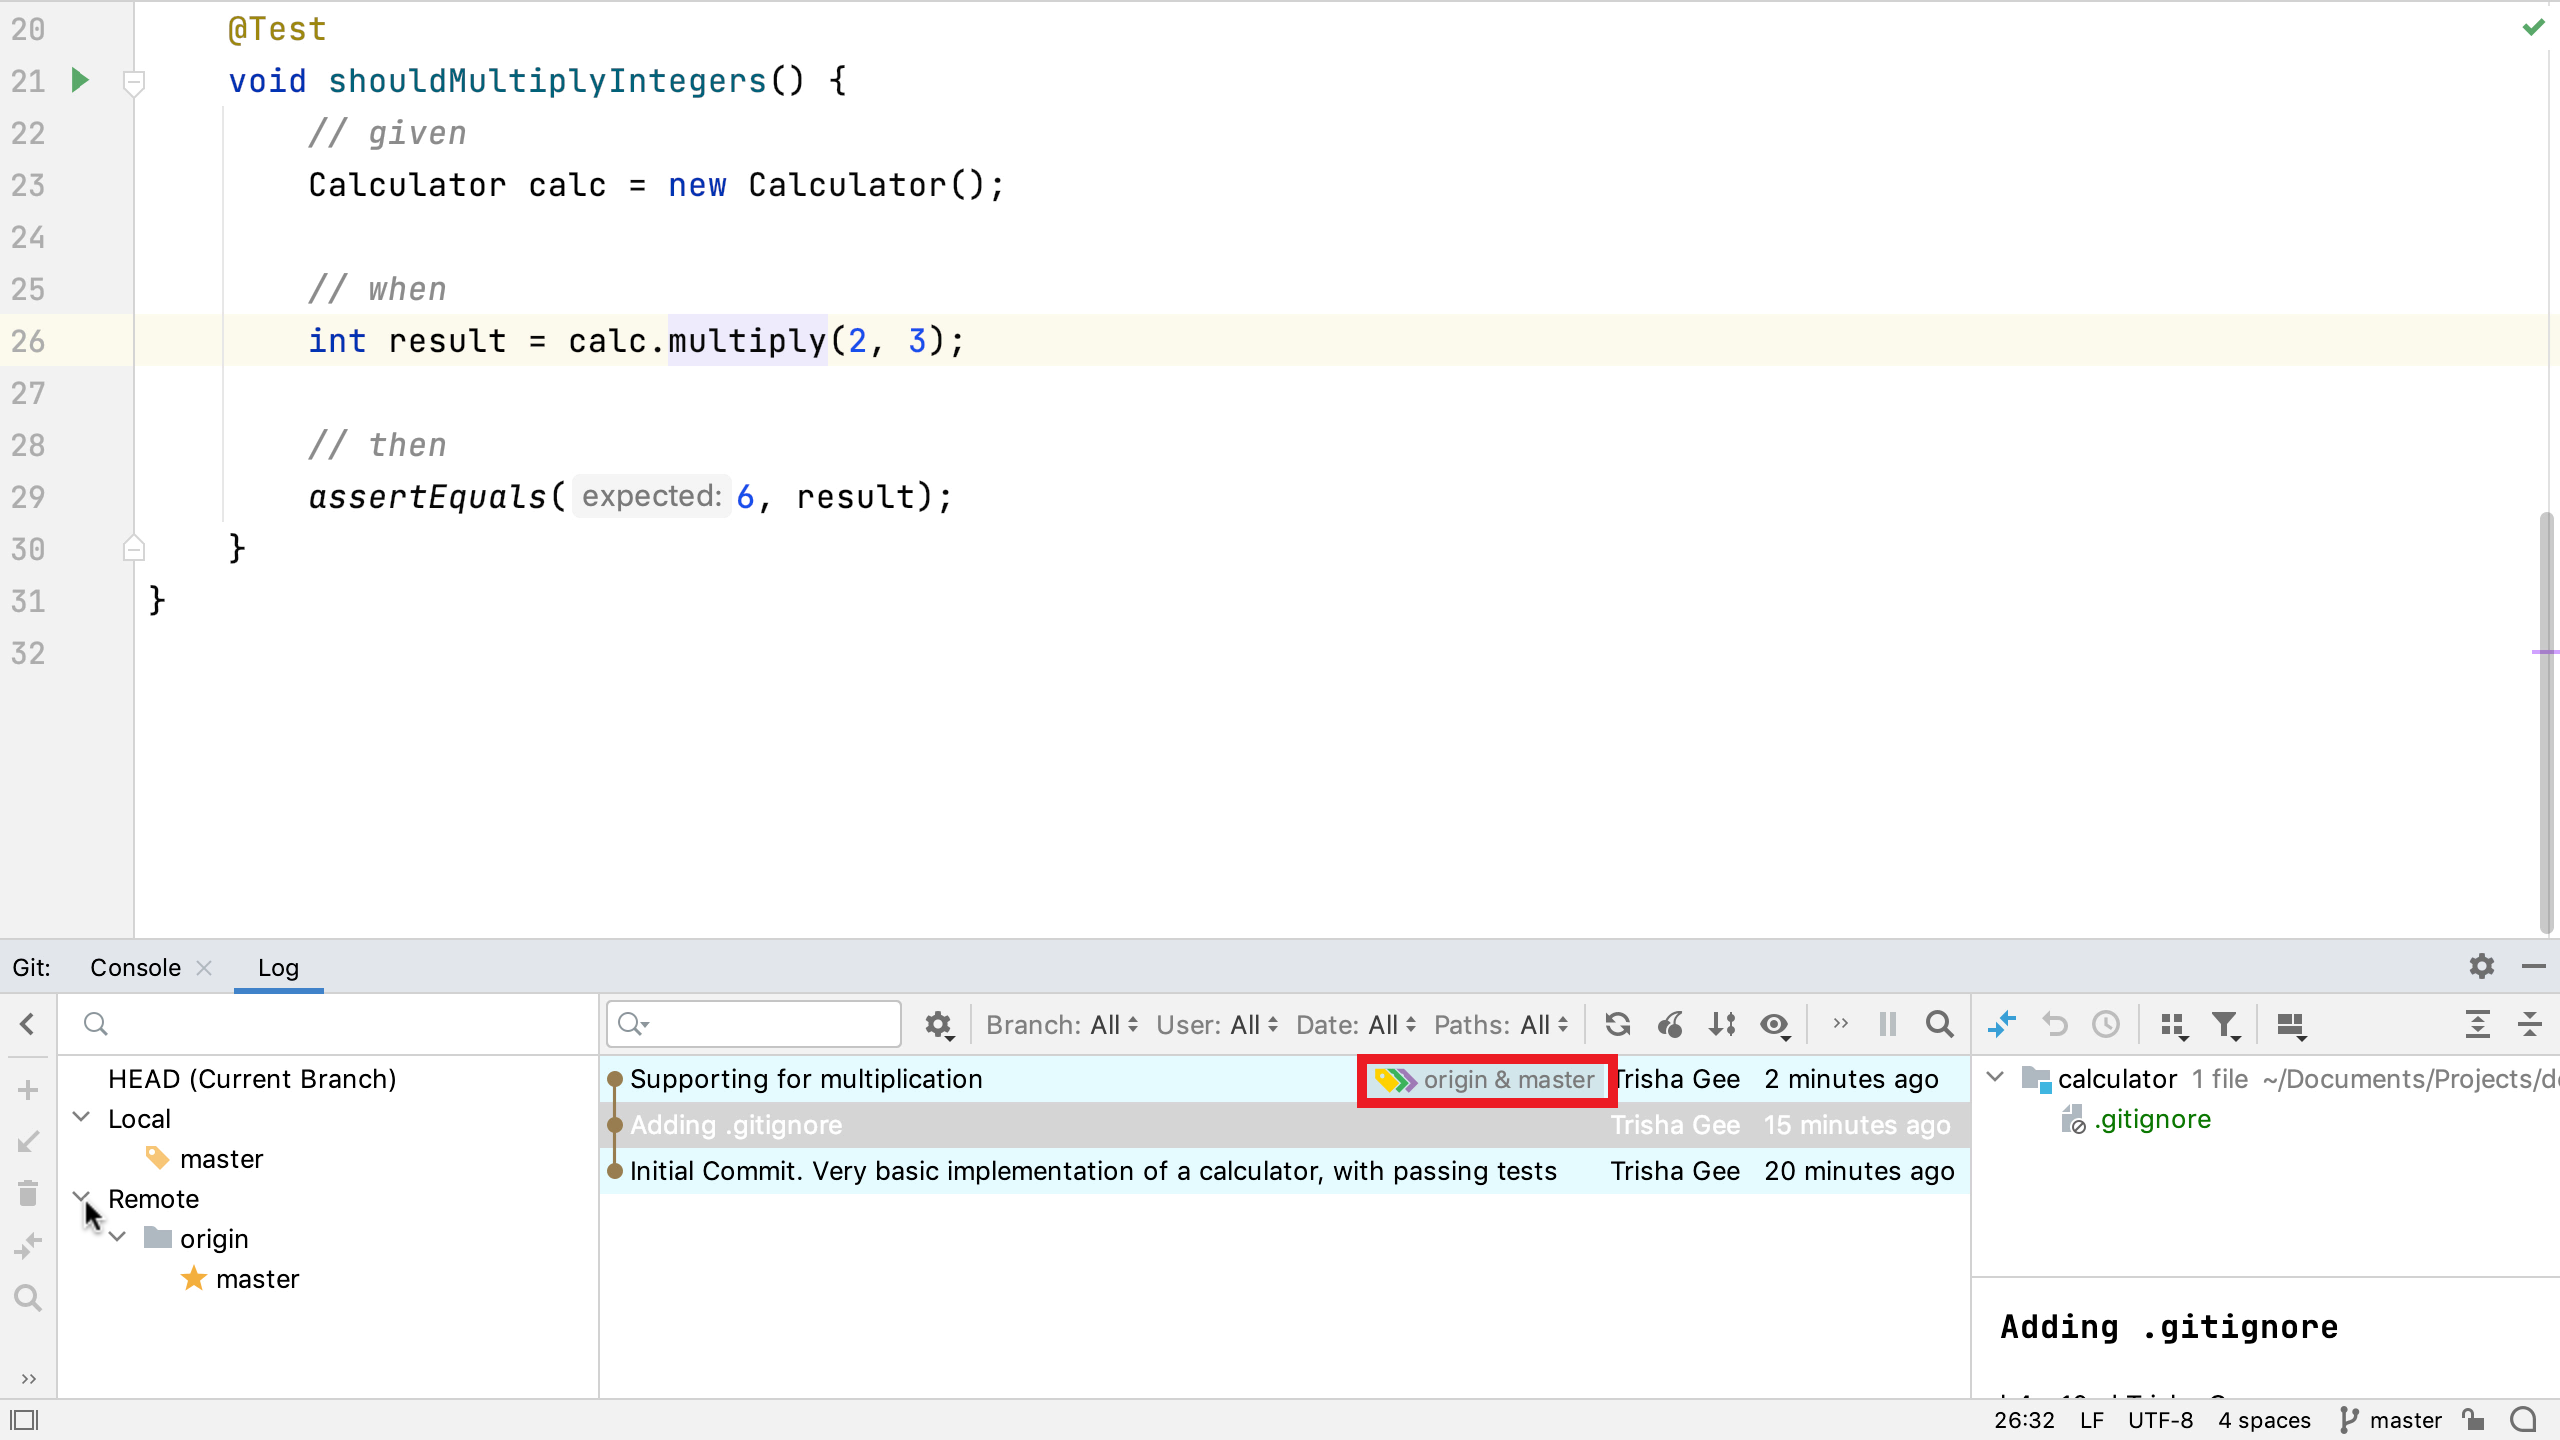
If we go back to IntelliJ IDEA, we can see the Git Log has been updated to show that the remote, origin, is also at this commit. When we expand the Remote branches we can see the master branch under the origin remote. This shows us everything has been successfully pushed to GitHub, and that IntelliJ IDEA is also up to date with all the information from the GitHub remote.
In this blog, we learned two ways to create a GitHub repository and local Git repository for an existing IntelliJ IDEA project.
See also:
- Set up a Git repository in IntelliJ IDEA
- Setting up GitHub in IntelliJ IDEA
- Using Git Integration
- Clone a Project from GitHub (includes video)