IntelliJ IDEA
IntelliJ IDEA – the Leading IDE for Professional Development in Java and Kotlin
How to Use Flyway for Database Migrations in Spring Boot Applications
Most software applications use SQL databases on account of their reliability, consistency, and maturity when it comes to handling structured data. The database schema evolves over time as business requirements change to add new features or update existing ones.
Object-relational mapping (ORM) frameworks like JPA/Hibernate provide an easy way to generate a database schema based on JPA entities, which can be convenient during development. For example, while using Spring Data JPA, you can configure the property spring.jpa.hibernate.ddl-auto=update to automatically create or update tables based on JPA entities.
However, automatically updating the database schema based on JPA entity changes is risky and error-prone, especially in production environments. Instead, it is recommended to use a database migration tool like Flyway.
In this article, you will learn about the following topics:
- Why using a database migration tool like Flyway is a good idea
- How Flyway works
- How to integrate Flyway with your Spring Boot application
- How IntelliJ IDEA helps you to generate Flyway migration scripts easily
Prerequisites
To follow along with this tutorial, Please install the following software:
- Java 17 or later
- Docker (installation instructions)
- IntelliJ IDEA
1. Why use a database migration tool?
While ORM frameworks provide the ability to generate and update database schema based on JPA entity models, automatically updating your database schema based on JPA entity changes alone is risky and error-prone, especially in production environments.
The following are some of the issues associated with using JPA/Hibernate ddl-auto=true to apply database changes based on entity changes:
- While ORM frameworks try their best to map object properties to appropriate column types, they may not always map to the expected data types.
- JPA entity updates may not result in the expected DDL changes. For example, if you rename an entity property, then instead of renaming the column name, JPA/Hibernate creates a new column, leaving the old column unchanged.
- JPA/Hibernate’s schema update mechanism doesn’t account for vendor-specific optimizations, such as custom column types, table partitions, or index types. This can limit performance tuning or lead to suboptimal database performance.
For these reasons, it is recommended to use a database migration tool like Flyway.
In this article, we will explore how to use Flyway database migrations in a Spring Boot application.
2. Introduction to Flyway
Flyway is an open-source database migration tool that simplifies the process of managing and versioning database schema changes.
With Flyway, migration scripts are stored alongside application code, following a consistent, versioned approach that allows teams to manage database changes as part of their regular development workflow. Flyway supports a wide range of databases, including MySQL, PostgreSQL, Oracle, SQL Server, and many others.
Flyway uses a simple versioning system to manage migration scripts. Each script is assigned a unique version number (e.g. V1__init.sql, V2__create_articles_table.sql), which Flyway uses to track which scripts have been applied and which are pending.
The naming convention for versioned migrations is:{Prefix}{Version}{Separator}{Description}{Suffix}
By default, for versioned migrations, {Prefix} is V, {Separator} is __, and {Suffix} is .sql.
Some example names for Flyway database migrations are:
V1__Init_Setup.sqlV2__Add_status_col.sqlV3.1__create_url_index.sqlV3.2__add_updated_by_column_to_bookmarks_table.sqlV4__Add_tags_table.sql
Once the migration scripts are created, you can apply them to a database either using the Flyway Java API or using the Flyway Maven or Gradle plugin.
Once applied, Flyway keeps track of the applied migrations in a table called flyway_schema_history as shown below:

IMPORTANT: One of the key benefits of using versioned database migrations is to make it possible to reproduce the database creation process and know when a particular change has been introduced. This being the case, once a migration is applied to the database, you should not update the contents of the applied migration file. To make any changes to the database schema, you should always create a new migration script.
3. Run a PostgreSQL database instance using Docker
If you don’t have a PostgreSQL database running, you can use Docker to run a PostgreSQL database container using the following command:
docker run -p 5432:5432 \
 -e POSTGRES_PASSWORD=postgres \
 -e POSTGRES_USER=postgres \
 -e POSTGRES_DB=postgres \
    postgres:17
This command will pull the postgres:17 Docker image from Docker Hub if it hasn’t already been pulled, start a Postgres container, and map container port 5432 to host port 5432. The username, password, and database values are passed using environment variables.
4. Create a Spring Boot project
Let’s start by creating a new Spring Boot project and adding the following dependencies:
- Spring Web
- Validation
- Spring Data JPA
- PostgreSQL Driver
- Flyway Migration
NOTE: If you are new to Spring Boot, then please check out the How to Build a CRUD REST API Using Spring Boot article to get started with Spring Boot.
Once the project has been created and opened in the IDE, you should see the following Flyway dependencies in the build.gradle file:
implementation 'org.flywaydb:flyway-core'
implementation 'org.flywaydb:flyway-database-postgresql'
As we have selected PostgreSQL Driver, the flyway-database-postgresql dependency should have been added. If you are using a different database then you need to make sure the respective Flyway database dependency has been added.
Spring Boot provides out-of-the-box support for Flyway database migrations. Once the Flyway Migrations dependency is added, you can add your Flyway migration scripts in the src/main/resources/db/migration directory. When you start the application, Spring Boot will apply the pending Flyway migrations automatically.
Let’s configure the database connection properties in the src/main/resources/application.properties file as follows:
spring.datasource.url=jdbc:postgresql://localhost:5432/postgres
spring.datasource.username=postgres
spring.datasource.password=postgres
5. Starting with a JPA-first approach
While building a Java application using JPA, we can either follow the JPA-first or Database-first approach. Let’s say we want to go with the JPA-first approach by first creating the JPA entities instead of creating the database schema.
First, let’s create a JPA entity called Bookmark with the properties id, title, url, createdAt, and updatedAt as follows:
package com.jetbrains.bookmarks;

import jakarta.persistence.*;
import jakarta.validation.constraints.NotNull;
import jakarta.validation.constraints.Size;
import org.hibernate.annotations.ColumnDefault;
import java.time.Instant;

@Entity
@Table(name = "bookmarks")
public class Bookmark {
    @Id
    @GeneratedValue(strategy = GenerationType.SEQUENCE, generator = "bookmarks_id_gen")
    @SequenceGenerator(name = "bookmarks_id_gen", sequenceName = "bookmark_id_seq")
    @Column(name = "id", nullable = false)
    private Long id;

    @Size(max = 200)
    @NotNull
    @Column(name = "title", nullable = false, length = 200)
    private String title;

    @Size(max = 500)
    @NotNull
    @Column(name = "url", nullable = false, length = 500)
    private String url;

    @NotNull
    @ColumnDefault("now()")
    @Column(name = "created_at", nullable = false)
    private Instant createdAt;

    @Column(name = "updated_at")
    private Instant updatedAt;

    // setters & getters
}
For the Bookmark entity, we’re using the database sequence-based primary key generation strategy.
Now, we want to create our first Flyway migration for creating the bookmarks table. We can create the Flyway migration scripts manually or use IntelliJ IDEA’s support to generate the migrations from JPA entities.
NOTE: IntelliJ IDEA provides support for working with Flyway that makes it easy to create Flyway migrations.
6. Creating Flyway migrations manually
We can manually create a file with the name V1__create_bookmarks_table.sql under the src/main/resources/db/migration directory with the following content:
CREATE SEQUENCE IF NOT EXISTS bookmark_id_seq START WITH 1 INCREMENT BY 50;

CREATE TABLE bookmarks
(
   id         BIGINT                                    NOT NULL,
   title      VARCHAR(200)                              NOT NULL,
   url        VARCHAR(500)                              NOT NULL,
   created_at TIMESTAMP WITHOUT TIME ZONE DEFAULT NOW() NOT NULL,
   updated_at TIMESTAMP WITHOUT TIME ZONE,
   CONSTRAINT pk_bookmarks PRIMARY KEY (id)
);
What if you are not sure how to write DDL statements or are unfamiliar with the syntax and column data types for your database? Imagine how much easier it would be if your IDE could generate these statements for you based on the specific database you’re using. Well, IntelliJ IDEA can do exactly that!
7. Generating Flyway migrations using IntelliJ IDEA
Instead of creating the migration script manually, we can use IntelliJ IDEA’s support to generate the initial Flyway migration from the existing JPA entities.
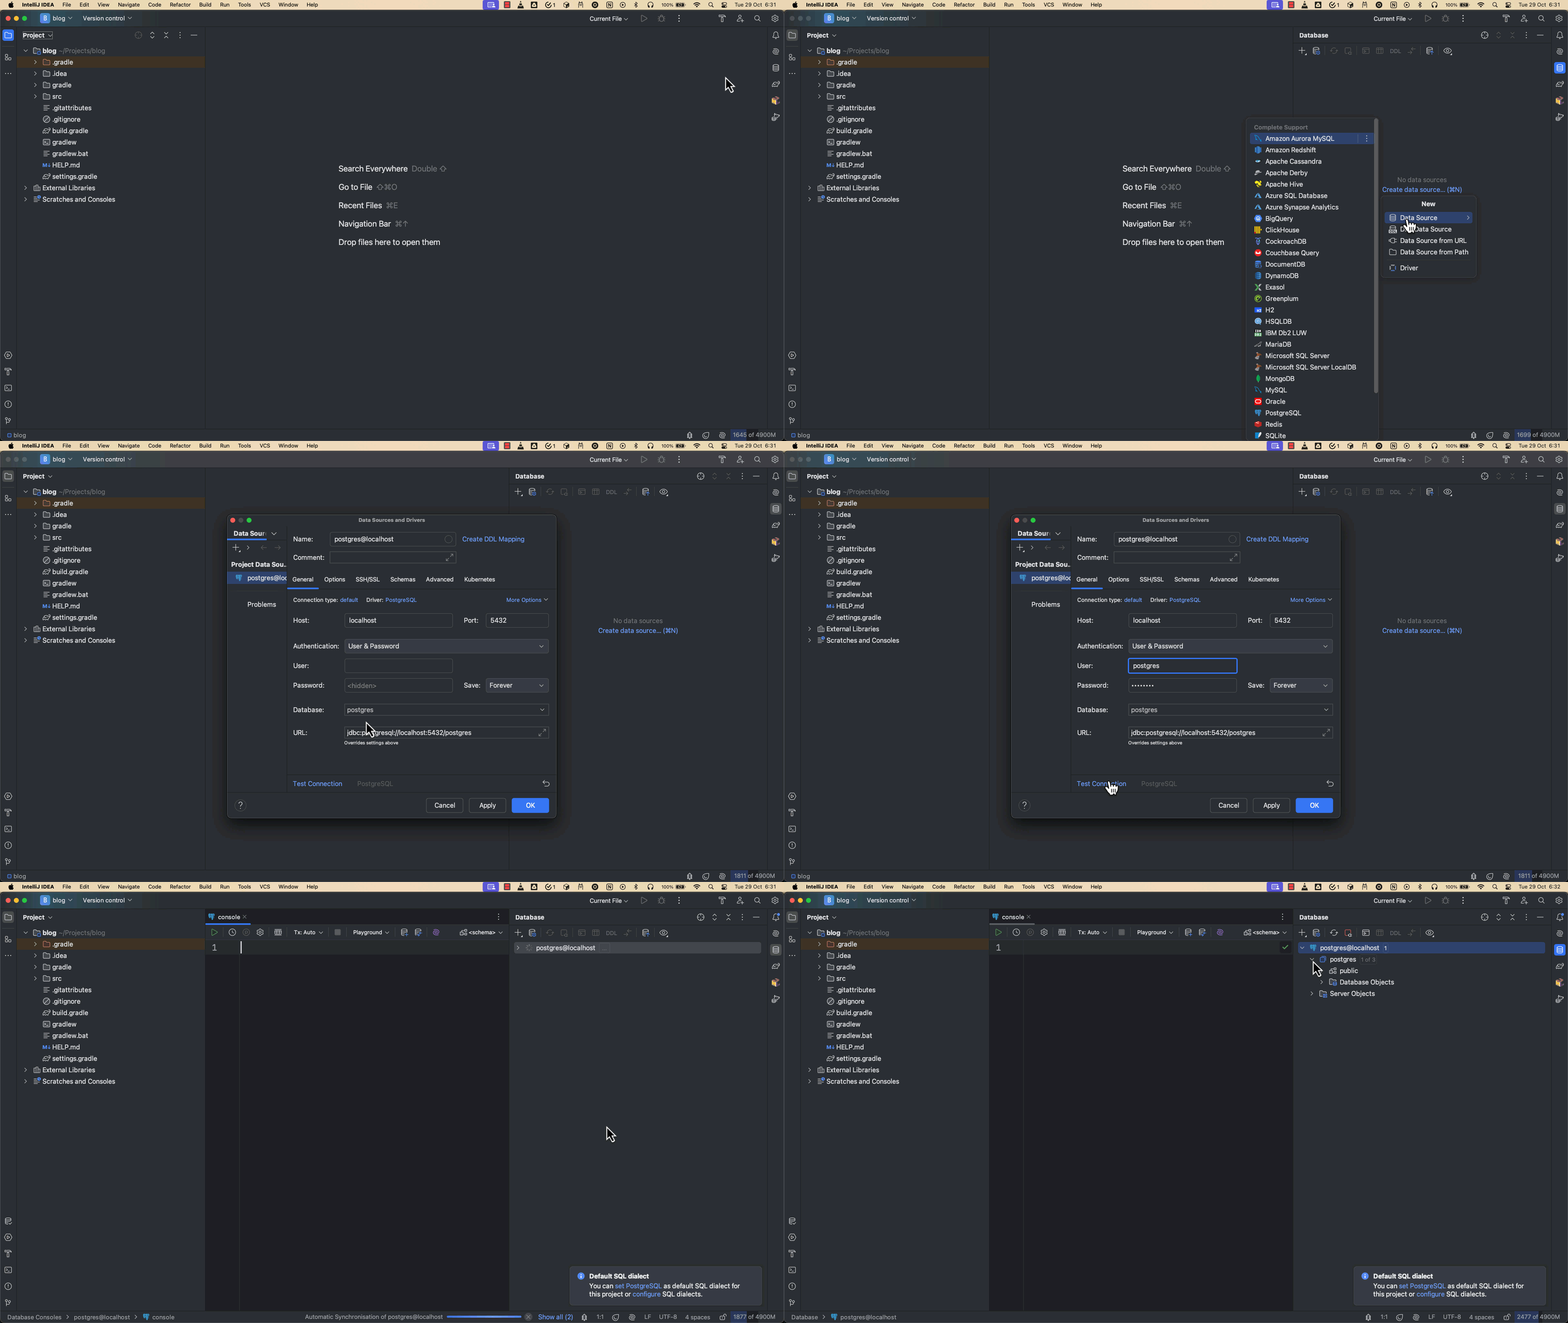
First, let’s connect to the PostgreSQL database using IntelliJ IDEA’s database tools support and the following connection parameters:
Host: localhost
Port: 5432
Username: postgres
Password: postgres
Database: postgres
You can open the Database tool window either by clicking on the database icon on the right-hand side toolbar or by going to View | Tool Windows | Database. Create a new data source for the PostgreSQL type and click on Test Connection to verify whether the database connection can be established successfully or not.

Now, open the Persistence tool window by going to View | Tool Windows | Persistence. Then, right-click on the main persistence unit, and select New | Flyway Init Migration.

Then, in the Flyway Init Schema Migration dialog, select Model as the Source type, PostgreSQL as the DB type, and then click OK.

Now, IntelliJ IDEA will inspect the existing JPA models and show you the preview of the Flyway database migration script that is going to be generated.

Create a File name according to the Flyway naming convention: V1__create_bookmarks_table.sql, and click Save. Now, the V1__create_bookmarks_table.sql file will be created under the src/main/resources/db/migration directory.
Now, if you run the Spring Boot application, the first Flyway migration ( V1__create_bookmarks_table.sql) will be applied and the bookmarks table will be created.
8. Modify JPA entities and generate new migrations
As we have database migrations applied, we have both the JPA entity and database schema in sync. But as the application evolves, we may need to create new entities or modify existing ones based on our requirements. In this case, we need to keep track of what specific changes we made to existing entities so that we can create a corresponding migration script for those changes.
Let’s say we want to categorize the bookmarks and also add an additional column called status to indicate whether a bookmark is in DRAFT or PUBLISHED state.
Create a new JPA entity called Category as follows:
package com.jetbrains.bookmarks;

import jakarta.persistence.Entity;
import jakarta.persistence.GeneratedValue;
import jakarta.persistence.GenerationType;
import jakarta.persistence.Id;
import jakarta.persistence.SequenceGenerator;
import jakarta.persistence.Table;

@Entity
@Table(name = "categories")
public class Category {
   @Id
   @GeneratedValue(strategy = GenerationType.SEQUENCE, generator = "category_id_generator")
   @SequenceGenerator(name = "category_id_generator", sequenceName = "category_id_seq")
   private Long id;

   private String name;

   // setters and getters
}
Update our Bookmark entity to add a String type property called status with a default value of DRAFT and a ManyToOne association with Category as follows:
package com.jetbrains.bookmarks;

import jakarta.persistence.Column;
import jakarta.persistence.Entity;
import jakarta.persistence.FetchType;
import jakarta.persistence.GeneratedValue;
import jakarta.persistence.GenerationType;
import jakarta.persistence.Id;
import jakarta.persistence.JoinColumn;
import jakarta.persistence.ManyToOne;
import jakarta.persistence.SequenceGenerator;
import jakarta.persistence.Table;
import org.hibernate.annotations.ColumnDefault;

import java.time.Instant;

@Entity
@Table(name = "bookmarks")
public class Bookmark {
   //...
   @ColumnDefault("'DRAFT'")
   @Column(name = "status", nullable = false)
   private String status;

   @ManyToOne(fetch = FetchType.LAZY)
   @JoinColumn(name = "category_id")
   private Category category;

   // setters and getters
}
To make the corresponding changes to the database schema, we need to create the second Flyway migration script.
But, manually keeping track of the changes made to JPA entities and creating the migrations is tedious and error-prone.
So, instead of creating the script manually, we can use IntelliJ IDEA to generate the Flyway migration based on the differences between JPA entities and the existing database schema.
From the Persistence tool window, right-click on the main persistence unit, and select New | Flyway Migration. Then in the Flyway Diff Migration dialog, select Model as the Source, DB as Target, and then click OK.
Now, IntelliJ IDEA will inspect the JPA models and the existing database schema and show you a preview of the Flyway database migration script that is going to be generated.
Give the File name as V2__add_status_category_to_bookmarks.sql, and click Save.

Now, this V2__add_status_category_to_bookmarks.sql file will be created under the src/main/resources/db/migration directory with the following content:
CREATE SEQUENCE IF NOT EXISTS category_id_seq START WITH 1 INCREMENT BY 50;

CREATE TABLE categories
(
   id   BIGINT NOT NULL,
   name VARCHAR(255),
   CONSTRAINT pk_categories PRIMARY KEY (id)
);

ALTER TABLE bookmarks
   ADD category_id BIGINT;

ALTER TABLE bookmarks
   ADD status VARCHAR(255) DEFAULT 'DRAFT';

ALTER TABLE bookmarks
   ALTER COLUMN status SET NOT NULL;

ALTER TABLE bookmarks
   ADD CONSTRAINT FK_ARTICLES_ON_CATEGORY FOREIGN KEY (category_id) REFERENCES categories (id);
As you can see, the second Flyway migration script generated contains the SQL script to create a categories table, as well as add a category_id foreign key and a status column with a default value of DRAFT to the bookmarks table.
If you restart the Spring Boot application and check the database, the categories table should have been created and the category_id and status columns should have been added to the bookmarks table.
9. Update existing JPA entities from database schema changes
So far we have seen how to generate Flyway migrations from JPA entities. What if we want to create a Flyway migration script manually, apply it to the database, and then update the JPA entities according to those database schema changes?
To do this, let’s create a third Flyway migration script with file name V3__add_published_at_col_to_bookmarks.sql and the following content:
ALTER TABLE bookmarks ADD published_at timestamp;
We are now adding a new column called published_at to the bookmarks table.
Restart the Spring Boot application and ensure that the published_at column has been added to the bookmarks table.
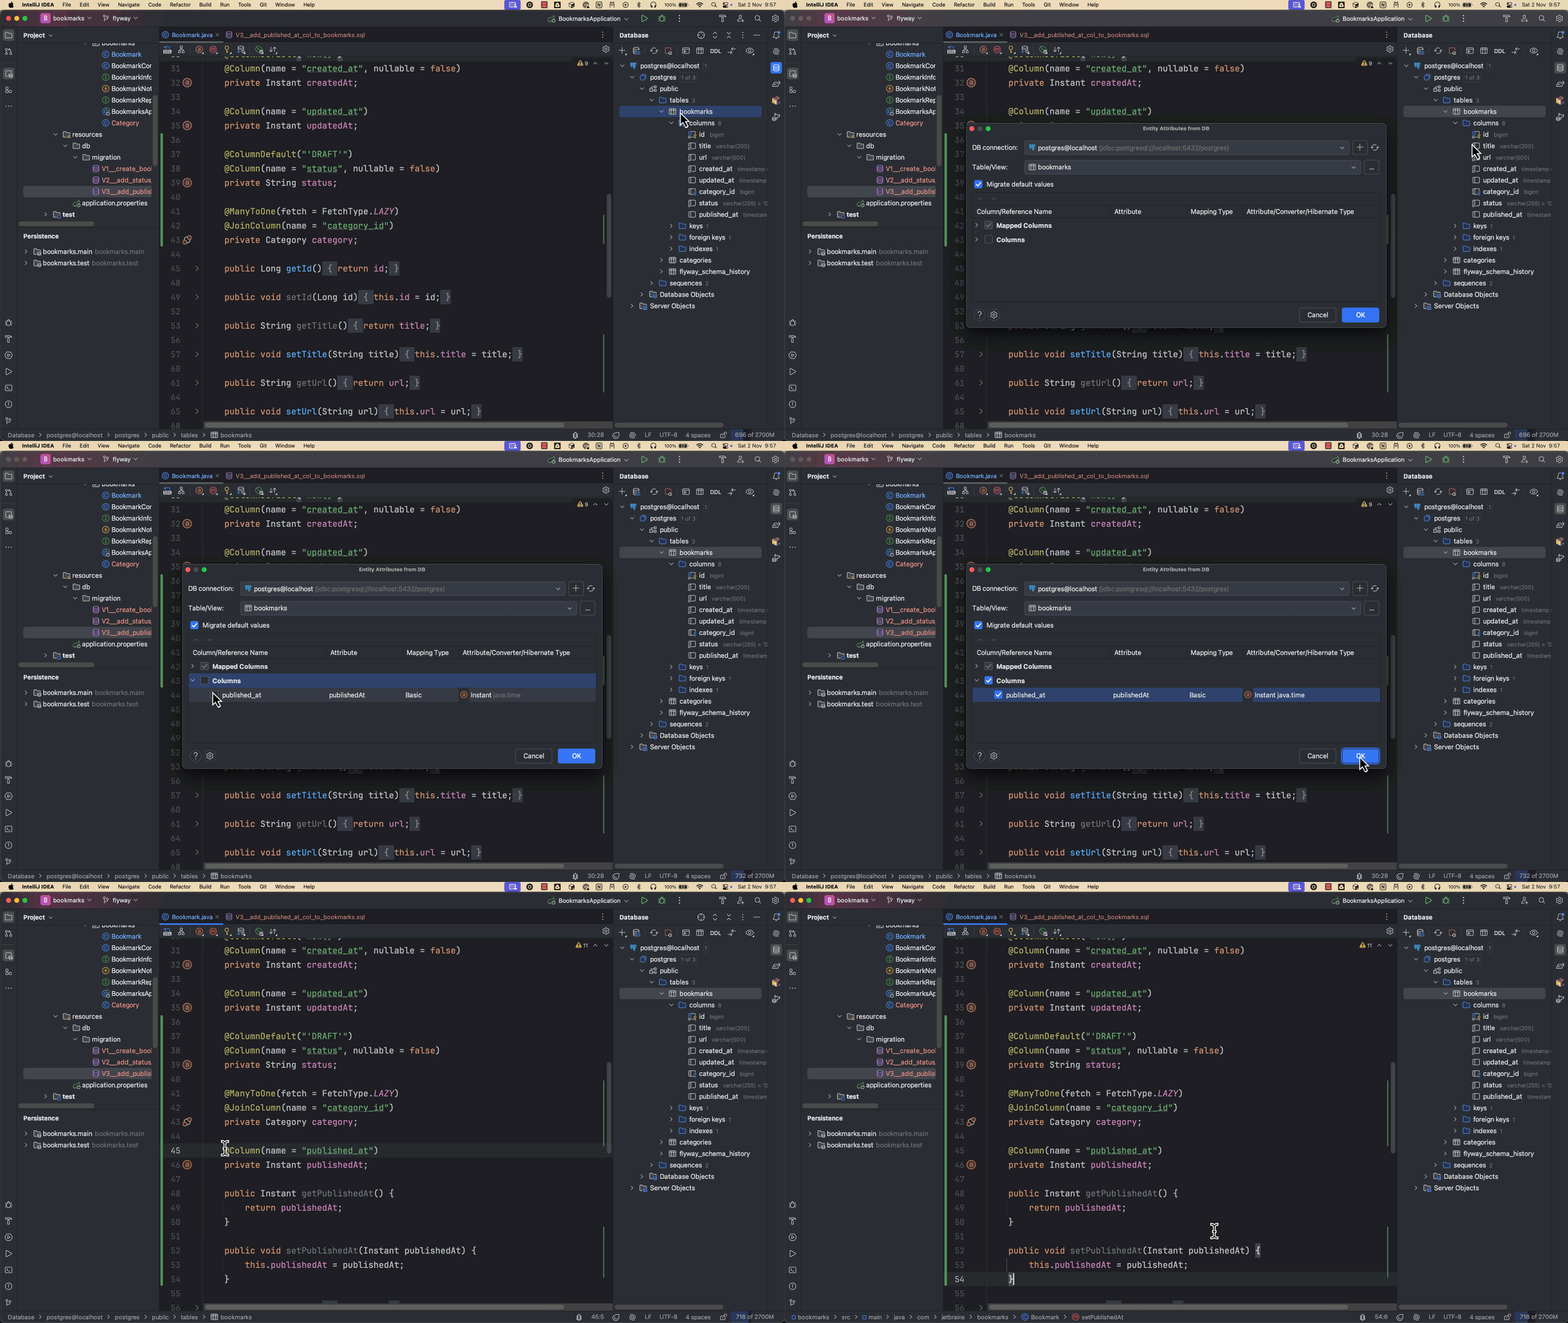
To keep both the database schema and JPA entities in sync, we need to add a publishedAt property to the Bookmark entity. Instead of making those changes manually, we can use IntelliJ IDEA’s feature to add or update entity attributes from the database.
In the Database tools window, right-click on the bookmarks table and select Create Entity Attributes from DB. The Entity Attributes from DB dialog will show the columns that have not yet been added to the Bookmark entity. Select the relevant columns and click OK.

The Bookmark entity will then be updated to add the publishedAt property as follows:
package com.jetbrains.bookmarks;

import jakarta.persistence.Column;
import jakarta.persistence.Entity;
import jakarta.persistence.FetchType;
import jakarta.persistence.GeneratedValue;
import jakarta.persistence.GenerationType;
import jakarta.persistence.Id;
import jakarta.persistence.JoinColumn;
import jakarta.persistence.ManyToOne;
import jakarta.persistence.SequenceGenerator;
import jakarta.persistence.Table;
import org.hibernate.annotations.ColumnDefault;

import java.time.Instant;


@Entity
@Table(name = "bookmarks")
public class Bookmark {
   //...

   @Column(name = "published_at")
   private Instant publishedAt;

   // setters and getters
}
While you can create Flyway migrations manually, IntelliJ IDEA helps you create them automatically from JPA entity changes. What’s more, it also allows us to update the JPA entities from database changes more easily. This significantly reduces the amount of manual coding required, preventing potential errors and improving developer productivity.
Summary
In this article, we have learned how to use Flyway for managing database migrations in a Spring Boot application. While using the JPA-first approach for building JPA-based applications, IntelliJ IDEA helps in creating Flyway migrations from JPA entities. As the application evolves we can update JPA entities and generate new Flyway migrations based on the differences between JPA entities and current database schema. Finally, we have seen how we can update JPA entities directly from database changes.
To learn more about Flyway, visit the official documentation.
Subscribe to IntelliJ IDEA Blog updates


