Tutorial: Unit testing in AppCode

In this tutorial, we will write simple unit tests in AppCode using different testing frameworks — XCTest and Quick/Nimble. You will learn how to create test classes and targets, run and debug tests, explore test coverage, and more.
Requirements:
- AppCode 2019.3 or later
- Xcode 11 or later
Initial project: iOSConferences
Final project: iOSConferences
Before you start
For this tutorial, we will use the iOSConferences application that we developed in the Use CocoaPods in your project tutorial. This application displays the up-to-date list of the upcoming conferences from the cocoaconferences.com website.
Download the iOSConferences project. Open the application in AppCode using the iOSConferences.xcworkspace file so that the pods already added to the project can be recognized by the IDE.
If CocoaPods gem is not installed yet, install it:
- Click Tools | CocoaPods | Select Ruby SDK from the main menu.
-
In the Preferences dialog that opens, click Add Ruby SDK, and specify the path to the SDK (by default,
/usr/bin/ruby). - Click Install CocoaPods.
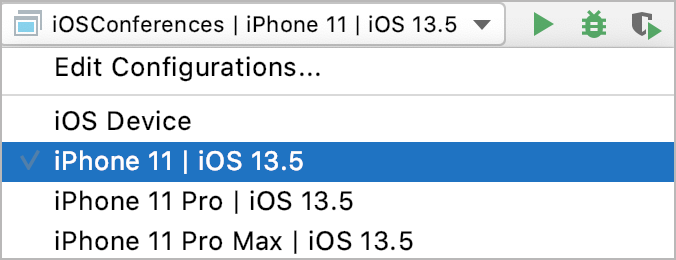
In the run/debug configuration selector, select a device or simulator to run the application on and press ⌃R or click the ![]() button:
button:
The launched application should display the list of conferences:

Step 1. Add a test target
When creating a new project, you can select the Include Unit Tests checkbox to have a test target and an XCTest class added. However, you can add it anytime while working with an existing project:
-
Press
⌘;to open the project settings. -
Click the
 button, select iOS | Test | Unit Testing Bundle from the dialog that opens, and click Next:
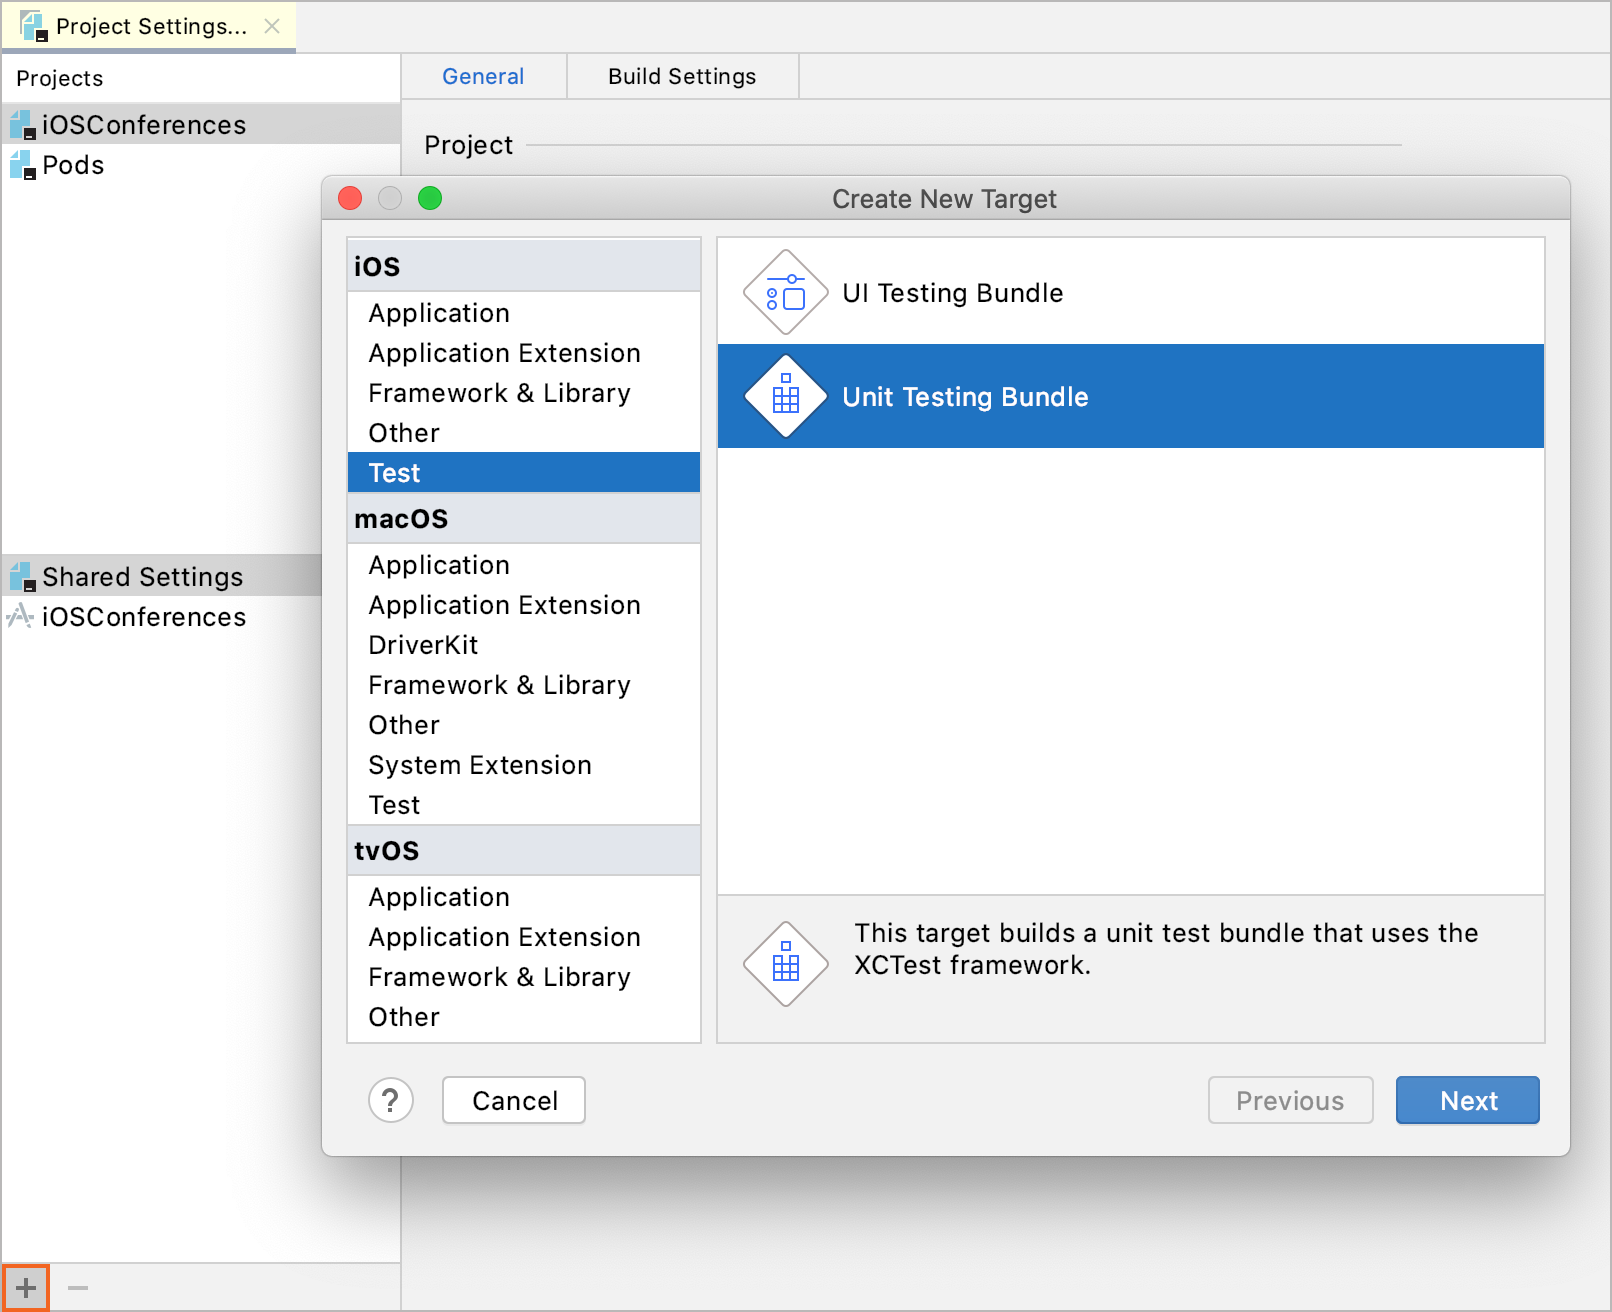
-
On the next page, leave the default values in all the fields including the automatically generated target name
iOSConferencesTestsin the Product Name field and click Finish: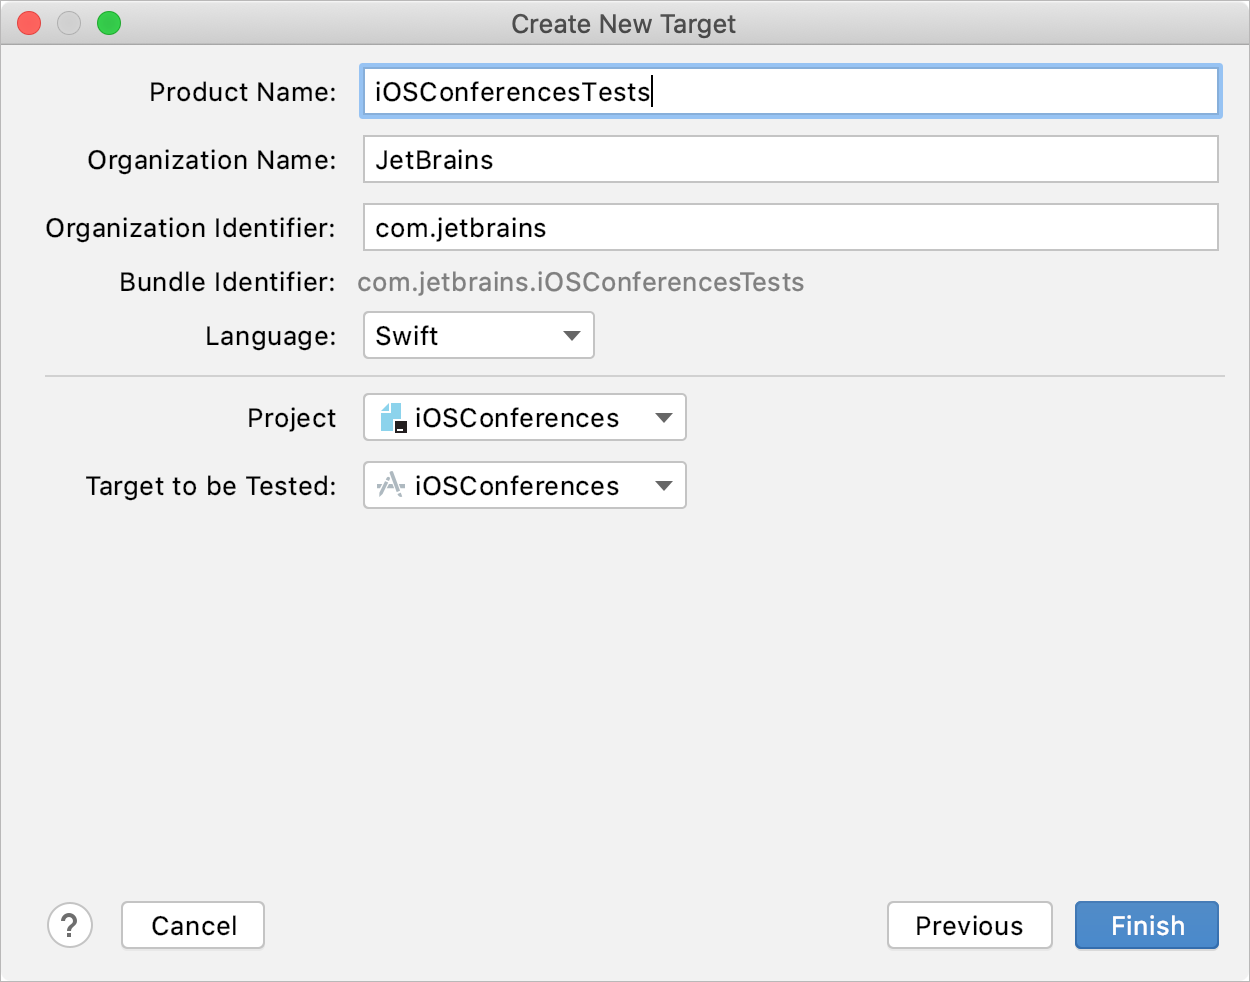
A new test target will be added to the project:
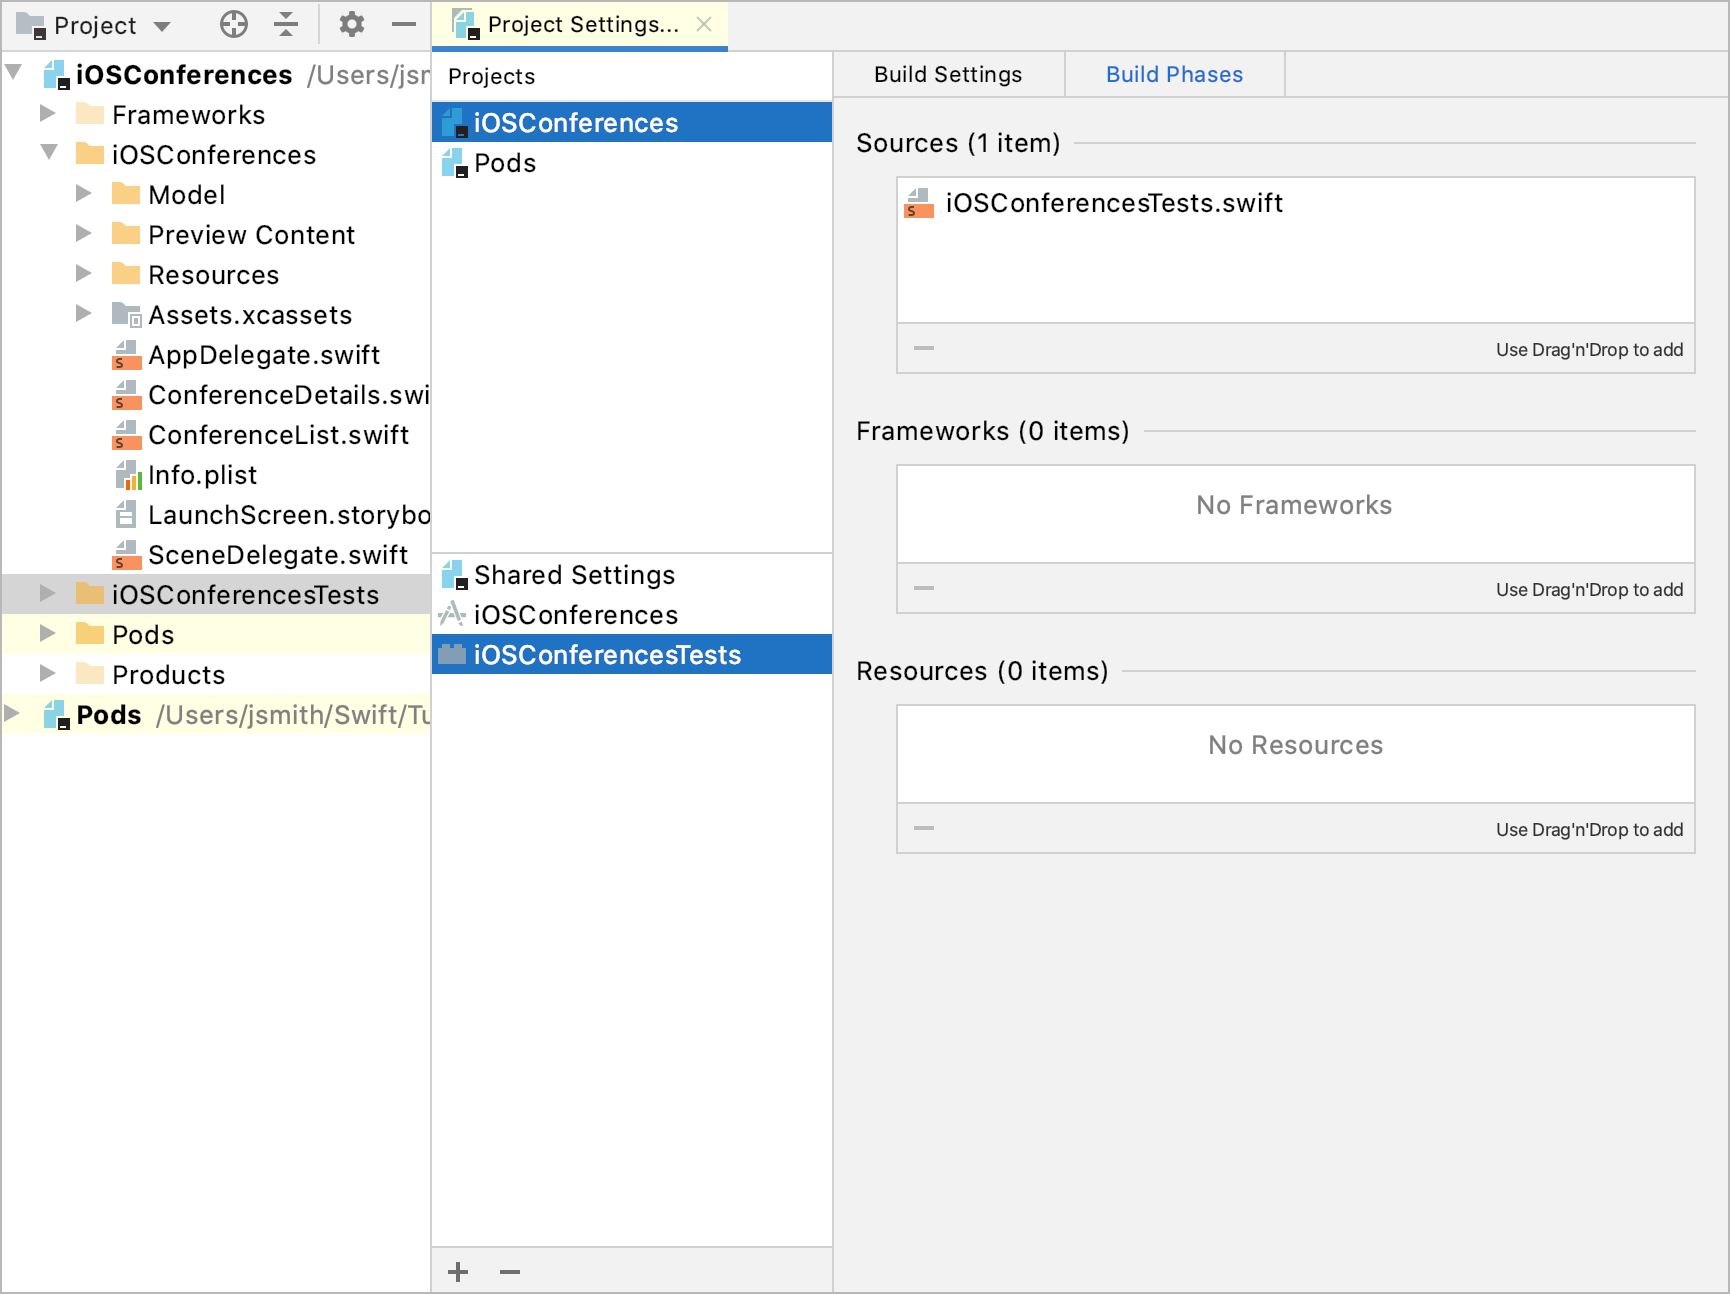
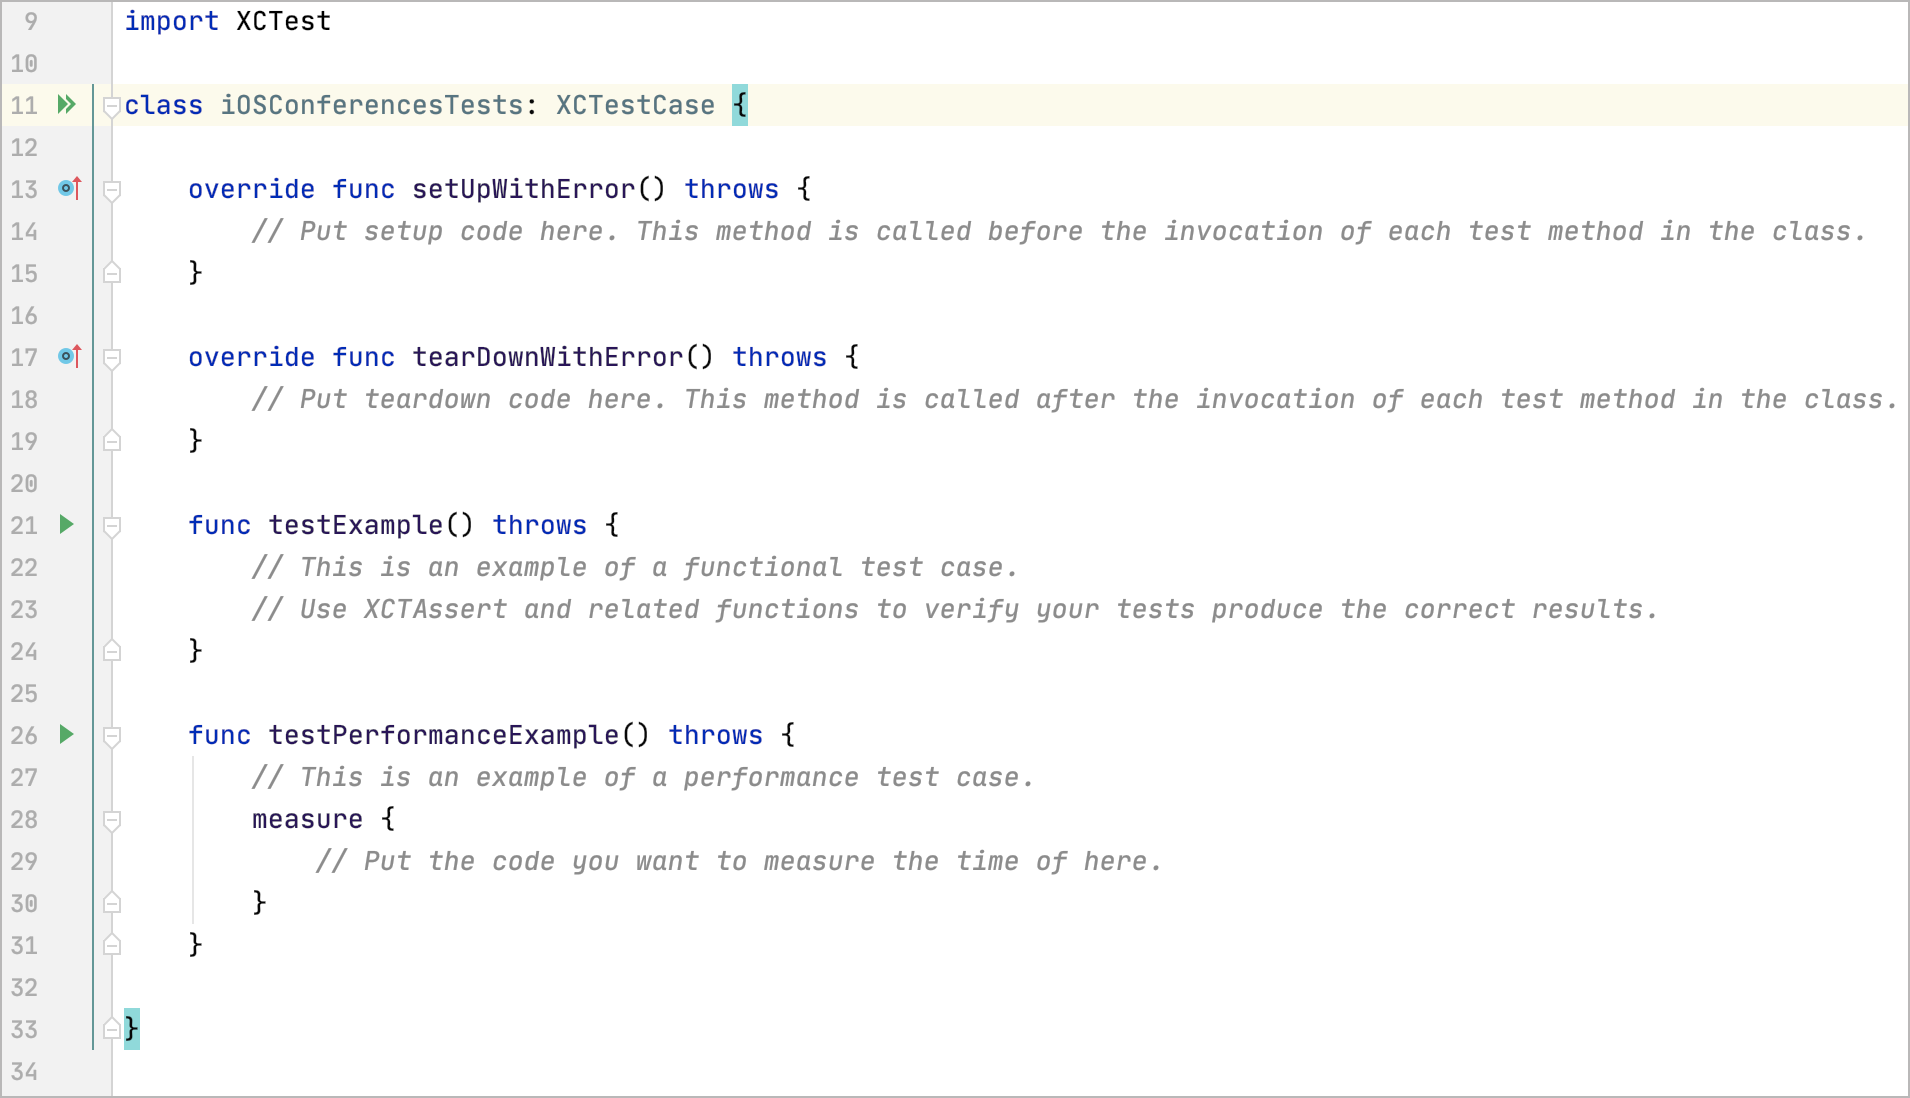
This target contains a default XCTest class with stub code for several test methods:
Step 2. Create XCTest tests
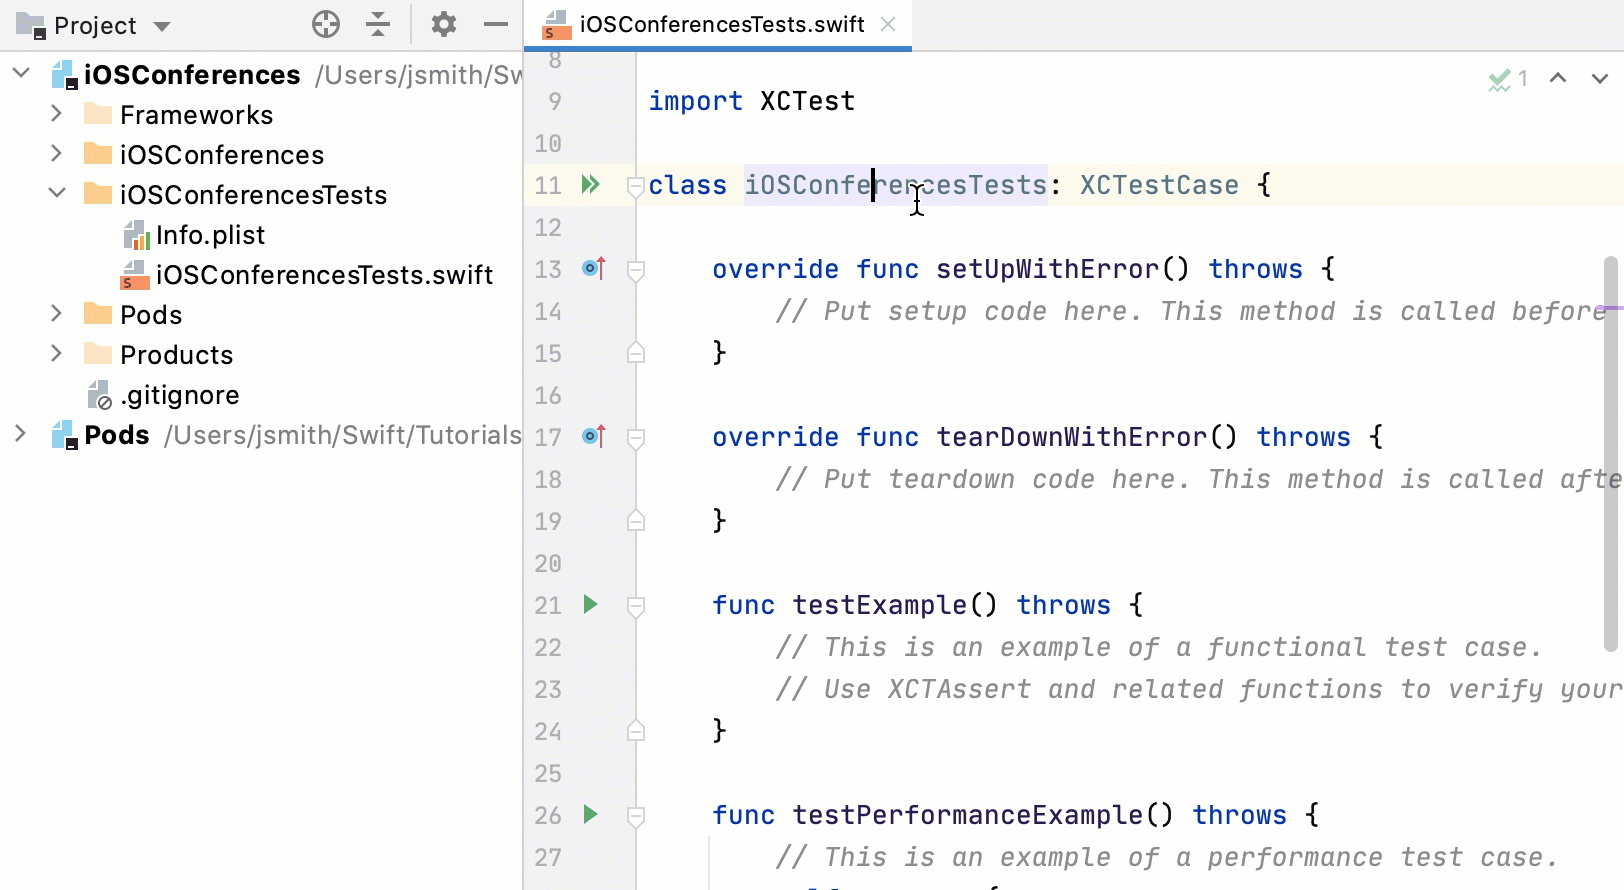
Let’s create some tests to check if the conference date is displayed correctly on the details screen. Rename the iOSConferencesTests class to DateTests using the Rename refactoring ⇧F6:
Import the Yams library that is used for decoding the YAML file:
import Yams
Make the application code available for tests by adding the following line right after the import statements:
@testable import iOSConferences
Delete all existing stub code inside the DateTests class. In the DateTests class, add the decoder instance variable:
let decoder = YAMLDecoder()
Add the following test methods:
func testSameStartEndDatesShownCorrectly() {
    let yaml = try! decoder.decode([Conference].self, from:
    """
    - name: mDevCamp
      link: https://mdevcamp.eu/
      start: 2019-05-30
      end: 2019-05-30
      location:  Prague, Czech Republic
    """
    )
    let conference: Conference = yaml[0]
    let textDate = conference.textDates()
    XCTAssertEqual(textDate, "May 30, 2019")

}

func testDateWithoutEndShownCorrectly() {
    let yaml = try! decoder.decode([Conference].self, from:
    """
    - name: mDevCamp
      link: https://mdevcamp.eu/
      start: 2019-05-30
      location:  Prague, Czech Republic
    """
    )
    let conference: Conference = yaml[0]
    let textDate = conference.textDates()
    XCTAssertEqual(textDate, "May 30, 2019")
}

func testEndEarlierThanStartReplaced() {
    let yaml = try! decoder.decode([Conference].self, from:
    """
    - name: mDevCamp
      link: https://mdevcamp.eu/
      start: 2019-05-30
      end: 2019-05-29
      location:  Prague, Czech Republic
    """
    )
    let conference: Conference = yaml[0]
    let textDate = conference.textDates()
    XCTAssertEqual(textDate, "May 29, 2019 - May 30, 2019")
}
These methods test if the application shows the conference dates correctly in some specific cases:
-
testSameStartEndDatesShownCorrectly(): if the values in thestartandendfields are the same, the application should display just one date instead of an interval (May 30, 2019instead ofMay 30, 2019 - May 30, 2019). -
testDateWithoutEndShownCorrectly(): if there is noendvalue specified for the conference, the application should display just the start date (May 30, 2019). -
testEndEarlierThanStartReplaced(): if the start date is later than the end one, they should should be replaced (May 30, 2019 - May 31, 2019instead ofMay 31, 2019 - May 30, 2019).
We will run and debug the created tests later. Now, let’s see how to create tests with the Quick and Nimble frameworks.
Step 3. Create Quick/Nimble tests
Let’s create some tests that will check if the application loads and parses the conferences data properly.
Install the Quick and Nimble frameworks
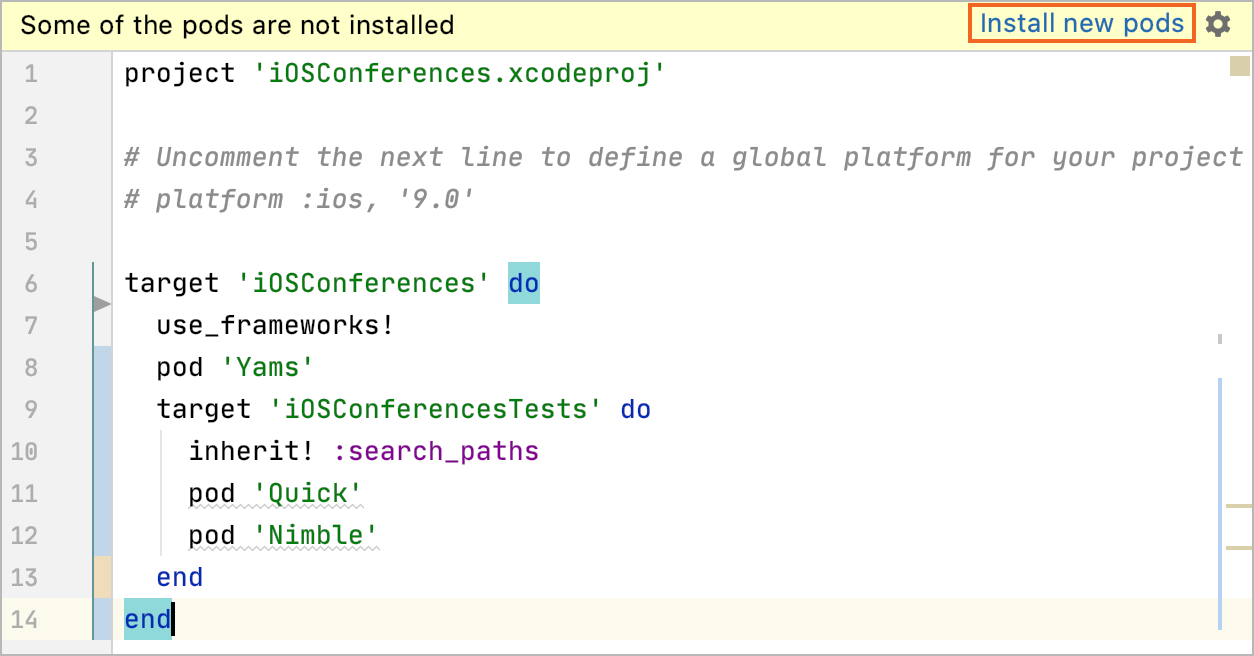
Open the existing Podfile by clicking Tools | CocoaPods | Edit Podfile in the main menu. Add the Quick and Nimble pods under the iOSConferencesTests target:
target 'iOSConferences' do
  use_frameworks!
  pod 'Yams'
  target 'iOSConferencesTests' do
    inherit! :search_paths
    pod 'Quick'
    pod 'Nimble'
  end
end
Click the Install pods link that appears in the top-right corner of the editor and wait until the two new pods are installed:
Create a new test class
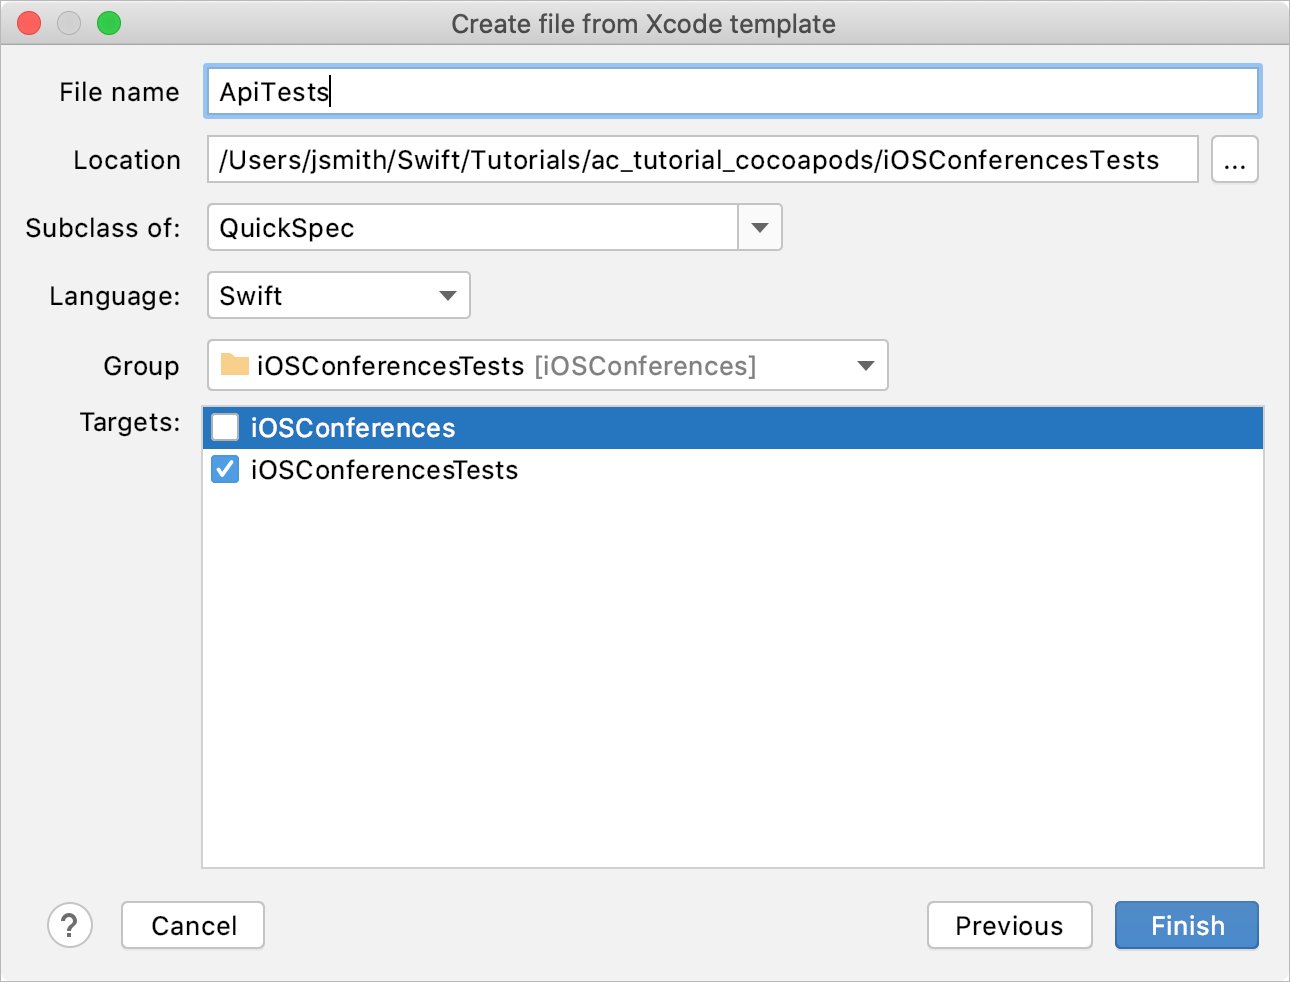
In the Project tool window ⌘1, right-click the iOSConferencesTests folder and select New | File from Xcode Template. In the dialog that opens, select iOS | Source | Unit Test Case Class and click Next.
On the next page, enter the filename — ApiTests, select Swift in the Language field, type QuickSpec in the Subclass of field, select iOSConferencesTests in the Targets list, and click Finish:
In the newly created Swift file, add the Yams, Quick, and Nimble import statements and delete all the default functions in the ApiTests class:
import XCTest
import Yams
import Quick
import Nimble

class ApiTests: QuickSpec {

}
Make the application code available for the tests by adding the following line right after the import statements:
@testable import iOSConferences
Create tests
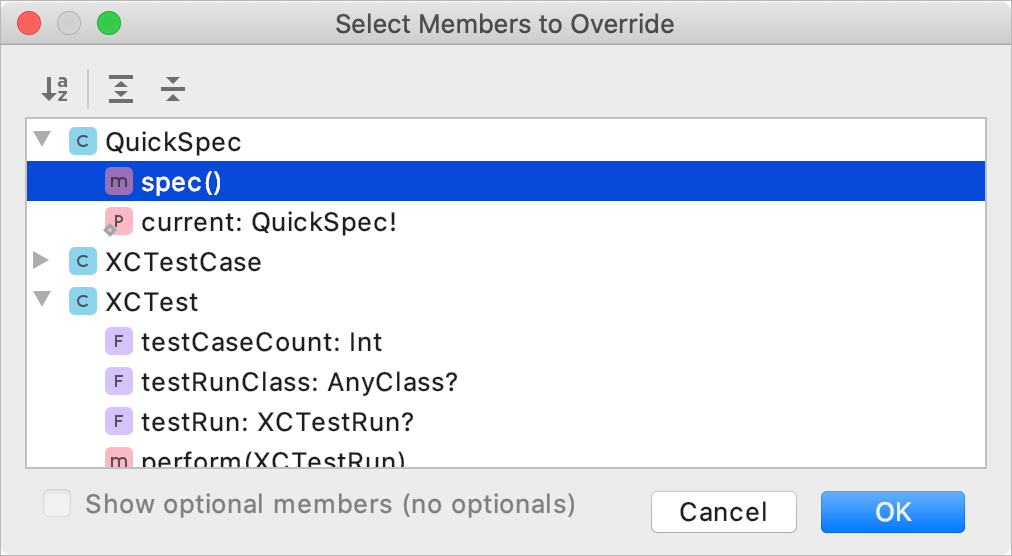
Override the spec() method of the QuickSpec class: with the caret placed inside the ApiTests class, press ⌃O and select spec() in the dialog that opens:
Inside the spec() method, add the describe block and create the decoder and loader variables there:
override func spec() {
     describe("Application") {
         let decoder = YAMLDecoder()
         let loader = ConferencesLoader()
     }
}
Inside the describe block, add the following test methods in the it blocks:
it("should load conferences") {
    waitUntil(timeout: 5) { done in
        loader.loadConferences { conferences in
            done()
        }
    }
}

it("should parse conference") {
    let yaml = try! decoder.decode([Conference].self, from:
    """
    - name: mDevCamp
      link: https://mdevcamp.eu/
      start: 2019-05-30
      end: 2019-05-30
      location:  Prague, Czech Republic
    """
    )
    let conference: Conference = yaml[0]
    expect(conference.end).toNot(beNil())
    expect(conference.name).to(equal("mDevCamp"))
    expect(conference.start).toNot(beNil())
    expect(conference.location).to(equal(" Prague, Czech Republic"))
    expect(conference.link).to(equal("https://mdevcamp.eu/"))
}

it("should ignore unused fields") {
    let yaml = try! decoder.decode([Conference].self, from:
    """
    - name: mDevCamp
      link: https://mdevcamp.eu/
      start: 2019-05-30
      end: 2019-05-30
      location:  Prague, Czech Republic
      cocoa-only: true
      cfp:
        link: https://www.papercall.io/swift-to-2020
        deadline: 2020-06-16
    """
    )
    let conference: Conference = yaml[0]
    expect(conference.end).toNot(beNil())
    expect(conference.name).to(equal("mDevCamp"))
    expect(conference.start).toNot(beNil())
    expect(conference.location).to(equal(" Prague, Czech Republic"))
    expect(conference.link).to(equal("https://mdevcamp.eu/"))
}
These methods test the following:
-
it("should load conferences"): the network request performed in the loadConferences() method doesn’t return an empty response. -
it("should parse conference"): the conference data is parsed correctly. -
it("should ignore unused fields"): the conferences with fields not handled by the application (such ascocoa-onlyorcfp) are parsed correctly.
Step 4. Run and debug tests
In AppCode, you can quickly run and debug all methods in a test class as well as single methods (for XCTest) using the gutter icons in the editor the ![]() /
/![]() or the
or the ⌃⇧R/⌃⇧D shortcuts. In this case, a temporary run/debug configuration is created which you can save and edit when needed.
For the XCTest framework, you can also run an arbitrary set of methods of one class by selecting and running ⌃⌘R them from the Run tool window or by creating a separate run/debug configuration where these methods are listed.
In this tutorial, we will create a run/debug configuration for running all the test classes available in the project, debug and fix failed tests, and check how much of the application code our tests cover.
Run all tests in project
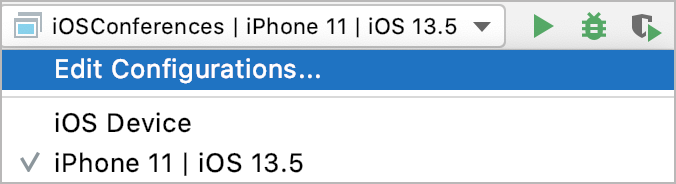
To run all test classes in the test target, you need to create a special run/debug configuration. In the run/debug configuration selector, click Edit Configurations:
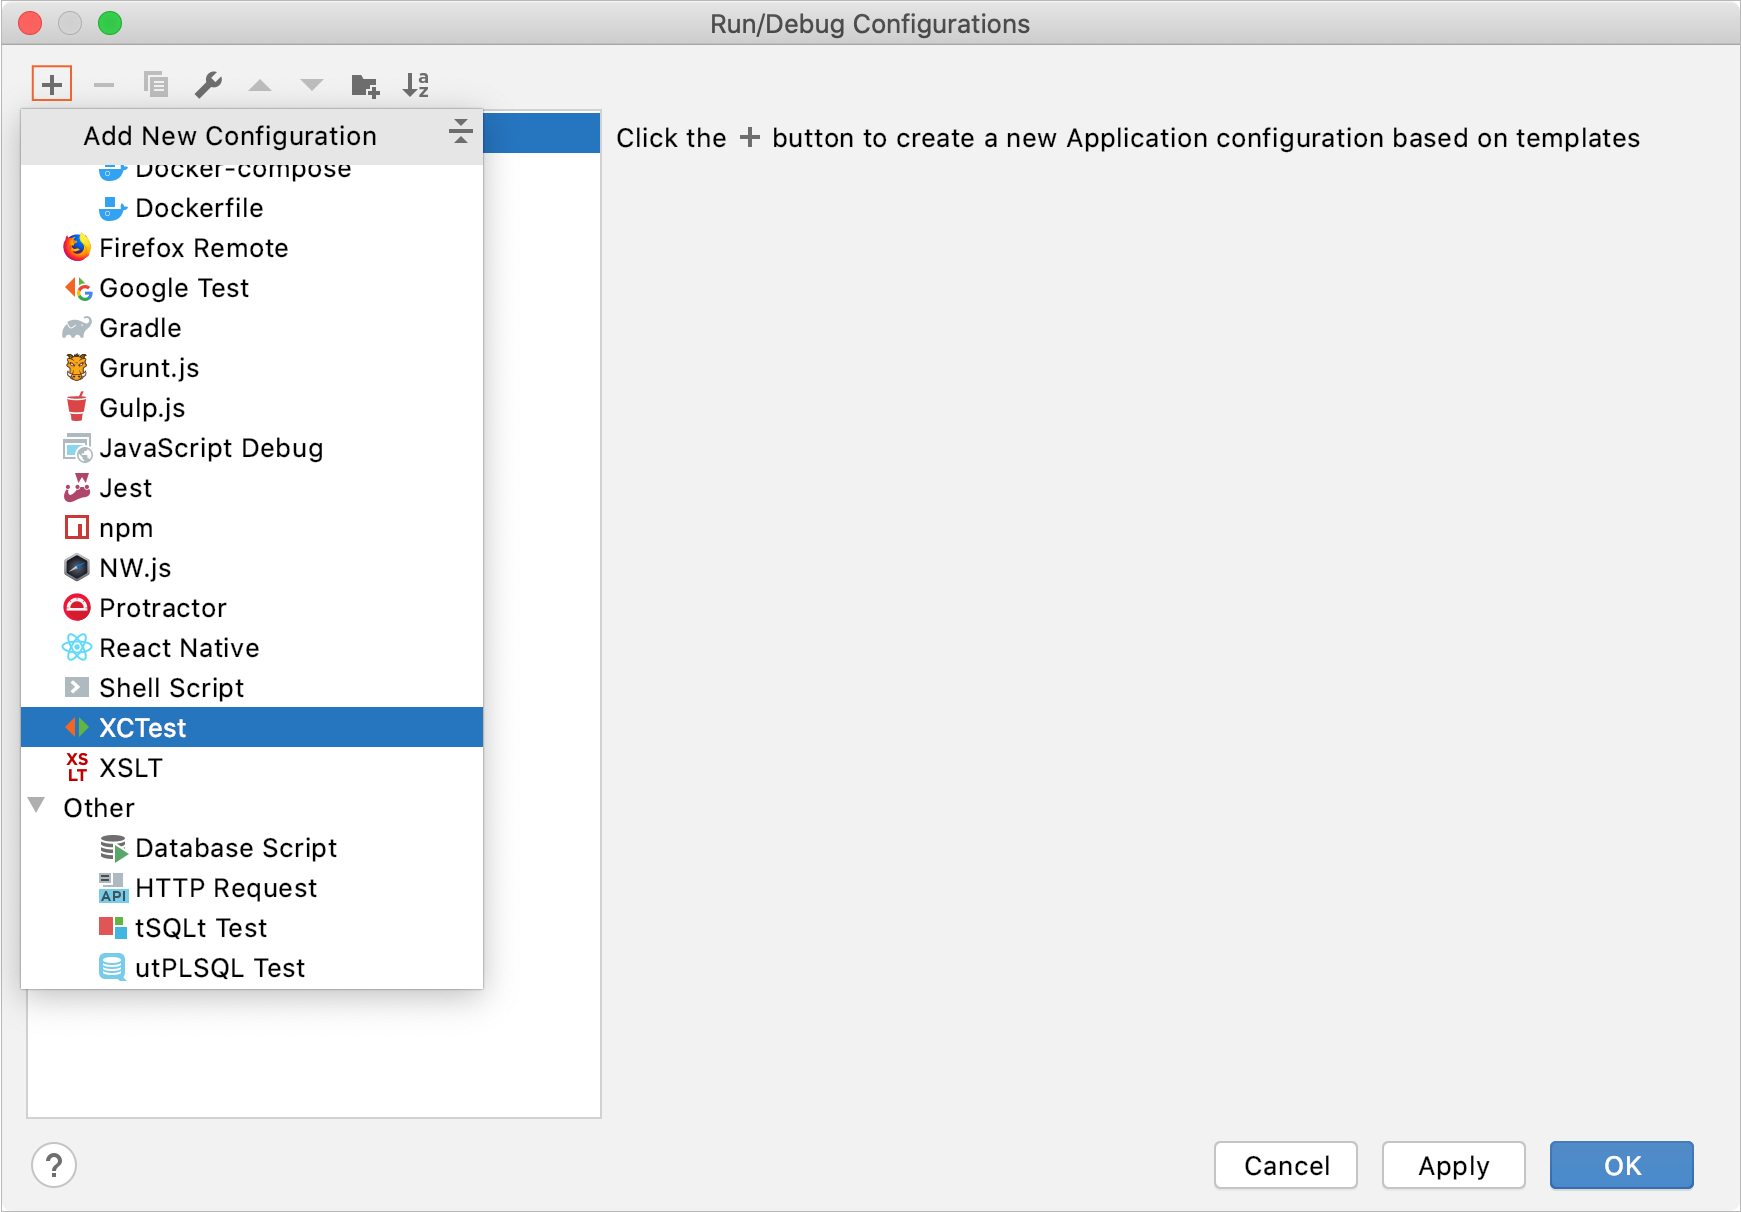
In the dialog that opens, click ![]() and select XCTest:
and select XCTest:
By default, AppCode creates a run/debug configuration for all classes in the test target:
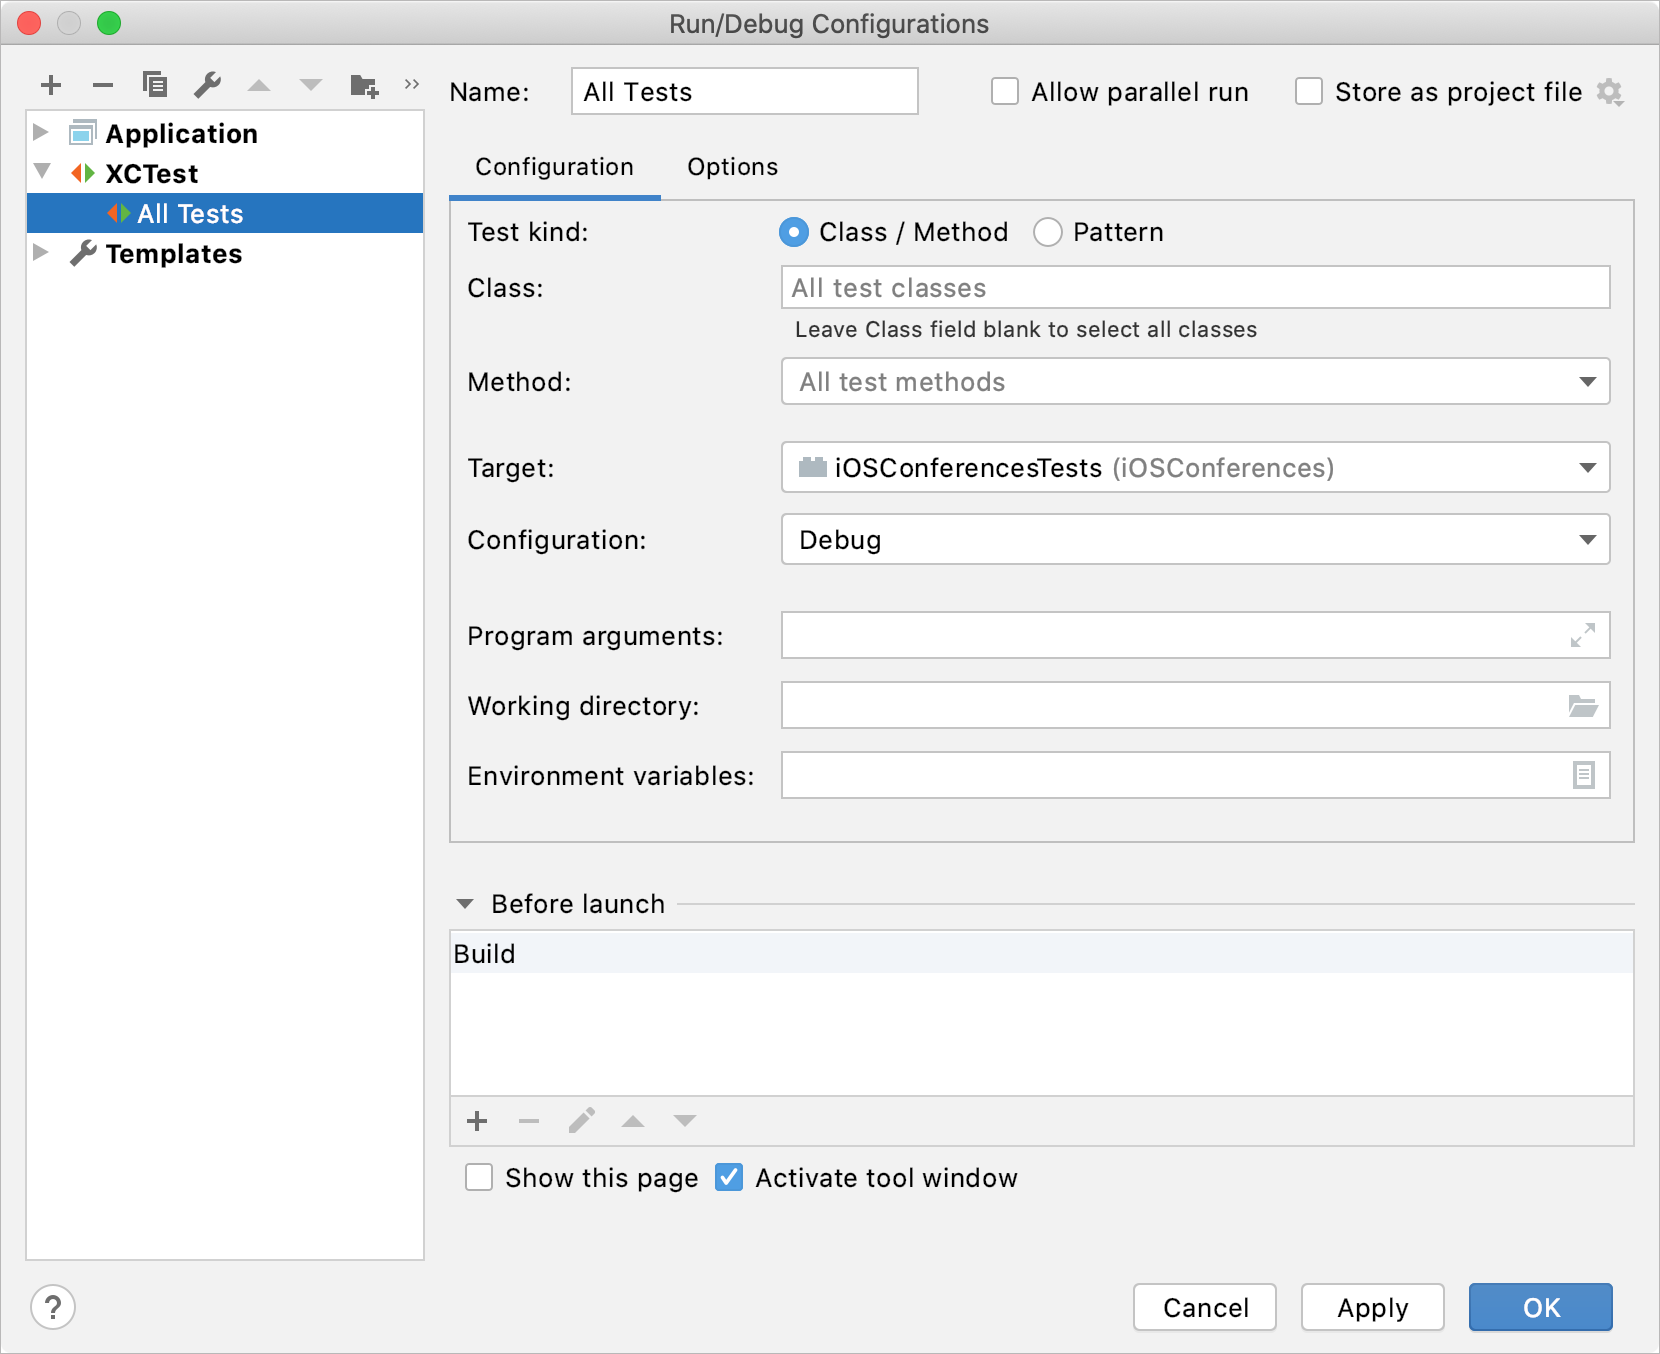
Save this configuration by clicking OK. Now it is pre-selected in the run/debug configuration selector:

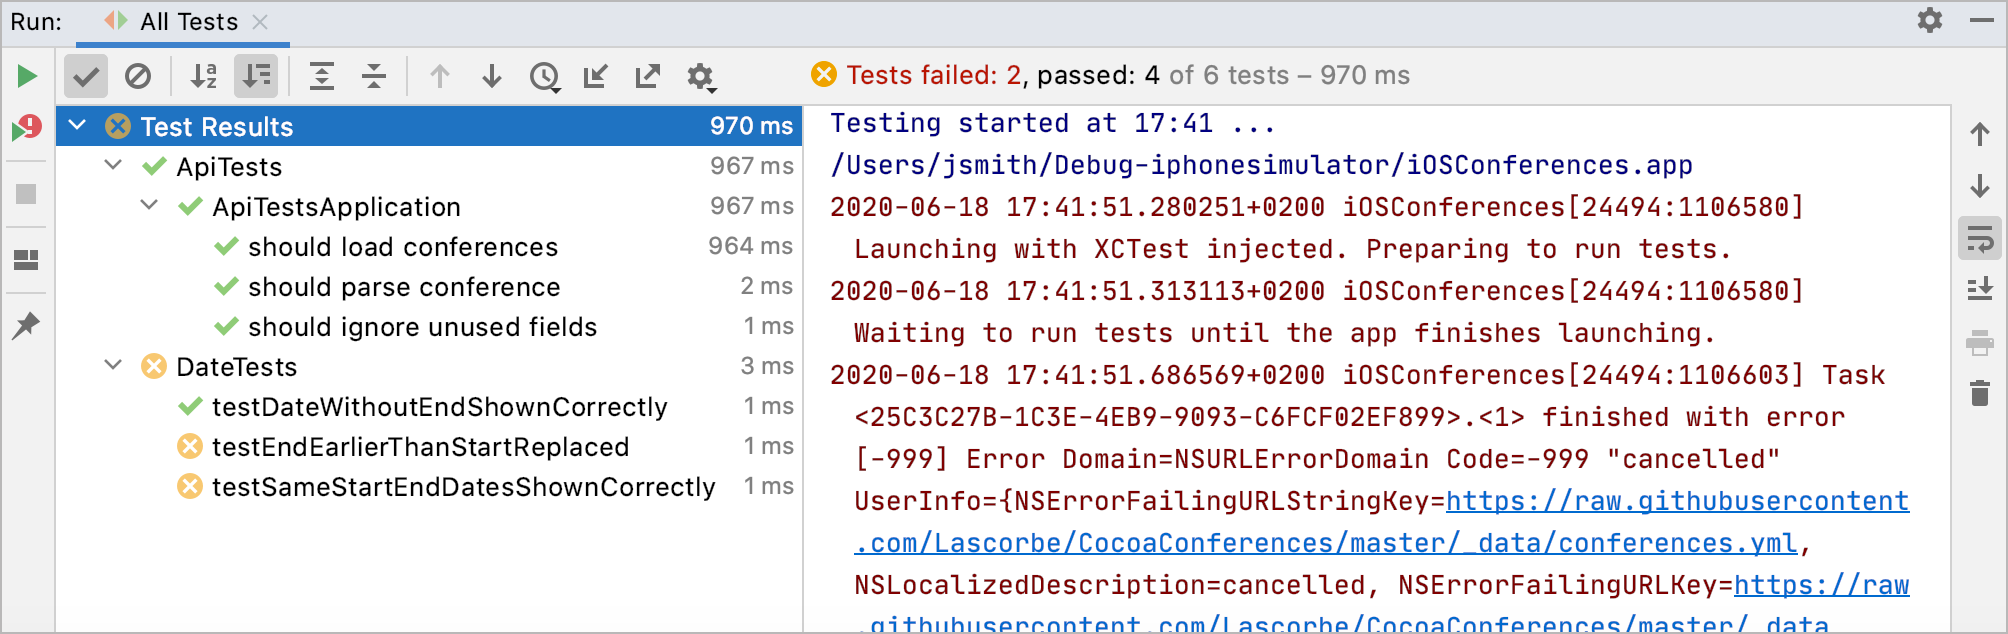
Press ⌃R to run all test classes. The Run tool window displays the results for all test classes available in the project, and you can see that there are two tests failed:
Debug and fix the failed tests
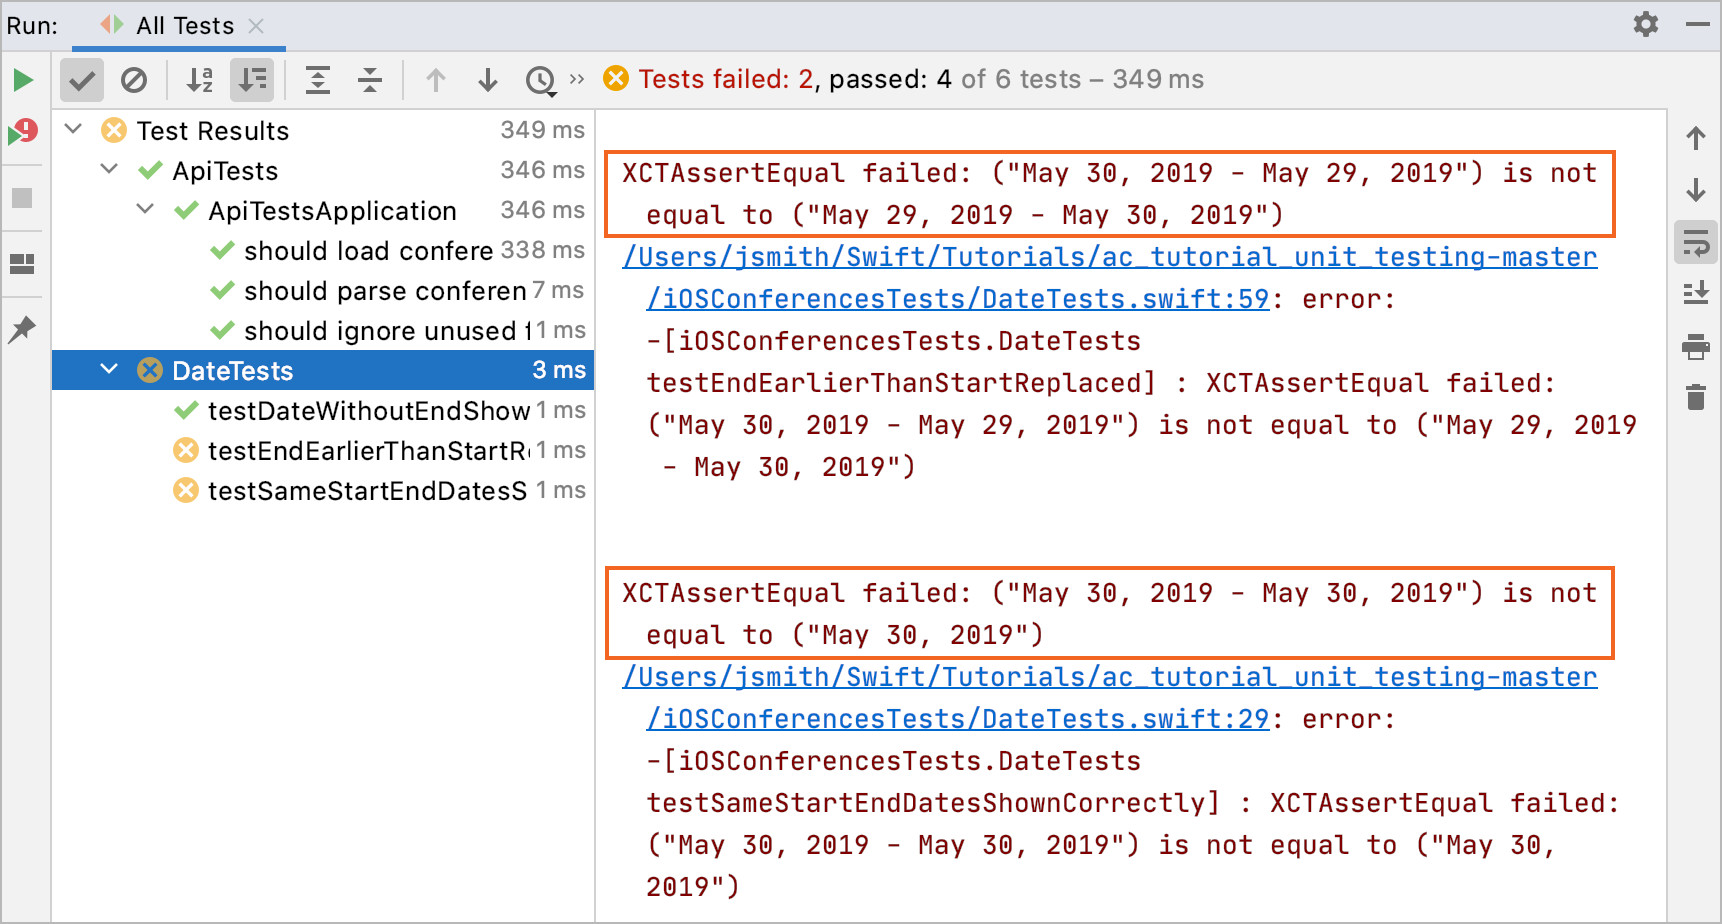
Click the DateTests node in the tree. In the right-hand pane, you can see the stack trace with error messages helping you understand why the tests have failed. In our case, the expected values don’t match the actual ones returned by the textDate() method:
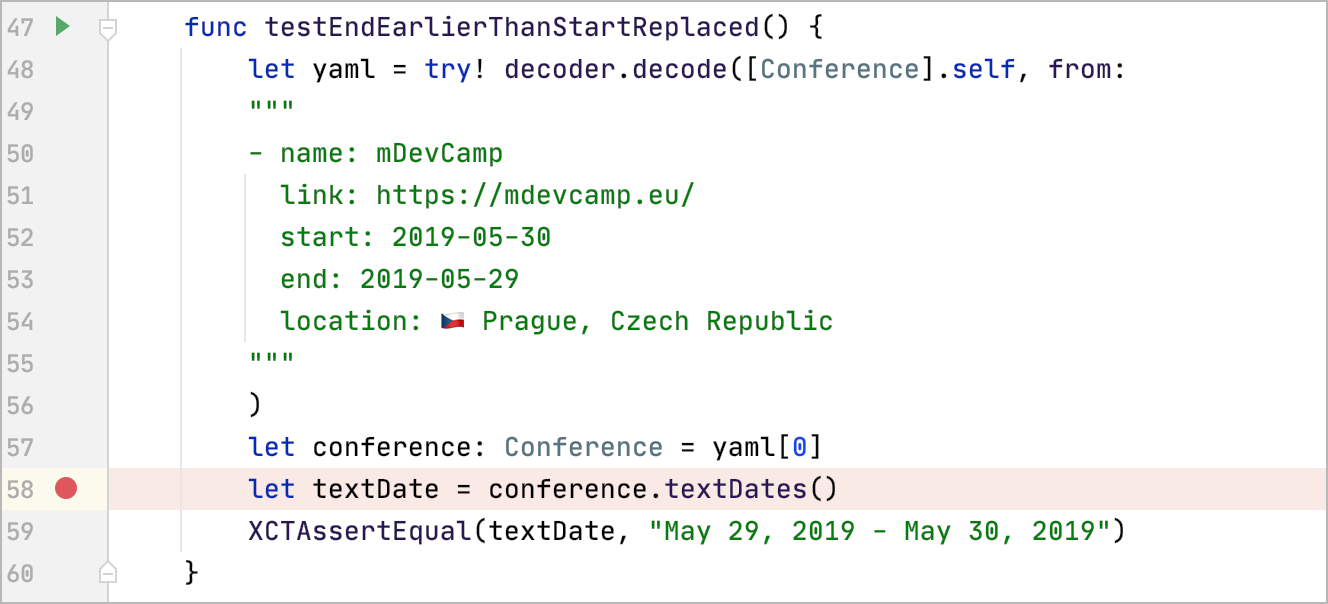
Click the testEndEarlierThanStartReplaced test in the tree to navigate to its code in the editor.
You can also navigate to the methods’ code by clicking the links in the stack trace.
Set a breakpoint ⌘F8 at the following line:
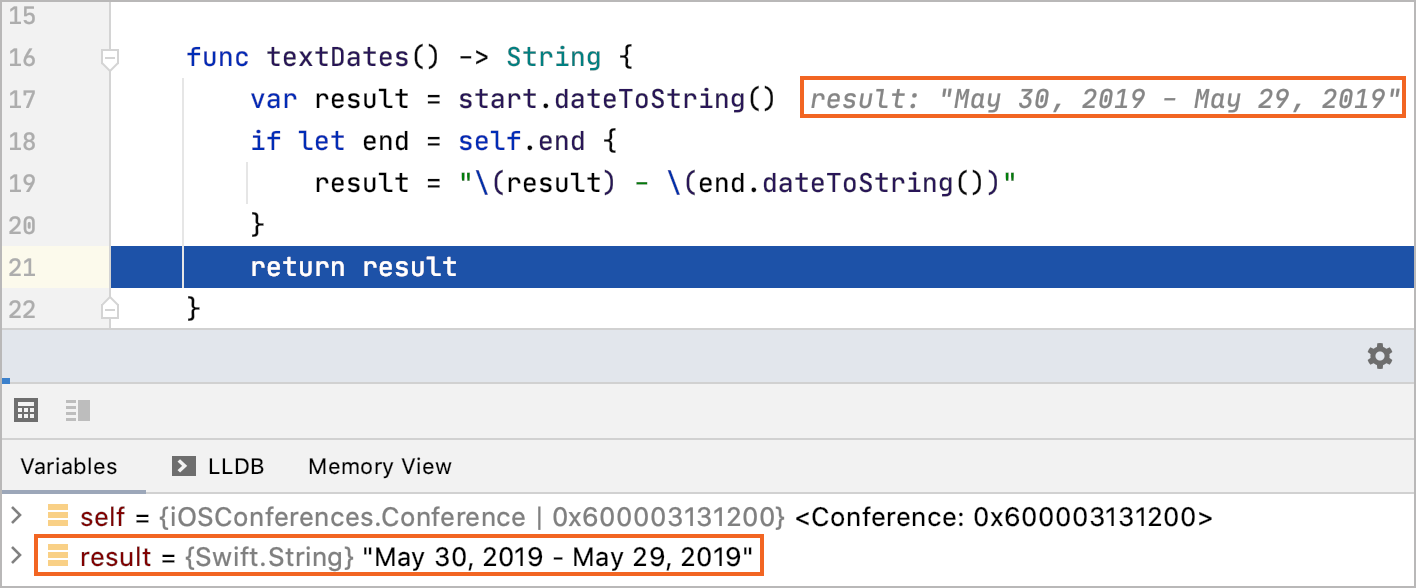
With the caret placed inside the testEndEarlierThanStartReplaced() method, press ⌃⇧D to run the test in debug mode. The program execution stops at the breakpoint and the Debug tool window opens.
Press F7 or click ![]() to go to the
to go to the textDate() method implementation and step over its code lines pressing F8 or clicking ![]() . On the Variables tab of the Debug tool window as well as in the editor, you will see the value this method returns:
. On the Variables tab of the Debug tool window as well as in the editor, you will see the value this method returns:
As far as you can see, there’s no code for swapping the end and start dates in case they are mixed up in the source file. Replace the textDates() method’s code with the following:
func textDates() -> String {
    var result = start.dateToString()
    if let end = self.end {
        if start  end {
            result = "\(end.dateToString()) - \(result)"
        }
    }
    return result
}
In the Debug tool window, press ![]() button to rerun the failed tests and go to the Console tab:
button to rerun the failed tests and go to the Console tab:
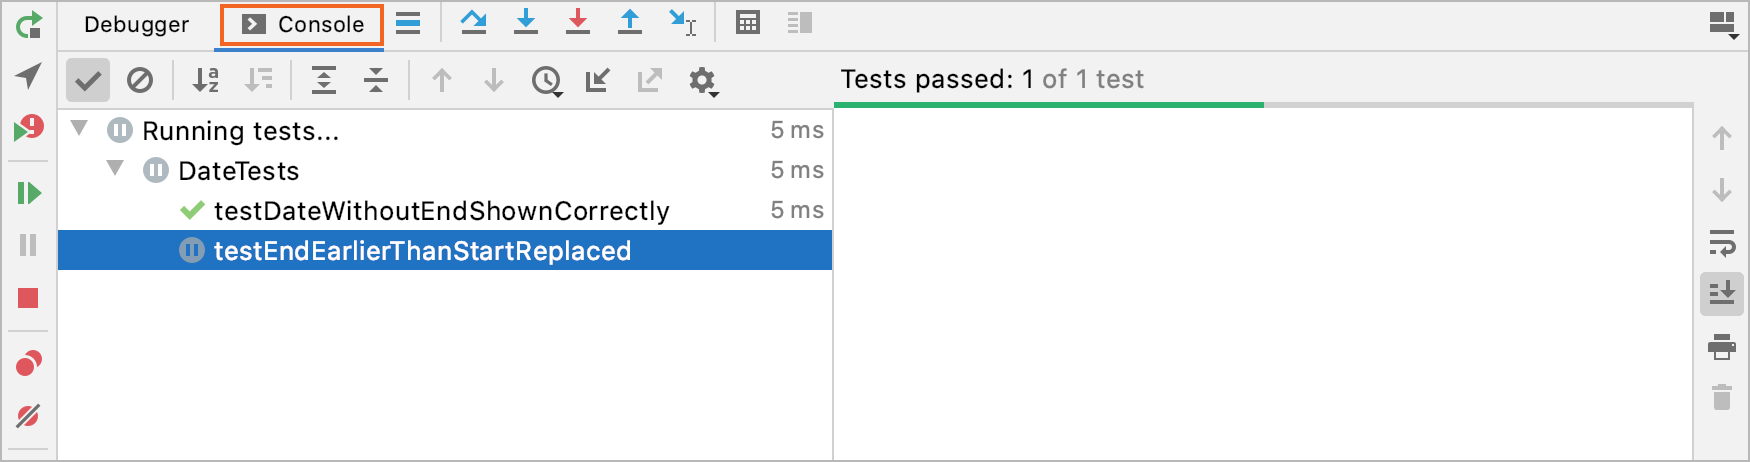
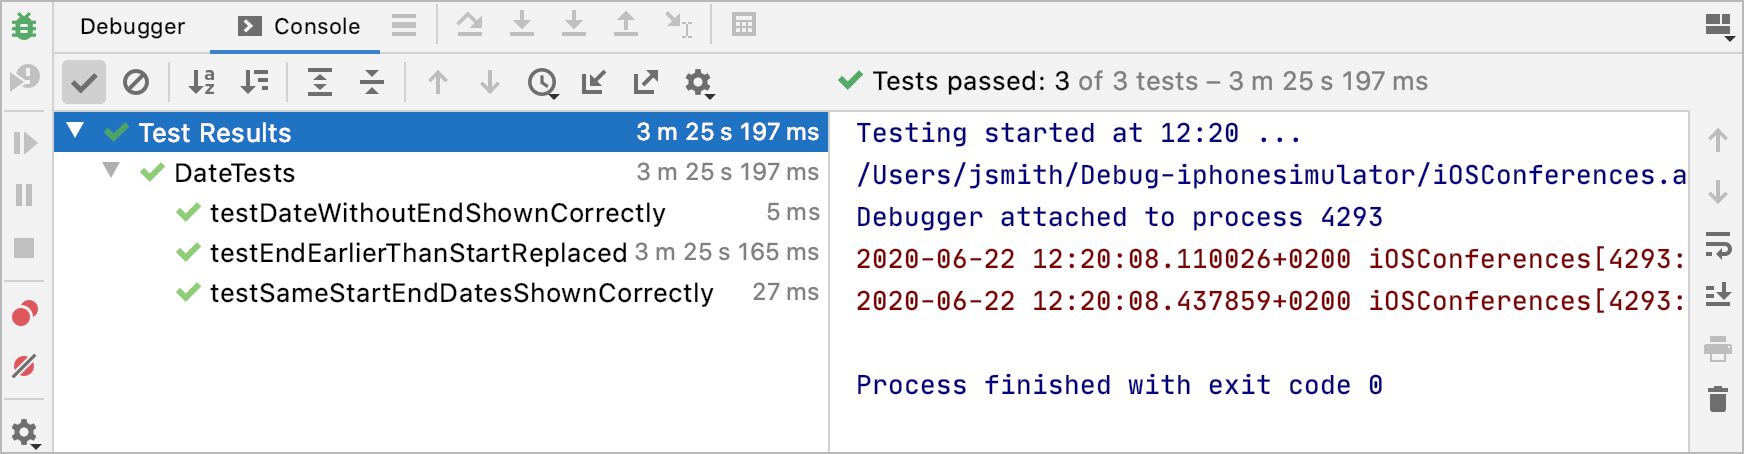
The execution is paused at the breakpoint at the moment. Press ⌥⌘R or click ![]() to resume the program. All the tests are successfully passed now:
to resume the program. All the tests are successfully passed now:
Run the tests with coverage
Finally, let’s check how much of the application code is covered by the unit tests:
- Make sure the All Tests run/debug configuration is selected.
-
Click
 button on the toolbar.
The Coverage tool window opens:

Double-click a folder to go to its contents or click the ![]() button to navigate to the upper level. Moreover, you can see the percentage of files and lines covered by the tests in the Project tool window:
button to navigate to the upper level. Moreover, you can see the percentage of files and lines covered by the tests in the Project tool window:

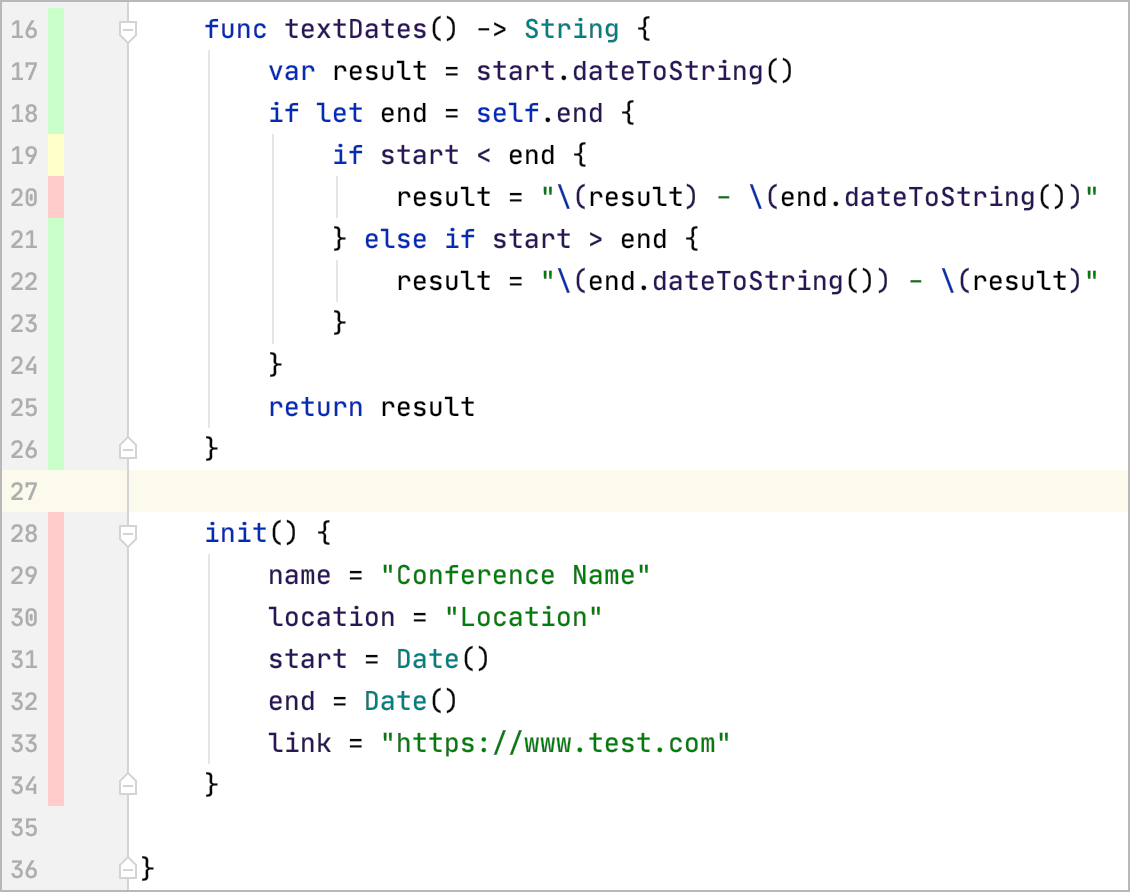
In the editor, the colored stripes appear in the gutter. Green means the line is fully covered by the tests, yellow — partially covered, red — uncovered:
⌘, dialog, go to Preferences | Editor | Color Scheme | General and select Line Coverage from the list.If you click the coverage indicator, the popup appears:
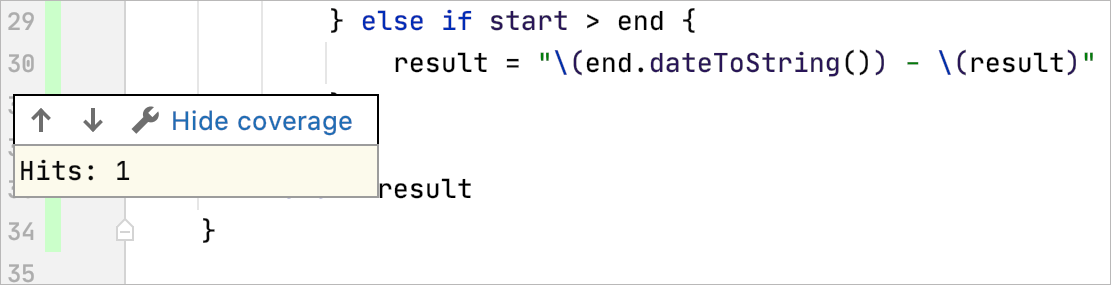
Here you can see how many times the line was executed during tests and hide the coverage data by clicking Hide coverage. To show it again, press ⌥⌘F6 and select the necessary coverage suite from the dialog that opens.
For more information on test coverage in AppCode refer to Run with coverage.
Your AppCode team
JetBrains
The Drive to Develop