Building an API using Flask-RESTful, and using the PyCharm HTTP Client

In the previous blog post in this series, I created a Vagrant VM and provisioned it with Ansible for Python development. In this part, we’ll have a look at a larger application which is configured in the same way.
In this post, I’ll introduce an application that I’ll be using for more blog posts in the future, so let me know in the comments if you have any cool ideas about what can be done to make this application better.
We’ll use the following:
- Flask
- Flask-RESTful
- PostgreSQL, and pgmigrate for migrations
- The Ubuntu, Vagrant, Ansible stack introduced in the blog post last week
The Application: Grouporder
Those of you working in an office will know the challenge of wanting to order food, and wanting to share the order with some coworkers. Many restaurants have minimum order amounts, and it’s also nice to have food together. That way if it ends up badly, you have others to share the misery with.
At JetBrains we have some Slack channels that help us arrange the orders, and I’m assuming many other companies have something similar. We’re a technology company, so today we’ll look into how we can solve this with code.
Our application should expose a REST API that allows us to create a group order, and then allows others to add the food they want to this order.
The routes we’ll need:
- /users for registering users
- /users/login for exchanging a username and password for a token
- /restaurants to keep track of the places we can order food from
- /restaurants/<id>/menu for the actual food items
- /orders to define the actual orders
See the example_requests.http file for a complete walkthrough of defining a restaurant, its menu, and then placing an order through the REST API.
I’d like to use this code base in future blog posts, as there are many possible ways to extend it. If you have any cool ideas of what to do with it, let me know in the comments below! Please keep in mind that the code is not production ready. So use it at your own peril.
The Stack
We’ll be using Flask together with Flask-restful to create our API. We’ll both accept and return JSON, and Flask-RESTful takes care of most of this for us. To keep separation of concerns, we’ll separate the API layer from the data layer.
The database for this project will be PostgreSQL, which we’ll communicate with using psycopg2 and plain SQL, because we can. If enough people are interested in the topic, a future blog post could look into how to change over to SQLAlchemy instead. Let me know in the comments if you’d like to read about this.
To version our database while not using an ORM, we’ll use pgmigrate, a tool that allows us to write migration scripts in SQL, and will handle the execution of the migrations.
Finally, we’ll use Vagrant to automatically create a reproducible VM for our development. We’ll use Ansible to provision the VM, so we can easily use the same provisioning on AWS in a later blog post.
Getting Started
Open PyCharm, and check out the repository (VCS | Checkout from Version Control | GitHub). After the project has opened, run vagrant up (Tools | Vagrant | Up) to bootstrap the development VM.
At this point, Vagrant will download a Ubuntu base box, as configured in the Vagrantfile. Afterwards it will provision the VM with using Ansible, with all the roles from the roles folder, as specified in setup.yml. For more details, read the previous blog post.
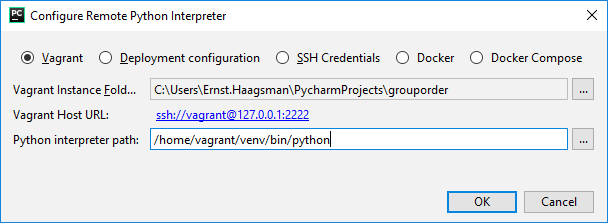
When Vagrant has finished, we can set up our interpreter. Go to Settings | Project Interpreter, use the gear icon to choose ‘Add Remote’, and then add a Vagrant interpreter, with /home/vagrant/venv/bin/python as the interpreter path.
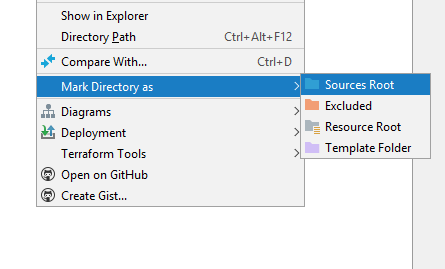
The grouporder Python code is in a subdirectory of the repository, so we need to tell PyCharm this so it correctly resolves the code. Right-click the ‘grouporder’ folder, choose Mark Directory as | Sources Root:
Before we can start the Flask application, there’s one more thing to take care of. We need to migrate the database. Let’s create a run configuration for this:
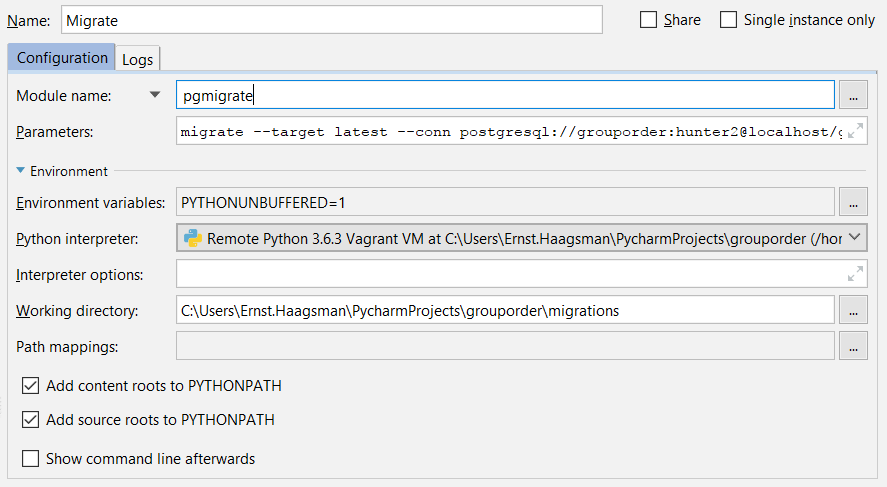
Use the downward facing arrow to select ‘Module name’, and then type pgmigrate. The parameters are: migrate --target latest --conn postgresql://grouporder:hunter2@localhost/grouporder. Then finally, make sure that the working directory is the migrations folder. When you run this configuration (with the green play icon), it should return nothing, and just say ‘Process finished with exit code 0’.
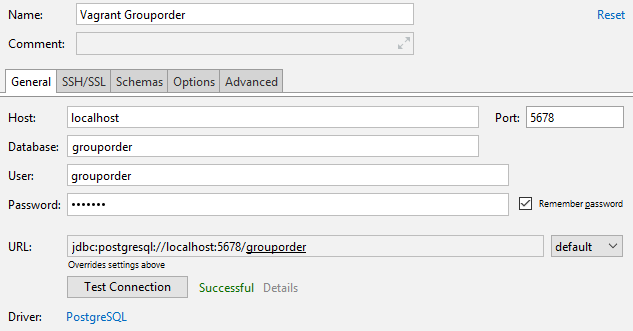
We can make sure that the migrations have been applied by connecting PyCharm to the database. Let’s go to the Database tool window (View | Tool Windows | Database) to configure the connection. Use the green ‘+’ to add a new PostgreSQL data source. If PyCharm tells you it’s missing a driver, just click the link and it will be installed automatically.
We exposed Postgres on the host’s port 5678 in the Vagrantfile, so we can connect to it by using localhost with that port. Of course the password is the ever-secure hunter2:
After clicking ‘OK’ we should see the database in the tool window, and if we expand the ‘tables’ node in the ‘public’ schema, we should see our application’s tables:
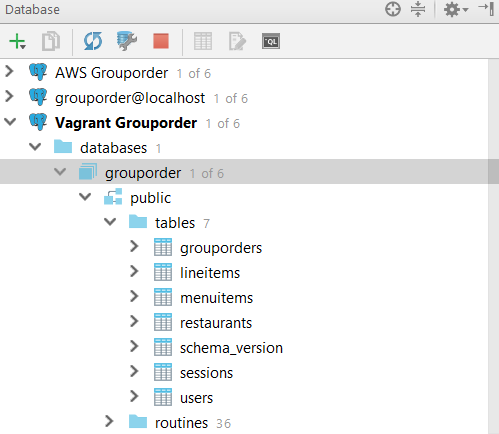
If you don’t, make sure that you’re connecting to port 5678, and not the default 5432, you may be connecting to a postgres server running locally on your system.
Running the Application
Now that all setup is done, let’s create a run configuration for our application, and have a look to see how it works. Go to Run | Edit Configurations, and use the green ‘+’ to add a new Python run configuration:

Again use the downward facing arrow to change from ‘Script path’ to ‘Module name’, and put flask as the module name. Then add run --host=0.0.0.0 as the parameters. All further configuration is done with environment variables. Use the ... button next to the environment variables field to add the necessary variables:
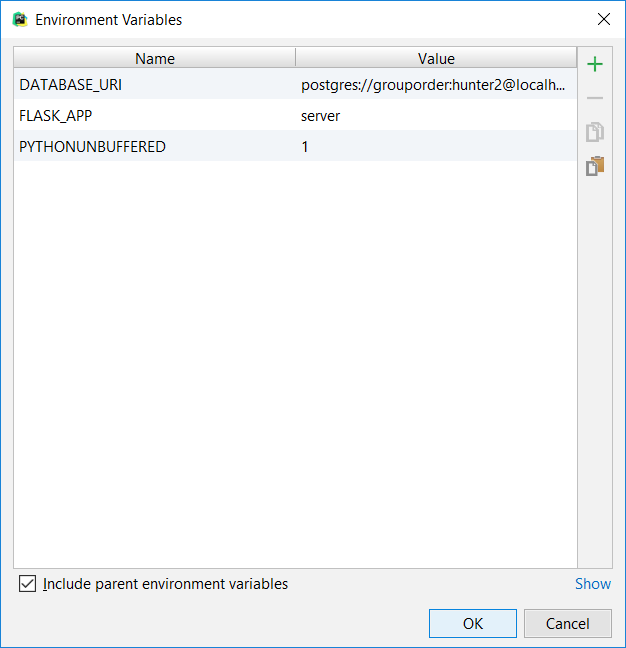
The database connection is configured with a postgres URL: postgres://grouporder:hunter2@localhost/grouporder. Finally, make sure to check the ‘Single instance only’ checkbox in the top-right corner of the run configuration. We only have one port 5000, so we can’t run multiple instances of the same server.
Now we can finally use our application for its intended purpose. Let’s set up a user account in our application, and go through the process.
HTTP Requests
In PyCharm 2017.3, we’ve introduced a new HTTP client. In the new client you can simply write an HTTP request in the editor, and then run it right from there. Let’s have a look to see how this works.
To create a user account, we need to POST to the /users route. Press Ctrl+Alt+Shift+Insert (or Ctrl+N on macOS) to create a scratch file, choose ‘HTTP Request’ for the file’s type. Then we can start writing the request:
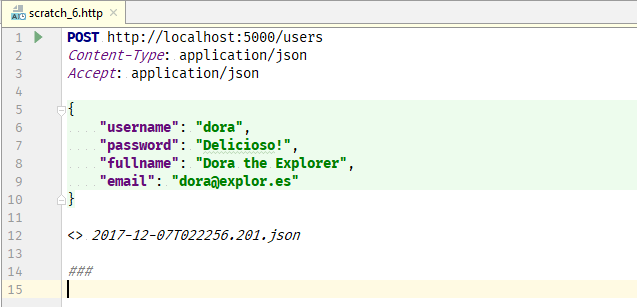
After using the green button to run the request, we can see the output in the run tool window. In scratch files we can also see the responses to our previous requests, by Ctrl+Clicking the line with the date and time of the request.
Now we can log in as the new user (we can write another request after the line with ‘###’), and we’ll get a token:
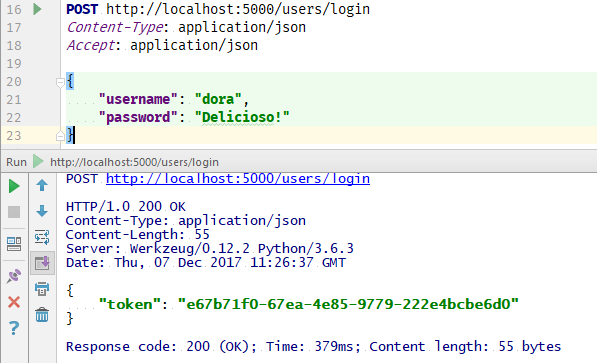
During this session, we can use this token in an Authorization header to authenticate our requests. The token expires three hours after it’s created (see data/api/users.py). So let’s use our token to try to create a restaurant:
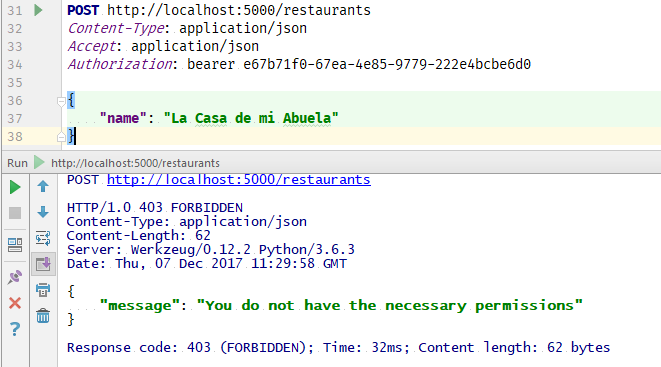
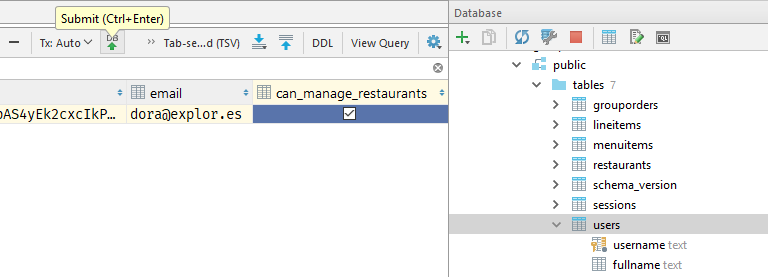
Unfortunately, the application doesn’t let us. Turns out we need a ‘can_manage_restaurants’ permission to make changes to restaurants or menus. And the lazy developer of this program (who is this guy anyway?) didn’t add a route to do so. So let’s manually change this in the database.
At this point we should be able to go to the users table, and check the can_manage_restaurants checkbox. Double-click the field to activate editing, and then click until it shows a checkbox. Afterwards, commit your changes to the database by clicking submit (or pressing Ctrl+Enter):
When you’ve made the change, you should be able to re-run the HTTP request, and get 201 Created. To see the rest of the requests you need to make to add menu items, and to create an order, see the example_requests.http file. As long as you replace the Authorization tokens with the one you got from the login request earlier, you should be able to go through the whole process by clicking the green play icons in the gutter.
In the next post we’ll set up a development environment for this application in AWS. Continue reading the next part now.