TeamCity
Powerful CI/CD for DevOps-centric teams
TeamCity brings Azure Resource Manager support

![]()
Microsoft has recently introduced a new way to deploy cloud resources, so currently there exist two Azure deployment models supported by TeamCity as two separate plugins.
The earlier Azure deployment model is in the feature freeze state and is now called Azure Classic. The same goes for the existing TeamCity Azure support, now called TeamCity Azure Classic plugin.
Azure Resource Manager is the new Azure deployment model, which has some advanced features and is now becoming popular. More and more users want to deploy cloud agents with it, so today we are glad to announce a new plugin, the Azure Resource Manager plugin for TeamCity.
Plugin Description
The plugin for TeamCity starts new cloud build agents from a generalized VHD image when all of the regular build agents are busy. It uses resource groups to deploy build agent resources and supports authentication with an Azure Active Directory (AD) application.
While starting a new virtual machine, the plugin creates a new resource group and deploys required resources into it. When a cloud agent is terminating, the resource group with the allocated resources is removed.
The latest plugin version is available for download to the TeamCity 9.1.x users as a separate plugin which can be installed manually.
Azure Authentication Settings
The plugin accesses the Azure Resource Manager by leveraging an Azure AD application. To create a new application, follow the steps described in the Azure documentation. Then open new portal, navigate to Subscriptions, select the target subscription and assign a Contributor role to your Azure AD application.
Note: To find your application, type the application name in the users search box, because originally that list contains only usernames, not applications.
Virtual Machines Preparation
The plugin supports generalized VHD images to start new TeamCity cloud build agents. Perform the steps below to prepare VHD images.
New Image Creation
Create a new virtual machine with the Resource Manager via the new portal or cli tools, and configure it properly. Then fulfill generalization according to the Azure documentation for Linux and Windows virtual machines. As a result, you will get a VHD image in your blob storage.
Migrating Specialized Classic VM Image
If you previously used a specialized image or Start/Stop behaviour for a cloud build agent, you must capture it now. To do that, prepare a virtual machine by removing temporary files and then make a new image capture. Please refer to the Azure documentation for Linux and Windows machines. Then follow the steps below to migrate a generalized classic VM image.
Migrating Generalized Classic VM Image
If you already have a generalized VHD image located in the classic storage account, just copy it to a storage account created with the Resource Manager. To do that, use Microsoft Azure Storage Explorer.
Network Settings
To start new virtual machines, ensure that you have a Virtual Network and Subnet created in the target Azure region. If you already have virtual machines deployed with the Resource Manager, you can use them; otherwise you must create a new one and configure it as follows:
- Open the Virtual Network creation widget on the new portal and press Create.
- Fill in the settings and select the Resource Group located in your target Azure region.
- Press Create and wait for the deployment completion.
Note: To access your virtual machines by a public IP address, please ensure that you have properly configured security group rules for your Subnet.
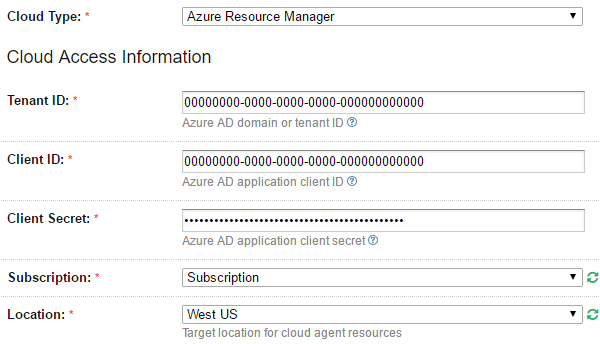
Configuring Agent Cloud Profile in TeamCity
Open TeamCity Agent Cloud configuration and create a new Azure Resource Manager profile. Fill in the AD application credentials from the classic portal: copy the tenant id, client id values, and create a new client secret. Then select your subscription and target region to deploy new TeamCity build agent resources:
Configuring Build Agent Images
Then add a new agent image in the cloud profile by pressing the Add image button and set configuration parameters:

Source image is a VHD blob URL of generalized Virtual Machine. Please note that currently the Azure Resource Manager allows creating OS disk images only in the original storage account where the source VHD image is stored. More details are available in the Azure forum request.
Name prefix will be used as a prefix for the resource group name. Note that you must use unique prefixes within your subscription.
Network settings allow using the preliminary created virtual networks in your target location and optionally creating a public IP address for build agent machines.
After the image is added and the cloud profile is saved, TeamCity does a test start for virtual agents to gather the agent configuration. Once the agents are connected, TeamCity stores their parameters to be able to correctly process build configurations-to-agents compatibility.
Feedback
You are welcome to try the plugin for TeamCity, and your feedback will be really appreciated, so please share your thoughts in the comments to this blog post, in the forum or issue tracker.
Happy building in the cloud!