

Working with files in DataGrip

People working with databases write SQL. A lot of SQL. In this post, we’ll go over whether it’s better to just use a temporary SQL editor in DataGrip or if it’s more convenient to work directly with SQL files stored on your computer.
Spoiler: it all depends on your needs. You might already have a working directory with tons of scripts; we will tell you how you can use DataGrip to deal with them too.

There are four types of files where you can write SQL in DataGrip:
1. Query console is an SQL editor attached to a particular data source. When you create a data source, a database console is created automatically. But you can add more consoles to a data source, each of them will then create a new connection, unless that is, you use Single Connection Mode.
2. Scratch files are like consoles, but they are not attached to a data source. We refer to scratch files as temporary notes or drafts for code ideas which are outside of the project context. If the scratch file is an SQL file, then it is also an SQL editor which can be associated with any of your connections.
3. User files are SQL scripts you store on your machine. You know where they are located and you can put them in Version Control.
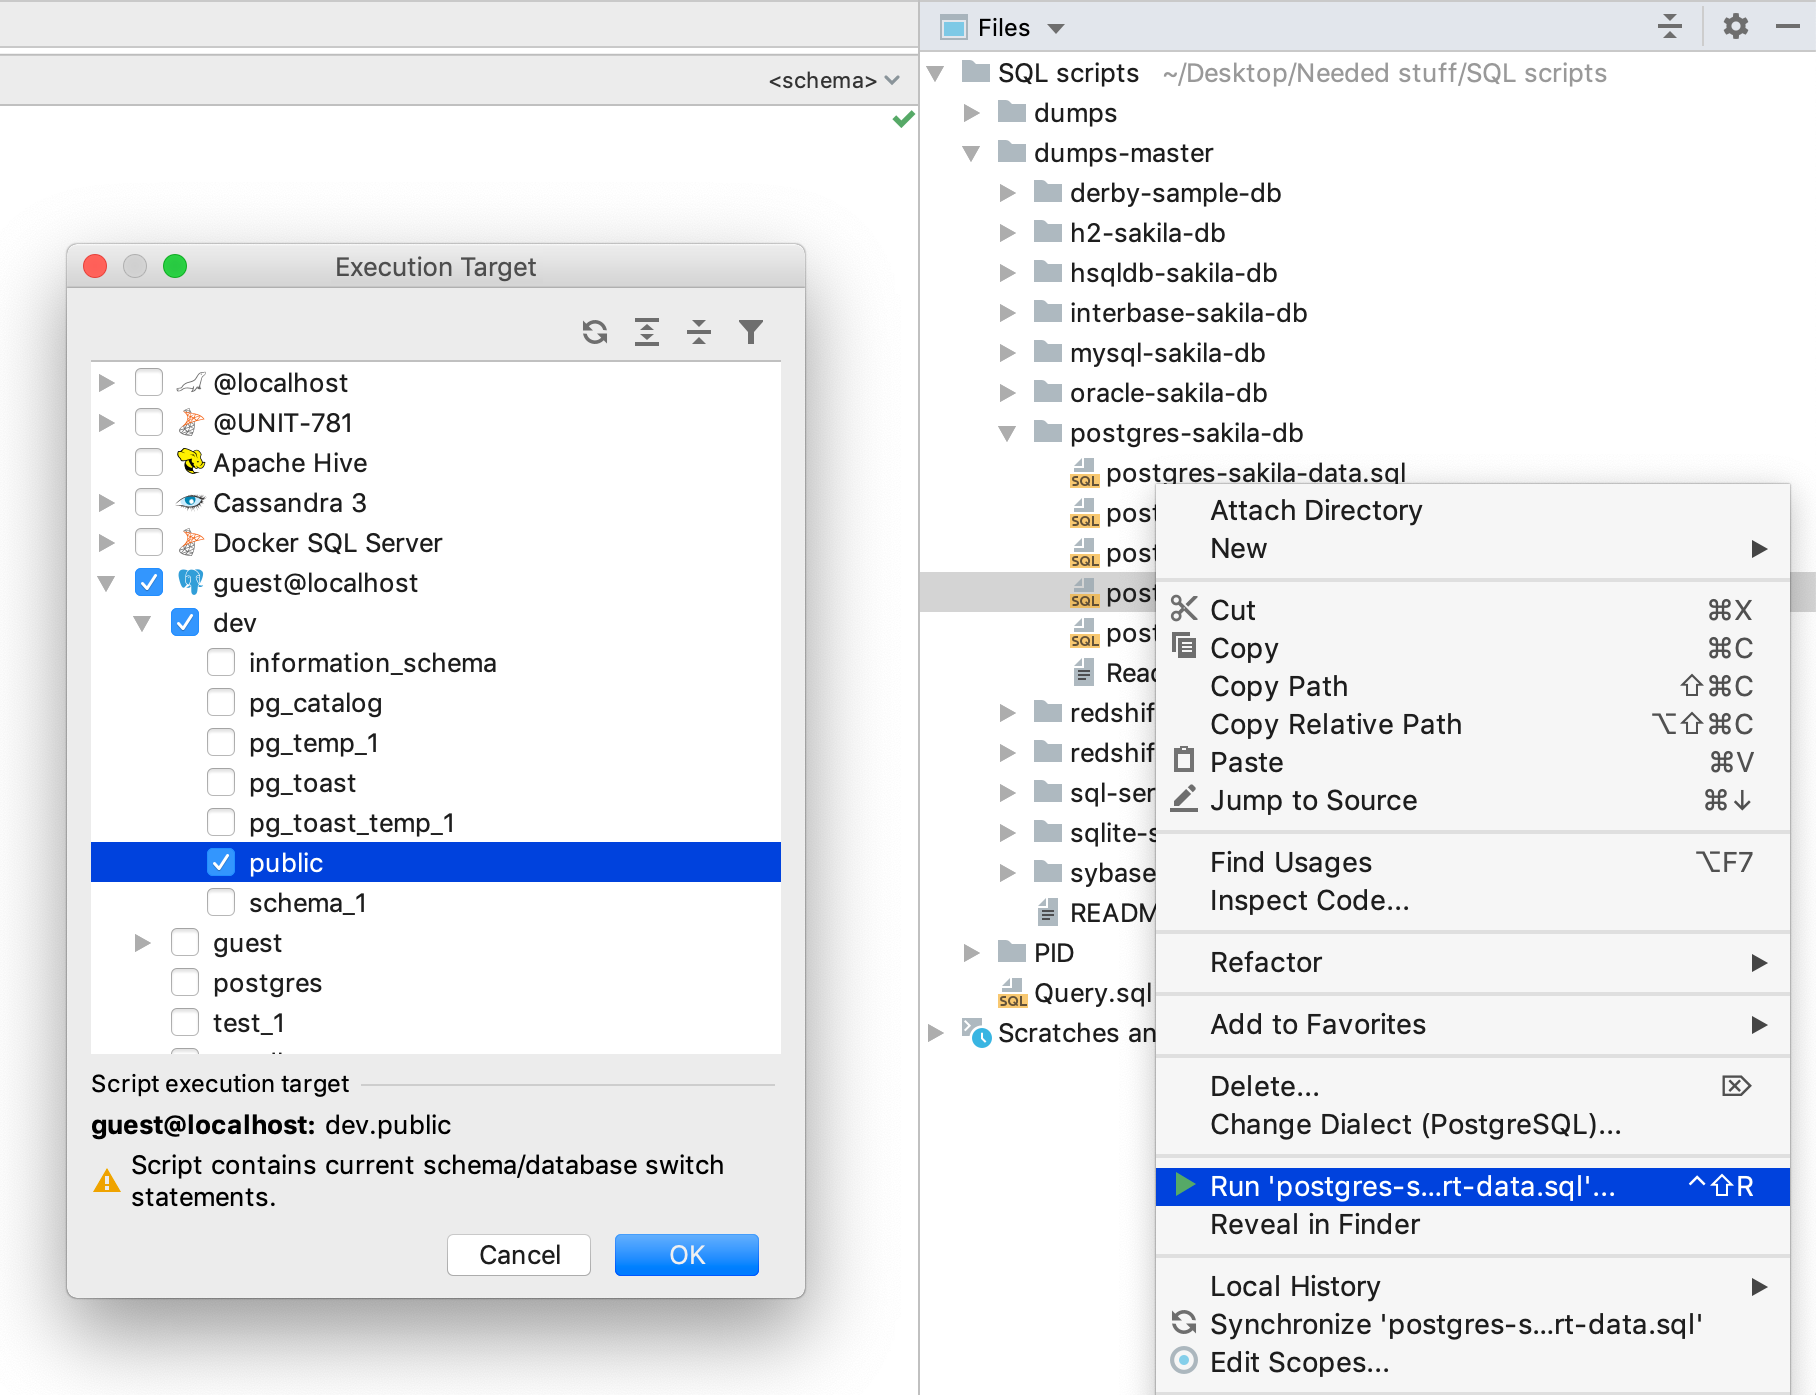
In DataGrip, you can run all the files we’ve mentioned above, without opening them.
4. Object editors are internal files where you edit the DDL of each object: procedure, view, etc. We’ll not be talking about these in this tutorial.
Let’s have a closer look at these first three cases.
Query console
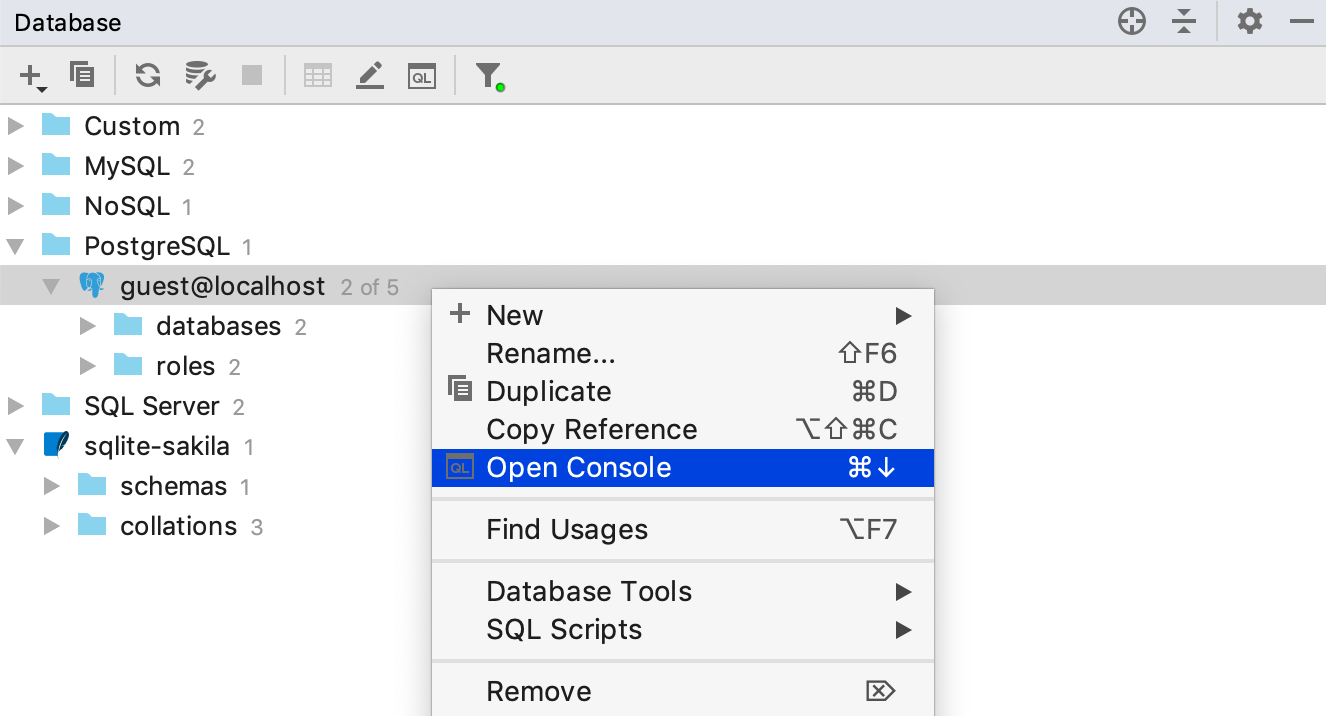
From our experience, the query console is the best place to write normal everyday SQL. Every data source has its own default console. To open it, go the context menu and click Open Console. Or use the shortcut (F4 or Cmd+Down).
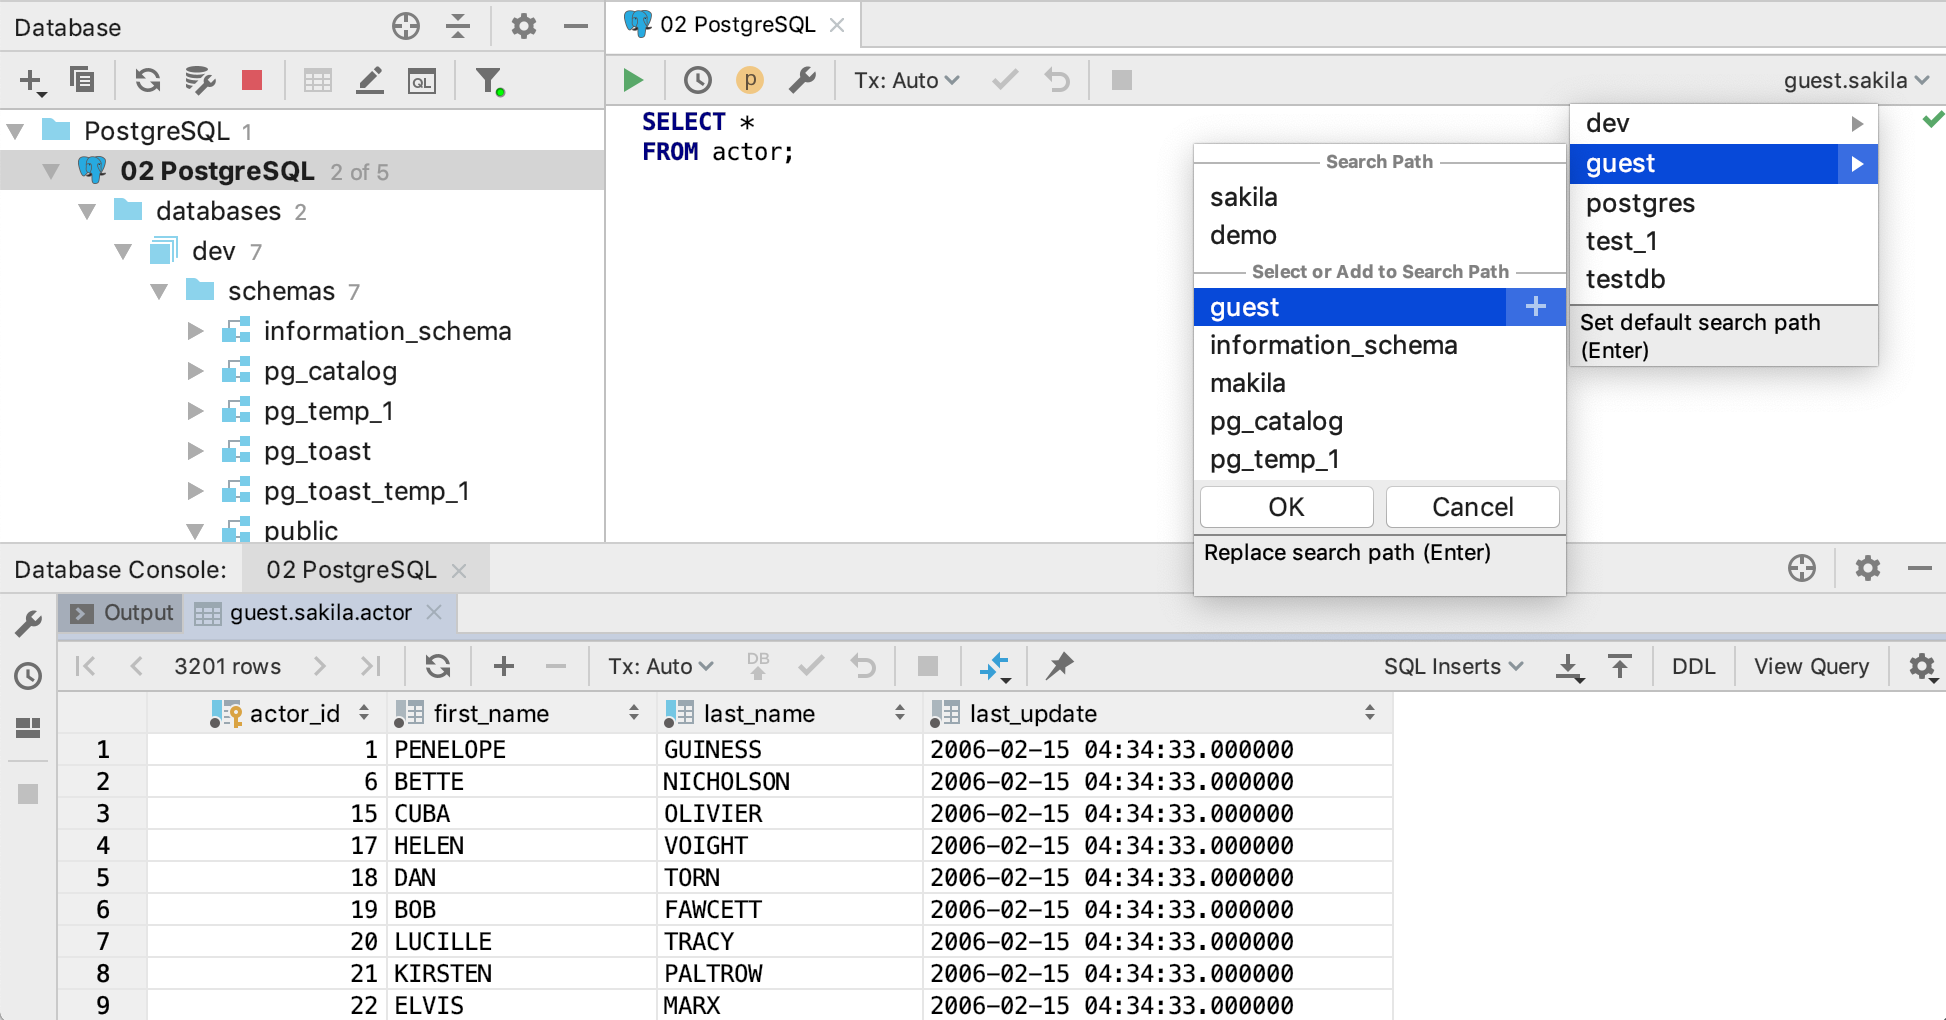
You can write SQL here, then run it and get the result! It is as simple as that. Located in the top right-hand corner of the query console, is a switcher where you can choose the database/schema you are working with, or, in the case of PostgreSQL, define a search path.
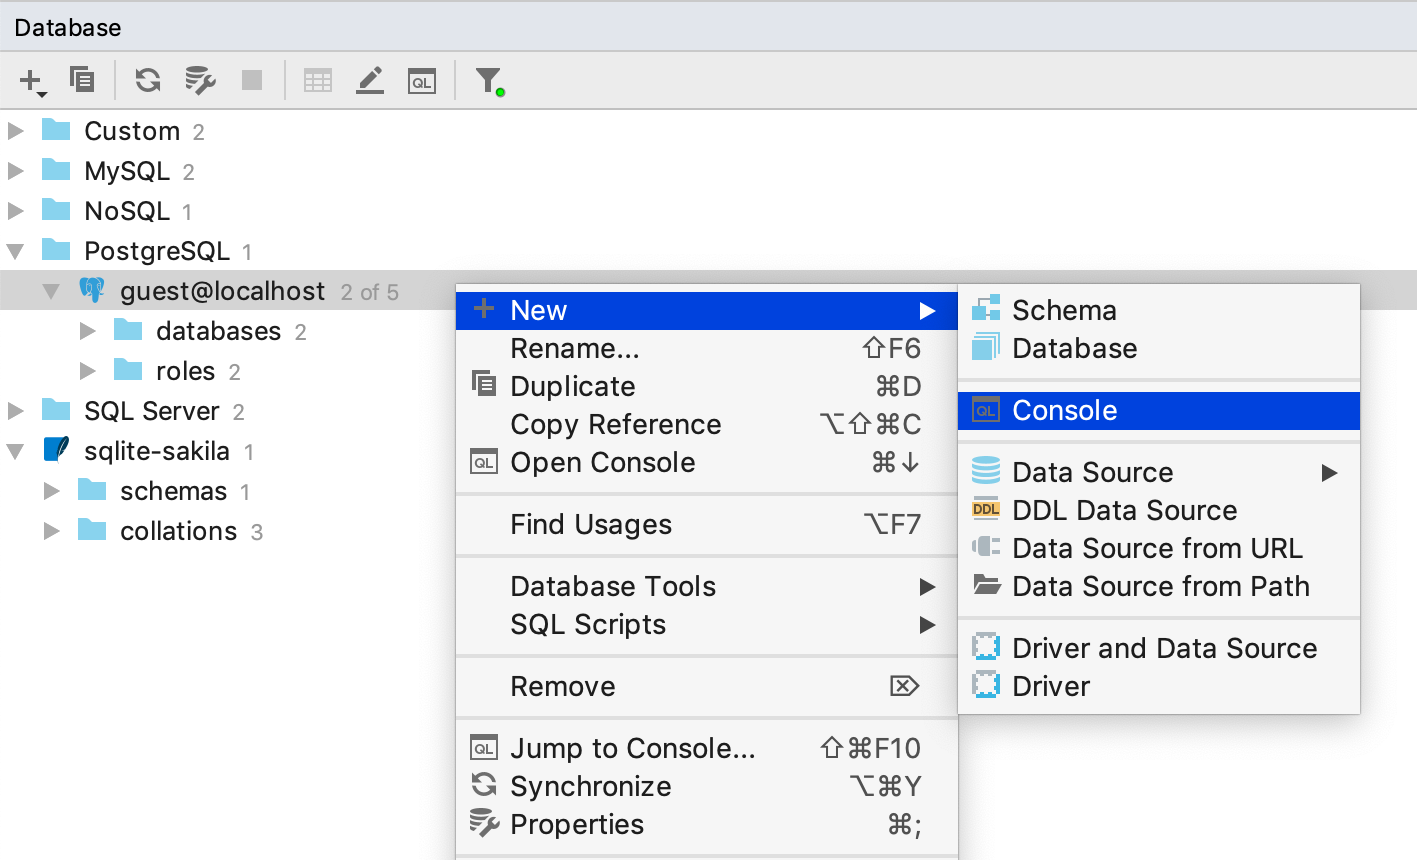
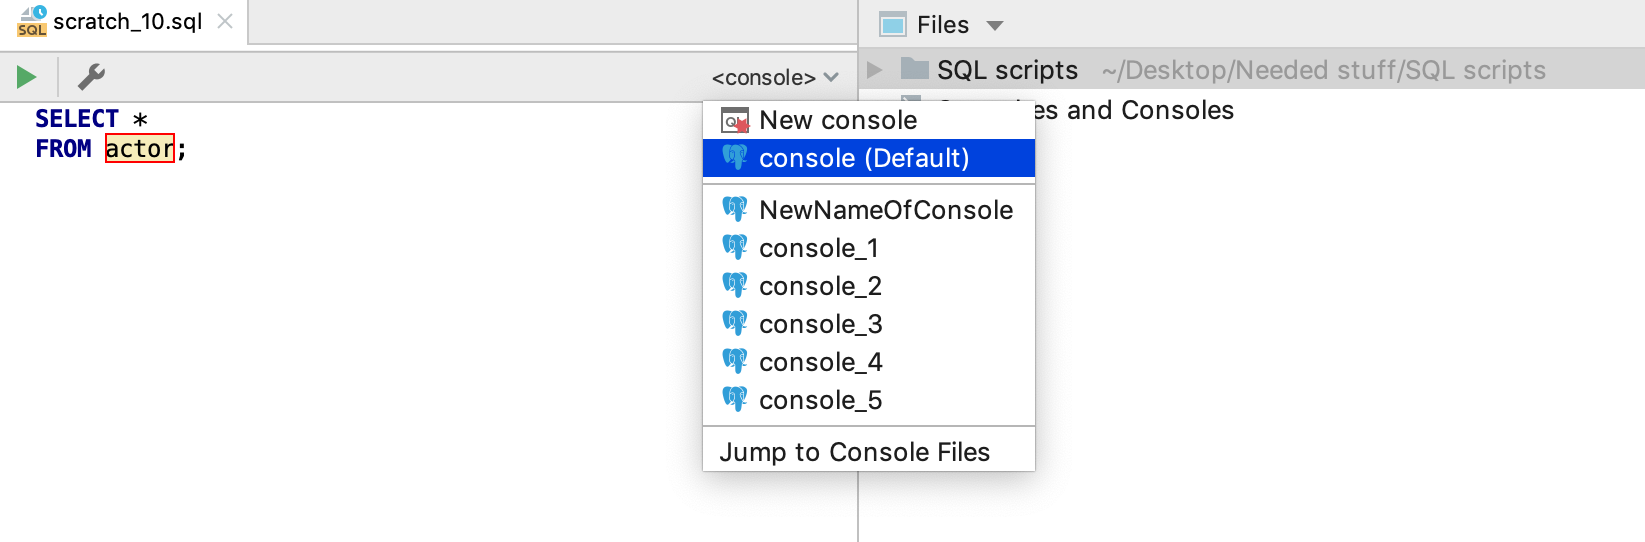
If for any reason you want to create another console for a data source, this is also possible: Context menu | New | Console
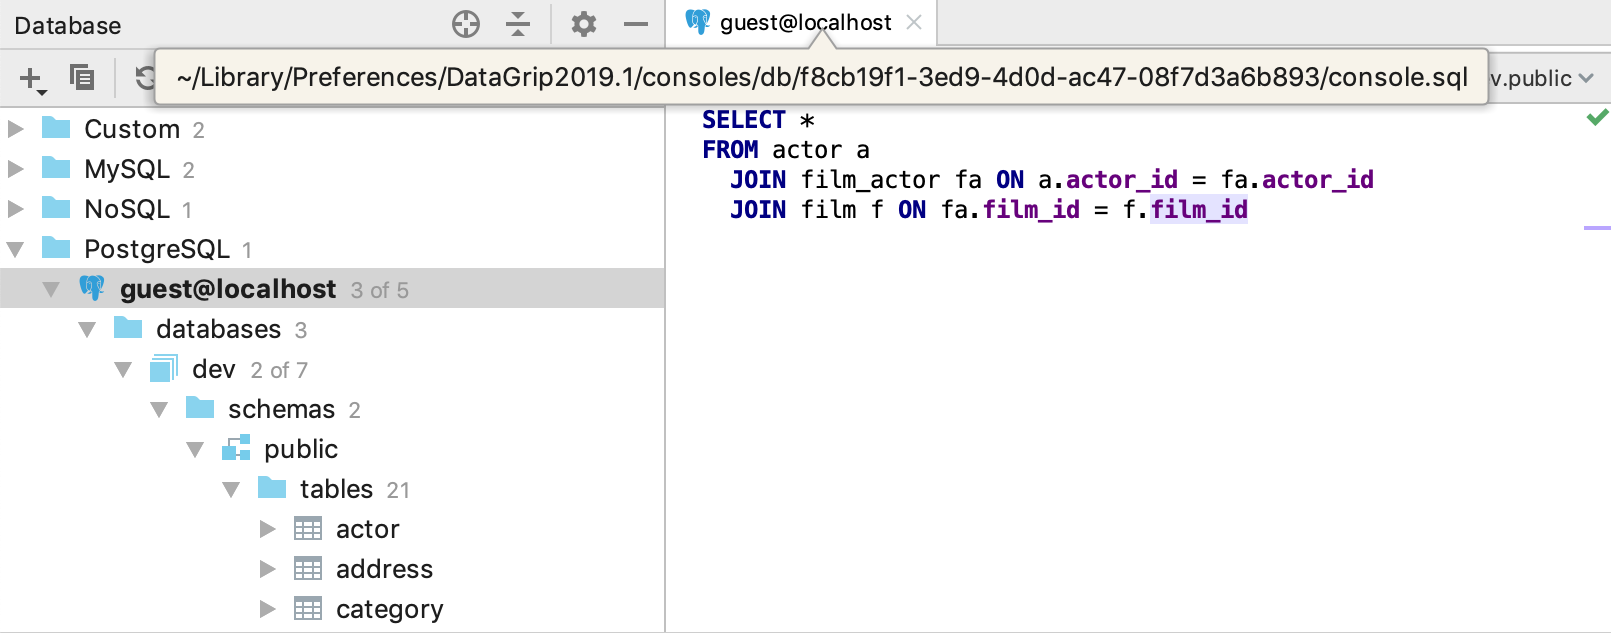
In fact, every console is a file. To see the details of a file, you can take a look at the tooltip on the console’s tab. If you want to create a separate file from the console, you can use the Save As… action for this.
You can see that all the consoles you’ve created are stored in the internal Database Consoles folder. To open this folder open the Files tool window (Alt/Cmd+2) and go to Scratches and Consoles | Database Consoles.
If you want to get to the current console in the Files tool window, press Alt+F1 (Select the object in the other view) and choose Files.
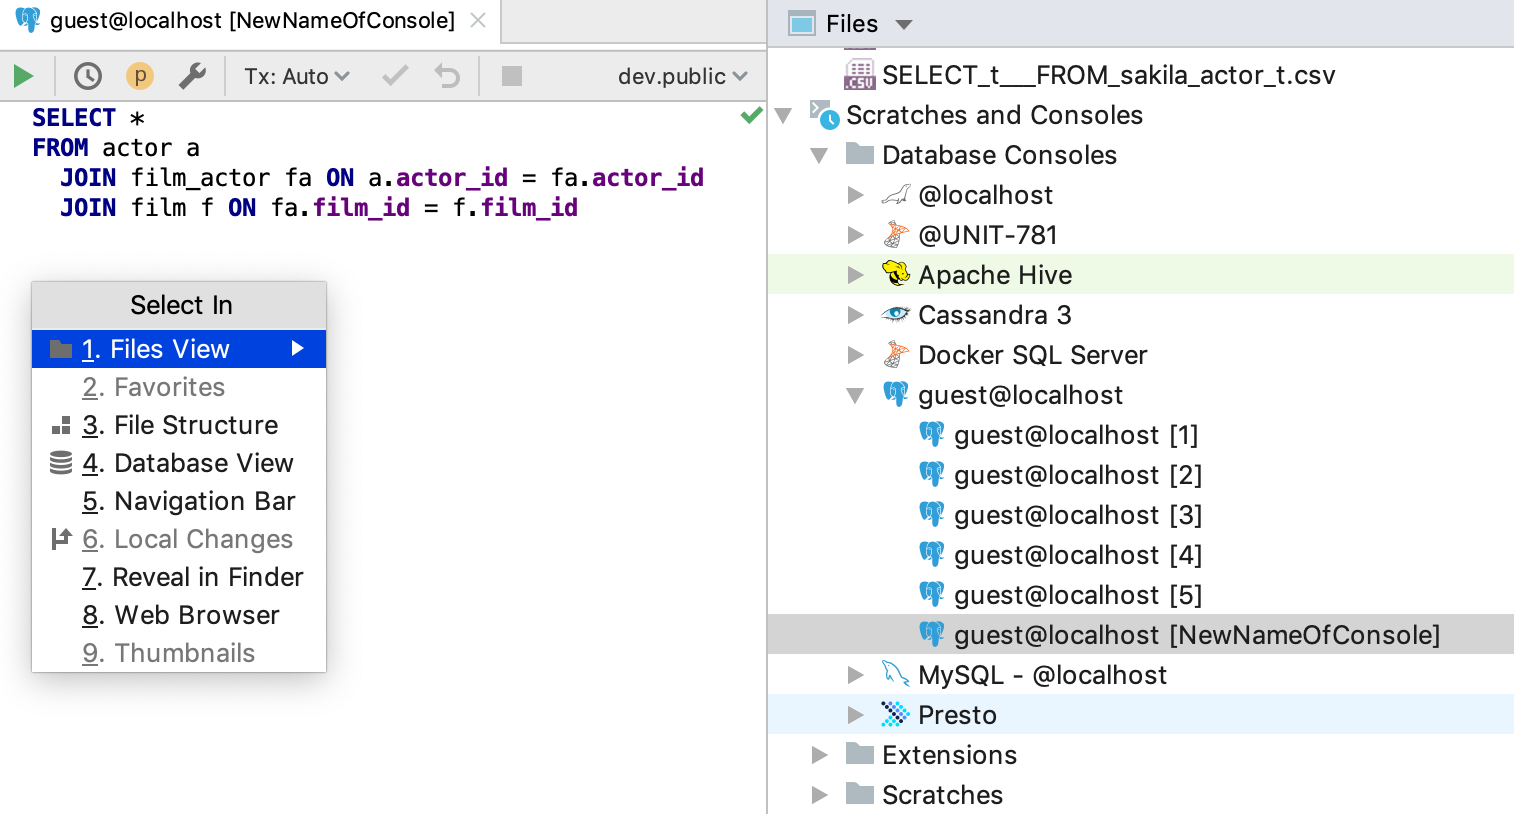
Here you can also rename a console file, which can then later help you to locate it.
Another way to rename a console file, without opening the Files tool window, is to open the Navigation bar (Ctrl/Cmd+Up) and then rename the console from there.
Scratch Files
Scratch files are similar to query consoles; the only difference is that they are not attached to a data source. They can be of any type: JSON, XML, or text files, but we’ll speak specifically about SQL scratch files. They are SQL editors which can be associated with any of your connections.
There are several ways to create a new scratch file:
— Shift+Ctrl/Cmd+N
— File | New | Scratch file
— Invoke Find Action (Ctrl/Cmd+Shift+A) then type ‘scratch’ and press Enter.
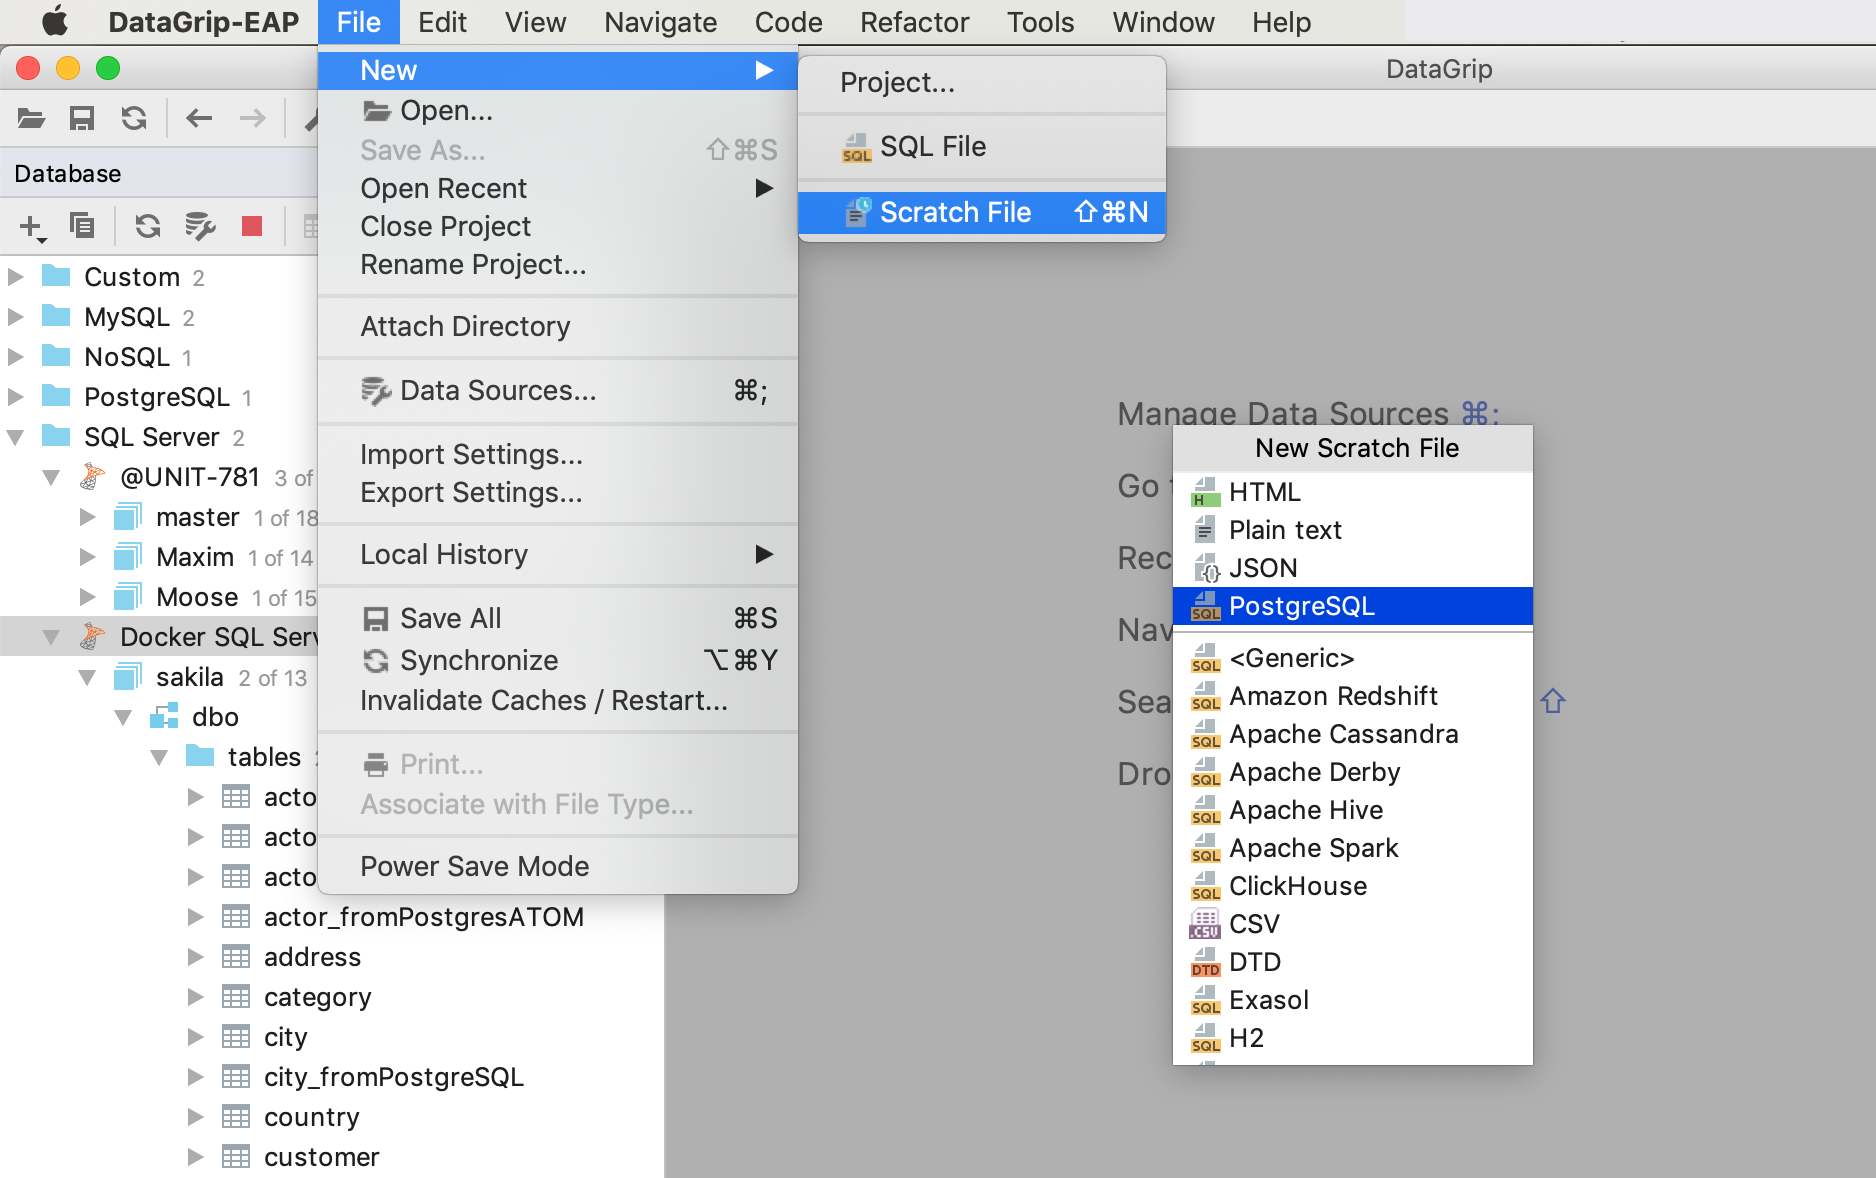
Then choose the language you want this file to be highlighted as. Let’s say it’s PostgreSQL.
In this newly created file, you can write SQL. If you need to run it, then obviously, you need the attached connection. In DataGrip you need to attach the console. Again, there are several ways to do this:
— Just click Run (Ctrl/Cmd+Enter), and the IDE will offer to do it for you.
— Use the switcher in the top right-hand corner. There you’ll see only the consoles which are associated with the same language as your file. To attach a console from the data source of another DBMS, first, change the file’s language.
— Use the context menu of your scratch file.
Once you have attached the console, the objects in your SQL will be resolved. This means that DataGrip now understands which particular objects are used there. As a result, you will be able to navigate from the SQL to the database tree.
All the scratch files you’ve created are saved in a virtual Scratches folder. Like Database Consoles, it can be found in the Files tool window in the Scratches and Consoles section.
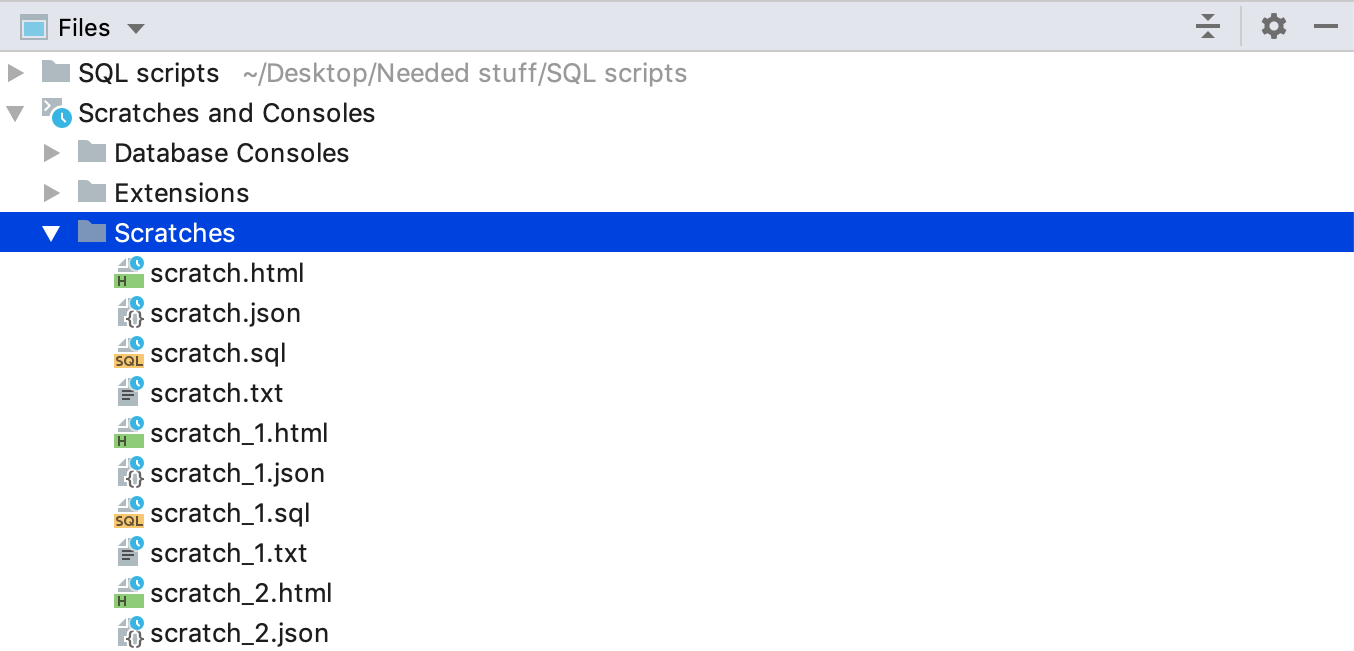
There are also files called scratch buffers which are almost the same, but they are created in a cyclical way: only 5 of them can exist at a time; when а the sixth scratch buffer is created the first one will be deleted.
User files
It is likely that you find the best way for you to work with SQL is to use the files as they are: you know where they are located, they can be modified from another place, and they can even be stored under Version Control System. Or they can be a huge legacy folder of scripts from the year 2005!
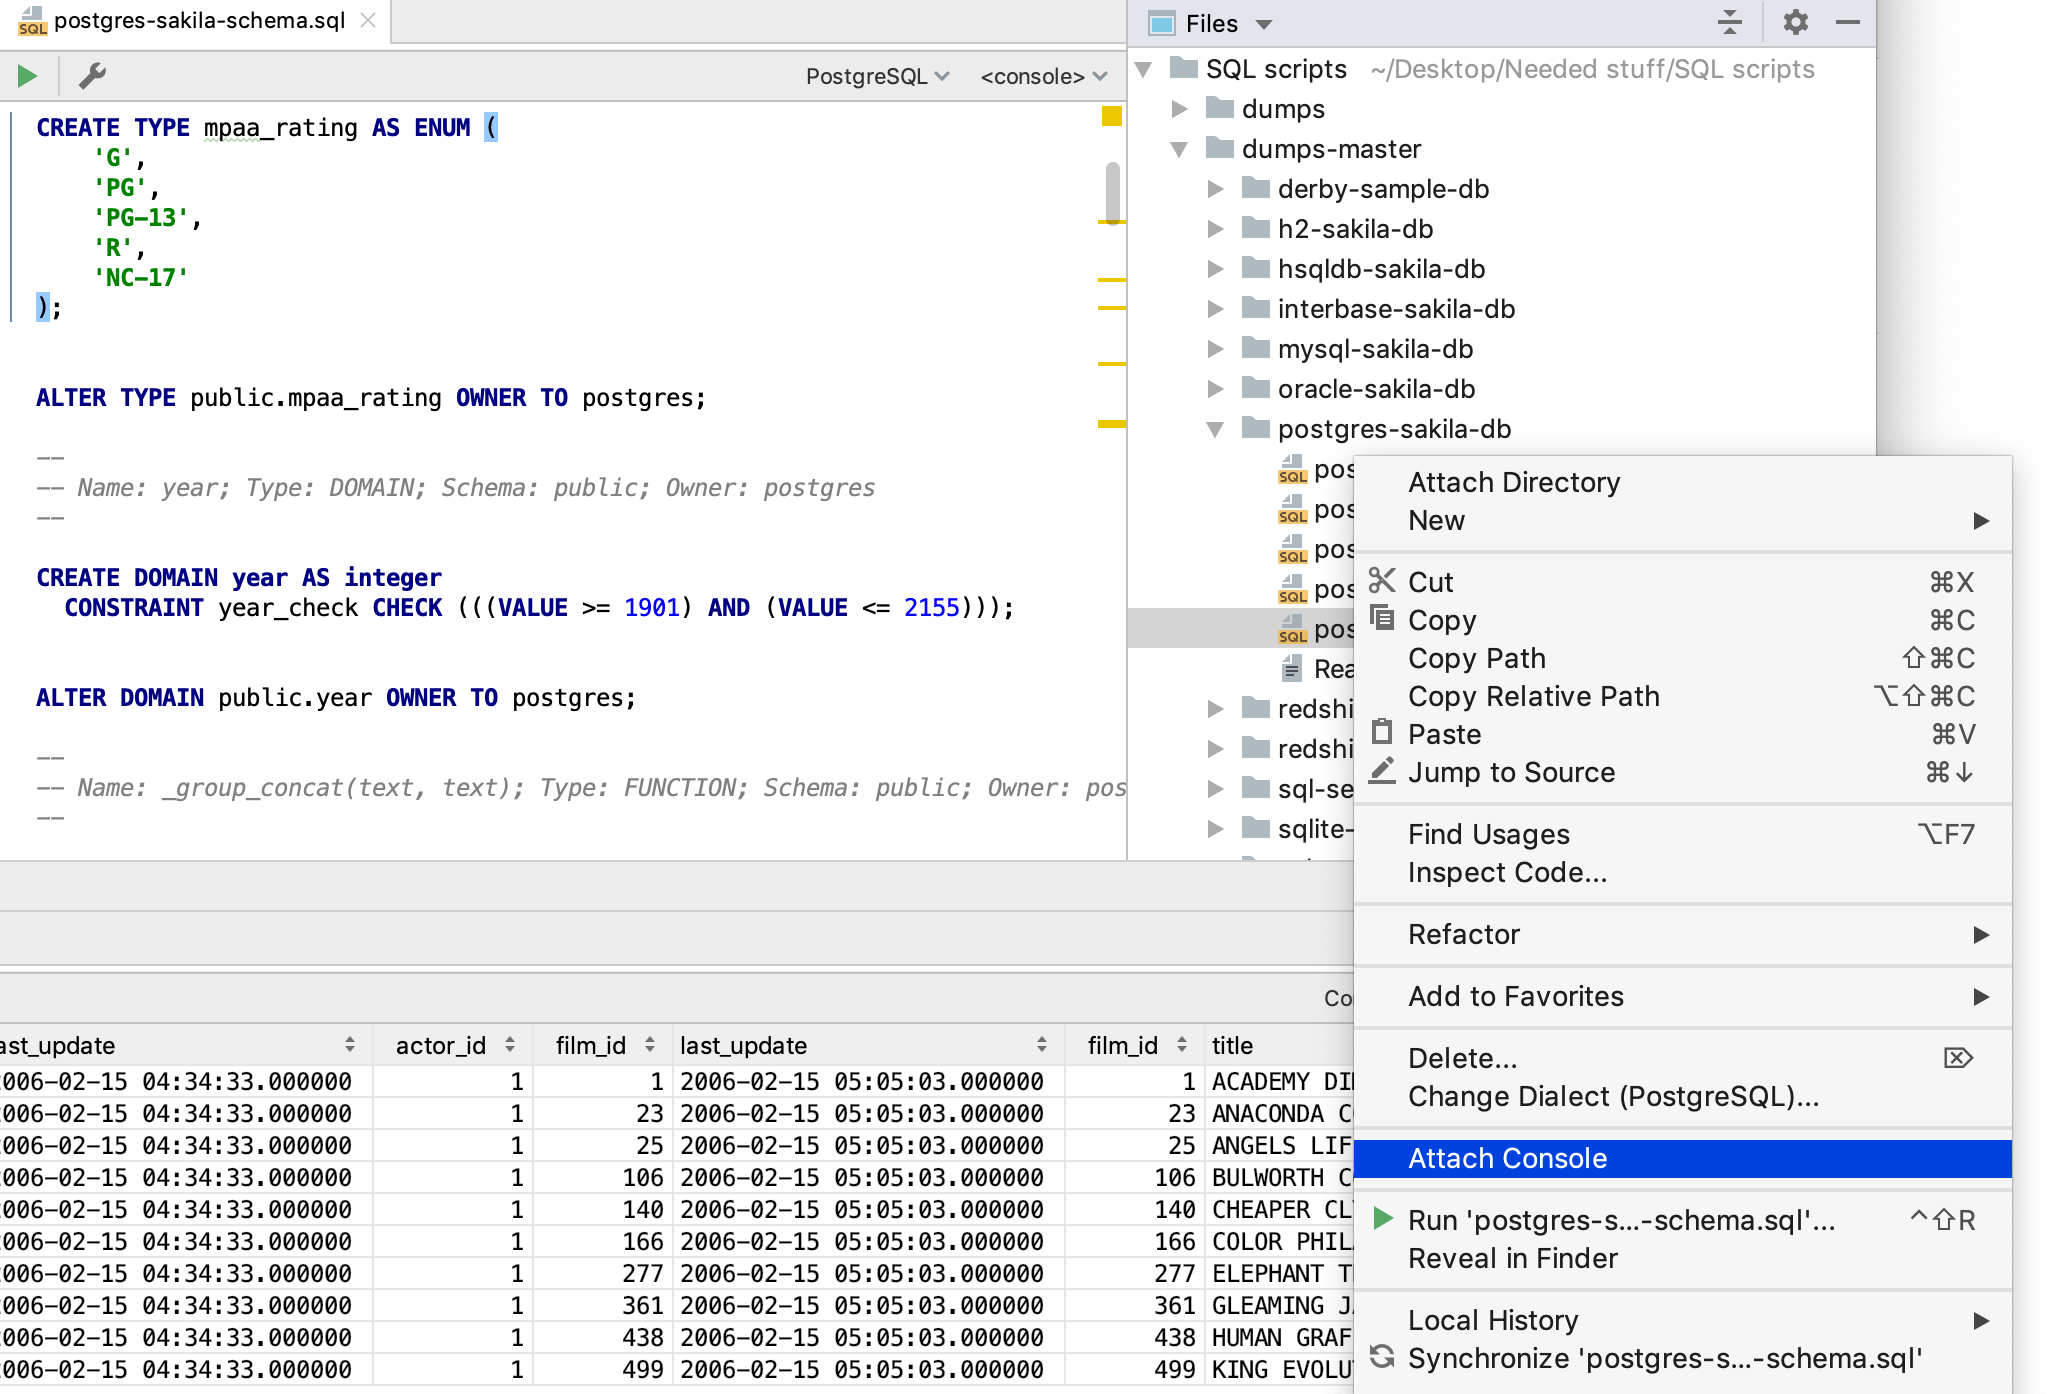
To work with files from your machine or any other place you have access to, attach the directory you need to the Files tool window. This can be done from the context menu. Or use the button on the toolbar.
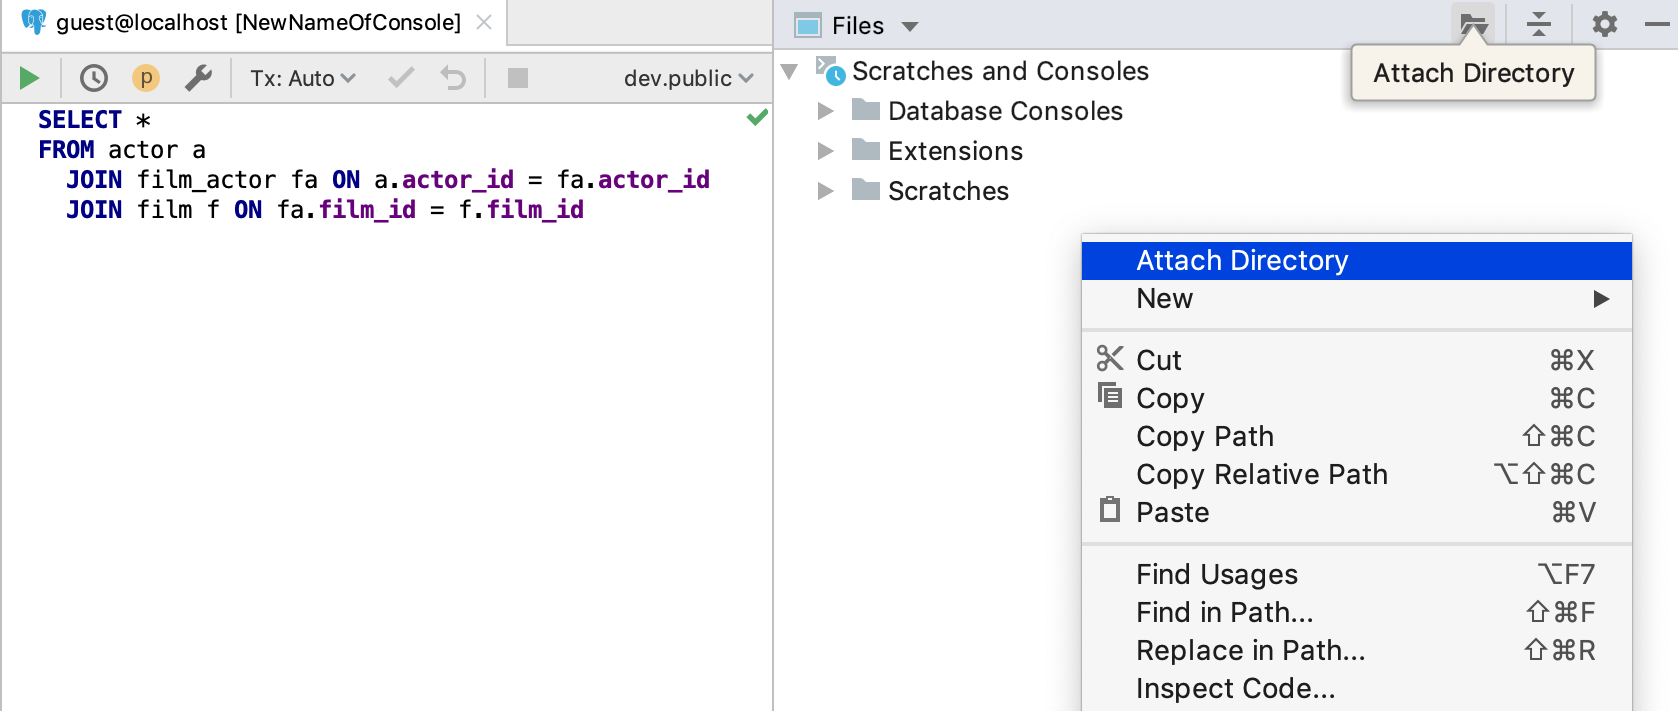
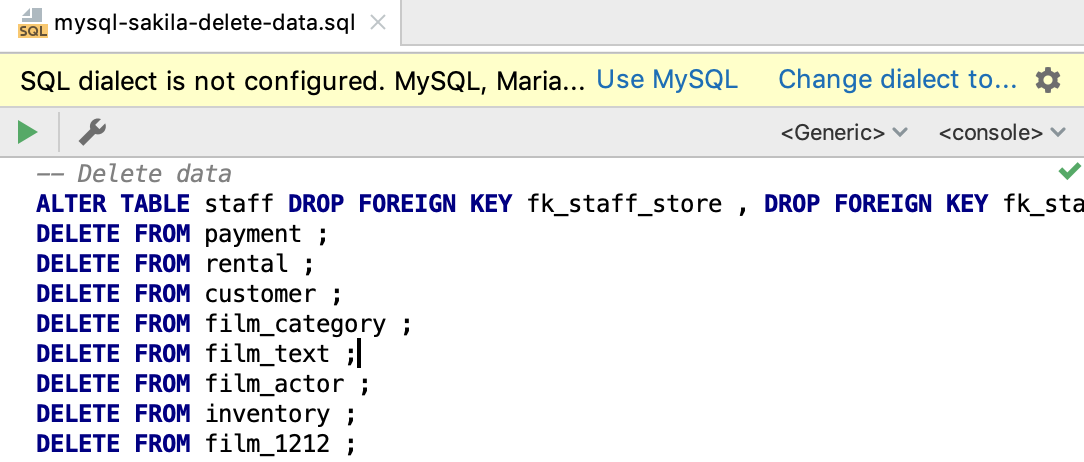
Then you’ll see the folder that you need. Open and modify each file there with DataGrip. As with scratch files, every file should have its own language specified so it can use the correct highlighting and code analysis. The language (in our case, SQL Dialect) can be chosen from the top right-hand switcher.

Sometimes DataGrip will detect the dialect automatically.
SQL dialects can be defined for the group of files in Settings | Database | SQL dialects.
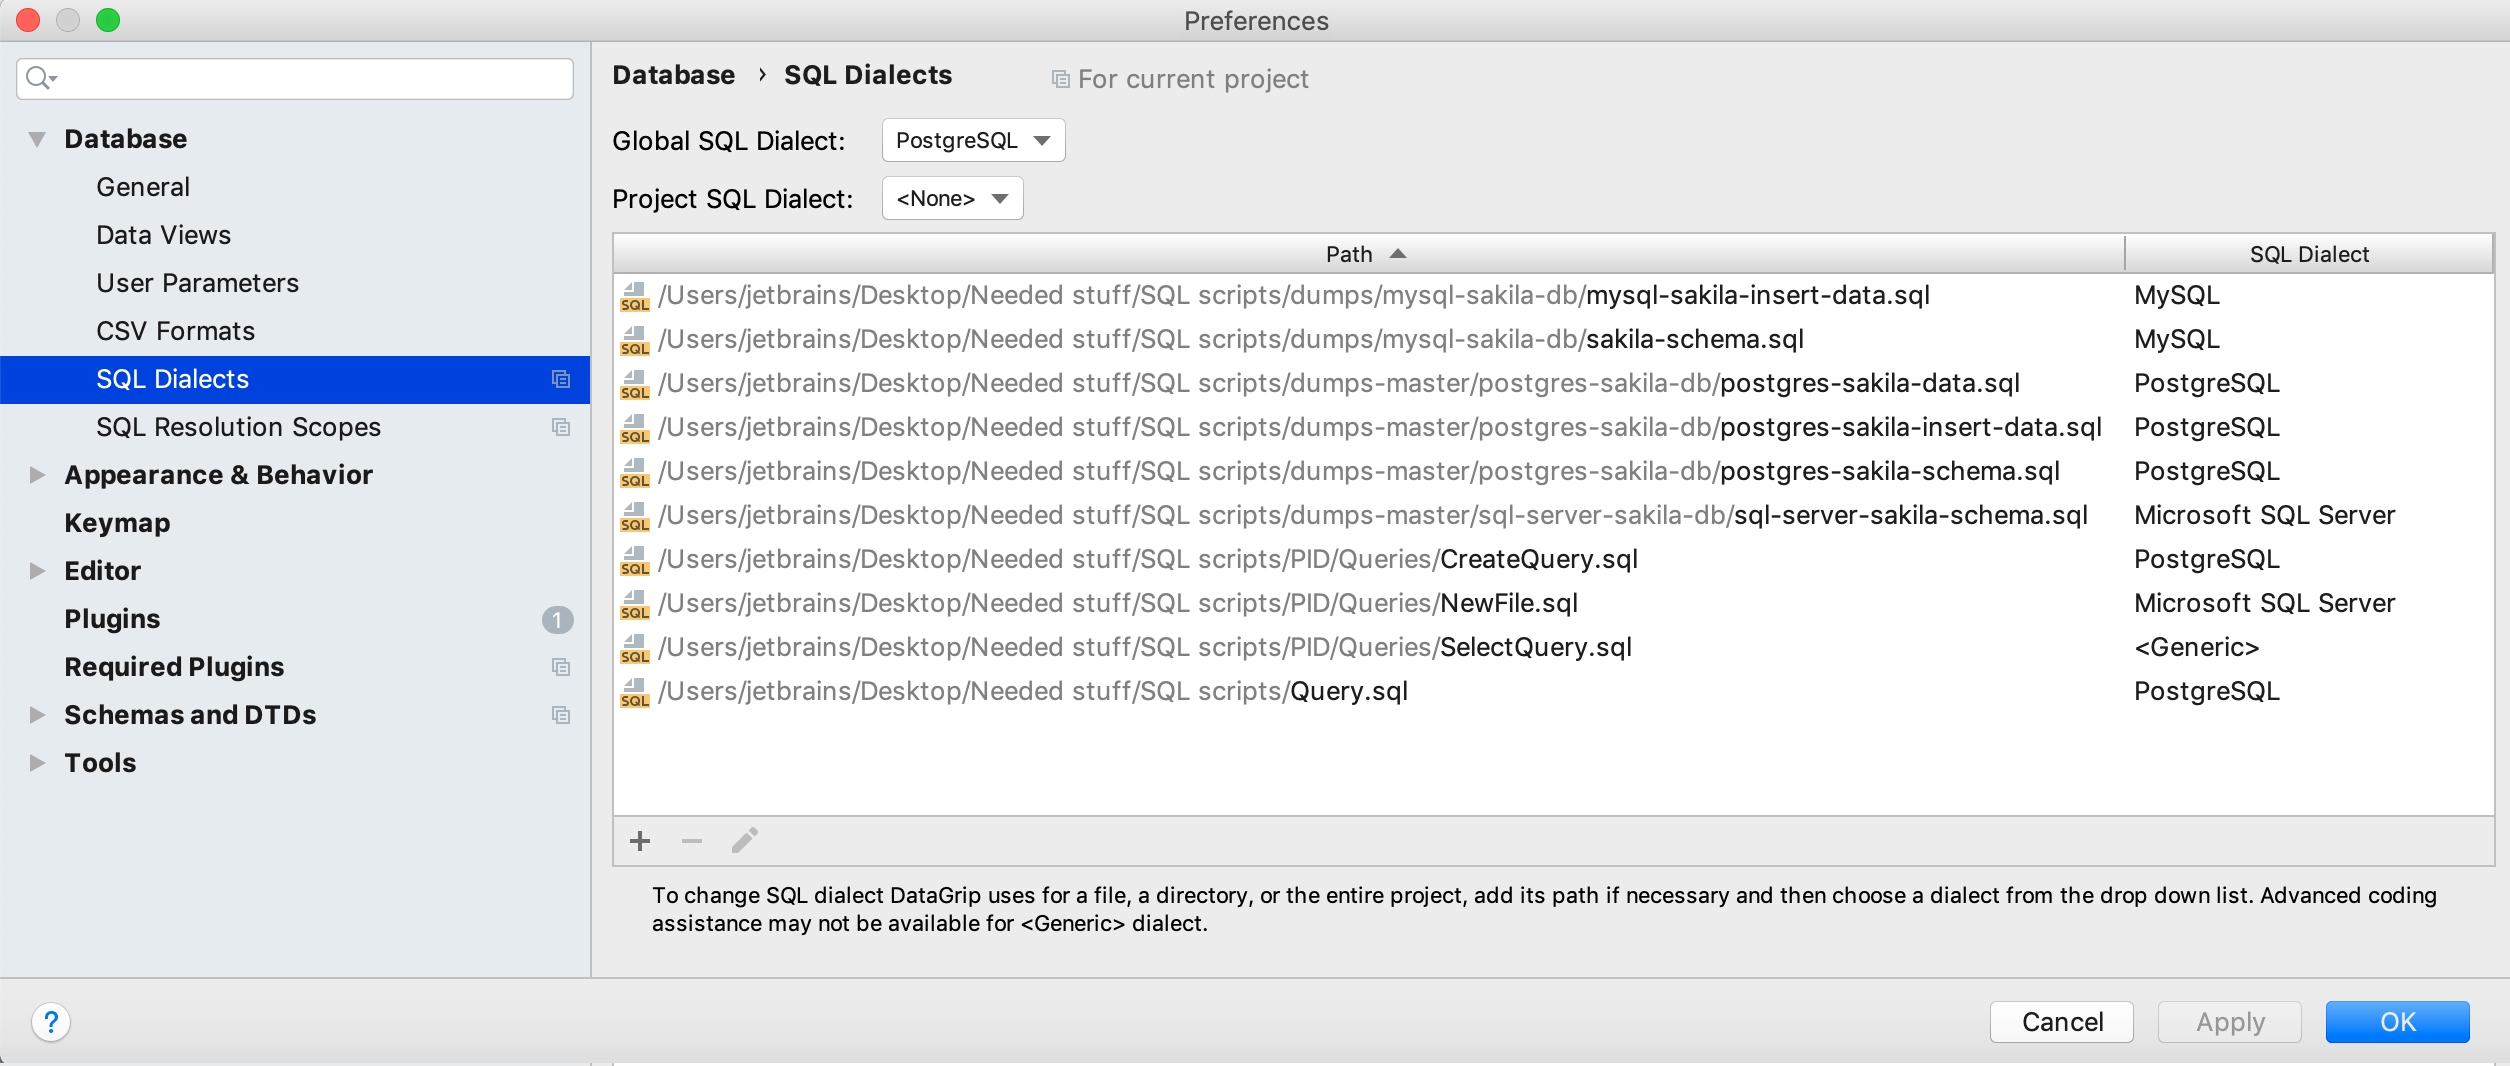
The dialect can be set for each file or for the whole script folder. If you define a Global SQL Dialect, this dialect will be used as the default to highlight all your files. It can be useful if you work on one DBMS.
As with scratches, once you’ve defined the dialect, it’s time to attach the console to the file. It can again be done from the different places.
When you run the statement, and the console isn’t attached, DataGrip will offer to do this.
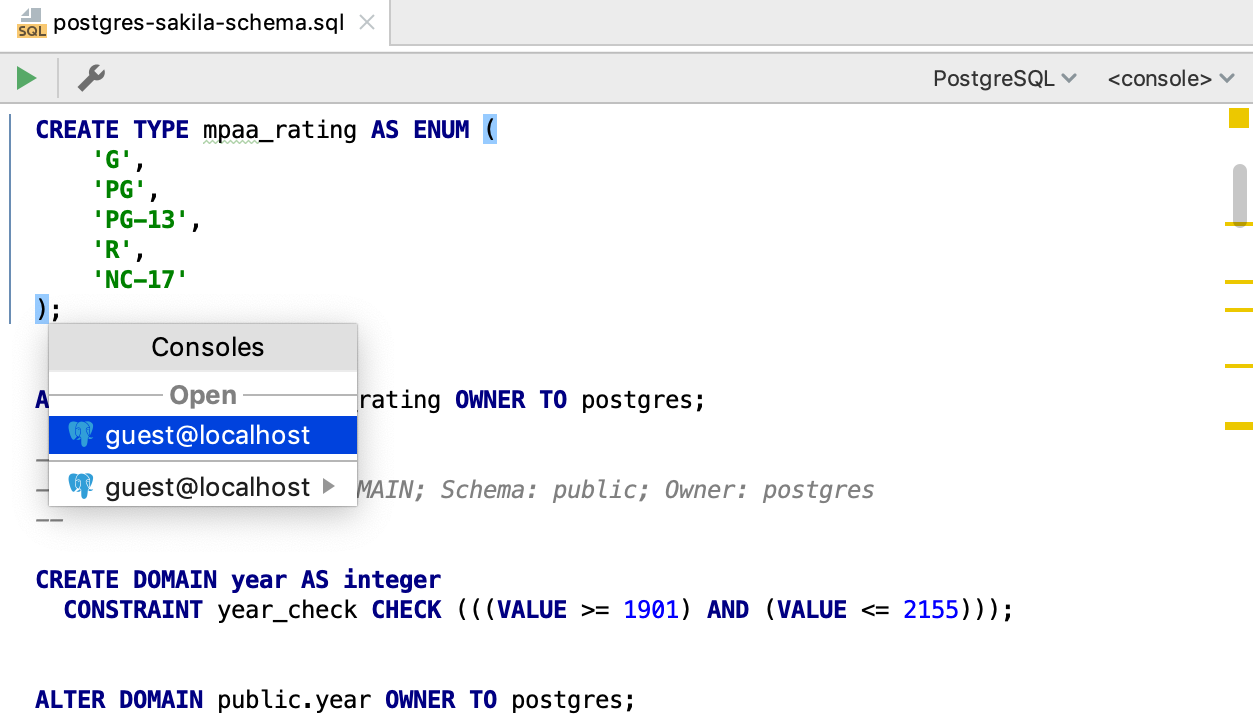
Or you can do it from the context menu.
The switcher in the top right-hand side also works.
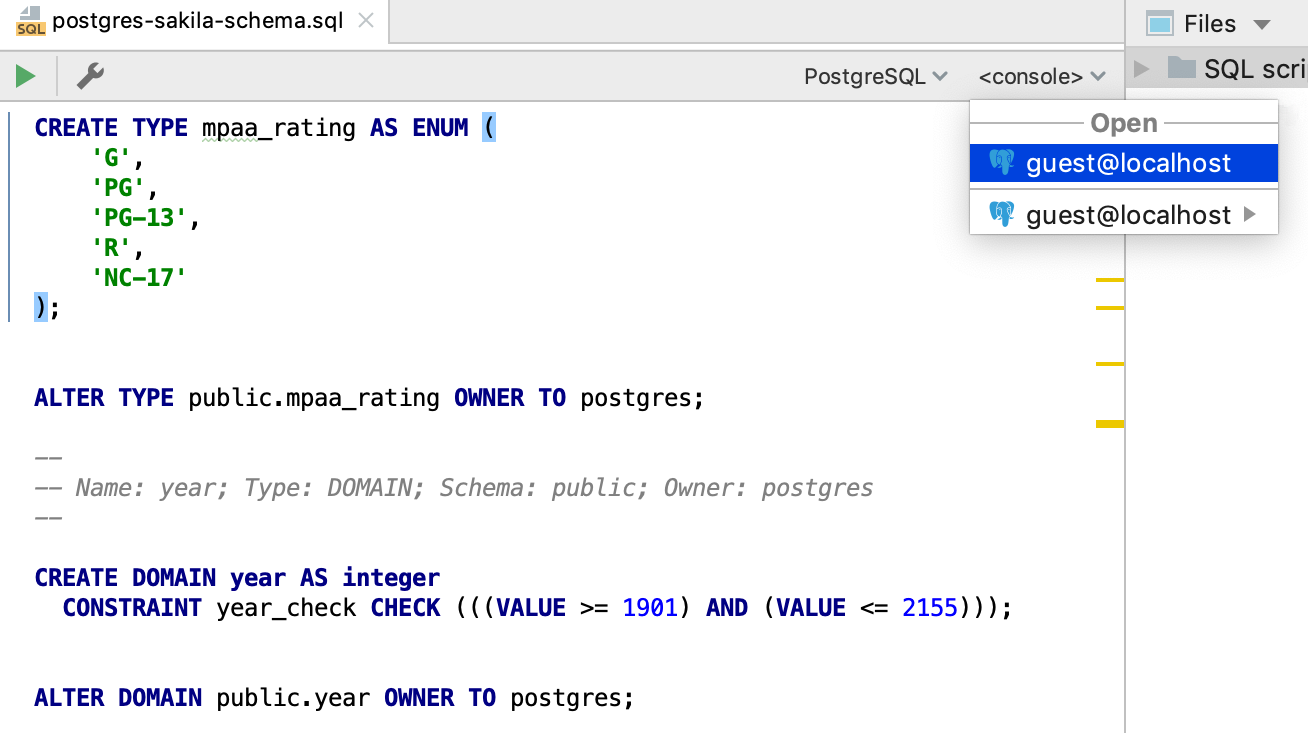
Once the console is attached, you can run statements in the context of the connection associated with that console. The resolve will work correctly as well.
There is also the possibility to resolve your scripts to CREATE and ALTER statements in other files. For this, you need to create a DDL Data Source from your DDL scripts.
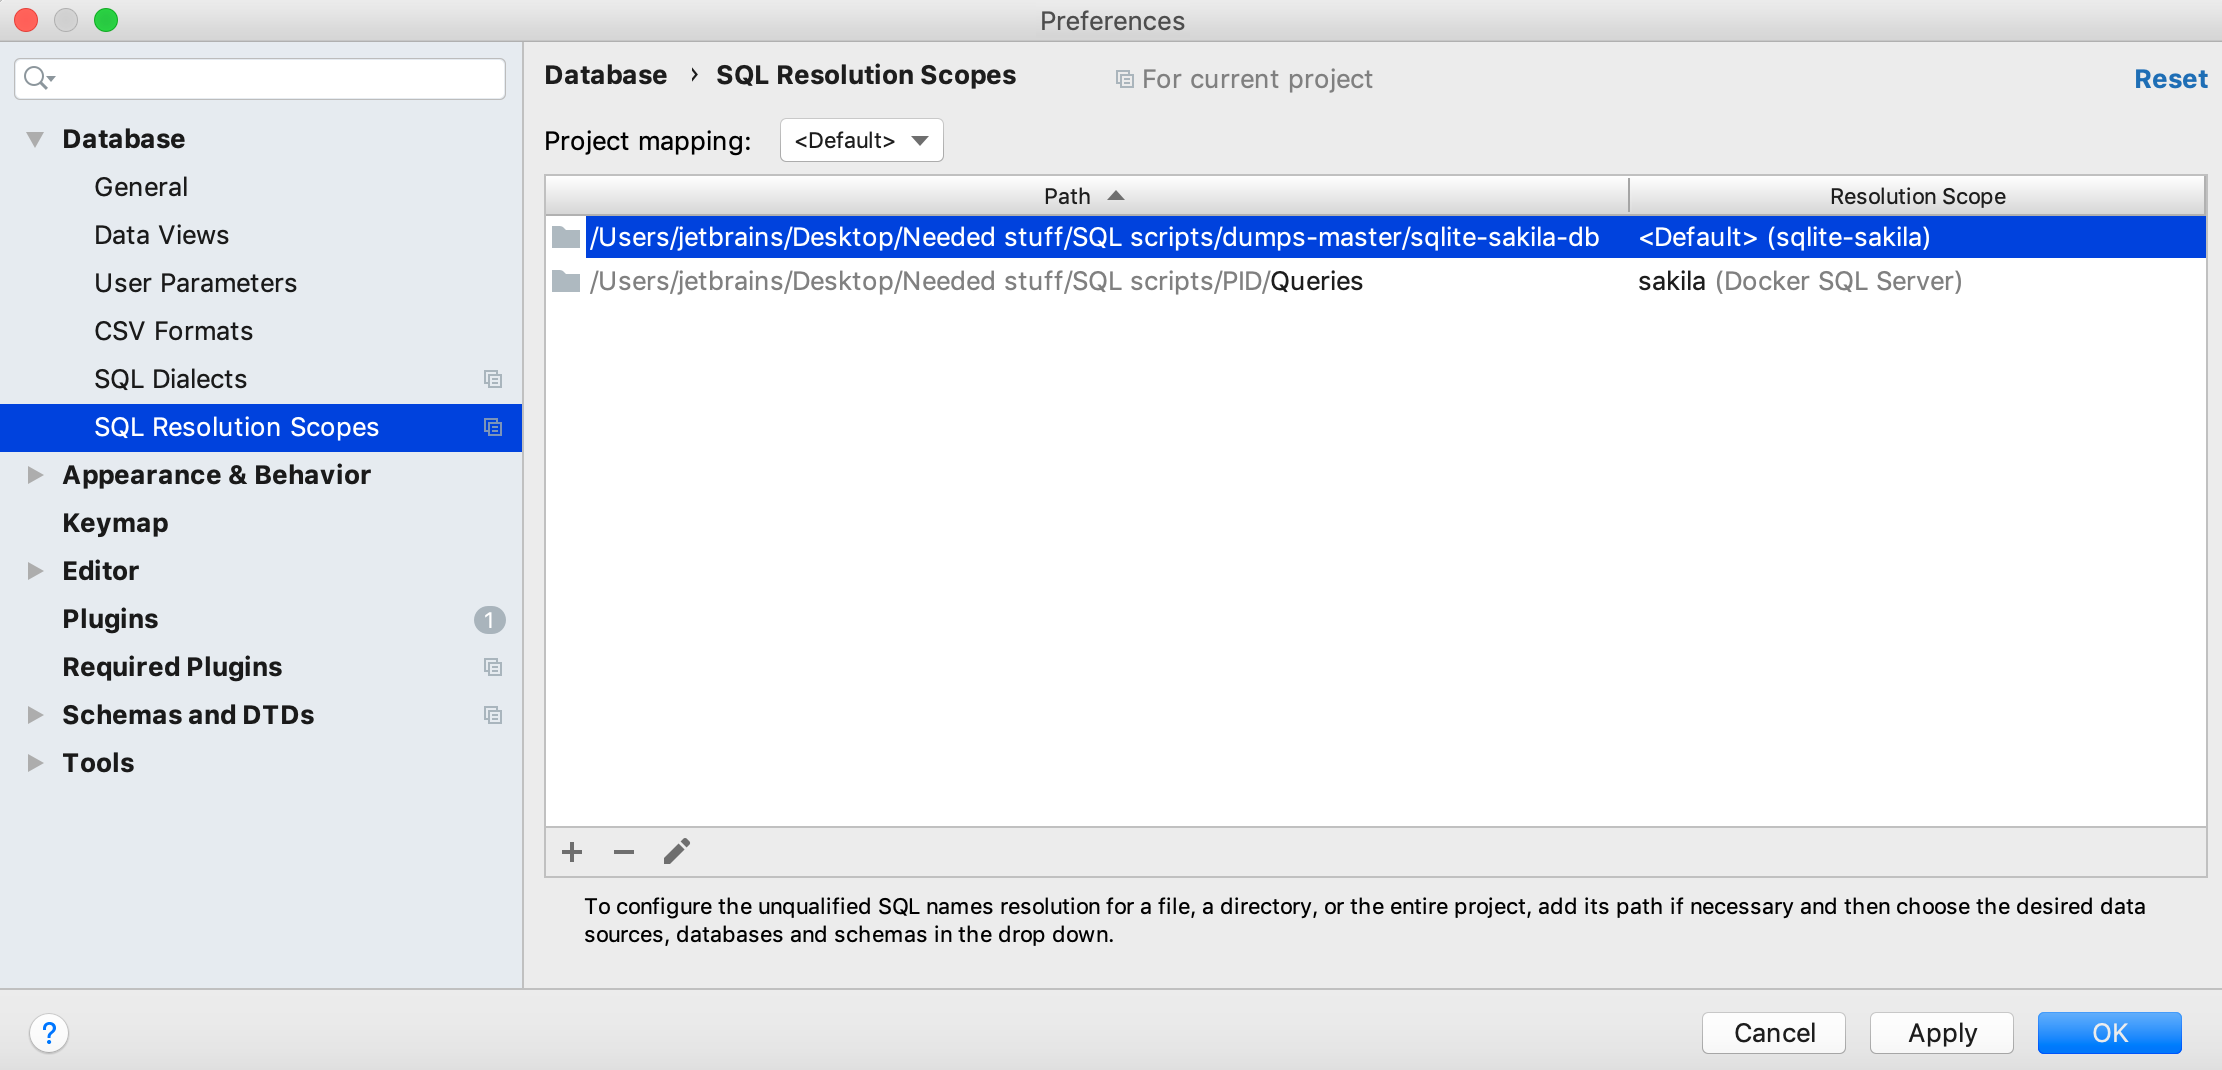
A little more about resolve: If you just observe files, then you also need to have a correct resolve without attaching consoles to the file. In these cases use Settings | Tools | Database | SQL resolution scopes where you can map any SQL file or folder to any scope. If you do this, all unqualified objects from these locations will be resolved to the selected data source, database, or schema.
The final thing to tell you about is that there is a file size limit which allows you to use the full set of code insight features. It is 2.56 MB by default. If the file you open exceeds this limit, you’ll get a notification. If the file is bigger than 20 MB, you will only see part of the file in the editor.
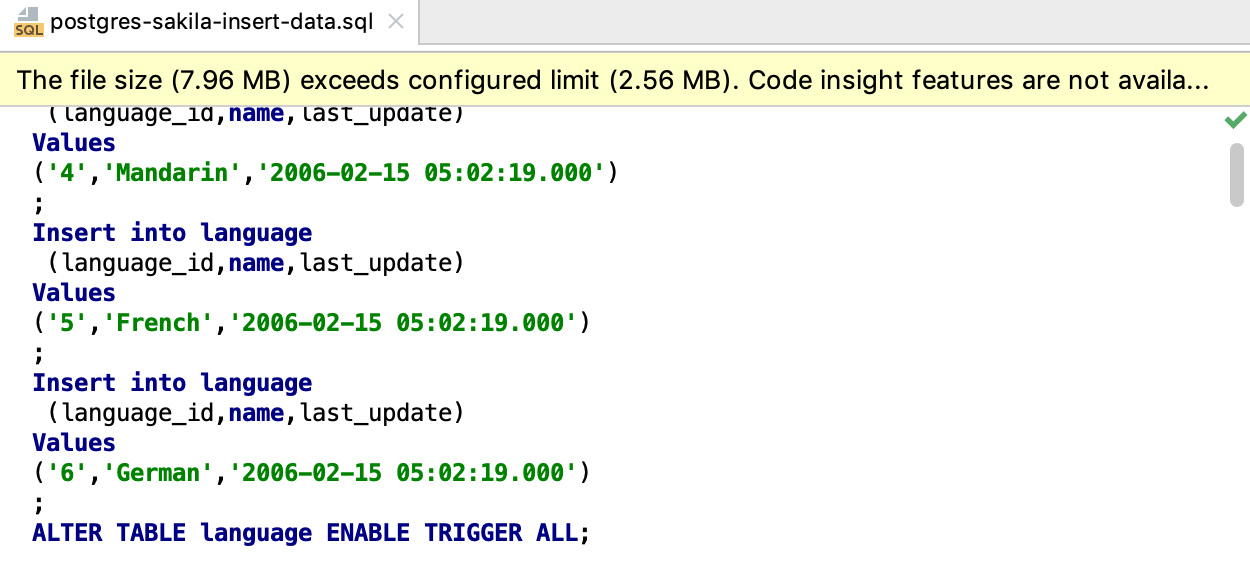
If you want to change this 2.56 MB limit, be aware that it can affect performance, do the following: Go to Help | Edit custom properties and in the open file (whether it’s empty or not) put the following string: idea.max.intellisense.filesize=3000 where 3000 is the new limit in bytes.

Usually, if the file is too big and you just want to run the whole script, use the Run action from the context menu of the file. You can define several schemas and databases here so that your file will be run against all of them.
If you want to know more about working with Version Control then check out our tutorials: How to work with Git in DataGrip and DataGrip and GitHub integration.
Thank you for reading! If you have any questions, please write them in comments or drop an email to datagrip@jetbrains.com.
DataGrip team

