.NET Tools
Essential productivity kit for .NET and game developers
In-depth look at Customizing Type Layout with ReSharper
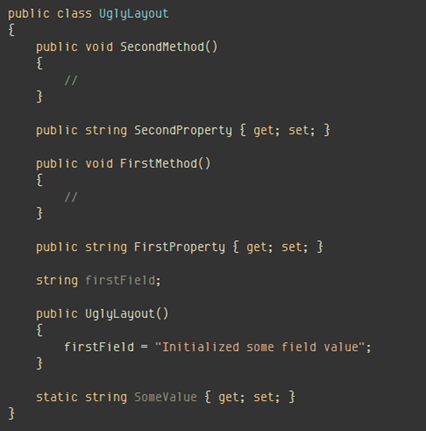
When we run Code Cleanup with ReSharper, one of the options it has is to re-order the member layout in classes. This means that some ugly layout like this
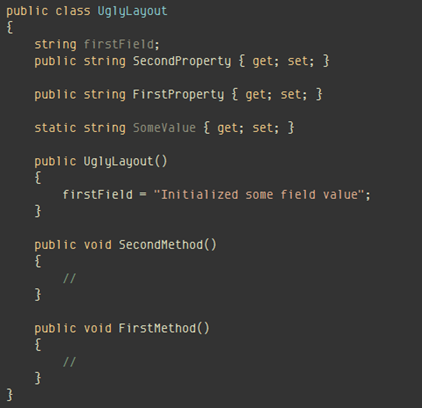
can be turned into this
(you need to have Reorder Type Members checked).
The advantage is that we don’t need to constantly worry about making sure properties and fields are declared in their correct position, wasting time manually re-arranging code.
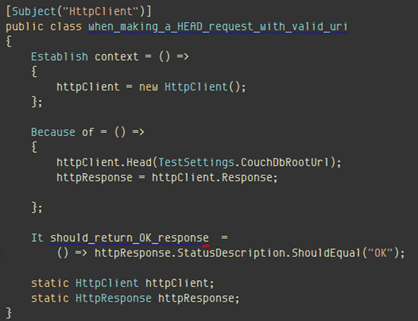
What happens however when we don’t agree with ReSharper’s choice in layouts? Recently I came across this situation when I ran the clean-up (by mistake) on my Specifications project. I use MSpec and I like to keep certain things in certain places. In particular, with MSpec you make use of statics and I like to have them placed at the bottom of each class where I can ignore them.
Of course, when I ran ReSharper clean up, I ended up with
So what to do? Well, I am aware of the possibility of modifying how type members are ordered in ReSharper, the problem with it however is that it’s global, that is, you can’t change it per project. What hadn’t occurred to me (talk about not looking at the default pattern. Thanks Alex) was to bind the customization to MSpec’s Subject attribute that specifications have (albeit it is not required but nice practice). Although much of the work is done, I thought it would be a good opportunity to delve a bit more into customizing layouts since it could probably benefit others. So here goes…
Customizing Type Layouts
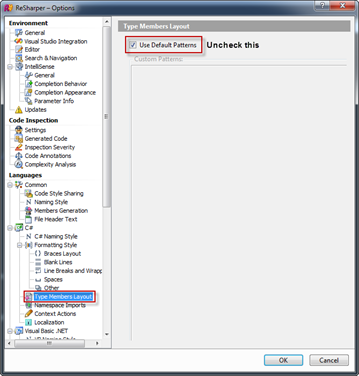
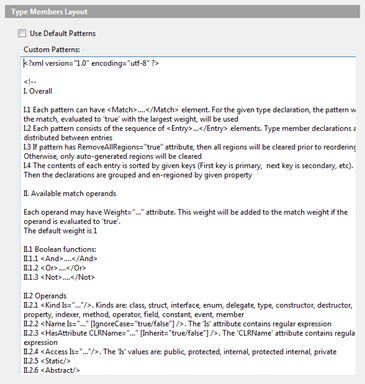
Layout is defined in ReSharper using XML which is defined under ReSharper | Options | Languages | C# | Type Member Layout
To get access to the default pattern and customize it, we need to uncheck the Use Default Patterns checkbox, which then causes the editor to display the text. Don’t be scared!
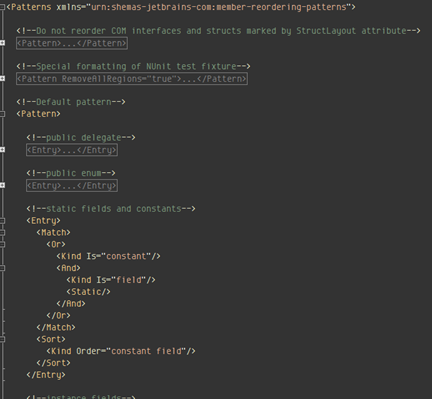
What we see is the XML file that defines the pattern layout. Most of the text is actually comments defining how things are layout. The actual patterns start lower down (although there’s no scrollbar, you can scroll). Here is the same contents in a nicely XML highlighted view
A Pattern (<Pattern></Pattern>) consists of multiple entries (<Entry></Entry>). Each entry in turn represents some type of member. The order of these entries define the order in which the code is laid out. Let’s take a look at an entry in more detail
Each entry consists of a <Match> element and optionally a <Sort> and <Group> element. <Match> in turn consist of one or more Operands combined using <And>/<Or> and negated with <Not>. An Operand can be:
| Operand | $val can be.. |
| <Kind Is=”$val” [Order=”$val”]> | class, struct, interface, enum, delegate, type, constructor, destructor, property, indexer, method, operator, field, constant, event or member |
| <Name Is=”$val” [IgnoreCase=”true/false”]> | Regular expression. IgnoreCase indicates whether to ignore case |
| <HasAttribute CLRName=”$val” [Inherit=”true/false”]> | Regular expression. Inherit indicates if it applies to inherited classes. |
| <Access Is=”$val”> | public, protected, internal, protected internal, private |
| <Static/> | |
| <Abstract/> | |
| <Virtual/> | |
| <Sealed/> | |
| <Readonly/> | |
| <ImplementsInterface CLRName=”$val” [Immediate=”true/false”]> | Regular expression |
| <HandlesEvent/> |
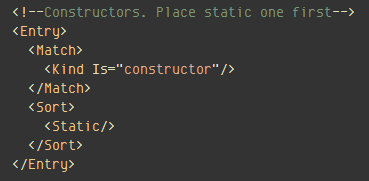
Taking this into account, if we look at the previous pattern, we see that we are trying to match constructors, specifying (optional) that static constructors should be ordered first. Let’s take a look now at a more “complicated” pattern
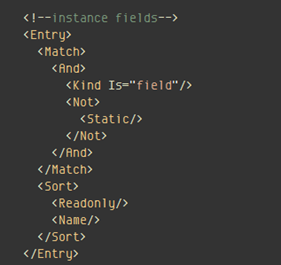
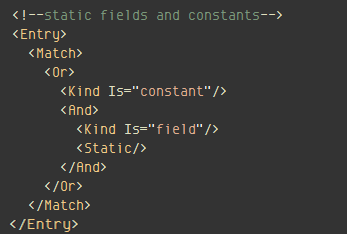
This pattern is for matching instance fields that are not static. What we do is identify fields using the Kind Operand and passing field as the value for the Is attribute. Since we are interested in non static fields, we add a <Not> operator around a <Static/> operand. We need to wrap this in an <And> operator (using Polish notation). Finally, let’s look at static fields and constant
Here the pattern should match a constant or (<Kind Is=”constant”>) <And> a static field (<Kind Is=”field”>) which is <Not> static (<Static/>). Again, if we look at this using Polish (or prefix) notation, it is easy to understand.
Defining Multiple Patterns
Having understood the basics of how patterns are defined, we can now come back to solving our issue with MSpec. Our issue is where statics are located. One solution would be to move the static pattern to the lower part of the pattern. Problem of course is that this would effect all classes. We only want it to effect classes that are of MSpec, that is, have the Subject attribute.
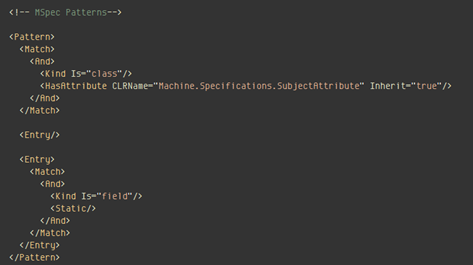
The key in solving this problem is to define a different pattern for MSpec classes. In the Pattern definition file, we can have multiple patterns. What we can therefore do, is add a new pattern specific for our MSpec classes. How will ReSharper choose which pattern to use? That’s solved easily by defining a <Match> as the first element of each Pattern
We have defined a new pattern that has a <Match> element with an <HasAttribute> for the Subject attribute of MSpec. When we now run Code Cleanup, ReSharper will match the pattern with MSpec classes and apply the appropriate layout. In our case, the only thing we have defined is that static fields should be after all other entries (indicated by using the <Entry/> element). This means that we are leaving layout as is for everything else (in real-world scenarios, this might not be the case. The MSpec file defined by Alex in fact has a full nice layout for MSpec).
Giving Matches Weights
In the previous pattern definition, there would not be any conflicts between the default patter and that of MSpec because the <HasAttribute> element discriminates correctly only MSpec classes. What would happen however if two patterns would match? That is where the weight factor comes in. Each <Match> element can have a Weight attribute associated with it. In case of conflicts, the one with the highest weight wins.
Sorting, Grouping and Regions
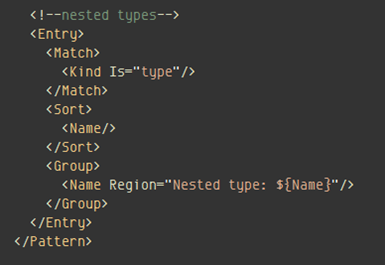
In addition to matching elements and defining their positions, we can also specify sorting and grouping options with patterns. By providing a <Sort> element
and defining the Operand by which it is to be sorted, elements that match the pattern will follow the specified order. In a similar way, using the <Group> element, we can group similar constructs and optionally wrap them in regions. Many of these operands can take as attribute values the variable they represent. In the previous pattern, we are specifying as the region name the variable ${Name} which will be instantiated to the name of the type.
One final option is the possibility (which many of us are thankful for) of removing regions on cleanup. Each <Pattern> element has an attribute RemoveAllRegions which can be set to true or false. By setting it to the latter, regions will be removed on code cleanup.
As we can see, the possibilities of laying out type members when performing code cleanup are quite unlimited. The process is a little bit cumbersome, mostly due to the editor, although there are already planned improvements for ReSharper 6. Nonetheless, if you have any feedback, please send it now or log it in YouTrack.
[Download the XSD Schema here]
Subscribe to a monthly digest curated from the .NET Tools blog:


