

.NET Tools
Essential productivity kit for .NET and game developers
Type Dependency Diagrams in ReSharper 9

In ReSharper 8, we introduced the concept of Architecture Tools as ways of visualizing the state of module dependencies in your solution. In ReSharper 9, we have augmented these tools with an ability to visualize class dependencies too.
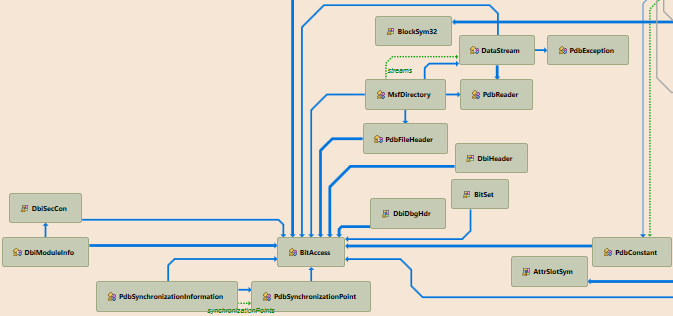
Dependencies between types are shown on a Type Dependency Diagram. You can make one by selecting any node from the Solution Explorer (you can pick a file, folder, project or the whole solution) and choosing Show Type Dependency Diagram. You will see something similar to the following:
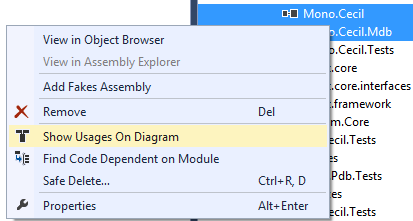
In addition, sometimes you need to investigate which external modules you depend on. In this case, you can once again open Solution Explorer, but this time pick a couple of references, right-click and choose Show Usages on Diagram in order to see how your code depends on the selected modules.
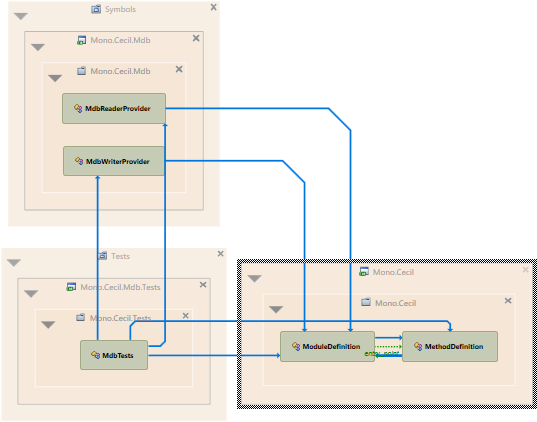
This yields the following diagram:
Just as with the project dependency diagram, arrows are used to indicate the dependence of one type on another, and the width of the line indicates the relative number of usages of one type from another. The diagram is capable of showing usages, aggregation, inheritance relationships, return type usage and even the use of constructor injections.
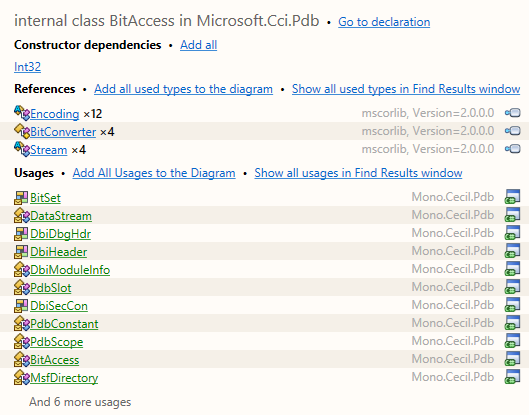
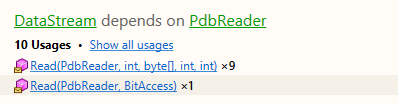
Both the types and the lines connecting them show additional navigation options if you hover the mouse over them. In the case of the types, you get to see the references and usages, with plenty of navigation hyperlinks:
Edge-related popups are similar, showing the usages:
It is also possible to collapse the groups in which the particular types are shown. If you do, the popup for the collapsed group will show how all the types inside this group depend on some external module.
It’s important to note that the diagram is very flexible in terms of content. Some of the things it supports are:
- Component removal: simply select a type and press Delete to get rid of it. The diagram will fluently readjust itself.
- Types can be added via simple drag-and-drop: grab an element on the Solution Explorer, drag it onto the diagram, and you’re done. Also, as an added bonus, you can select a class name right in the text editor and drop this onto the diagram canvas to add the desired class!
- Types can also be added if you simply start typing right on the diagram. This will result in a search (similar to Go to Type) and, after you pick a particular element, that element will be added to the diagram.
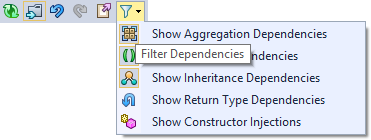
- You can also filter out particular types of elements:
- You can drag an element on the type diagram to a different folder or project. This will automatically invoke the Move refactoring.

The right side of the diagram also contains the controls for zooming and panning, but also has two large buttons for controlling the layouter that’s used for the diagram, and they both cause the graph to be laid out in a specific way.
The Inheritance Hierarchy Layouter is more suitable for one big inheritance hierarchy, whereas the Business Logic Layouter is better for a set of non-derived but dependent modules. ReSharper generally tries to automatically determine which layout is better, but you are always at liberty to change the setting.
We hope you enjoy this functionality. If you haven’t got yourself a copy of ReSharper 9 already, a 30-day trial awaits.


