

.NET Tools
Essential productivity kit for .NET and game developers
Rider front end plugin development

While JetBrains is still working on a full SDK for Rider, it is already possible to make a plugin for it – at least for the front-end part. As Rider is built on IntelliJ Platform, just like WebStorm and IntelliJ IDEA, we can write plugins for it using the IntelliJ plugin SDK.
A good example would be the REST client we have in Rider. Sure, it’s built-in, but it’s a plugin providing some awesome functionality! One could build, for example, a NuGet package explorer – just showing package contents is not something that would need the back end. Want to add an image editor into the IDE? Create a context menu action that converts a JDBC database connection string to a .NET connection string? A tool window showing Dilbert comics? All fine examples that can be built as a front end plugin!
But front end? Back end? Before we look at a simple example, let’s see what Rider is made of.
Microservices!
When we embarked on the path of building Rider, we decided we wanted to reuse as much of our existing tools as possible. We’ve been building an IDE platform, IntelliJ Platform, for years and we support many development scenarios in there that power many of our IDEs like WebStorm and IntelliJ IDEA. On the other side, we’ve been building ReSharper for a long time too. So why build an IDE from scratch if we can leverage existing knowledge and experience?
Rider consists of two main components: the front end, powered by IntelliJ Platform, and the back end powered by ReSharper. One is written in Java and Kotlin, the other in C#. We’ve built a rich, custom protocol that allows both sides to communicate with one another.
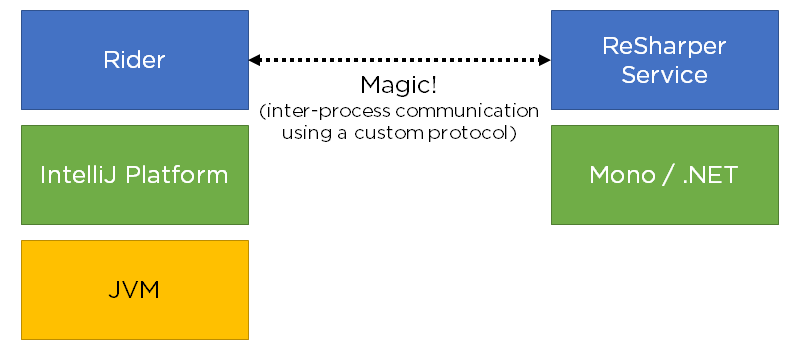
That protocol is worth a blog post of its own, but let’s not go there for now. By combining both platforms, we are able to provide fantastic IDE functionality. Also, running ReSharper out of process frees us from sharing resources and memory with Visual Studio.
What is not possible (today) is writing a plugin that adds a new quick-fix, for example. This would sit in the back end and have access to the semantic (code) model. Our plugin story for Rider is still under development, but with Rider being based on IntelliJ Platform, we can already create plugins for the left-hand side of the above diagram: the front end. Anything that plugs into the IDE as a tool window, a tool that can be invoked as an action – that’s all possible today.
Creating a front end plugin
First things first: front end plugins should be written in a JVM (Java Virtual Machine) language. That means dabbling in Java, or in our own JVM language called Kotlin. While Kotlin is built on the JVM, it’s incredibly easy to start writing code in if you come from a C# background.
Once IntelliJ IDEA is installed (Community Edition is fine), it’s best to go and read our plugin development guidelines. There are two actions that are slightly different:
- When configuring the IntelliJ Platform Plugin SDK, make sure to use the following alternative step 5: instead of selecting the necessary IntelliJ IDEA version, make sure to reference the Rider installation folder.
- Once the plugin project is created, edit the Run/Debug configuration and add
-Didea.platform.prefix=Riderto the VM Options.
Let’s look at a minimal example. We have a plugin for Unity3D’s editor, which allows users to open the existing project (or file) in Rider. On the Rider side, we have a plugin which listens for commands and then opens the project or file in the IDE.
Apart from some ceremony, the plugin is fairly straightforward. It listens for incoming UDP packets from the Unity3D editor, and when such packet arrives, we open the requested solution and show a new editor tab, opening the requested file and potentially line number. Annotated with some comments:
// Open project
SolutionOpenStrategy strategy = new OpenExistingSolution(slnFilePath, true);
project = RiderProjectOpenProcessor.Companion.doOpenSolution(null, false, strategy);

// Open file at specific line and column
new OpenFileDescriptor(project, vf, line, column).navigate(true);
Another example would be adding a context menu in the editor. In this example reverse NuGet package search plugin, we’re registering an action (in plugin.xml) that is shown in the editor context menu, and launches a search for the current word at the cursor:
override fun actionPerformed(ae: AnActionEvent) {
    val editor = ae.getData(DataKeys.EDITOR)
    val project = ae.getData(DataKeys.PROJECT)
    val word = getWordAtCaret(editor!!.document.charsSequence, editor.caretModel.offset)

    if (word != null) {
        val query: String
        try {
            query = URLEncoder.encode(word, "UTF-8")
        } catch (e: UnsupportedEncodingException) {
            return
        }

        BrowserUtil.browse("https://packagesearch.azurewebsites.net/?q=" + query, project)
    }
}
More information about writing plugins for the IntelliJ platform is available in our plugin devguide, and examples can be found in various open-source plugins.
Once the plugin code is written, use the Build | Prepare plugin for Deployment menu to generate a single .jar file that can be installed into other people’s Rider (Settings | Plugins | Install plugin from disk). This plugin can also be shared in the Rider plugin gallery.
What’s next?
But how can I build features on the .NET side of things? How can I show a dialog in the front end from an inspection that runs on the back end? Patience, young padawan. We’re hard at work to make plugin development for Rider an easier and more enjoyable experience. We just know there are many people out there who want to fiddle with extending Rider, and this blog post should give some basic insights in how to get started.
Rider front-end plugins are just IntelliJ IDEA plugins. Many of the plugins available for our other IDE’s are also available for Rider. A lot of them are open-source, so do check them out if you’re interested in plugging into Rider’s front end.
More to come, promise! Or await Task<PluginDevelopment> if you like.


