IntelliJ IDEA
IntelliJ IDEA – the Leading IDE for Professional Development in Java and Kotlin
Easy Hacks: How to Handle Exceptions in Java

Previously, we explored how to throw exceptions in Java to signal error conditions in our code. But throwing exceptions is only half the story. To build robust and reliable applications, we also need to know how to handle them effectively.
In this post, we’ll explore how you can handle exceptions in Java, and we’ll also show you some techniques to manage expected and unexpected events in your projects.
Understanding exceptions
Exceptions are objects that represent errors or unexpected events that occur during program execution. When an exception is thrown, the normal flow of control is interrupted, and the program transfers control to an appropriate exception handler.
Java defines three main categories of exceptions:
- Checked exceptions – These are exceptions that the compiler requires you to handle explicitly. They typically represent recoverable errors, such as files not being found (
FileNotFoundExceptionorIOException), network connection issues, or business logic errors that you will want to recover from. - Unchecked exceptions – These exceptions, also known as runtime exceptions, don’t require explicit handling. They often represent programming errors, such as attempting to access a null object (
NullPointerException), or an invalid array index (ArrayIndexOutOfBoundsException). - Errors – These exceptions are typically used by the JVM, like
OutOfMemoryError, and indicate severe problems like the JVM being unable to allocate memory for an object. Recovery from such situations is generally not possible.
The Java platform provides a rich library of exception classes to signal errors in your code. Additionally, you can create custom exception types to indicate interruptions in the normal application flow.
Methods in code that can throw checked exceptions must be annotated with the throws syntax to make information available to the caller. Either by adding throws to their own method signature (signifying the caller could also throw checked exceptions), or catch the exception and handle it. You could also re-throw the exception, as we will see later. What’s more, tools like IntelliJ IDEA can analyze whether exceptions are handled (or not), and suggest a proper resolution.

Note: Make sure to read How to Throw Java Exceptions to get a better understanding of the topic.
Handling exceptions with try...catch blocks
The try...catch block is the primary mechanism for handling Java exceptions. Code that might throw an exception is placed within the try block, and the catch block handles the exception or its inheritors as appropriate.
Here’s the basic syntax:
try {
  // Code that might throw an exception
} catch (SomeException e) {
  // Handle the exception of type SomeException and its inheritors
}
For example, the following code attempts to read data from a file and catches a potential FileNotFoundException:
try {
  FileReader reader = new FileReader("data.txt");
  // Read data from the file
} catch (FileNotFoundException e) {
  System.out.println("Error: File not found!");
}
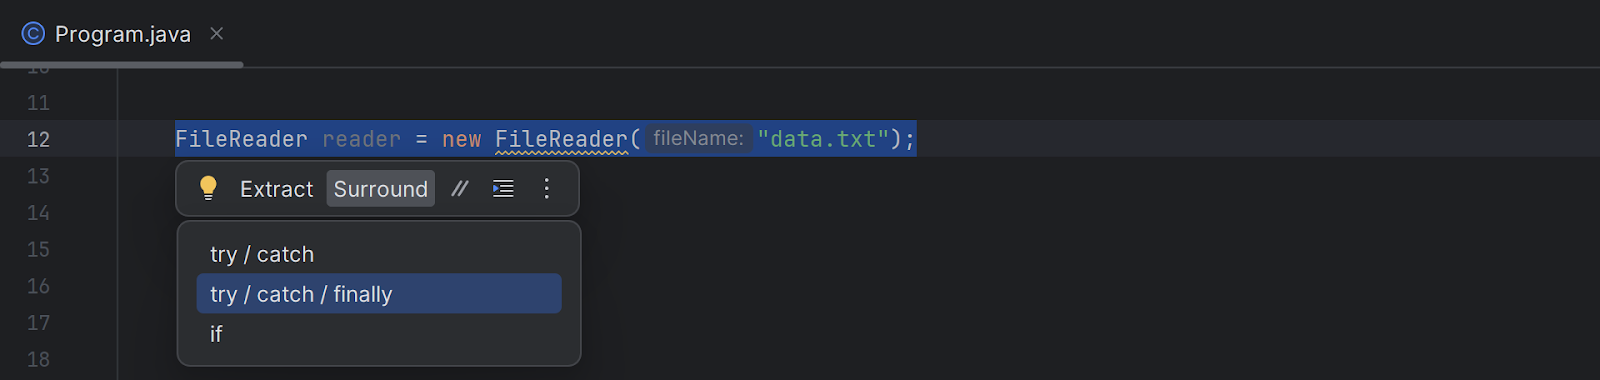
Note: In IntelliJ IDEA, use the Surround With… action (Ctrl+Alt+T on Windows/Linux, ⌘⌥T on macOS) or use the Surround tab in the floating toolbar to quickly add a try...catch or try...catch...finally block around selected code:
You can have multiple catch blocks to handle different types of exceptions:
try {
  // Code that might throw different exceptions
} catch (FileNotFoundException e) {
  // Handle file not found exception
} catch (IOException e) {
  // Handle other I/O exceptions
}
The finally block is an optional part of the try...catch construct. It executes regardless of whether an exception is thrown, unless it’s an exception that terminates the JVM, such as the one thrown after invoking System.exit(). The finally block is ideal for cleanup tasks like closing files, streams, database connections, or releasing other resources. Note that try...finally is also possible, without catch.
try {
  // Open a file and process data
} catch (IOException e) {
  // Handle exception
} finally {
  // Close the file
}
While the try...catch...finally construct provides a robust mechanism for handling exceptions and ensuring resource cleanup, a more concise and streamlined approach exists: try...with...resources. Let’s see how it works!
Resource cleanup with try...with...resources
Java 7 introduced the try...with...resources construct, simplifying exception handling when working with resources that need to be closed. Files, streams, database connections, and other closable resources will be closed automatically, even if an exception occurs, eliminating the need for explicit cleanup in a finally block.
Any object that implements java.lang.AutoCloseable, which includes all objects that implement java.io.Closeable, can be used as a resource.
Here’s the syntax for try...with...resources:
try (Resource resource = ...) {
  // Code that uses the resource
} catch (ExceptionType e) {
  // Handle exception
}
The following example reads the first line from a file. It uses an instance of FileReader and BufferedReader to read data from the file. FileReader is a resource that must be closed after the program is finished using it in order to prevent resource leaks and allow other programs to access the file:
try (BufferedReader reader = new BufferedReader(new FileReader("data.txt"))) {
  String line;
  while ((line = reader.readLine()) != null) {
    // Process the line
  }
} catch (IOException e) {
  System.out.println("Error reading file: " + e.getMessage());
}
In this example, the FileReader used by the BufferedReader resource is automatically closed when the try block finishes, regardless of whether an exception occurs or not. This eliminates the need for a finally block to explicitly close the reader.
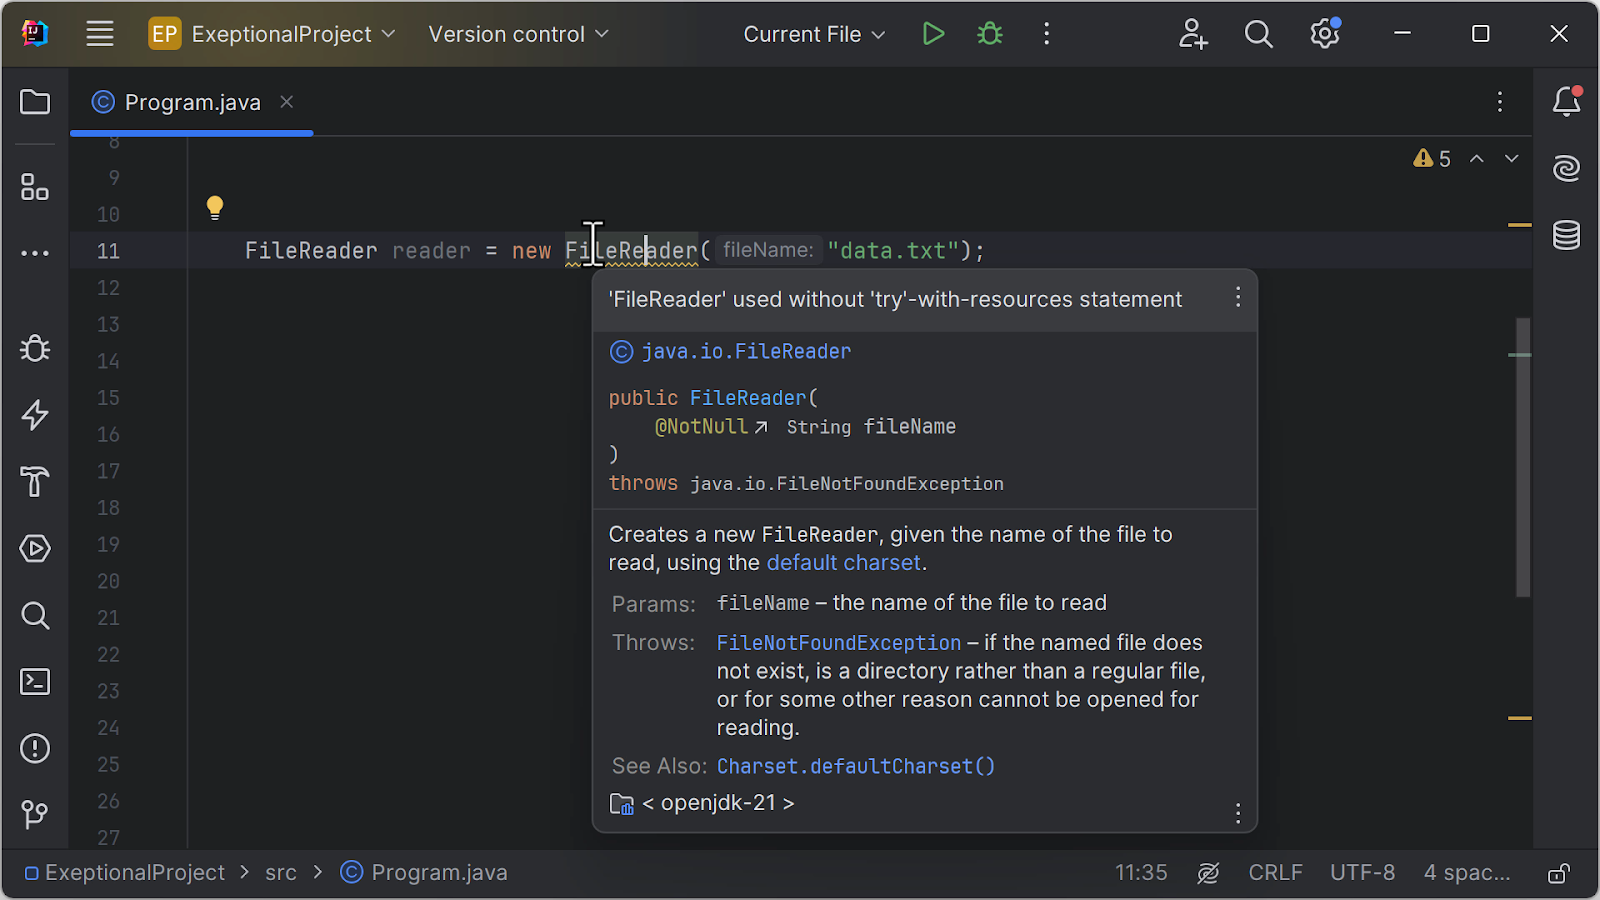
In IntelliJ IDEA, use the Fix Anything action (Alt+Enter on Windows/Linux, ⌥⏎ on macOS) after the IDE warns about using a closable resource without try...with...resources to automatically wrap the resource with this construct:
As a more elaborate example, consider using a JDBC database connection, executing a query on it, and working with the result set. The Connection, PreparedStatement, and ResultSet objects being used all have to be closed in the finally block. Here’s what that code would look like with try...catch...finally:
Connection conn = null;
PreparedStatement preparedStatement = null;
ResultSet resultSet = null;
try {
    conn = getConnection();
    preparedStatement = prepareStatement(conn);
    resultSet = executeQuery(preparedStatement);

    // ...do something with resultSet...

} catch (SQLException ex) {
    ex.printStackTrace();
} finally {
    if (resultSet != null) {
        try {
            resultSet.close();
        } catch (SQLException e) {
            e.printStackTrace();
        }
    }
    if (preparedStatement != null) {
        try {
            preparedStatement.close();
        } catch (SQLException e) {
            e.printStackTrace();
        }
    }
    if (conn != null) {
        try {
            conn.close();
        } catch (SQLException e) {
            e.printStackTrace();
        }
    }
}
Yikes! Here’s some equivalent code with try...with...resources, where the three closable objects are instantiated in the try statement:
try (Connection conn = getConnection();
     PreparedStatement preparedStatement = prepareStatement(conn);
     ResultSet resultSet = executeQuery(preparedStatement)) {

    // ...do something with resultSet...

} catch (SQLException ex) {
    ex.printStackTrace();
}
Now that’s much more readable! Note that there is a difference between this example and the original code: the try...with...resources version doesn’t catch exceptions from the calls to close() on the resource. If you also need to catch those exceptions, you’ll have to resort to using try...finally and catch the exception when calling close() in the finally block, much like in the original code.
Exception propagation
When an exception is thrown within a method and not caught locally, it is propagated up the call stack to the calling method. This process continues until a matching catch block is found or the exception reaches the top of the call stack, causing the program to terminate. Exception propagation allows for centralized exception handling, where exceptions can be caught and dealt with at a higher level in the application.
Here’s an example illustrating exception propagation:
public void main() {
    try {
        methodA();
    } catch (FileNotFoundException e) { // Exception handled here
        System.out.println("File not found exception caught in main method.");
    }
}

public void methodA() throws FileNotFoundException {
    methodB(); // Exception not handled here, so it propagates up the stack
}

public void methodB() throws FileNotFoundException {
    FileReader reader = new FileReader("nonexistent_file.txt"); // Exception thrown here
}
In this example, methodB() attempts to open a non-existent file, throwing a FileNotFoundException. Since methodB() doesn’t handle the exception, it is propagated to methodA(), which also doesn’t have a catch block. The exception is further propagated to the main method, which catches the exception and prints an error message.
This demonstrates how exceptions can be handled at different call stack levels, allowing for flexible and centralized error management.
Re-throwing exceptions
In some cases, you might want to catch an exception within a method but then re-throw it to be handled further up the call stack. This can be useful in several situations:
- Performing additional actions before passing the exception – You might want to log the exception, perform some cleanup, or add additional context before letting another part of the program handle it.
- Converting to a more specific exception type – You might catch a general exception and then re-throw it as a more specific exception type that provides more information about the error.
- Hide implementation-specific examples – Imagine building a framework to store data in different database systems. Instead of surfacing exceptions for specific database engines, your framework may catch all those and throw a common exception type from your framework.
Here’s an example of re-throwing an exception:
public void processFile(String filename) throws IOException {
    try {
        FileReader reader = new FileReader(filename);
        // Process the file content
    } catch (FileNotFoundException e) {
        System.out.println("File not found: " + filename);
        throw e; // Re-throw the exception after logging
    }
}
In this example, the processFile() method catches a FileNotFoundException but then re-throws it. This allows the calling method to handle the exception if needed, while still logging the error message within processFile() itself.
When re-throwing exceptions, you can re-throw the same exception object or create a new exception. If you create a new exception, you can include the original exception as the cause so methods up the call stack still have access to the original exception:
public void processFile(String filename) throws IOException {
    try {
        FileReader reader = new FileReader(filename);
        // Process the file content
    } catch (FileNotFoundException e) {
        System.out.println("File not found: " + filename);
        throw CustomException("Could not process file: not found”, e); // Throw new exception
    }
}
Best practices for exception handling
When handling exceptions, there are three key best practices. Let’s start with the most important: Don’t leave catch blocks empty. While it’s tempting to write code that is more “fire-and-forget”, and Java requires you to catch checked exceptions, you will lose out on valuable information and cause problems for your application. Don’t do this! At a minimum, log your exceptions so you can potentially handle them better based on the information in the logs.
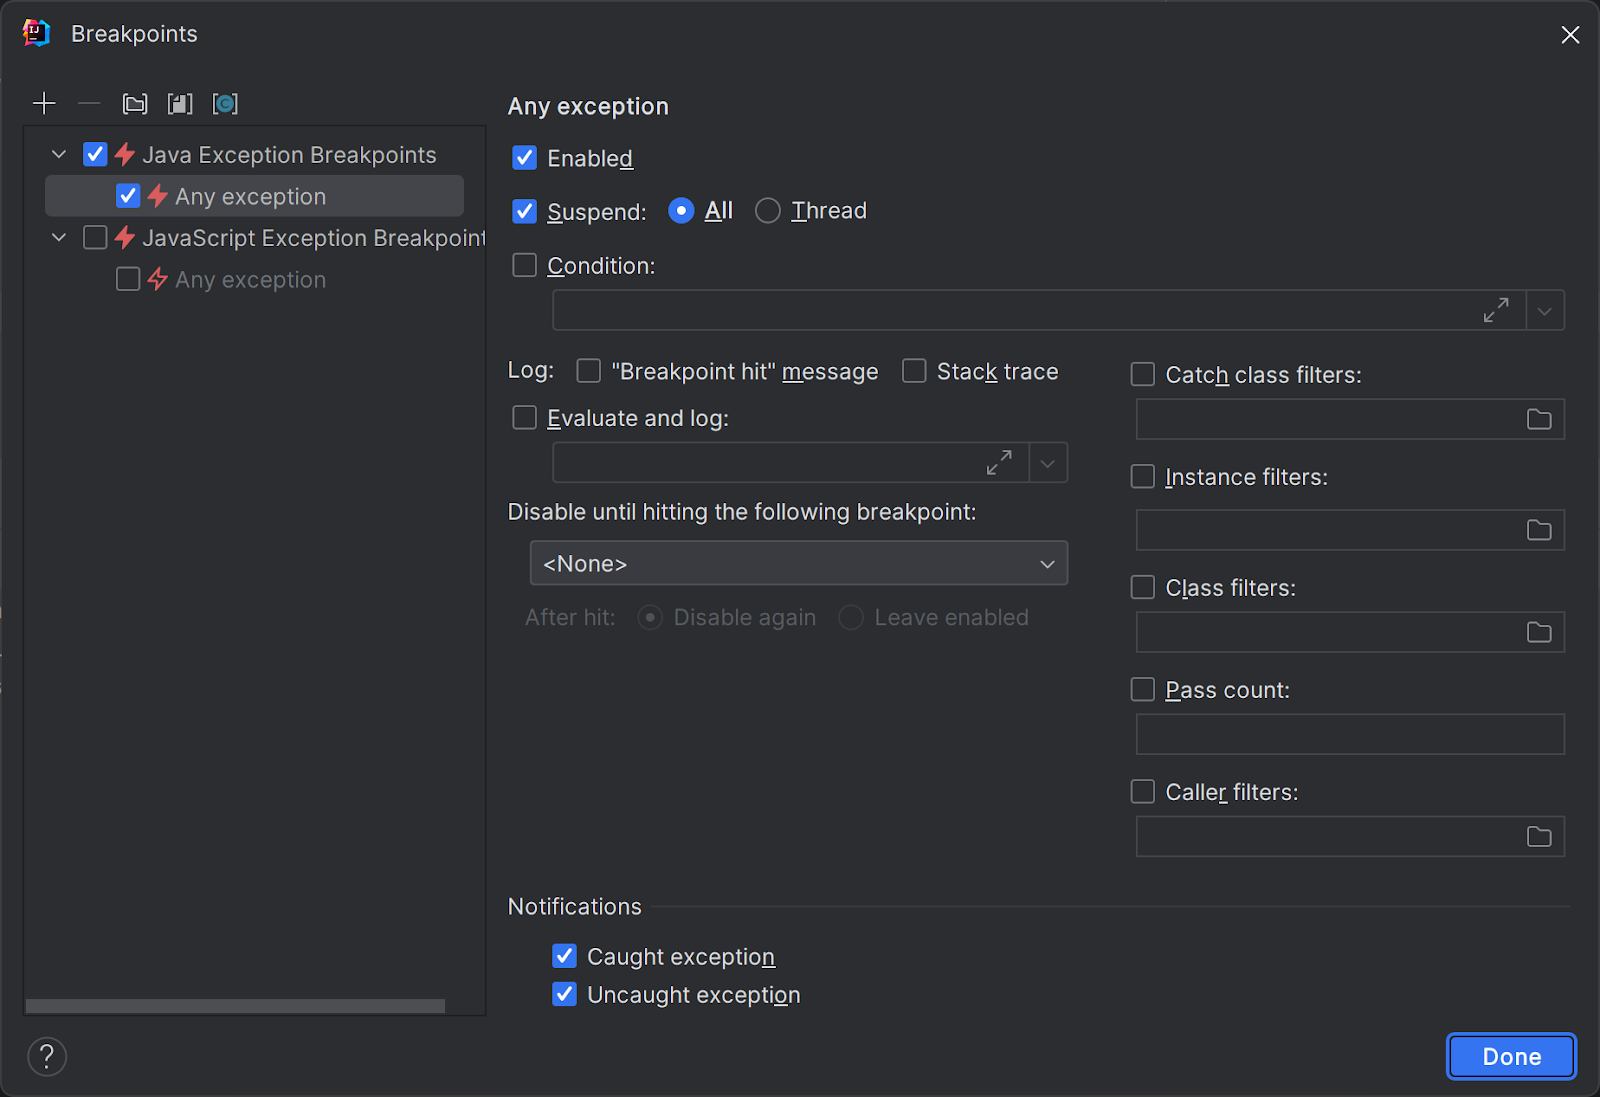
With Java Exception Breakpoints in IntelliJ IDEA, you can have the debugger suspend program execution on any caught/uncaught exception, which may help you identify exceptions handled in an empty catch block. You can enable/disable Java Exception breakpoints for all exceptions or specific exception types using the Run | View Breakpoints menu (Ctrl+Shift+F8 on Windows/Linux, ⌘⇧F8 on macOS).
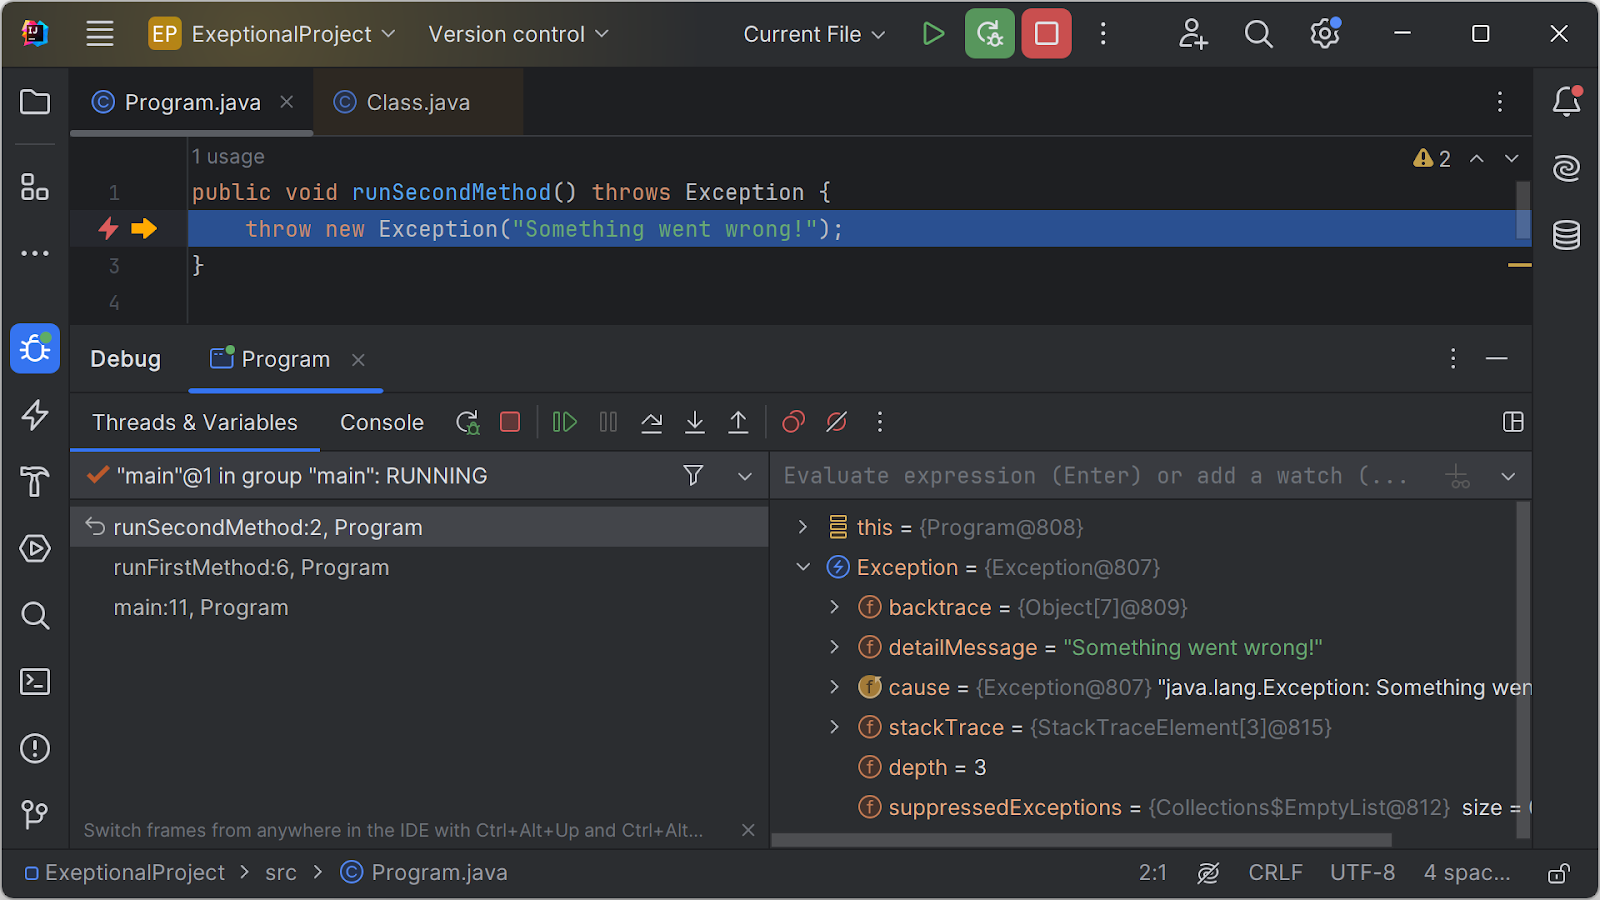
When debugging, IntelliJ IDEA will suspend your program whenever an exception that matches the breakpoint settings is thrown:
Another best practice would be to handle exceptions at the appropriate level. Catch exceptions at the level in the call stack where you can meaningfully handle them. Don’t catch exceptions just for the sake of catching them. If you have a utility function to read a file, you can catch IOException directly if it makes sense. However, it might be more meaningful to handle file-related exceptions at a higher level where the caller can decide how to proceed (e.g. retry, or prompt the user to provide a different file).
Lastly, avoid catching overly broad exceptions. Be specific about the exceptions you catch. Avoid catching generic exceptions like Exception, as this can mask other potential errors.
Conclusion
In this post, we’ve explored the essential aspects of exception handling in Java. We learned how to use try...catch blocks to gracefully handle checked and unchecked exceptions, ensuring that our programs don’t crash unexpectedly. With try...catch...finally and try...with...resources, it’s possible to gracefully close resources like files, streams, database connections, and more. We also looked at exception propagation and re-throwing exceptions.
Remember to ensure there are no empty catch blocks, at the minimum log exceptions, handle exceptions at the appropriate level, and avoid catching overly broad exceptions. With these practices in mind, you can write cleaner, more maintainable, and user-friendly Java code.