Space
The intelligent code collaboration platform
Space and SpaceCode will be discontinued on June 1, 2025. Learn more → →
Dev Environments Under the Hood


With JetBrains Space, you can use dev environments to work on your code remotely instead of using your local machine. You can launch a dev environment for any Git repository in your Space organization. Click Open in IDE and choose the IntelliJ-based IDE you want to run remotely.
Space launches your IDE in the cloud, and a few moments later you have a powerful, dedicated virtual machine running the IntelliJ IDEA backend, and you connect to it using a thin client called JetBrains Gateway.
How does this all work? In this post, we’ll have a look at how Space launches your dev environment, how warm-up is orchestrated, how your project directory is preserved during hibernation, and more!
Compute workers
When working on your code remotely with a dev environment, computing power is needed. An isolated virtual machine (VM) is created for you that runs your IDE backend, compiles your codebase, and lets you run and debug the application you are working on.
The Space cloud runs on Amazon Web Services (AWS), where we run our compute workers – EC2 VMs that can be used to run Space Automation jobs or dev environments. The upcoming on-premises version of Space will also support Kubernetes, in addition to EC2.
Each compute worker runs a Linux operating system and communicates its capabilities with Space: what the CPU and memory capacity is, whether Docker is installed, whether block storage support is enabled, and so on. These capabilities are used by Space to determine the best compute worker for a specific workload.
Starting new Linux VMs in EC2 takes around 40-60 seconds on average. To reduce the start-up time of automation jobs and dev environments, Space maintains several pools of ready-to-go compute workers with different capabilities.
When a compute worker is assigned a workload, it’s marked as being in use. After that workload finishes, for example, when a dev environment is stopped or hibernated, the underlying VM is discarded. In other words, every VM is single-use, which improves security and isolation.
Space has auto-scaling logic for these pools to make sure a minimum number of unused VMs are maintained. Based on overall load or traffic spikes, a bigger pool of unused compute workers may be provisioned to make sure workloads can always be assigned and started promptly.
Dev environments
When you start a dev environment in Space, a compute worker that can run Docker is assigned. The moment this happens, the underlying VM is yours for the rest of its lifetime: when you stop or hibernate the dev environment, the VM is discarded.
First, the compute worker attaches a volume that will hold your project directory and the $HOME directory. This volume can be empty or created from a warm-up snapshot. Having this volume is important because, when your dev environment gets hibernated and you resume it later on, the volume is preserved and any uncommitted changes are preserved.
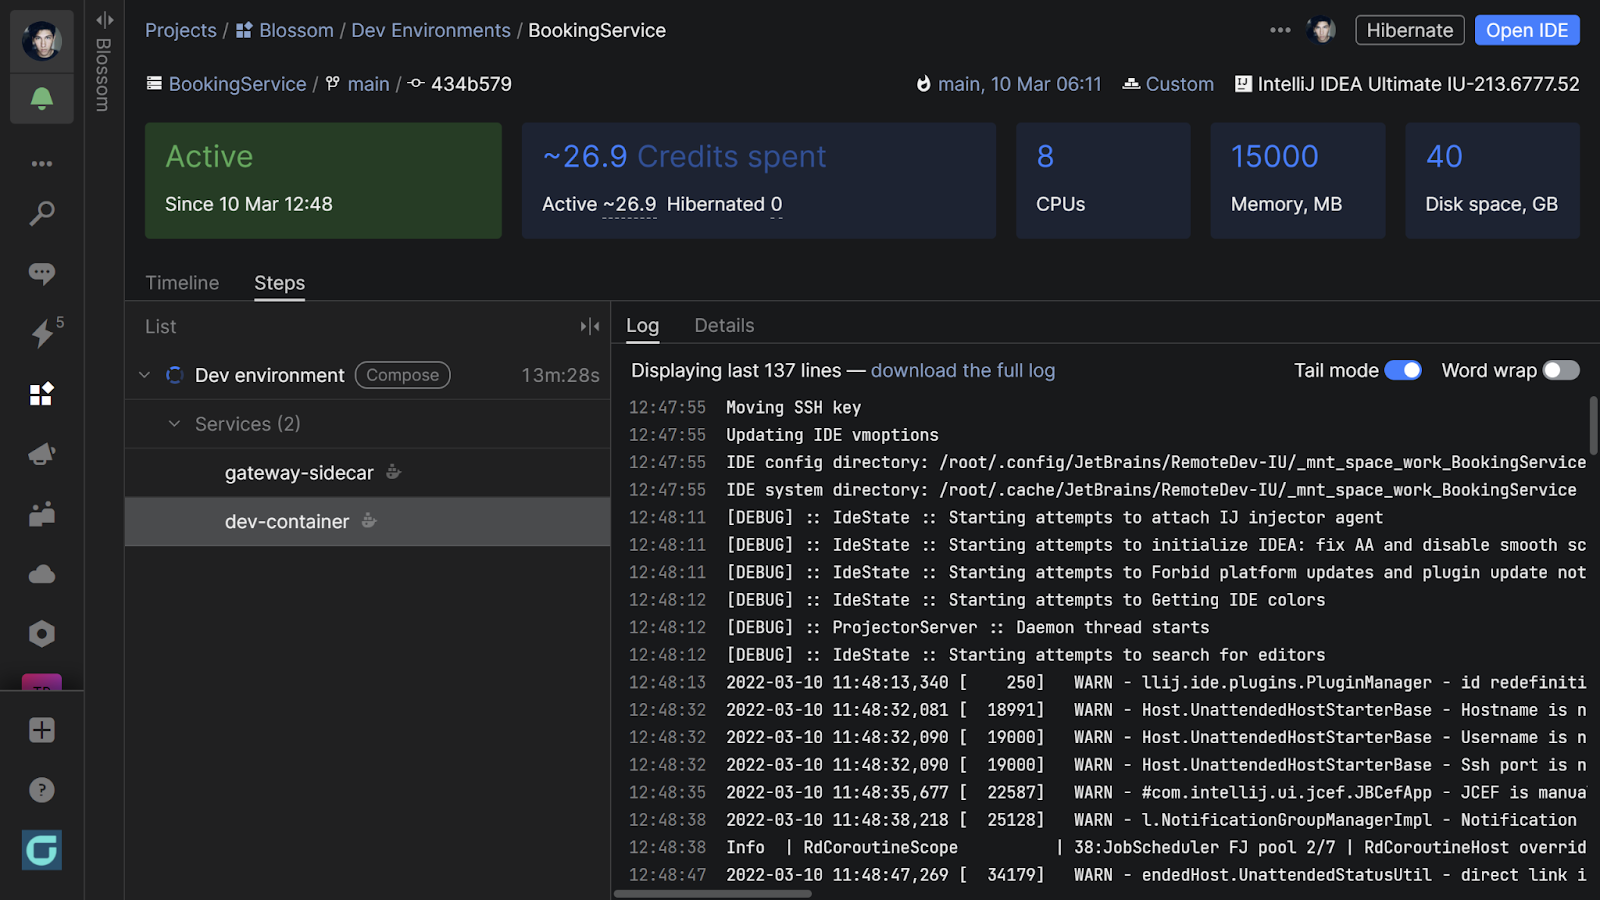
Second, the compute worker starts two containers using Docker Compose:
- The dev-container hosts your dev environment. It is created using the default Docker image, or from a custom Dockerfile in your repository. The volume that was created earlier is attached to this container, and your Git repository is cloned into it. Next, the selected IDE backend is downloaded and started.
- The gateway-sidecar container oversees your dev environment container, and reports its status back to Space. The sidecar is different for IntelliJ-based IDEs and Fleet.
You can see both containers running from the Details page in Space:
The sidecar container is also responsible for giving access to the dev environment. It mediates connectivity and authentication between Space and the dev environment container.
Warm-up snapshots
To shorten the time it takes for the remote IDE to run background activities, such as resolving dependencies and building indexes, you can build a warm-up snapshot. These are created with Space Automation: add a .space.kts file, and configure warm-up for your project.
For Space, warm-up is not that different from running the actual dev environment. A compute worker gets assigned and an empty volume gets attached, which will store the project directory and $HOME directory.
Next, the dev environment container is started, any scripts you configured in .space.kts are run, and the IDE is launched to warm up project indexes. You can see a lot of this process in the Space Automation job logs:

Note that no sidecar container is started: Since nobody is going to connect to the remote IDE during warm-up, it’s not required to provide external connectivity.
When warm-up is done, Space creates a snapshot of the volume. This snapshot (with warm data) is then later used when starting new dev environments. Additionally, if you have a custom Dockerfile to configure your environment, the resulting image is saved so it does not have to be rebuilt when starting a dev environment.
With warm-up, starting your dev environment should be significantly faster. You can shorten the time it takes for a dev environment to be ready to use. The warm-up snapshot already contains the IDE, project dependencies are already resolved, indexes are pre-built, and more.
Hibernation
Your Space dev environment will be hibernated whenever it goes unused for more than 30 minutes (or when you trigger hibernation manually). Hibernation stops the compute worker so it does not consume credits unnecessarily, while making sure the data on your dev environment is preserved.
When hibernating, Space signals the compute worker to gracefully stop the Docker Compose step that runs both the dev container and sidecar. The volume that contains your data is then detached and stored, ready to be attached again when you resume the dev environment. Finally, the compute worker is terminated and destroyed.
Note: the volume only contains the project directory and $HOME directory – no other paths will be persisted. This is why it’s important to use a custom Dockerfile if you require specific tools installed in the dev environment.
Conclusion
In our deep dive into Space dev environments, we looked at how you can launch and customize dev environments in JetBrains Space. In this post, we’ve seen how remote development with Space is orchestrated, how compute workers are assigned, and how warm-up works under the hood.
Give JetBrains Space and dev environments a try! We’d love to hear what you think!