TeamCity
Powerful CI/CD for DevOps-centric teams
TeamCity UI: How Do We Test It?

Developing a working piece of software is difficult. Just like building an airplane, it requires talented people, working components, and a testing framework. No plane leaves the hangar before everything is ready, checked, and double-checked.
At JetBrains, we adopt the same philosophy for building our software. Vigorous testing helps us discover bugs and problems before the final product takes off. Just like building a plane, software development is a process that consists of multiple stages. Although the authors of this post are not aerospace engineers, we will use simplified aircraft analogies. There are several reasons for that: aircraft is beautiful, it is pure engineering, and it reveals that the problems we raise here are not exclusive to software engineering.
The bigger your product, the more steps and modules there are. To make sure your software is ready to lift off, every module needs to be tested and correctly integrated with everything else. CI/CD services, if set up correctly, help automate this process. Most importantly, they remove the human factor famous for one careless action being able to lead to total disaster.
Contrary to popular belief, testing is very important in frontend development. To continue the analogy, your plane is not only required to fly – it has to be comfortable inside! Moreover, its exterior affects how airplane flies (aerodynamics). Getting back to the frontend, this means that you have to test the usability as well as functionality. This makes frontend testing a must. In this article, we will provide an overview of UI testing used in TeamCity. If you have any questions about the technical details, don’t hesitate to ask us.
Note: Each section of this post contains links to useful resources. Some of them lead to public TeamCity configurations where you can examine how we test the front end. Feel free to sign in as a guest and look around.
TL;DR:
- UI testing is not only about the Unit tests. There are screenshots, behavior, accessibility, performance, security, and perception tests. Each type is listed below.
- Testing systems and CI/CD help concentrate on things that really matter.
- With TeamCity, you can build sophisticated pipelines to test any UI issue.
Interception of issues
Let’s consider the interception of issues. At JetBrains, it works on multiple levels, most of which are based on CI/CD. Each test, each department, and each level plays its part in the entire process of revealing and reporting problems. On the chart below, the Y-axis represents the number of issues the app could possibly have. The blue bars signify the actual number of issues, while the X-axis lists the filters that take care of issues. This is how different layers impact on the actual number of issues.
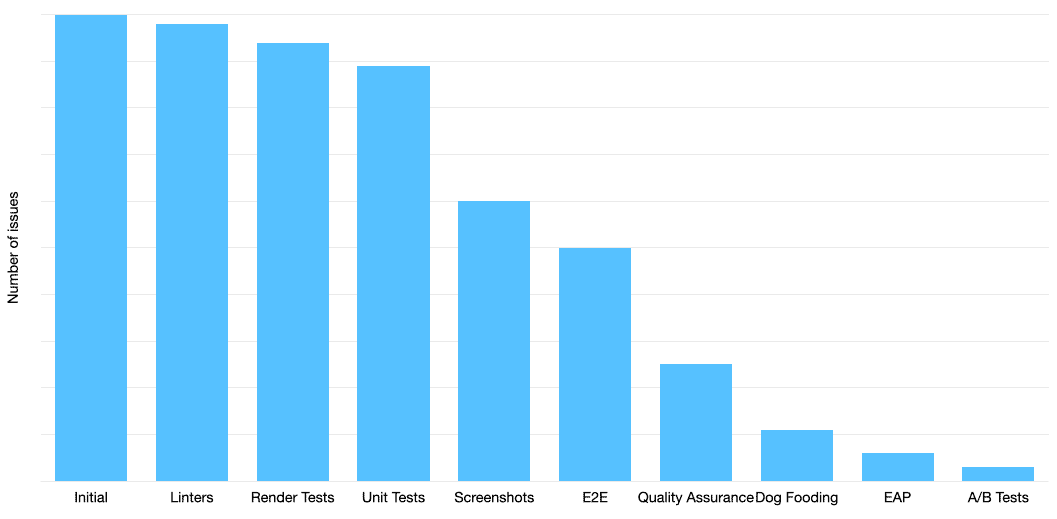
Every filter takes care of some issue categories.
For example, a huge number of UI problems we catch belong to the Screenshot testing stage. Fewer problems belong to the Linters / Unit / Render tests. That doesn’t make those tests meaningless. On the contrary, it could mean that we work in these areas well enough to prevent tons of issues.
The key point here is that the Quality Assurance Department ends up facing only one-third of the problems. This means that by using CI/CD you could help your colleagues save time on inspecting issues that are easy to predict, which could be caught by a well-organized testing system.
The chart may not be 100% representative as the numbers vary from release to release, with some levels removing more or fewer problems than others. However, it shows that the test system is very important, even if each separate test covers only one case. Quantity doesn’t equal quality here, as a test could find “only” one bug but that one bug could have crashed your whole application if left unnoticed.
Linters, typings, and unit tests
Needless to say, code should be clean and consistent, but it’s never that simple. Everyone has their own understanding of clean code. At JetBrains, we’ve come up with a set of 200+ rules that help ensure our code stays objectively clean. As a result, we get a warning from IntelliJ IDEA whenever a linter detects a problem. It should also be mentioned that static typings with TypeScript, Flow, Kotlin, or Reason are required for complicated applications. The TeamCity team has decided to use Flow. One of the first tests we use for building the frontend is just an eslint/stylelint check. Its purpose is not only to find code style problems but also issues with missed variables, imports, or non-cheap/safe operations (like React Hooks without dependencies).
Of course, there are also unit tests. We simply write pure atomic functions and then assert their output. If the output is OK, TeamCity marks them green and allows the pipeline to continue.
Read more:
Unit Tests / Linter Build Configuration Settings
JestJS, a Framework for Organizing Unit Tests
Screenshot testing
Displaying a consistent UI across multiple devices and platforms is one of our main goals. We need to be certain that all the components are displayed correctly, regardless of the browser, layout, or viewport size used. This requires testing how the components are visually presented in different configurations. Screenshot testing does exactly that.
Screenshots diff
After one of the updates, Comment sections were added to Unauthorized Agents. That’s quite OK. But what if this kind of test could reveal elements disappearing? This does happen from time to time, which is why we find the test very useful. (Snapshot Testing also help in this case, but don’t let us get ahead of ourselves.)
This is how we do it:
- Launch a server that renders the components (Storybook in our case).
- Connect to the server using the WebDriver API. This API allows us to interact with a website in automatic mode, without a real user.
- WebDriver calls the relevant components.
- Hermione, a utility tool by Yandex, connects to Storybook using WebDriver and takes multiple screenshots of the selected area in every browser.
- Those screenshots are then put into a folder, where Hermione compares them to the default screenshots using Mocha.
- If something has changed, we get a notification. The differences are also highlighted visually.
Read more:
Ring UI Hermione Build Configuration Settings
Screenshot False Assertion Example
React and rendering
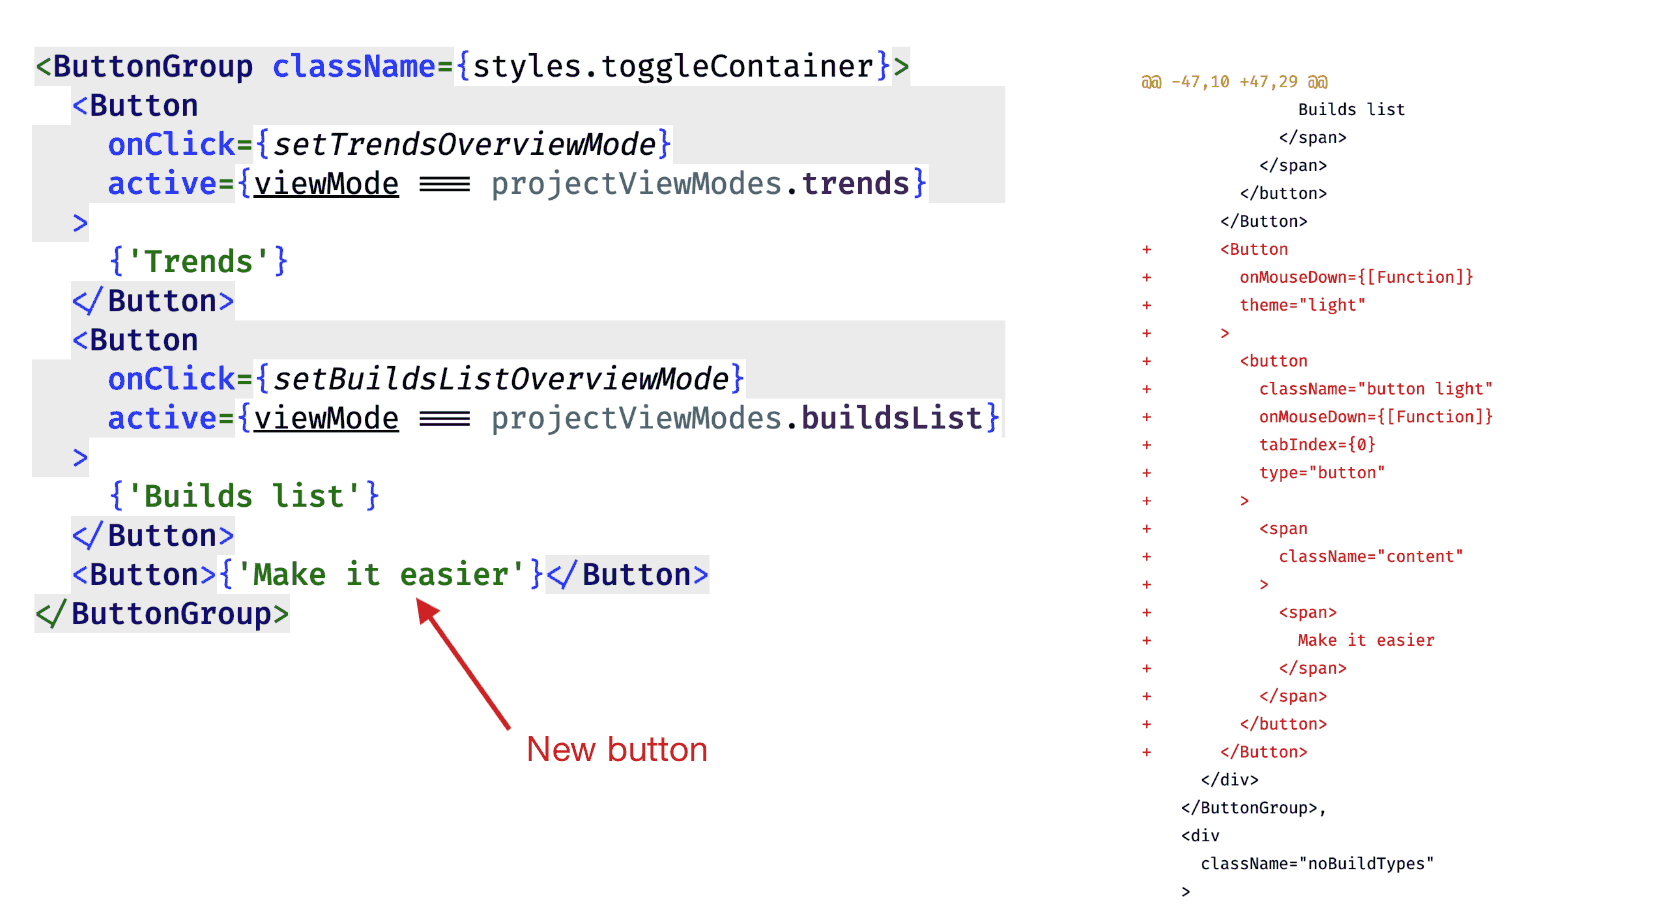
We try to improve the performance of our interfaces by minimizing unnecessary rendering. Generally, React is pretty good at that. However, one tricky situation is that when you change something in a component, React creates a new one instead of modifying the original component.
Suppose you pass new props into a component. To save the resources needed for a re-render, React checks whether the passed props differ from the previous version. If they are the same, no re-rendering takes place. Unfortunately, many of us forget that in JavaScript, two arrays or objects with equal content are different entities (because those objects/arrays will have different references). As a result, we end up unnecessarily rendering equal components.
React Highlights DOM updates
You can enable React Updates Highlighting with React Developer tools. This will reveal all re-renders in your App. For example, there are rerenders that occur during the cursor moving over the Trends Page subcomponent. Fortunately, all those rerenders are intended here. But what if in addition to these re-renders the app will fire up one hundred more?
Read more:
React Lifecycle Diagram
Should we re-render?
Even though we knew about this danger, we decided to check for redundant rendering using why-did-you-render. To our surprise, we discovered multiple instances of inefficiency. That’s how we did it:
- We created a dummy action that triggers changes to the store.
- If we change something in the store, we will make all the components (subscribed to this store) collect data once again. This is done via the mapStateToProps callback.
- After collecting the data, we pass it to the component and launch a compare function to check whether the props had been changed.
- Meanwhile, we know that the dummy action doesn’t actually change any values in the store, meaning that no new props should be passed to the component.
- If new props lead the component to a re-render, we know that we created a new object/array somewhere where we should not.
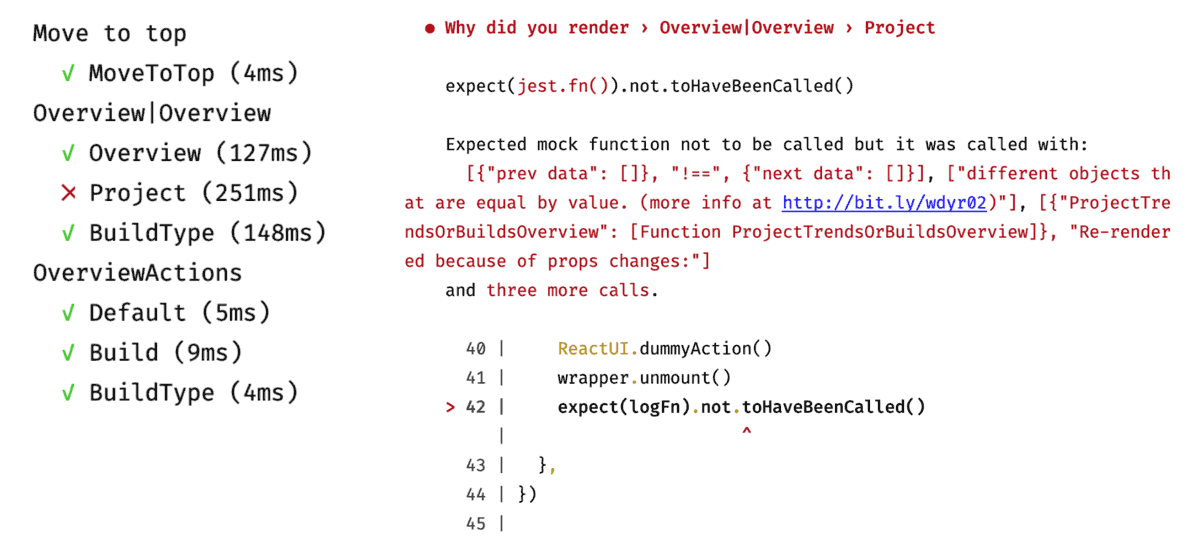
TeamCity reports excessive re-renders
We have two tips for solving this problem:
- The Reselect library
- Immutable data structures
Reselect
Using the Reselect library, you can memorize the results when all the parameters for the generation function remain the same. If the passed parameters are equal to the previous ones, we’ll get references to old objects rather than the new objects. No re-rendering takes place.
Immutable data structures
You can predefine an object or array as immutable by freezing it. Next time, whenever you would like to return a fallback value, you should return this immutable object. It guarantees that references to this object will always be the same, so the component will not be re-rendered.
Snapshot testing
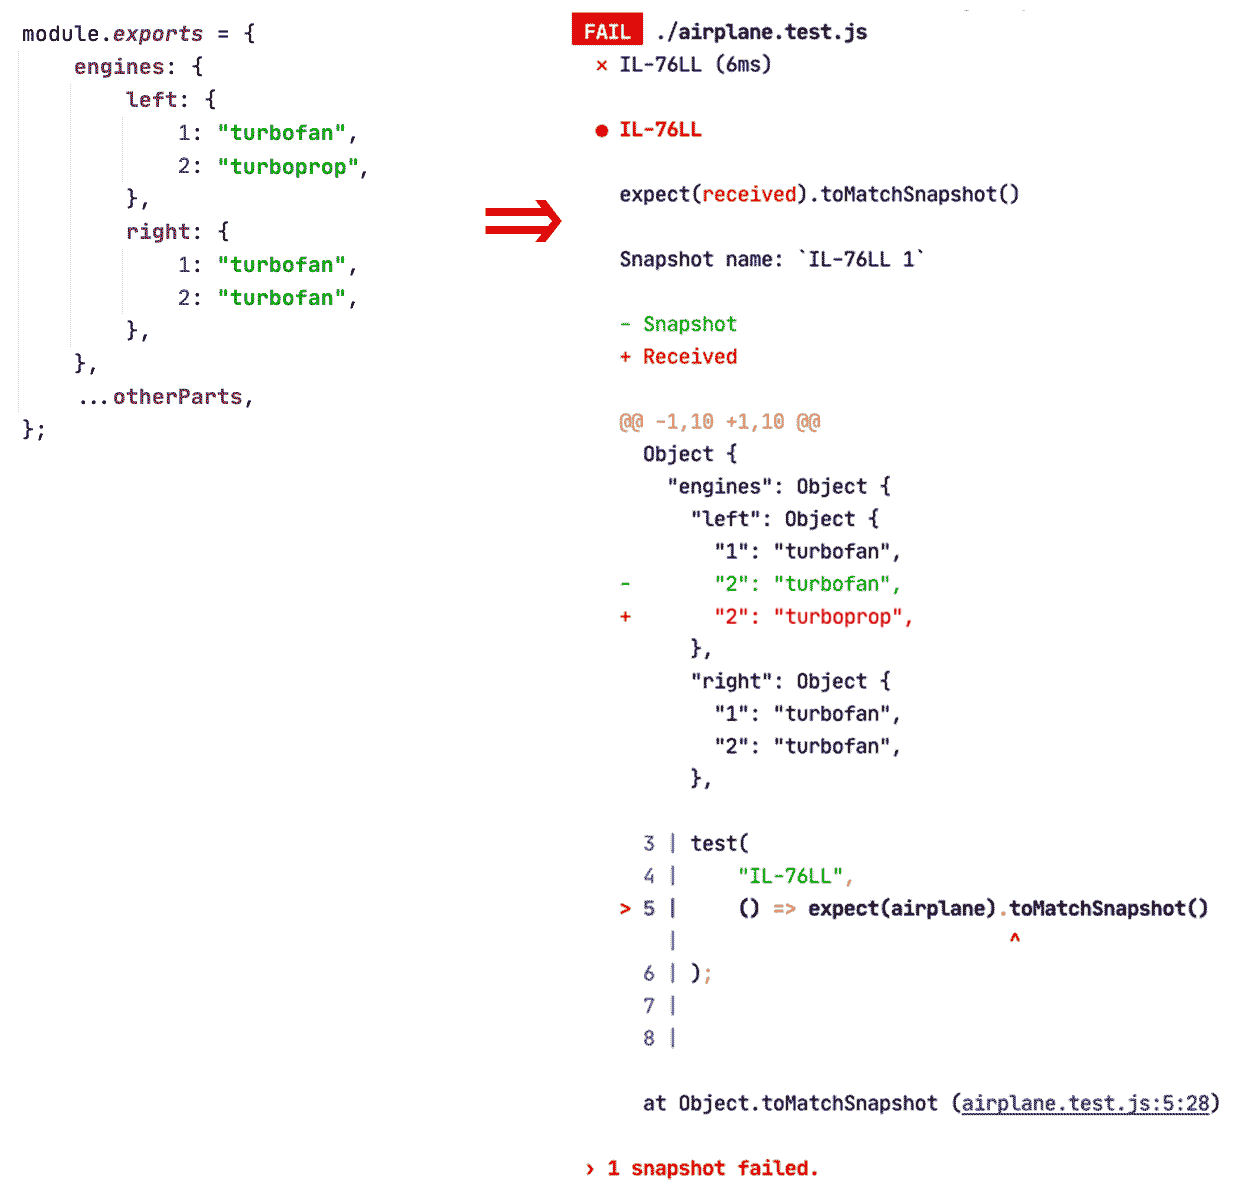
Snapshot testing verifies that any changes made to the structure of important components are intentional. Let’s return to our airplane analogy. Imagine that we have a snapshot of a plane’s structure: it should have a body, one wing, and four jet engines. Suddenly, we decide to remove one of the jet engines and replace it with a turbine. While this may be a great idea, it no longer fits our snapshot. Consequently, we would get a notification.

Sometimes even hardcoded items can be changed. Photo by Anthony Noble.
The change of engine in the picture above was intentional. Now imagine a snapshot of our plane that consists of hundreds of components. Tracking all the interactions between them would be very difficult. JavaScript projects are similar in this respect: A small change to one component could lead to unwanted consequences for the structure of the whole project.
You can protect structures by creating their snapshots. Whenever you misspell something, change an HTML class, or add a new component, you break the structure. A snapshot test, however, will alert you to that fact. Consider the example below:
- We create a snapshot of an important structure. We specify the IL-76LL engines:

- We always want to compare future airplanes to the snapshot we made previously:

- Here, we change the engine type from turbofan to turboprop, just to test how it works. Since the new engine no longer matches our snapshot, the test fails. We get a report and our engineers are on their way to investigate the problem.
We do the same to the React components:
Read more:
Storybook Structural Testing / Jest Snapshot Testing Guide
E2E Tests
E2E tests are very similar to test flights. Like with planes, we have to make sure that our interface is actually usable in the real world. With thousands of components interacting with each other, you never know if your plane can take off before the pilot actually takes it into the air.
E2E tests are designed to test an application flow from start to finish. They emulate a real user who is going through the same specific use case over and over again.
E2E in action
This is how E2E testing looks in our case:
- Create a list of scenarios that are critical from the user’s point of view (user stories).
- Create an automated test for every listed scenario.
- Each of those tests should describe how Selenium is supposed to interact with the UI.
- Imperatively:
- Open the browser.
- Log in.
- Go to page X.
- Click button Y.
- Make sure window Z is displayed.
- Declaratively:
- “Make sure the user gets window Z after going to page X and starting process Y.”
- Imperatively:
- Launch the Docker container with the last TeamCity instance.
- Launch the tests that connect to Docker using Selenium and execute the algorithms.
Read more:
E2E Build Configuration Settings
Other tests
As I was writing this articles, we managed to implement several new tests, such as Dependencies Security Audit and Accessibility tests, and we’re considering adding more test types.
We would appreciate it if you could share your feedback with us. Let us know if we should write more about frontend testing. Thanks!
TeamCity and build chains
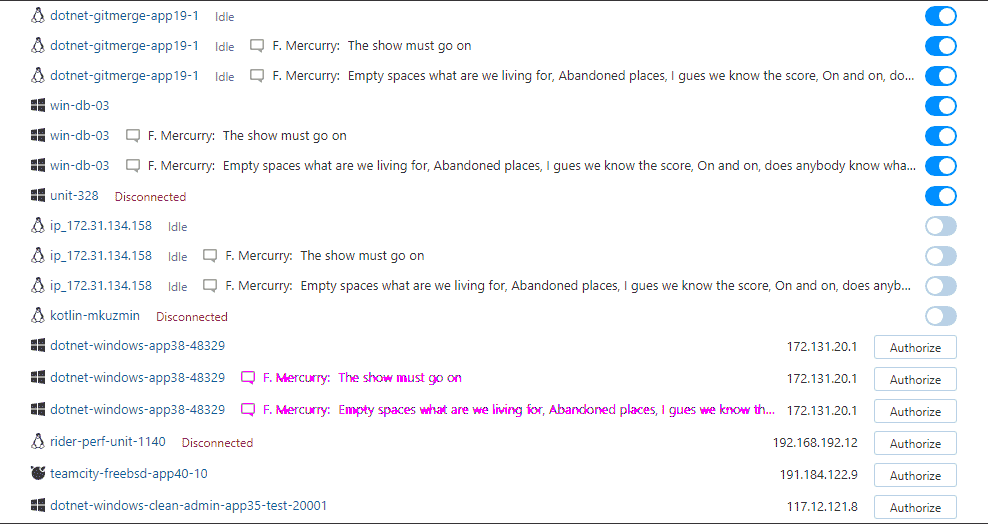
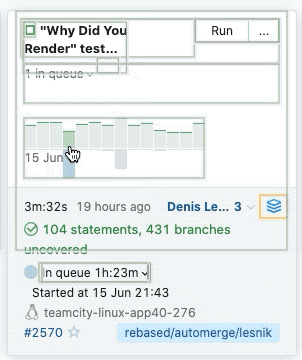
TeamCity lets you create infinitely complex logic for launching tests and deploying builds. This is how TeamCity displays the chain/timeline of builds for its own UI:
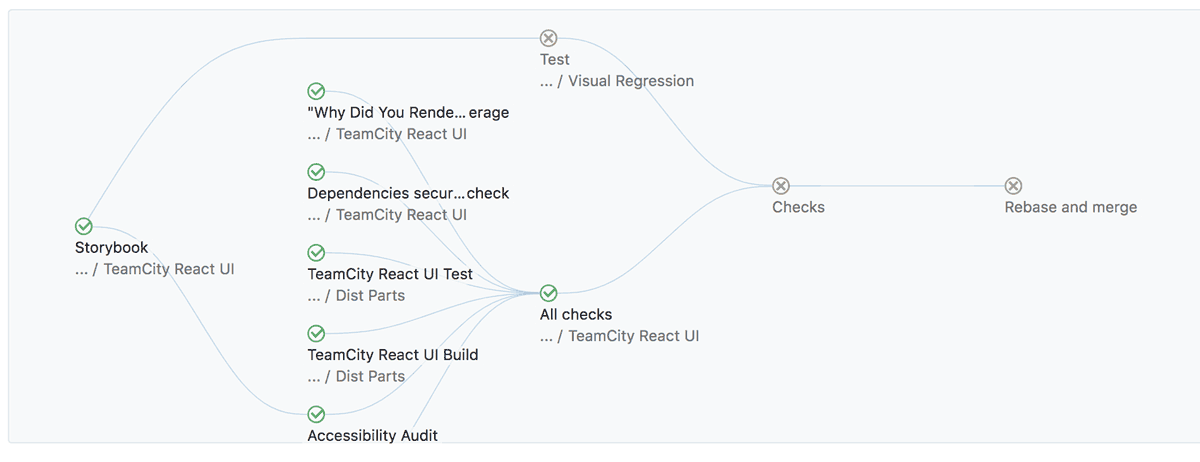
TeamCity runs tests in parallel, which sometimes leads to builds waiting for others to be finished successfully. If anything goes wrong, TeamCity might even stop the whole pipeline, just to prevent wasting computing resources on tests that are sure to fail.
This is how TeamCity visualizes a huge project like itself:
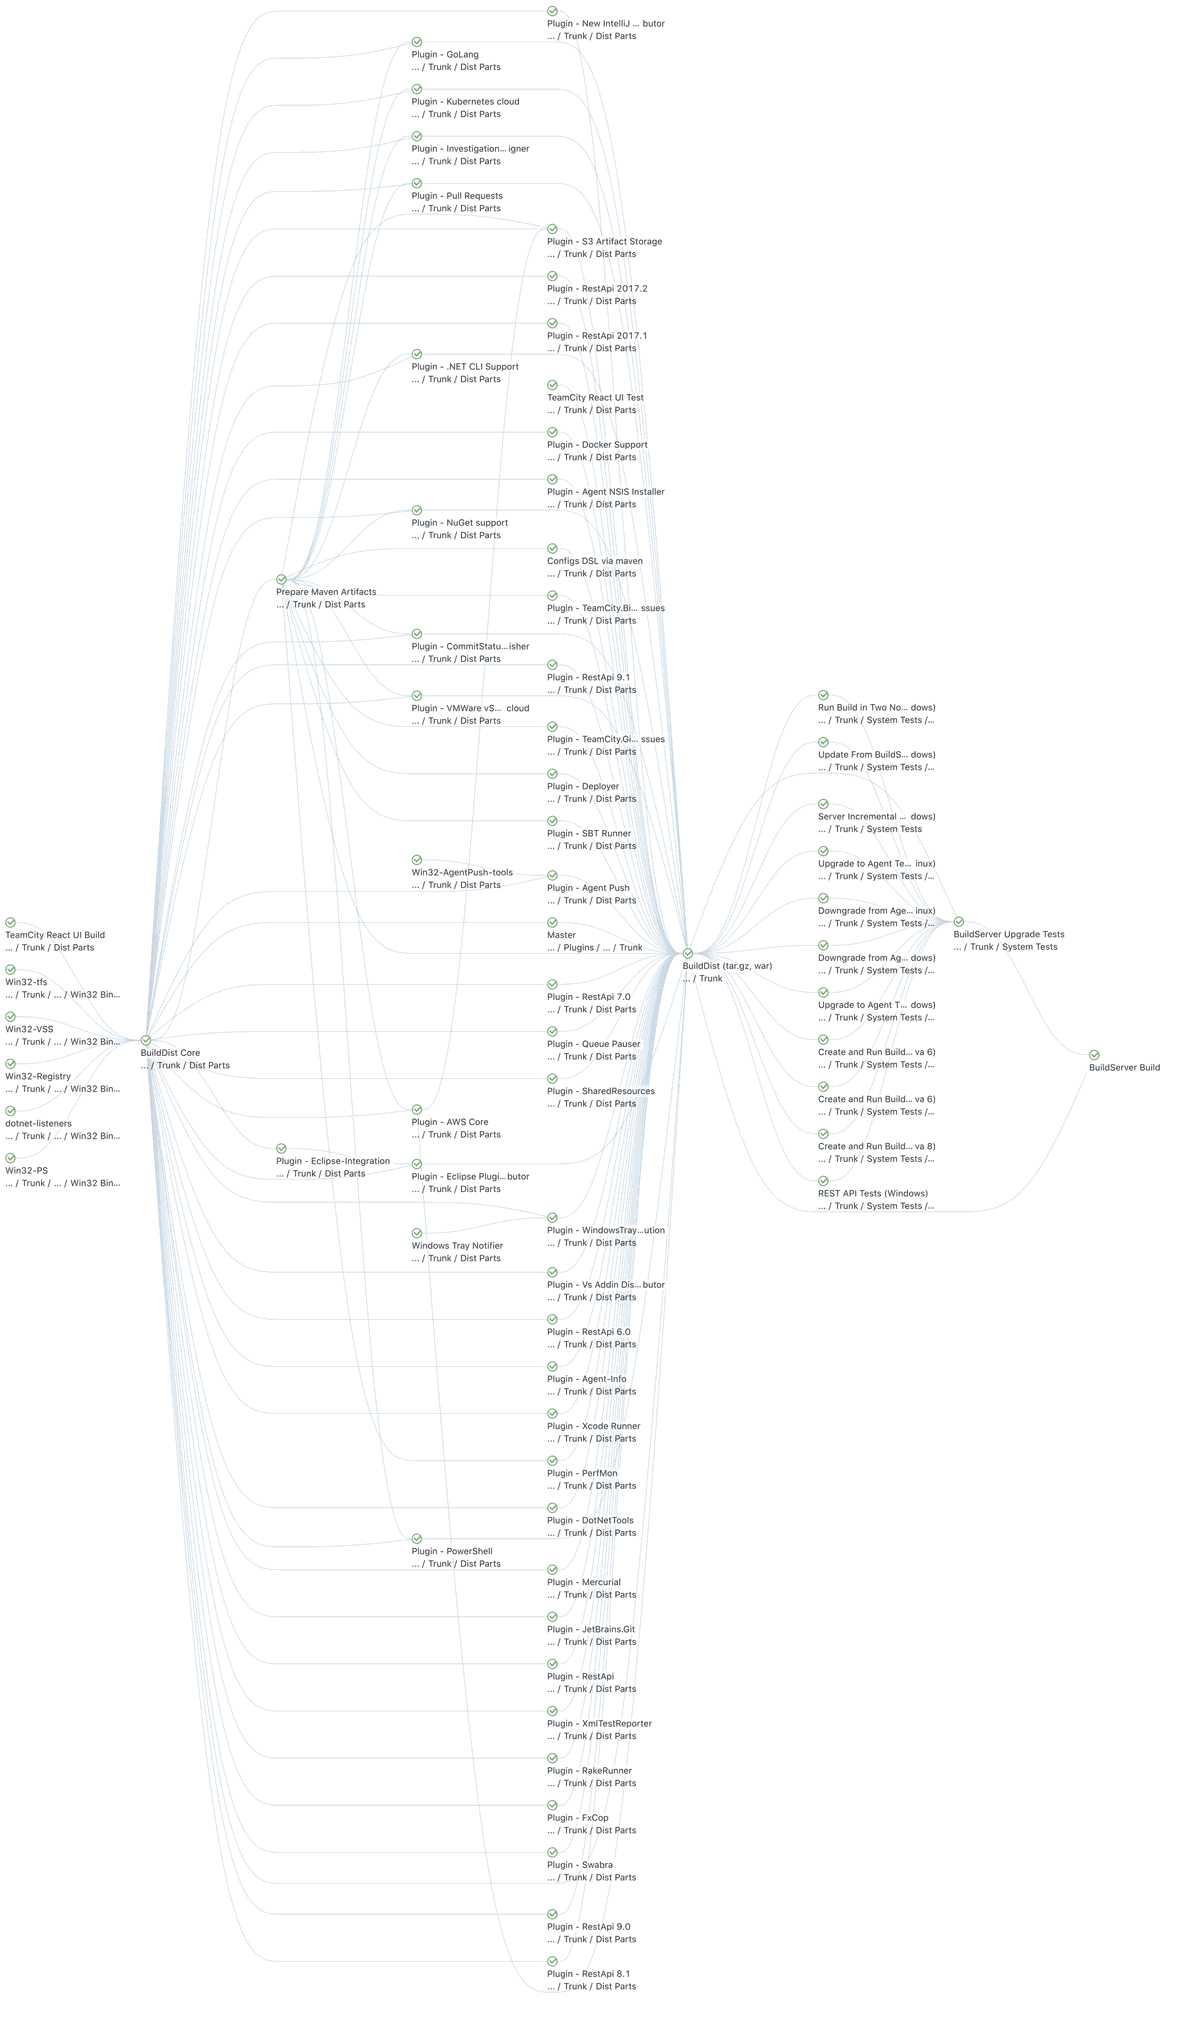
Building a complicated pipeline is not a good thing in itself. The good thing is we managed to build complex pipelines that are effective. For example, some parts of our pipeline must be built on OS X agents, some on Linux, and others are going to be built with Amazon Cloud Agents.
Read more:
Build Chains: TeamCity’s Blend of Pipelines (Part 1)
Build Chains: TeamCity’s Blend of Pipelines (Part 2)
Ring UI Build Chain
Conclusion
Looking back at our first diagram above, our automated tests cover more than half of those issues, and the Quality Assurance Department covers one-third. That still leaves about one-sixth. To cover that last mile, at JetBrains we widely practice “dogfooding”: We use our own products (IntelliJ IDEA, TeamCity, Space, YouTrack, and a couple dozen others) to develop and build software. Because of this, most JetBrains developers have some experience using TeamCity and have feedback to share with us. This is how we catch more bugs that managed to bypass all the other filters and fix them.
During our Early Access Program, you can preview the latest and greatest things we’re working on adding, share your feedback, and request new features that we just might prioritize in our roadmap thanks to you.
Hopefully, we’ve made the basic principles of frontend testing clear. Think of it as insurance: It requires extra effort but can be a true lifesaver and protect yourself from costly mistakes.
If you think TeamCity could be a good match for you, try it out for free.
With love,
The TeamCity team