

.NET Tools
Essential productivity kit for .NET and game developers
ReSharper Unified NuGet-based Installer. How?

Recently we published a post explaining some user-visible aspects of the ReSharper Ultimate unified installer. This post attracted lots of feedback regarding the underlying technologies that we used to build the installer. That was probably to be expected, as building a modern-looking installer is quite a hard task. You can either choose to use the standard .msi and accept its limitations and old-school UI, or build your own installer. Of course, the latter requires a lot of effort to re-implement all the standard functionality.

In ReSharper, we chose the second way — ‘the road less traveled’ — with a view to a better user experience.
Before I get to the nitty-gritty details, let me formulate the task we set out to solve.
We desperately needed a common installer for our .NET lineup. One that would not only allow our customers to install several products (like ReSharper, ReSharper C++ and dotCover) in one click, but also simultaneously register these products in Visual Studio. For this purpose, we needed to physically share registered binaries of the products that a user chooses to install.
At some point we realized that the designed logic of maintaining product compatibility and performing updates goes far beyond .msi capabilities. We decided to go with the custom .exe installer. Initial design also included such features as automatic updates, support for ReSharper extensions, a lightweight web installer, support for pre-release versions, etc.
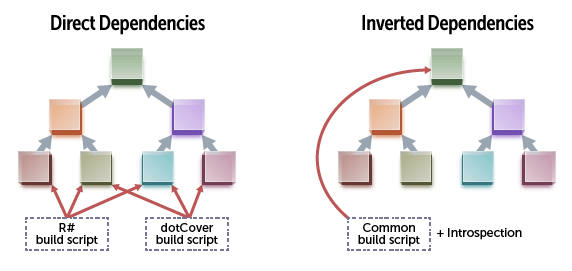
When we started working on the new installer, we’d already had some experience in working with NuGet for the ReSharper extensions gallery. That’s why we decided to use NuGet as a primary means for distributing product packages. But before distributing packages, you need to build them first! Previously we had built a bunch of DLLs using a dedicated MsBuild script for every product. The unified installer forced us to invert dependencies in our build system and create a new build script that could support composition.
Unified Build System
MsBuild had many disadvantages that we wanted to overcome in our build system:
- Composability.
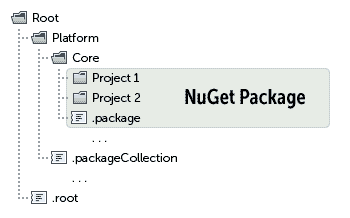
Our build script should operate on folders and collect all parts of the product introspecting subfolders. During development, we needed to be able to work with an arbitrary subset of our products (including the ‘all products’ scenario). - Isolation and control.
A lot of problems were caused by the fact that MsBuild parametrization is exposed in a shared state. The lack of static typing and development tools support for build scripts also made us dislike the technology. - Difficulties in creating custom steps.
We noticed that it was extremely easy for us to compile all our projects, which contained almost no custom build logic. The magic occurs when we already have the binaries and are, therefore, able to execute the code from these binaries. We used some features of our component model to express build steps right in the code of our projects. This script is responsible for building NuGet packages, packing installer standalone tools and many other tasks. To execute the script, we load the compiled assemblies and execute the application model similarly to the one we use in our products. This also implied creating custom annotations and a system of build steps that operate on build artifacts. As all the dependencies are inverted, the core build script contains generic operations which are extended in product-specific projects.
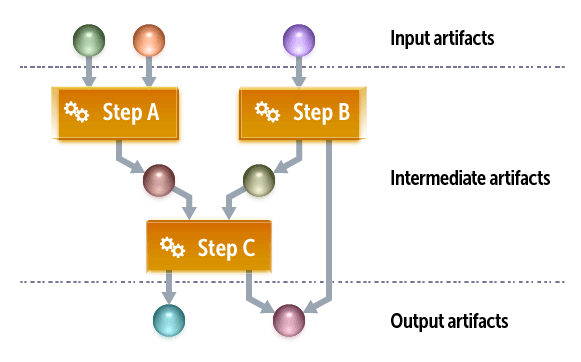
An important part of the build system is its dependency on the folder layout. Special annotations are used to create packages encapsulating DLLs and other content.
Our local and remote build infrastructure still uses .csproj files, but only to keep the ability to edit projects in Visual Studio. We are considering different ways to fully switch to file-system-based projects, and the approach used in the recently introduced .xproj project format looks very promising. Our build tool is capable of switching between source and binary dependencies, so you’re free to choose what project you want to be able to edit and what to keep only as a binary. MsBuild doesn’t have native support for this, so we use a set of hacks to make the switch possible.
Sharing the code of a build script and the production code was a great experience for us. Some results of build tasks could be serialized, saved into NuGet packages and used directly at run-time or in an installation script. For example, the component model (a set of classes marked with specific attributes) can be saved at build time and then used at application start-up. This allowed us to significantly reduce the time of the first start-up. In the build script, we also take advantage of using dependency injection and application model.
Installer. Packages and Introspection
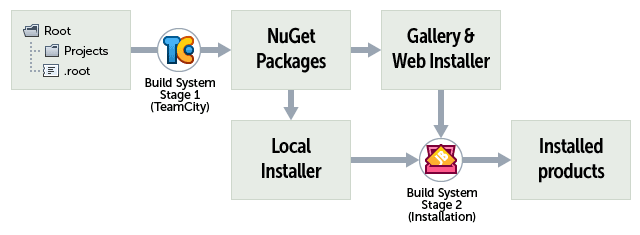
Using our build system, we build packages and collect metadata for each package. These metadata are used by the installer to populate the list of products. More specifically, the data are used to expose Visual Studio registration options, product name, and some other options. The installer introspects either our Azure-hosted NuGet gallery (in case of the web-installer) or the local file-system-based gallery (in case of the full installer).
Installation Script
For the installation script, we employed the same approach used in our composite build system. Actually, the script restarts the machine-specific part of the build script extracted from the packages of a specific product. Machine-specific data are passed as an input parameter. The data include local installation directories, machine registry, specified isolation root-suffix and so on. The build script execution system is designed with respect to error isolation and is highly fault-tolerant. The same applies to the installer UI code. The build script is also designed to have no side effects. All temporary data are stored in memory and only the final step performs a limited number of operations on the file system and registry. These operations are stored for safe roll-back in case a user uninstalls the product.
Visual Studio Registration
Visual studio has a lot of new MEF-based interfaces which make it easy to install an extension. Unfortunately, there are still some COM-based entities that require an additional effort to generate manifests or special resources. We use generation to avoid code duplication and get rid of potential errors. One of the most complex things is .cto files containing definitions for actions and menus. In ReSharper, we have our own elaborated action system, which also allows us to declare actions in the source code. Here is an example of how actions are defined in our code:
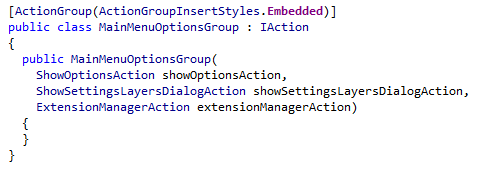
Using our build script infrastructure, we load ReSharper actions of all installed products and issue an assembly that contains the .cto file generated specifically for the installed products.
Conclusion
ReSharper unified installer is a high-tech piece of software. Unfortunately, it is too bound to the ReSharper component model, metadata and application model, meaning we can’t share it without sharing our build system, project organization pattern and application model. Nevertheless, we hope that the underlying ideas like composite solutions, functional-style build system described in the application code, application-driven installation and NuGet-based deployment might see wider use at some point.


