.NET Tools
Essential productivity kit for .NET and game developers
First-class Upgrades for ASP.NET Core with JetBrains Annotations

Regarding integrated development environments (IDE), one could argue that developers care the most about the “integrated” part and why JetBrains Rider and ReSharper have been so popular. Having IDE facilities seamlessly provided during the code-writing process can make or break the experience for many.
JetBrains tools have first-class paradigm support for .NET, most notably around the ASP.NET Core development. These tools include route pattern highlighting, the HTTP Client tool, and the endpoint tool window, each providing great time-saving value. These tools work well when developing with commonly known .NET APIs but may not function as expected when refactoring a codebase or writing an open-source library.
In this post, we’ll see how you can use JetBrains.Annotations to enable first-class IDE support in your libraries to take advantage of these features. These techniques will transform your user experience into an enjoyable and productive for ReSharper and Rider users.
What are JetBrains Annotations?
The NuGet package JetBrains.Annotations provides library developers access to tooling support without writing a full-blown plugin. My colleague, Maarten Balliauw, wrote about the library previously in the post “What are JetBrains Annotations?” JetBrains .NET tooling, whether ReSharper or Rider, will scan your codebase for known JetBrains annotations. Each annotation hints to the tool what features the library author expects the current code to utilize. There are over 90 annotations within the JetBrains.Annotations package, and they are the same attributes JetBrains developers use to enable features in the ReSharper engine.
For this post, let’s see how we can use JetBrains Annotations to light up the following features:
- Route template parsing
- Endpoint tool window entry
- URL parameter suggestions
In the next section, we’ll start with a very straightforward Minimal API sample and see how to improve the development experience.
Upgrading the ASP.NET Core experience
Before starting, install the JetBrains.Annotations package into your project. You can do that by using the JetBrains NuGet tool window.
Next, let’s look at the source code we’ll be transforming and looking at screenshots of the changes along the way.
using JetBrains.Annotations;

var builder = WebApplication.CreateBuilder(args);
var app = builder.Build();

app.MapGet("/", () => "Hello World!");
app.MapCustomGet("/this/{id:int}", () => "hey hey!");

await app.StartAsync();

var id = 1;
var result = await app.GetMessage($"/this/{id}");
app.Logger.LogInformation("Result: {Result}", result);

public static class Endpoints
{
    public static IEndpointConventionBuilder MapCustomGet(
        this WebApplication app,
        string path,
        Delegate @delegate)
    {
	    return app.MapGet(path, @delegate);
    }

    public static async Task<string> GetMessage(
        this WebApplication app,
        string uri)
    {
        var baseAddress = new Uri(app.Urls.ToList()[0]);
        using HttpClient client = new();
        client.BaseAddress = baseAddress;
        var response = await client.GetAsync(uri);
        var message = await response.Content.ReadAsStringAsync();
        return message;
    }
}
Let’s start by looking at our MapCustomGet extension method. It has a path parameter and a @delegate parameter. As humans, we know that path will be a URL, but our tools can’t infer that due to the code redirection. Let’s fix that by applying the RouteTemplateAttribute.
public static IEndpointConventionBuilder MapCustomGet(
    this WebApplication app,
    [RouteTemplate]
    string path,
    Delegate @delegate)
{
    return app.MapGet(path, @delegate);
}
You’ll instantly notice that the path argument now has syntax highlighting for route values within your editor.

The RouteTemplateAttribute in JetBrains Annotations indicates to the IDE to recognize the argument as a route template and to support syntax highlighting, code completion, navigation, rename, and other features for the string literal.
Next, let’s ensure that any usage of our MapCustomGet method also registers our new endpoint with the endpoints tool window by applying the AspMinimalApiDeclarationAttribute to our extension method. You can also use the AspMinimalApiHandler on parameters that take in a Delegate type for clarity, but this is optional.
[AspMinimalApiDeclaration(HttpVerb = "GET")]
public static IEndpointConventionBuilder MapCustomGet(
    this WebApplication app,
    [RouteTemplate]
    string path,
    [AspMinimalApiHandler]
    Delegate @delegate)
{
    return app.MapGet(path, @delegate);
}
Note that when using AspMinimalApiDeclarationAttribute, you can specify the HTTP method the endpoint will be registered to use. Looking at the Endpoints Tool Window, we can now see Rider has found the endpoint and is ready to use it with the HTTP Client. These high-level attributes also work as a stand-in for UriStringAttribute, providing navigation, completion, and renamed capabilities. For folks working with ASP.NET Core MVC, you can use AspAttributeRoutingAttribute or AspRouteConventionAttribute to provide similar functionality.

Remember how previously we had mentioned that these attributes also register endpoints for code completion? We’ll need to use the UriStringAttribute to tell our IDE that a particular parameter expects a URL from our codebase. We’ll need to modify our GetMessage method in this sample.
public static async Task<string> GetMessage(
    this WebApplication app,
    [UriString]
    string uri)
{
    var baseAddress = new Uri(app.Urls.ToList()[0]);
    using HttpClient client = new();
    client.BaseAddress = baseAddress;
    var response = await client.GetAsync(uri);
    var message = await response.Content.ReadAsStringAsync();
    return message;
}
It may not look like a significant change to your codebase, but it can make a difference for your API consumers. Using the method now in our codebase lists all available URLs.
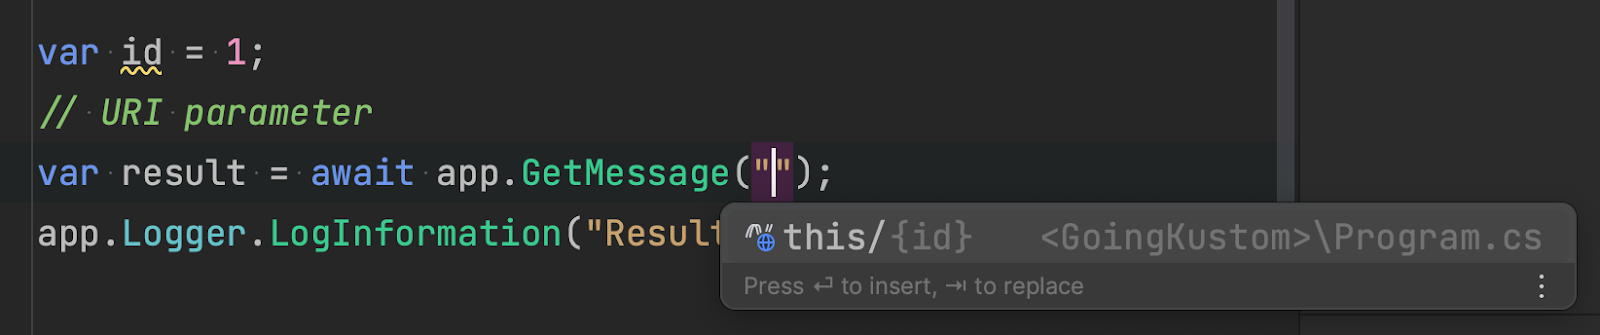
Providing this feature can help you and your API consumers find endpoint route patterns more quickly and lead to fewer errors when working with HttpClient.
Let’s see what the complete sample looks like.
using JetBrains.Annotations;

var builder = WebApplication.CreateBuilder(args);
var app = builder.Build();

app.MapGet("/", () => "Hello World!");
app.MapCustomGet("/this/{id:int}", () => "hey hey!");

await app.StartAsync();

var id = 1;
var result = await app.GetMessage($"/this/{id}");
app.Logger.LogInformation("Result: {Result}", result);

public static class Endpoints
{
    [AspMinimalApiDeclaration(HttpVerb = "GET")]
    public static IEndpointConventionBuilder MapCustomGet(
        this WebApplication app,
        [RouteTemplate]
        string path,
        [AspMinimalApiHandler]
        Delegate @delegate)
    {
	    return app.MapGet(path, @delegate);
    }

    public static async Task<string> GetMessage(
        this WebApplication app,
        [UriString]
        string uri)
    {
	    var baseAddress = new Uri(app.Urls.ToList()[0]);
        using HttpClient client = new();
        client.BaseAddress = baseAddress;
        var response = await client.GetAsync(uri);
        var message = await response.Content.ReadAsStringAsync();
        return message;
    }
}
For folks wanting to expand IDE functionality to MVC-based methods, you can look at the in-IDE documentation for MapControllerRoute for an example of how to decorate your methods to give users the most help.
[AspRouteConvention] public static ControllerActionEndpointConventionBuilder MapControllerRoute(
    this IEndpointRouteBuilder endpoints,
    string name,
    [StringSyntax("Route"), RouteTemplate] string pattern,
    [AspDefaultRouteValues, AspMvcAction("Action"), AspMvcArea("Area"), AspMvcController("Controller"), AspMvcModelType] object? defaults = null,
    [AspMvcAction("Action"), AspMvcArea("Area"), AspMvcController("Controller"), AspMvcModelType] object? constraints = null,
    object? dataTokens = null)
An example of using these attributes in your code may look like the following.
[MyCustomRoute(Template = "myCustomRoot")]
public class MyAwesomeController : ControllerBase
{
    [MyCustomPut(Template = "myCustomPut/{id}")]
    public string Show(string id)
    {

    }
}

[AspAttributeRouting]
public class MyCustomRouteAttribute : Attribute, IRouteTemplateProvider
{
    [RouteTemplate]
    public string? Template { get; set; }
    public int? Order { get; }
    public string? Name { get; }
}

[AspAttributeRouting(HttpVerb = "PUT")]
public class MyCustomPutAttribute : Attribute, IActionHttpMethodProvider,
    IRouteTemplateProvider
{
    public MyCustomPutAttribute()
    {
        // perform custom logic here
    }

    [RouteTemplate]
    public string Template { get; set; }

    public int? Order { get; }
    public string? Name { get; }

    public IEnumerable<string> HttpMethods => new[] { "PUT" };
}
The annotations allow you to implement custom attributes to perform additional logic not normally found in ASP.NET Core’s route attributes.
These attributes help determine elements of route registration, including the route template and the values found in anonymous objects that help resolve the route. Using these attributes on custom methods can significantly reduce developers’ errors when consuming them. These methods will again register any new endpoint with the Rider’s mechanisms.
Shipping JetBrains Annotations in your (OSS) libraries
JetBrains Annotations use a compile-time constant to determine if attributes make it into the final build artifacts. The exclusion makes sense for folks using local libraries, as these attributes’ value is primarily for development purposes, and including them would be unnecessary for production purposes. On the other hand, OSS authors will want to share the value through NuGet packages with the appropriate JetBrains Annotations metadata. Those authors will need to take another step but don’t worry. It’s straightforward.
JetBrains has marked all of the JetBrains Annotation attribute classes with a ConditionalAttribute, causing the compiler to ignore the attribute usages in your code, leading to no binary reference to the “JetBrains.Annotations.dll” assembly. However, you can define the JETBRAINS_ANNOTATIONS conditional compilation symbol in your projects to preserve the attributes in the metadata. After the change, you should start seeing JetBrains Annotations’ assembly showing as a library dependency, and your users can benefit from all your hard work.
Conclusion
Suppose you’re responsible for building ASP.NET Core APIs for your team members or the community through open-source libraries. In that case, adding some JetBrains Annotations can make the discovery process a more pleasant experience. It also gives your APIs a feeling of first-class support you wouldn’t otherwise have. This post only begins to scratch the surface of what JetBrains Annotations are capable of, and if you’re interested in learning more, please check out our detailed documentation.
We hope you found this post helpful and informative. As always, thank you for reading, and we look forward to your comments.
image credit: Deon A. Webster