How to Connect Django With MongoDB

One of the most popular web frameworks, Django, has adopted the “batteries included” philosophy. This means that you can build a production-ready application using only the vanilla Django with no extensions or other frameworks. Even the database SQLite is available out of the box. SQLite is great for learning and developing small applications, but has certain limitations that often lead to issues as projects grow.
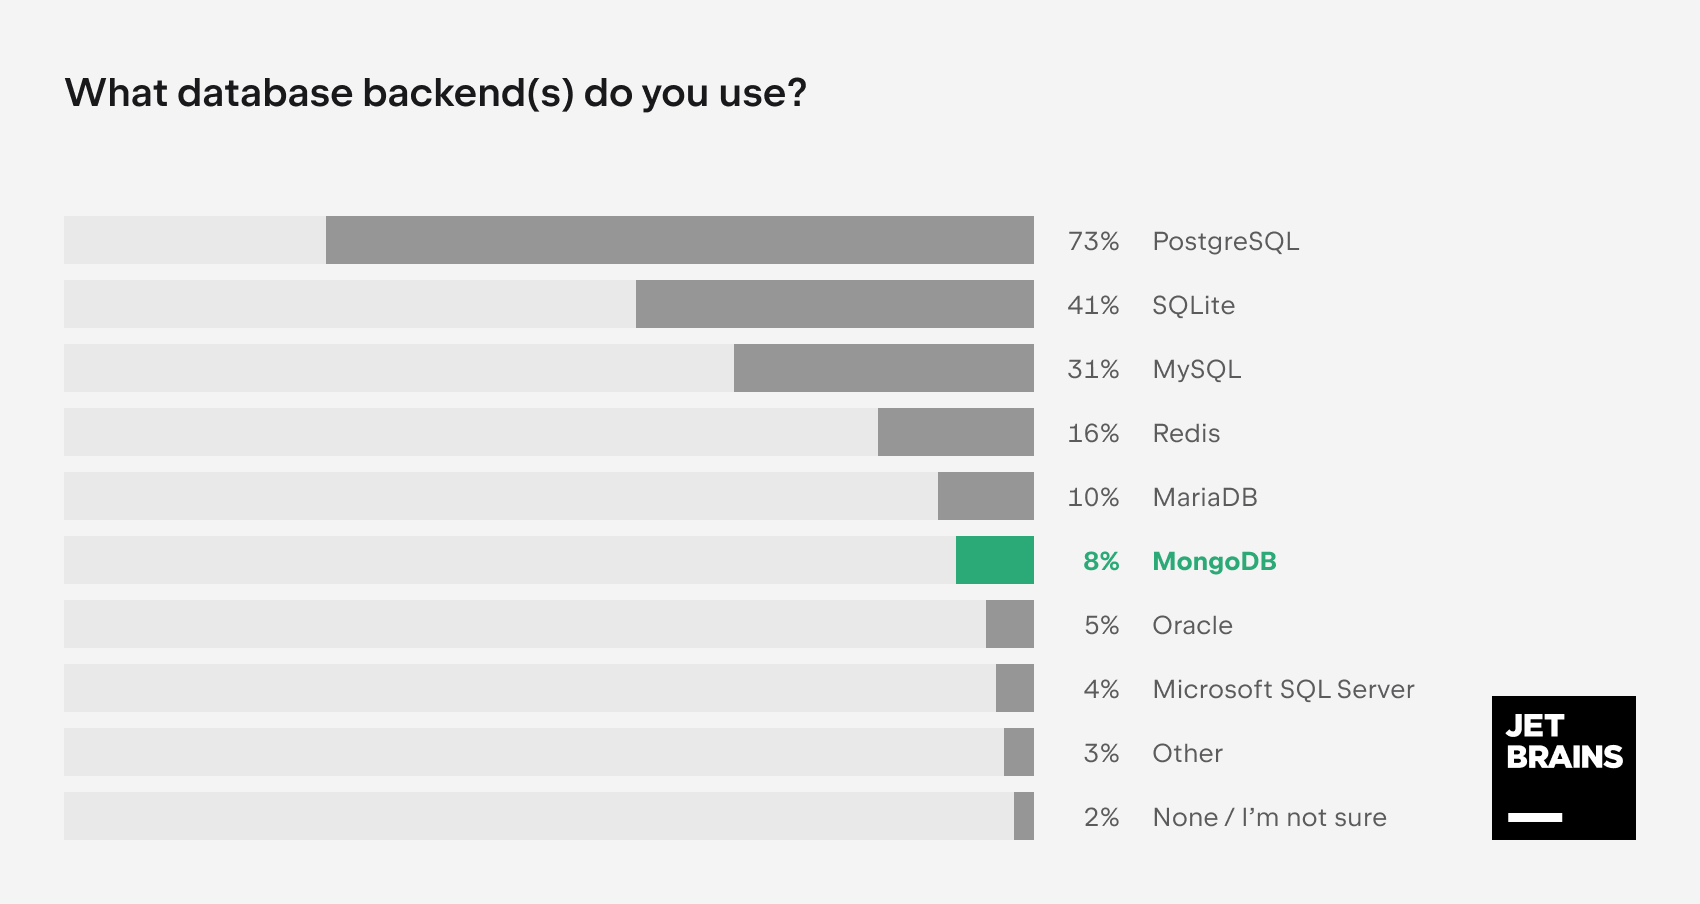
Developers tend to choose other databases over SQLite so that their apps can be scaled and perform high-load operations. Django officially supports a number of databases, including PostgreSQL, MariaDB, MySQL, Oracle, and SQLite, as well as some third-party database backends. MongoDB is not on the list, but it is still a very popular option: 8% of Django developers use it, according to the Django Developers Survey conducted by JetBrains in 2023.
Why choose MongoDB with Django
What are the possible reasons for choosing MongoDB for Django projects and what does Django’s lack of official support for this database mean in practice? Let’s see.
All of the officially supported databases are relational database management systems (RDBMS), meaning that they store data in tables and support SQL (Structured Query Language). MongoDB, however, is a non-relational database. Such databases are also often referred to as NoSQL. Instead of tables with rows and columns, they store data in a JSON-like format called BSON.
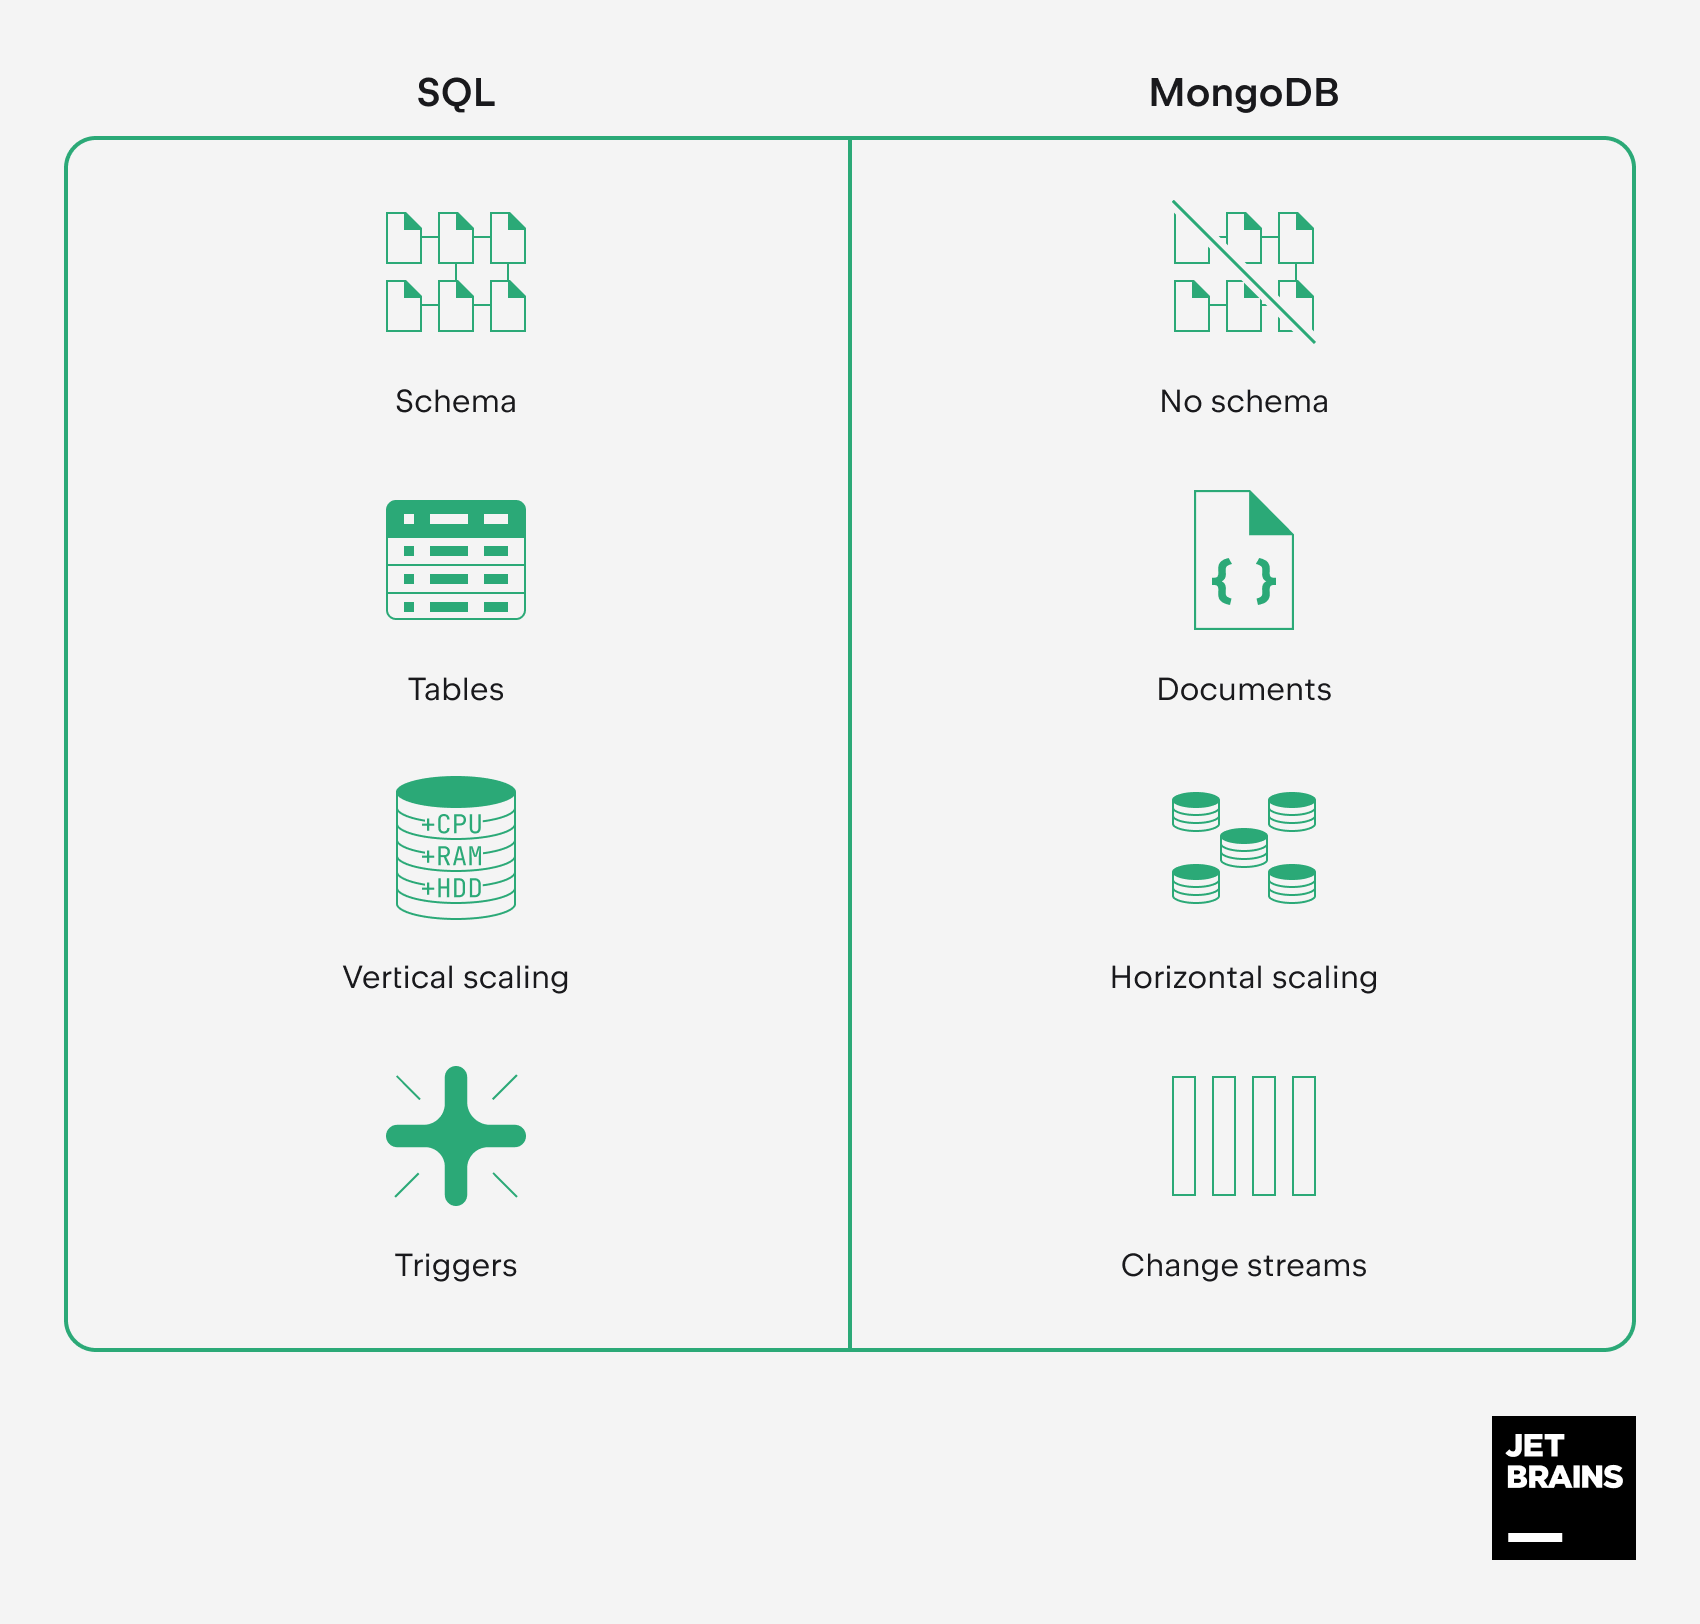
As a non-relational database, MongoDB has the following main advantages over SQL databases:
- No schema: The flexibility of BSON can be very helpful if you need to store complex data whose structure is likely to require changes over time.
- Document model: The format of data can vary from document to document, which is ideal for hierarchical data storage and various unstructured data.
- Scalability: MongoDB is horizontally scalable by design and supports sharding for handling large volumes of data and high loads.
- Real-time processing: With MongoDB, applications can react to data changes almost instantly by subscribing to change streams.
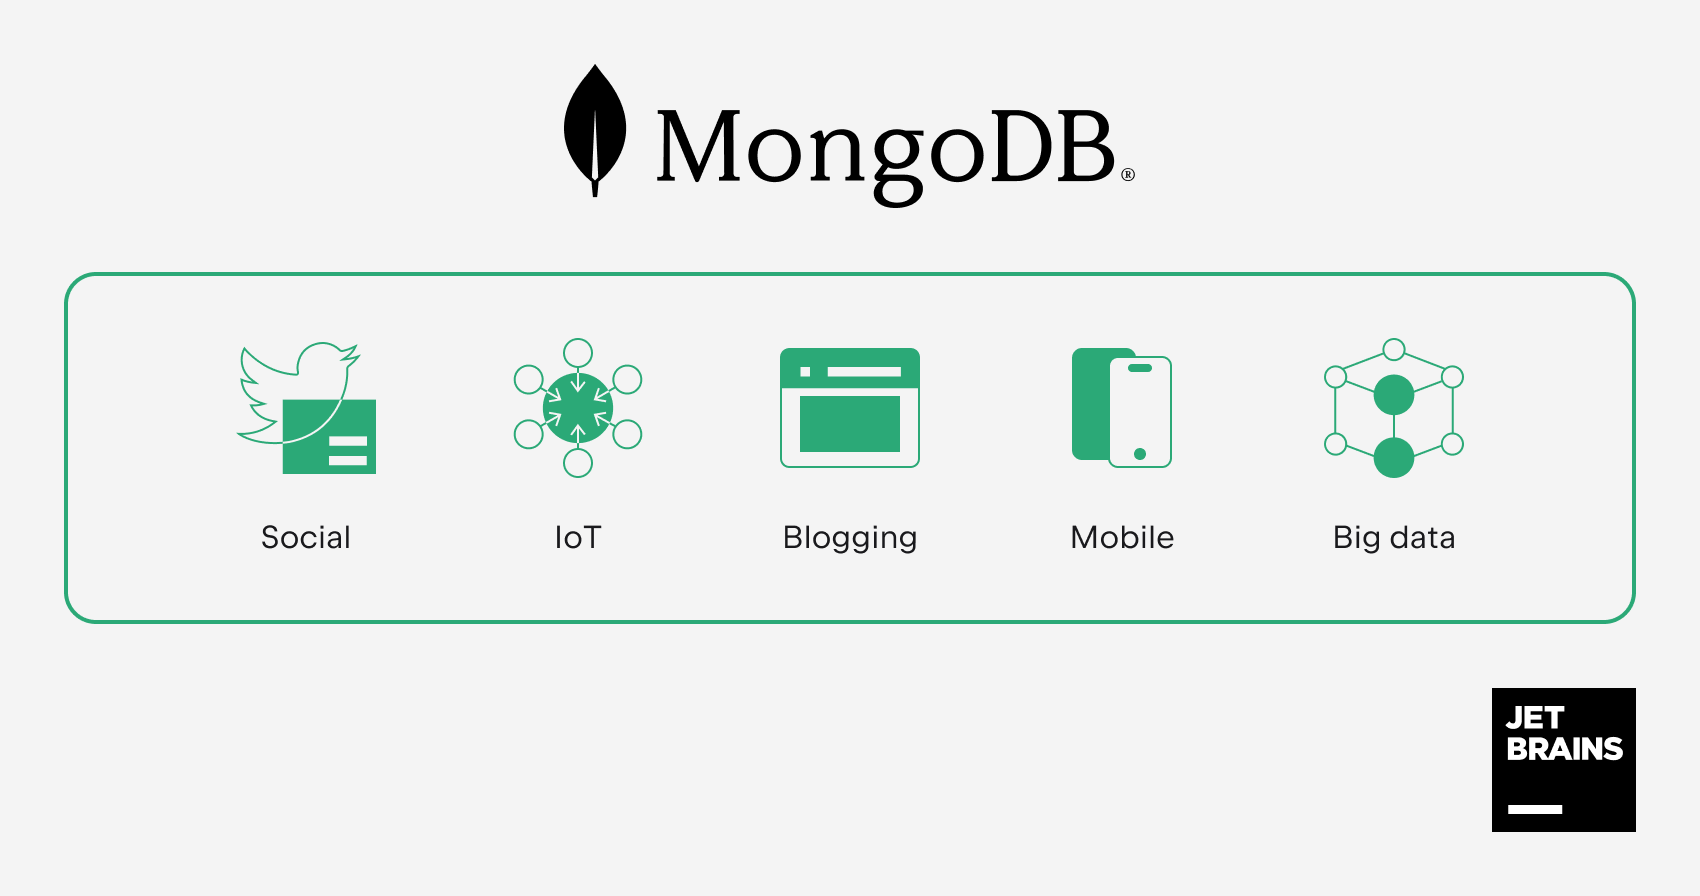
Considering these advantages, developers often prefer MongoDB for blogging platforms and applications that deal with user-generated content, IoT (Internet of Things), Big Data services, and mobile applications.
It’s important to understand, however, that MongoDB cannot serve as a drop-in replacement for SQL databases. Since there’s no native support for MongoDB in Django, you’ll have to integrate third-party packages and adjust the codebase accordingly. Moreover, you’ll have to organize the whole development process, taking into account the following limitations:
- Django’s built-in SQL-oriented ORM becomes useless with MongoDB.
- You will no longer be able to manage the content through the Django admin interface.
- Many other Django features designed for working with databases will be out of reach. By using MongoDB, you’ll definitely step off “the Django way”.
The more code you already have, the more changes will be required. For this reason, it makes sense to switch to MongoDB in the very early stages of your project’s lifecycle.
In this tutorial, we will connect a very basic Django project with MongoDB in two different ways:
- By using MongoEngine (which is based on PyMongo)
- By using only PyMongo
Requirements
Before your start, you need to install the following:
- PyCharm Professional (a free 30-day trial is available)
- Python
- Docker (only for running MongoDB in a container)
The installation instructions for the following Python packages and software will be provided in the course of the tutorial:
- MongoDB Community (only for local installation)
- Django
- PyMongo
- MongoEngine
Prepare your Django project
We will use a project with a basic Django to-do list application. If you want to create the project from scratch, you can follow this tutorial in PyCharm’s documentation. Otherwise, just clone the repository as follows:
- Launch PyCharm and then click Get from VCS on the Welcome screen.
- Insert the repository URL and click Clone.
PyCharm downloads the project and configures your system interpreter. In this tutorial, we will use a local virtualenv interpreter, which you’ll also need to set up.
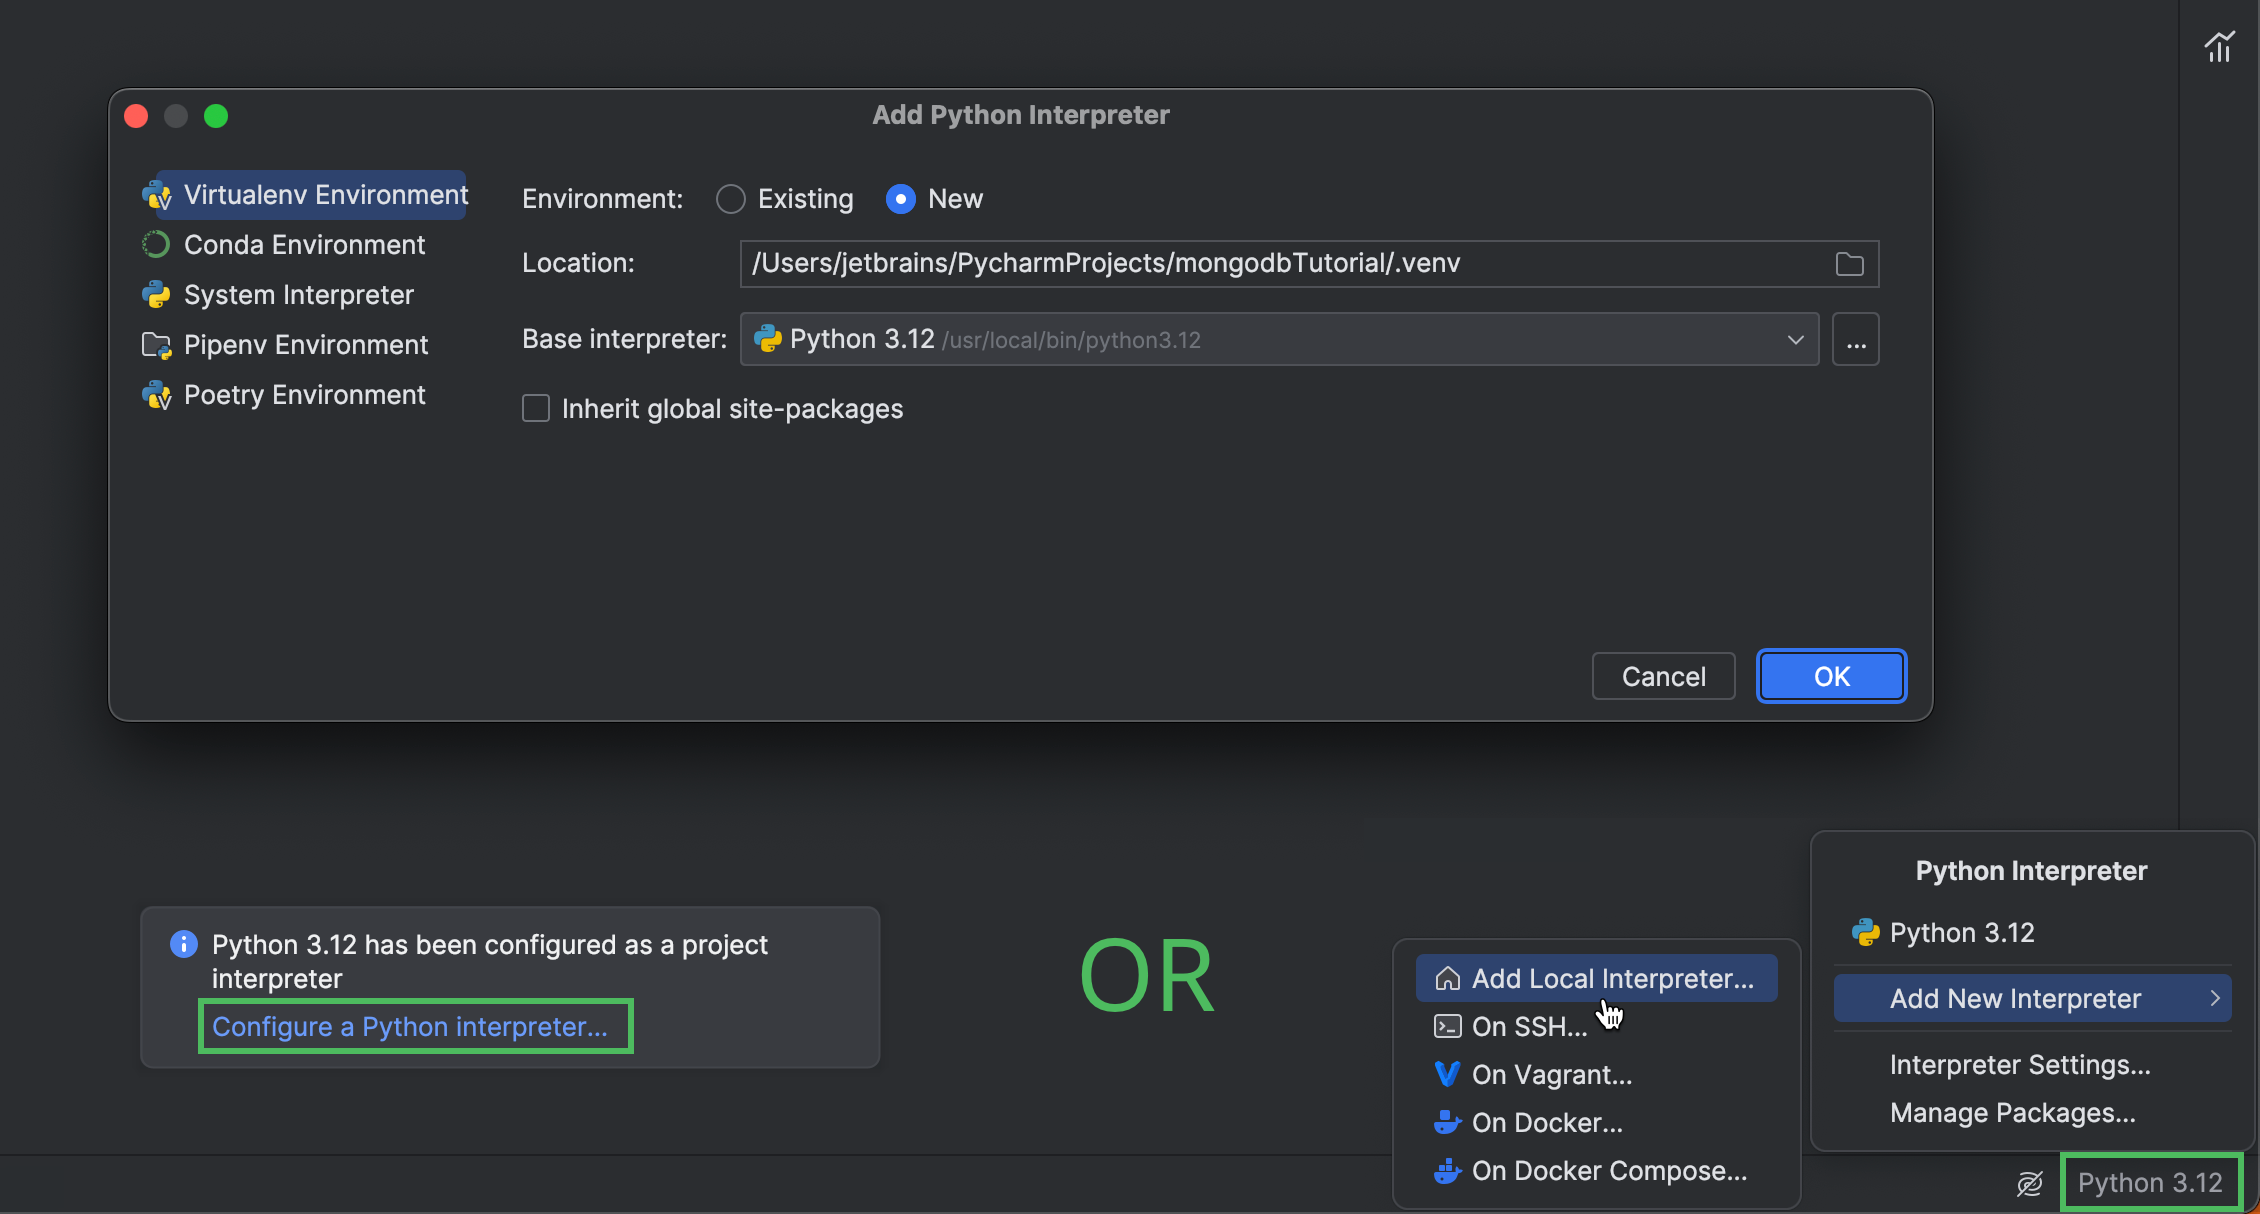
Click Configure a Python interpreter in the popup that appears right after you clone the project. Alternatively, click the interpreter selector in the lower right-hand corner, and then select Add New Interpreter | Add Local Interpreter. For more information about configuring interpreters in PyCharm, refer to the documentation.
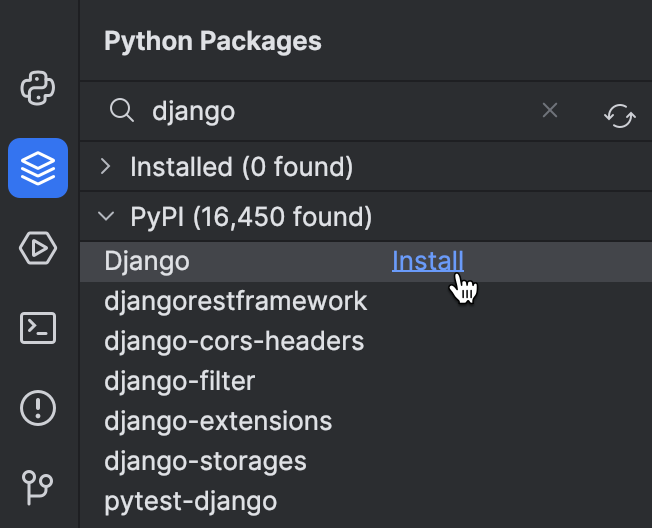
After you’ve configured the interpreter, open the Python Packages tool window and install Django.
Install MongoDB
Now that you have your Django project ready, you need to provision the MongoDB database. You can use one of three options, depending on what suits your project best:
Set up MongoDB Atlas
If you’re going to connect your Django project with a cloud MongoDB database, sign up for MongoDB Atlas and deploy a free database cluster there. To access this cluster from your application, you also need to add your connection IP address to the IP access list and create a database user. For the next steps of this tutorial, you’ll need the connection string. Here’s how you can get it:
- Select your database.
- Click Connect on the Overview tab.
- Select Drivers.
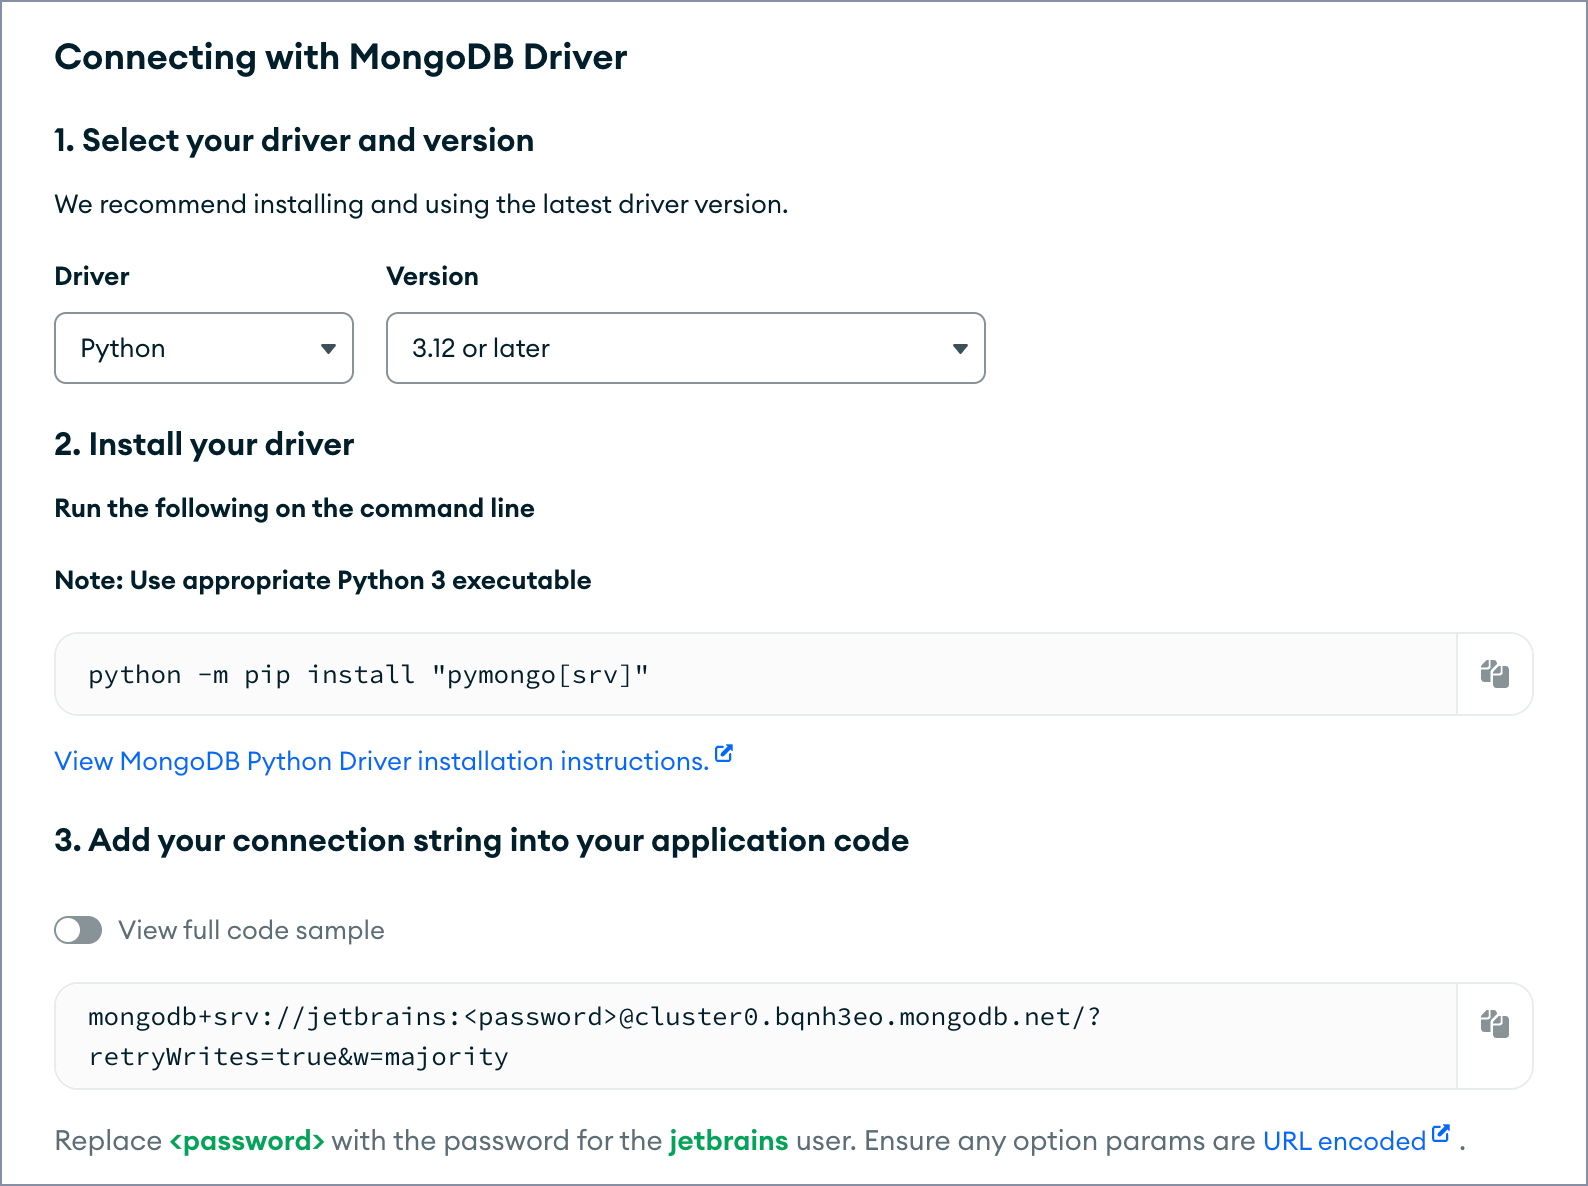
For more detailed information, see the MongoDB Atlas documentation.
Run MongoDB in a Docker container
If you decide to run MongoDB Community Edition in a container, follow these steps:
- Pull the MongoDB Docker image:
docker pull mongodb/mongodb-community-server
- Run the image as a container:
docker run --name mongo -d -p 27017:27017 mongodb/mongodb-community-server:latest
For further details, refer to the MongoDB documentation.
Install MongoDB locally
If you’re opting to run MongoDB as a local database, perform these steps:
- Install MongoDB Community Edition.
- Start the MongoDB Shell and create a database:
% mongosh
> use djangoTutorial
Configure the data source
This step is optional. Configuring a data source allows you to view the database collections and track changes to them right in PyCharm rather than install additional software or open the web interface of MongoDB Atlas.
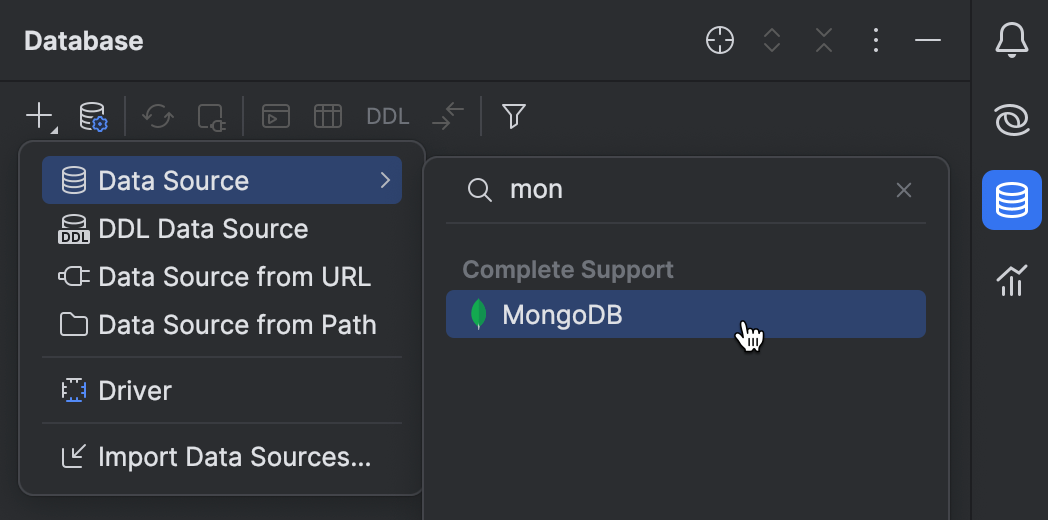
Go back to PyCharm, open the Database tool window, and click “+” to start creating a data source. Select MongoDB as the data source type.
Configure the newly created data source. If you are using MongoDB Atlas, insert the connection string into the URL field, and then provide the credentials of the database user.
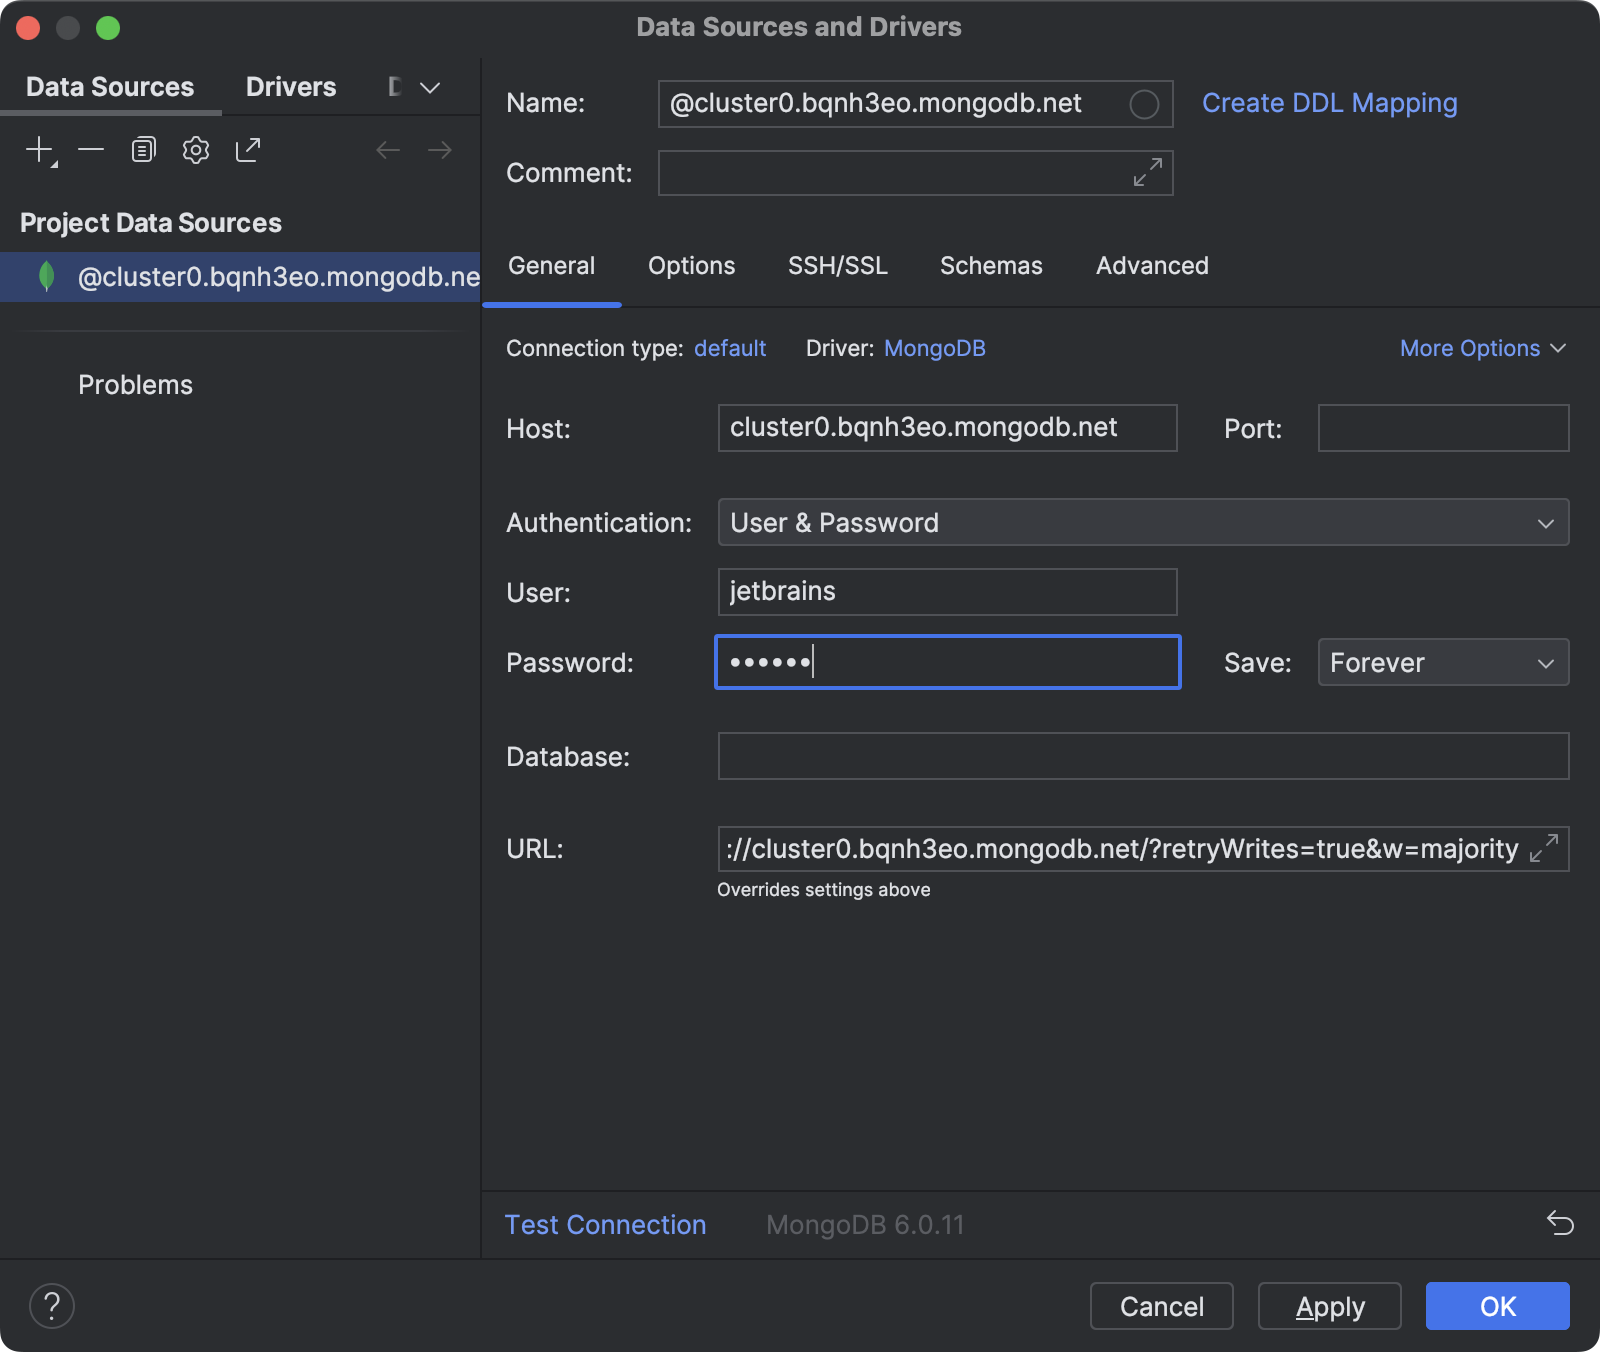
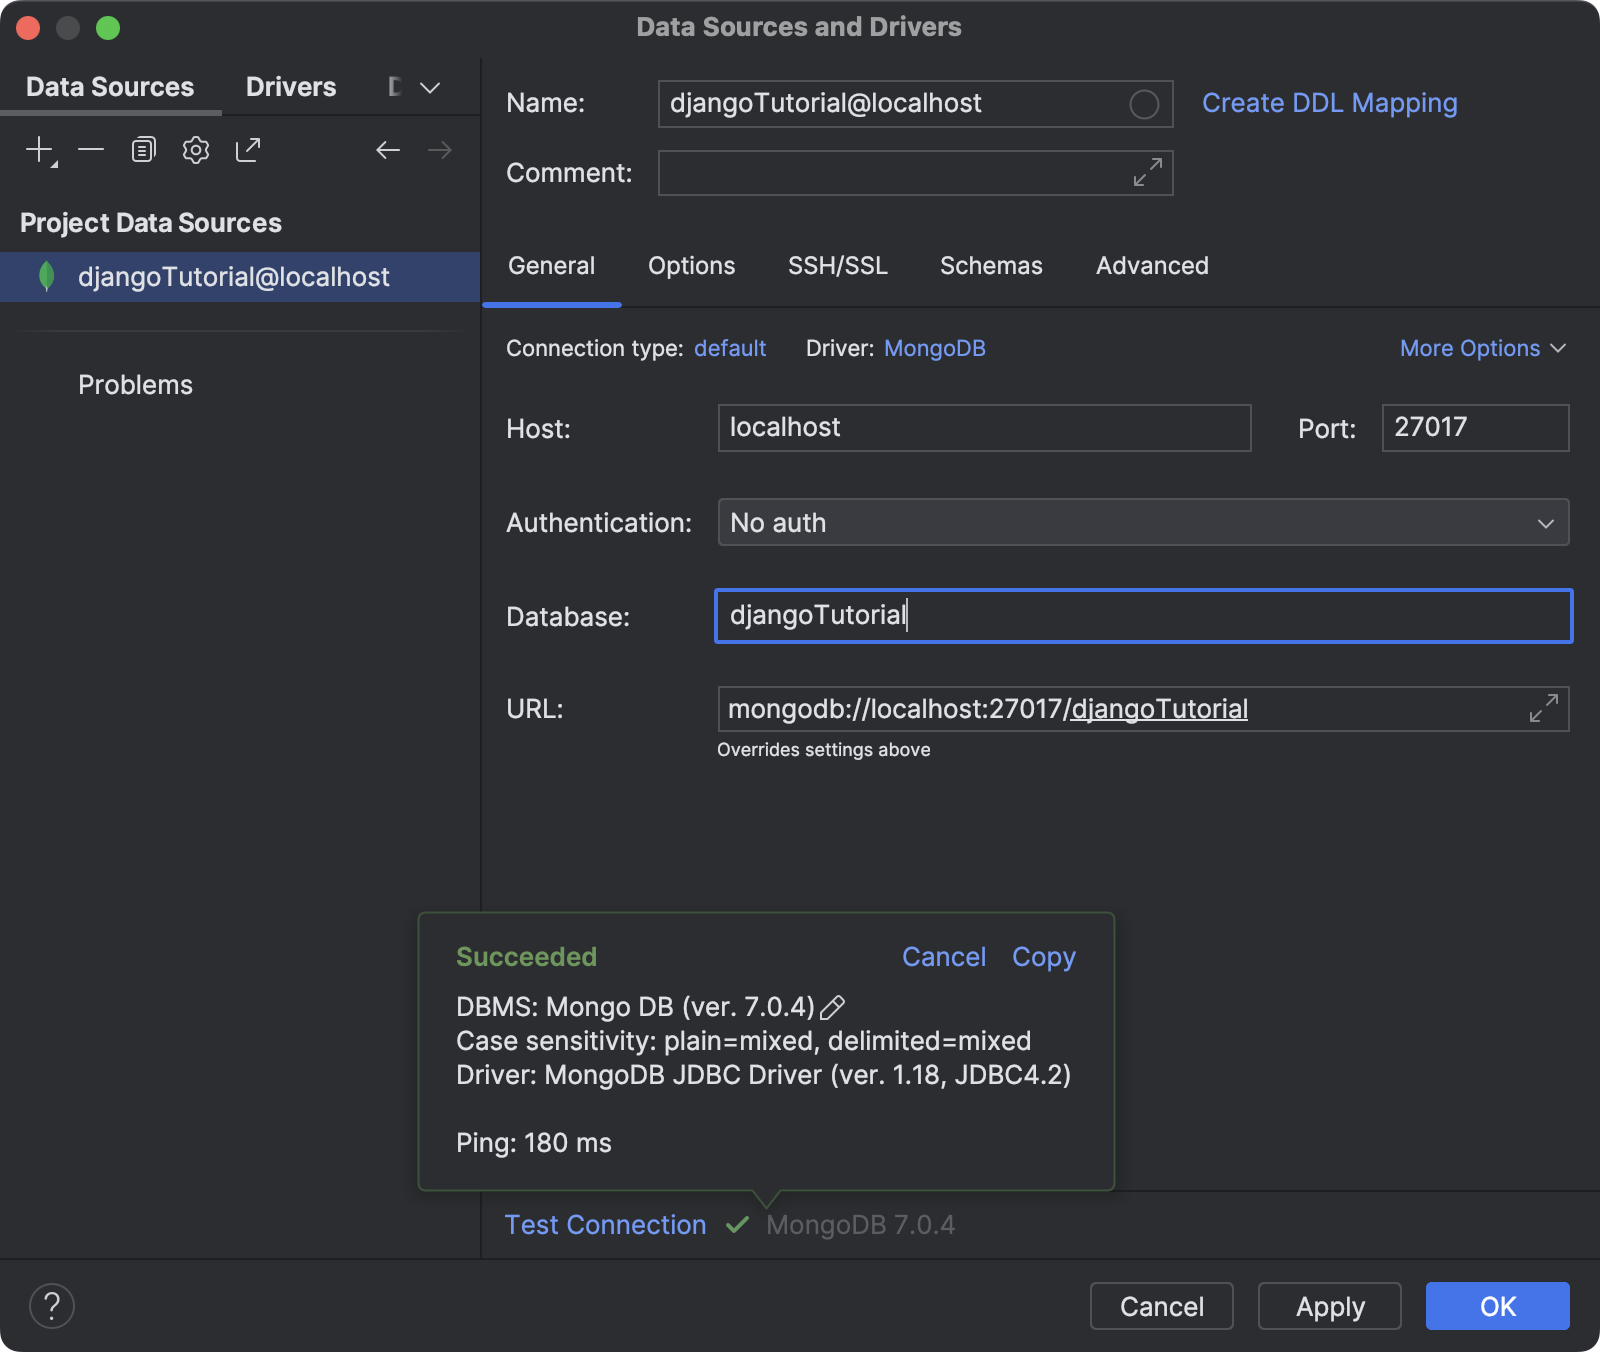
If you’re using MongoDB Community, either locally installed or running in a Docker container, configure the data source as follows:
- If you’ve changed the default settings during the installation, enter the database host address and port number. Otherwise, proceed to step 2.
- If you’ve configured the username and the password, enter them in the corresponding fields. Otherwise, select No auth in Authentication.
- Specify the database name in the Database field.
- Click Test Connection.
For more information about how to configure a MongoDB data source in PyCharm, refer to the documentation.
Configure environment variables
If you’re using MongoDB Atlas or a local MongoDB database with user and password authentication, you need to create an .env file with the environment variables to store your credentials. This is considered a best practice for preventing leaks of confidential data when putting projects under version control.
- Right-click the root directory of your project and select New | File from the context menu.
- Specify .env as the file name.
- The newly created file is opened in the editor. Add the environment variables and their values. For example:
USERNAME=jetbrains
PASSWORD=czUfHKhGNxtGTsv
HOST=cluster0.bqnh3eo.mongodb.net
HOST is required only for MongoDB Atlas.
- Right-click anywhere in the editor and select Git | Add to .gitignore from the context menu.
Next, you need to configure the run configuration so that the newly created .env file is loaded every time you start the Django server.
- Click the Run widget above and select Edit Configurations from the menu.
- Specify the path to .env in the Paths to “.env” files field.
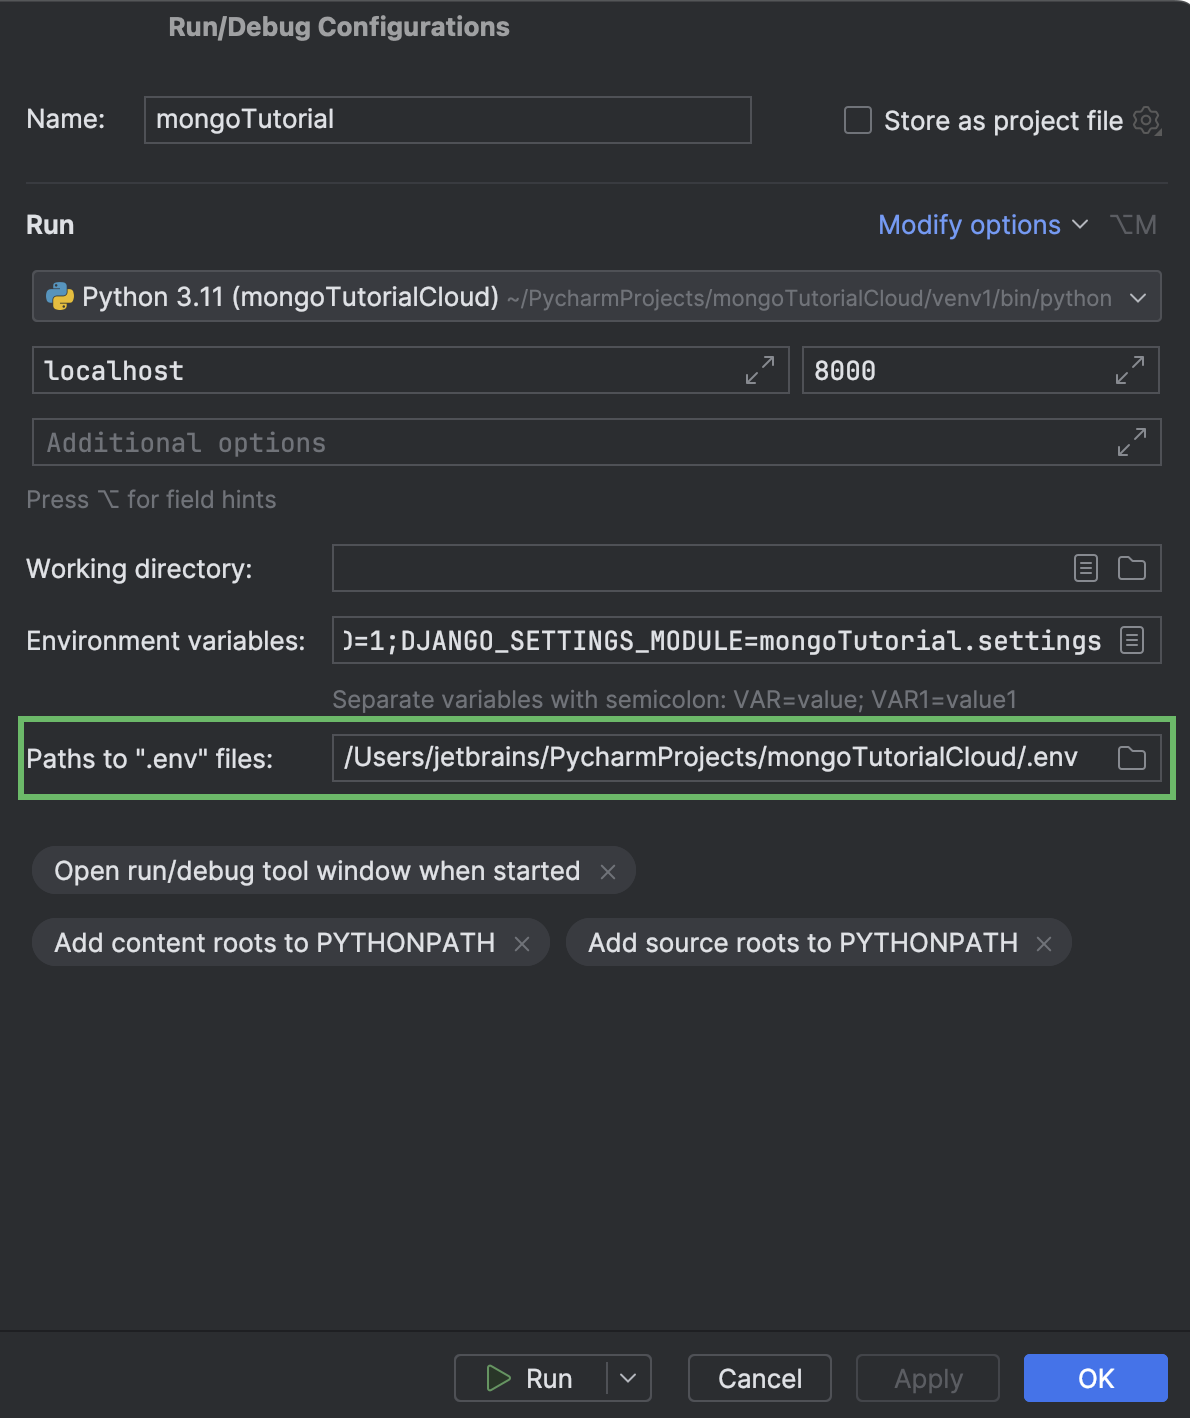
- Click OK or Run when you’re ready.
Now you are all set to proceed with the selected method for connecting Django and MongoDB (or try both).
Connect Django with MongoDB using MongoEngine
MongoEngine is a Python Object-Document Mapper (ODM) for Django projects. It works similarly to ORM (Object-relational mapping) in relational databases. Here are the main advantages of connecting MongoDB to Django through MongoEngine:
- ODM allows defining schemas for documents in code with familiar syntax (similar to models when using Django with SQL databases).
- Rich “pythonic” syntax for database queries.
- Support for Django forms and Django Rest Framework serializers.
To sum up, MongoEngine provides a high-level experience of interaction with MongoDB in Django projects. It can also be a great choice if you need to convert an existing Django project to one using MongoDB.
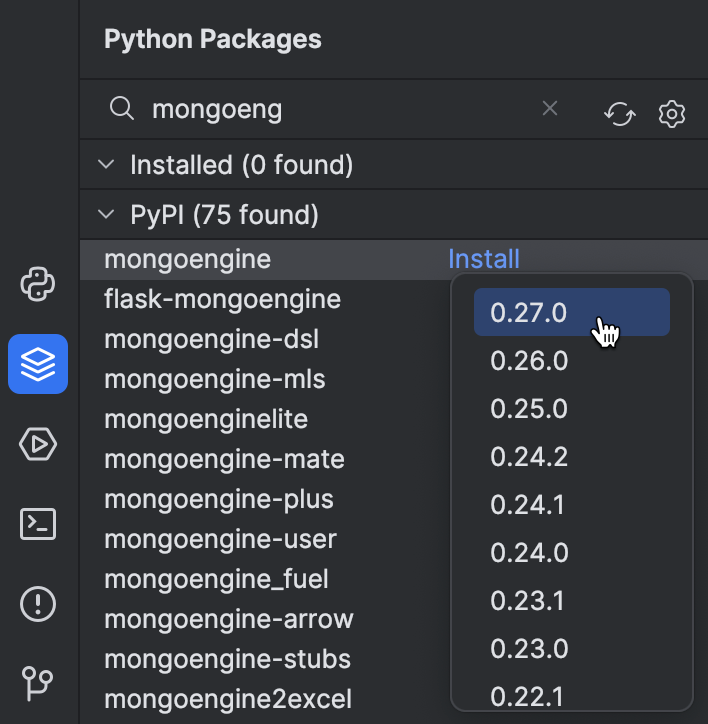
Install and enable MongoEngine
Let’s start by installing the MongoEngine package in the Python Packages tool window. Open the tool window, type mongoengine, click Install, and select the version.
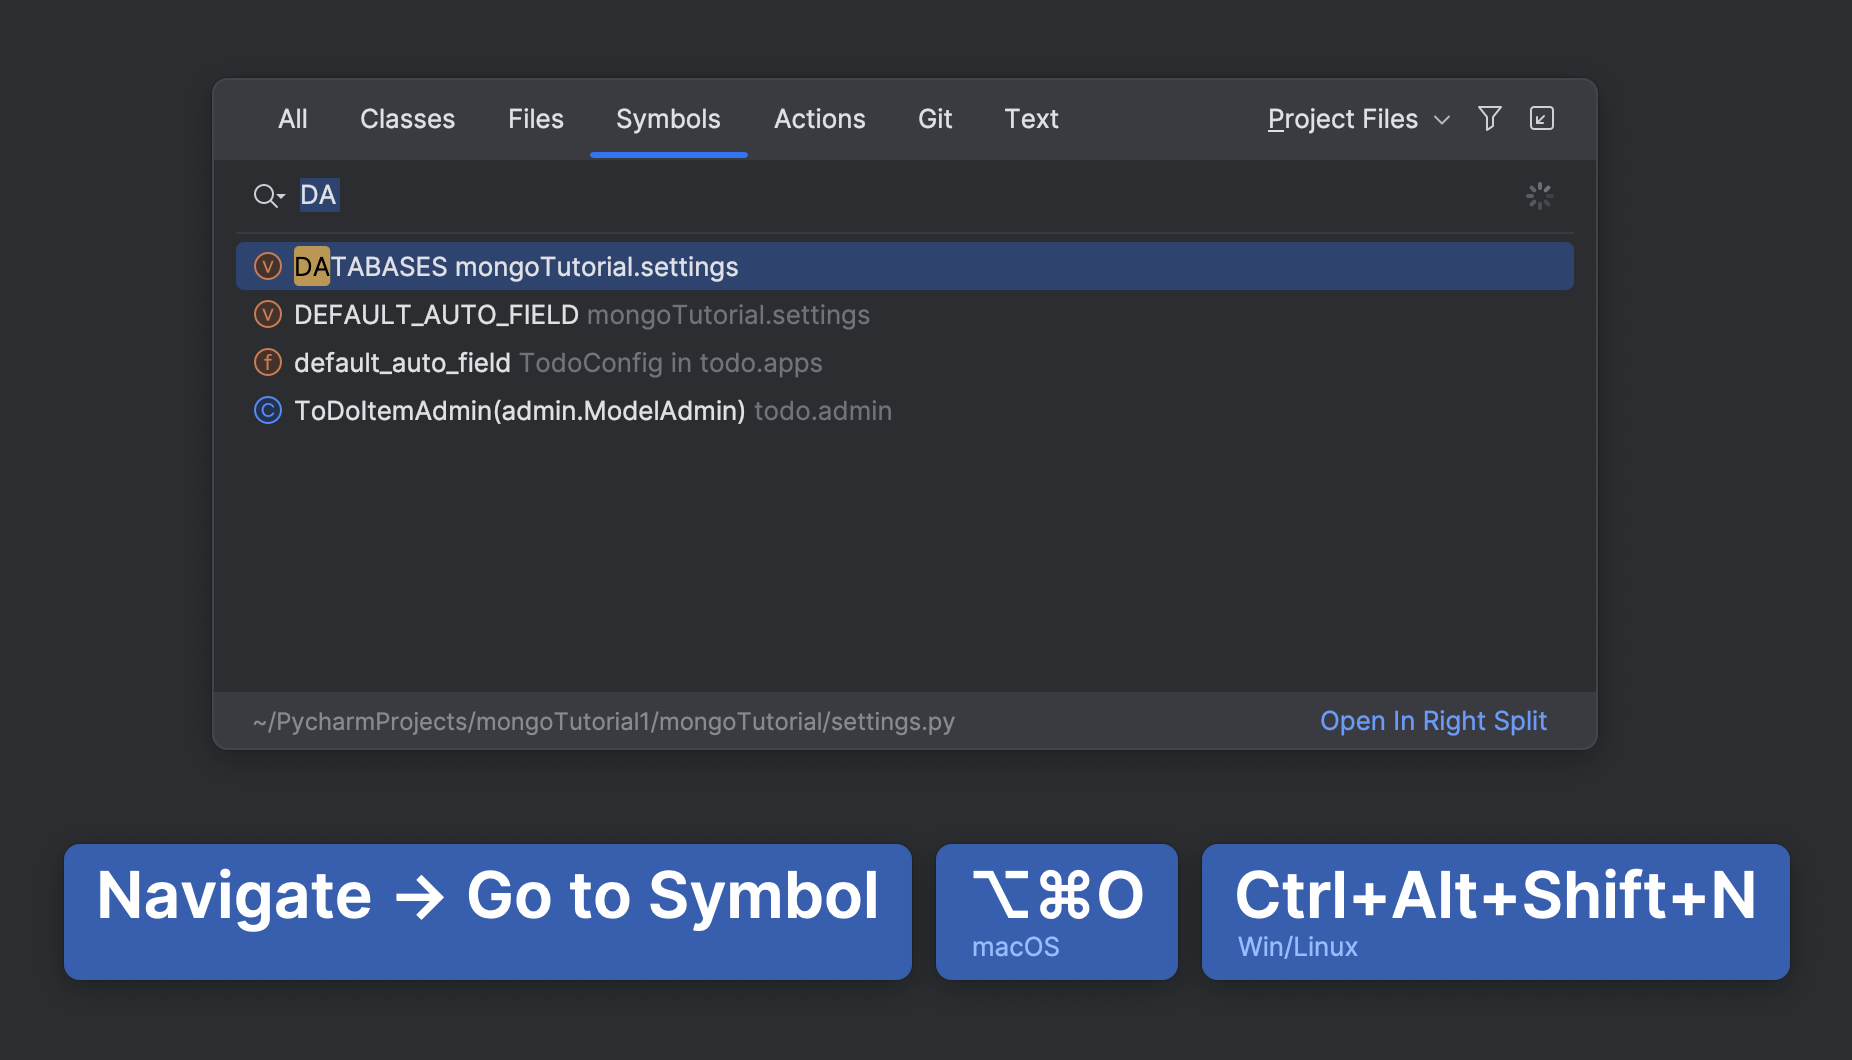
By default, Django projects are created with an SQLite database. We need to disable it by commenting (or removing) the DATABASES section in settings.py. Press ⌥⌘O / Ctrl+Alt+Shift+N and start typing DA… for quick access.
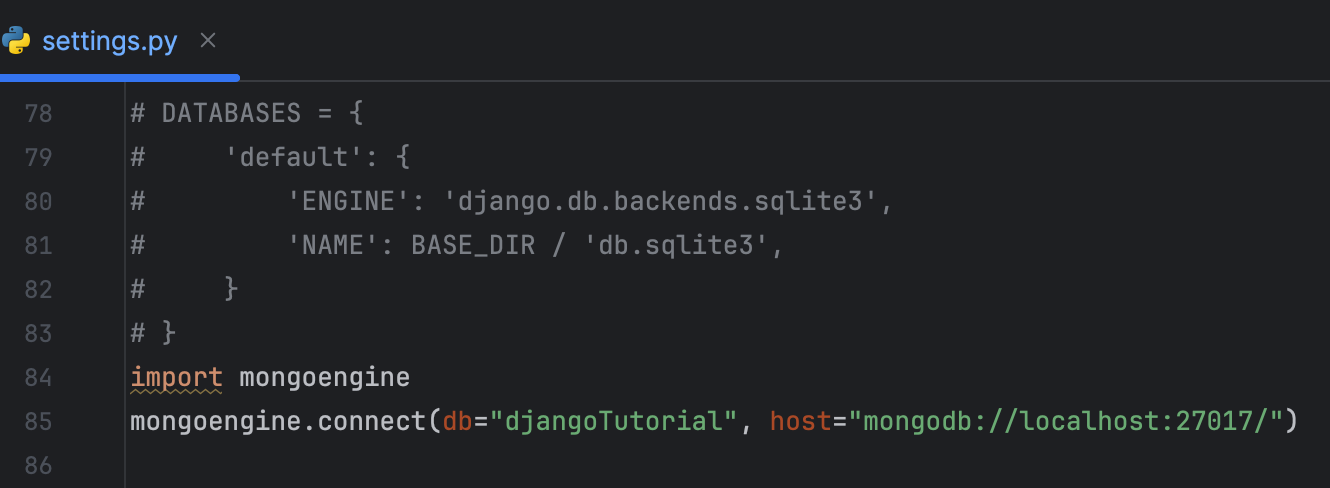
Instead, add the following to settings.py:
import mongoengine
mongoengine.connect(db="djangoTutorial", host="mongodb://localhost:27017/")
For MongoDB Atlas, load the username and the password from the .env file. For example:
import os
import mongoengine

USERNAME = os.getenv("USERNAME")
PASSWORD = os.getenv("PASSWORD")
HOST = os.getenv("HOST")


mongoengine.connect(db="djangoTutorial", host=f"mongodb+srv://{HOST}/",
                    username=USERNAME, password=PASSWORD)
Edit the model
Although MongoDB is schemaless, MongoEngine allows defining schemas at the application level. Such schemas are not passed to the database, but they let developers write more concise and maintainable code by adding an extra level of abstraction to the interaction between Django and MongoDB.
Unlike the Django ORM, MongoEngine uses documents instead of models. Unfortunately, MongoEngine documents are not supported by the Django admin interface. To avoid errors when launching the Django server, unregister ToDoItem in admin.py by commenting or removing the corresponding class.
You can use the Django Structure tool window for quick access to the model admin class:
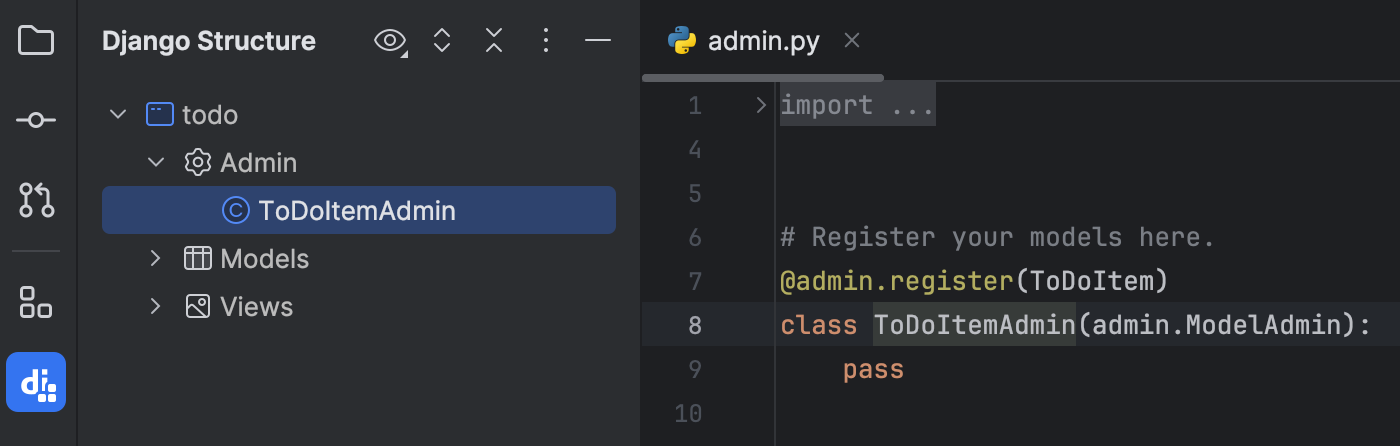
Double-click ToDoItem under Models in the Django Structure tool window to open the model in the editor. Make the following replacements:
| Original | Replacement |
|---|---|
from django.db import models | from mongoengine import Document, fieldsor from mongoengine import * |
models.Model | Document |
models.CharField | fields.StringField() |
models.DateField | fields.DateField |
Here’s what you should get:
from mongoengine import Document, fields
from django.utils import timezone


class ToDoItem(Document):
    text = fields.StringField(max_length=100)
    due_date = fields.DateField(default=timezone.now)

    def __str__(self):
        return f"{self.text}: due {self.due_date}"
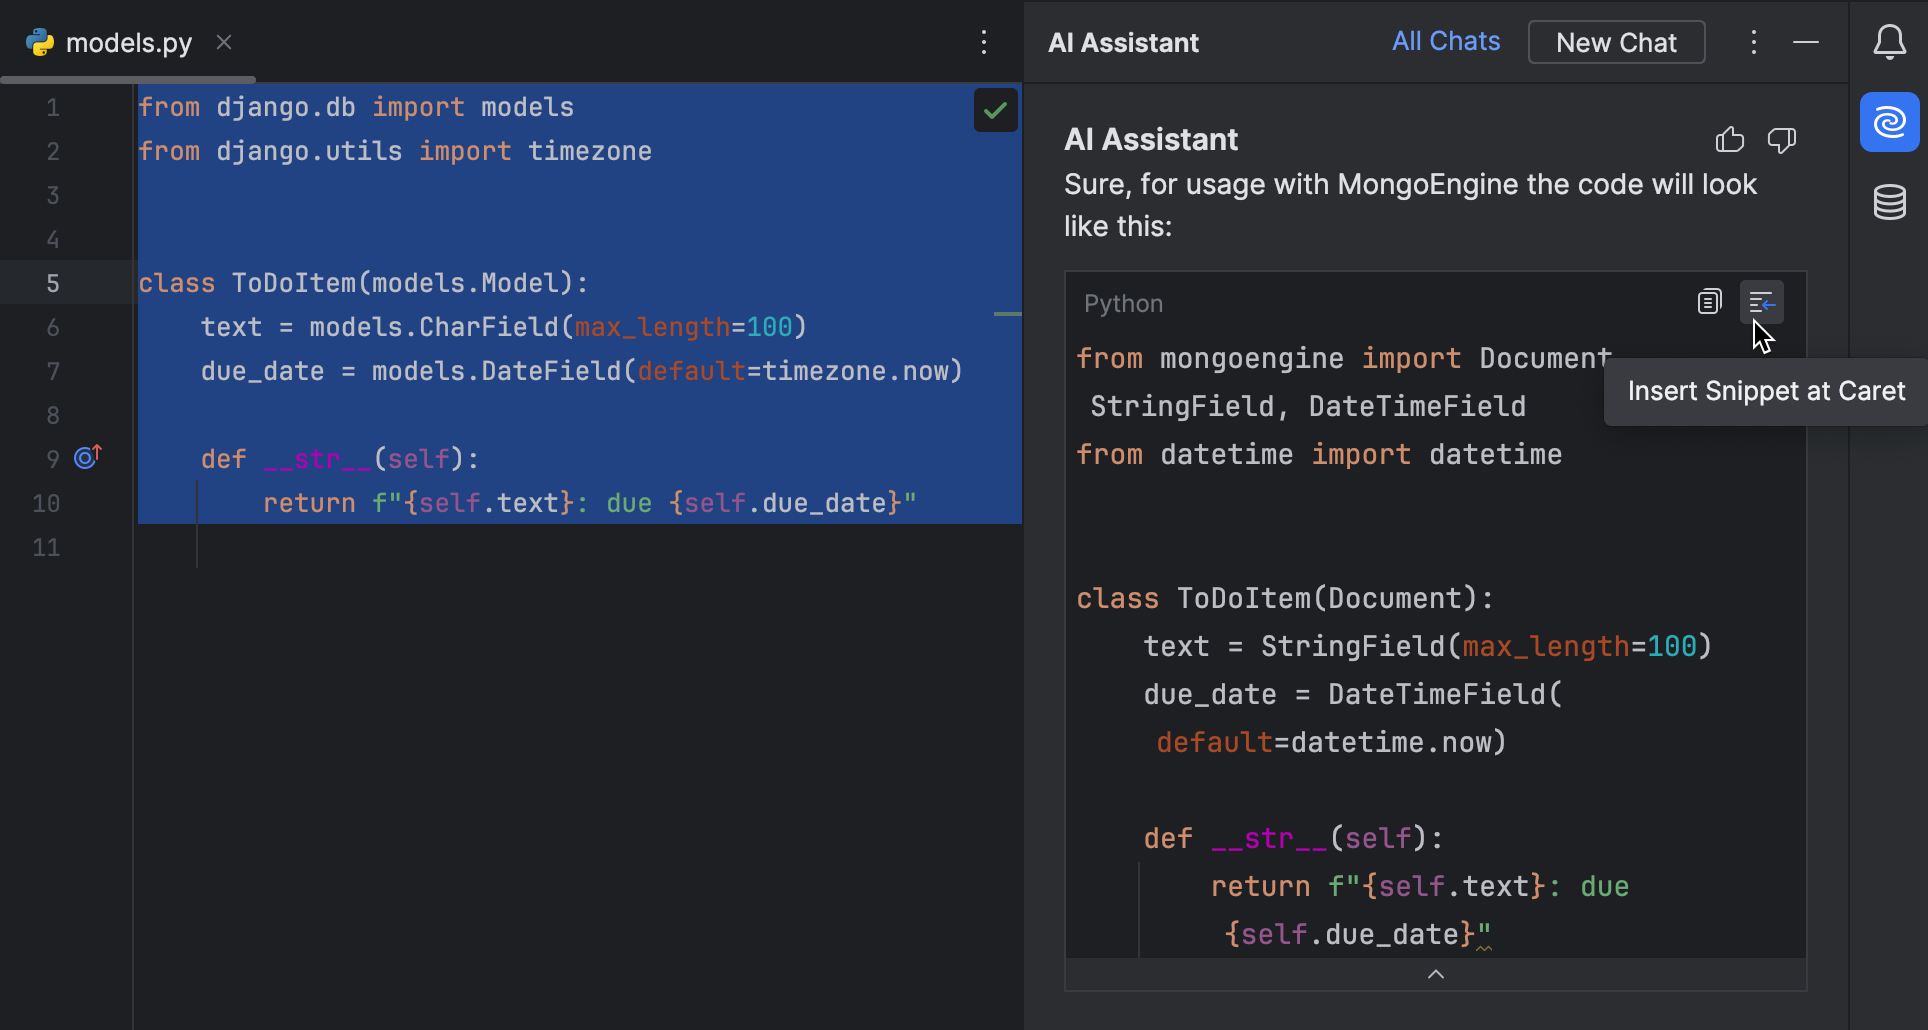
To avoid making replacements manually, you can ask Pycharm’s AI Assistant to do this for you:
- Select the code in models.py.
- From the context menu, select AI Actions | New Chat Using Selection.
- Write the prompt, for example, Modify the code for usage with MongoEngine.
For information about using AI Assistant, refer to the PyCharm documentation.
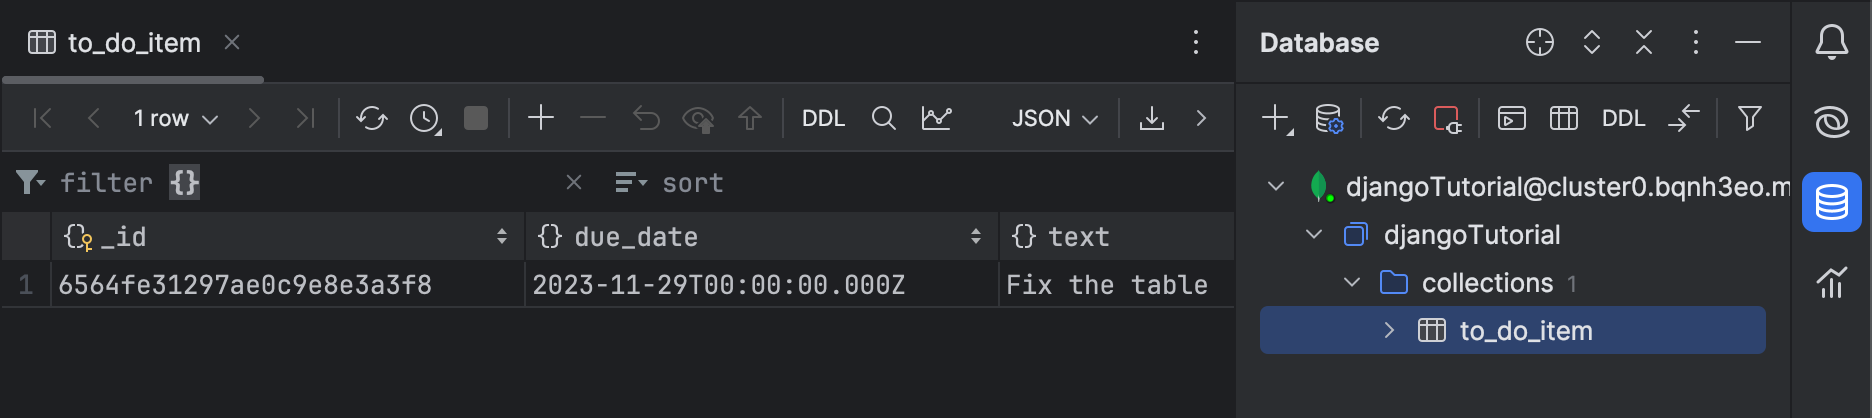
Now let’s test the solution by creating an instance of the ToDoItem document and saving it to the database. Open the Python console and run the following:
from todo.models import ToDoItem
from datetime import datetime
task = ToDoItem(text="Fix the table")
task.due_date = datetime(2023,11,29)
task.save()
If you are using a cloud database, this may take a while. In the event you get an [SSL: CERTIFICATE_VERIFY_FAILED] error, see the troubleshooting recommendations.
Open the to_do_item collection in the Database tool window and make sure that the record has been added:
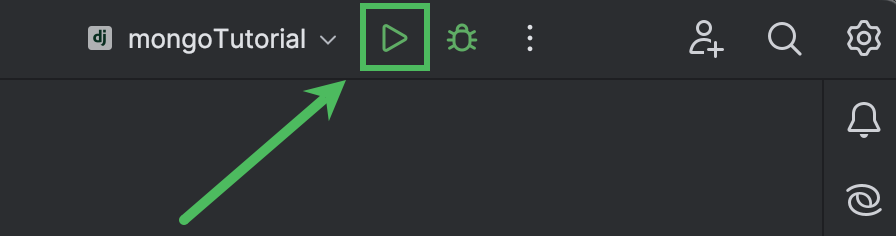
Let’s make sure that our changes didn’t break the application. Launch the Django server configuration, which was automatically created by PyCharm.
Then, go to http://localhost:8000/todo/ in the browser:
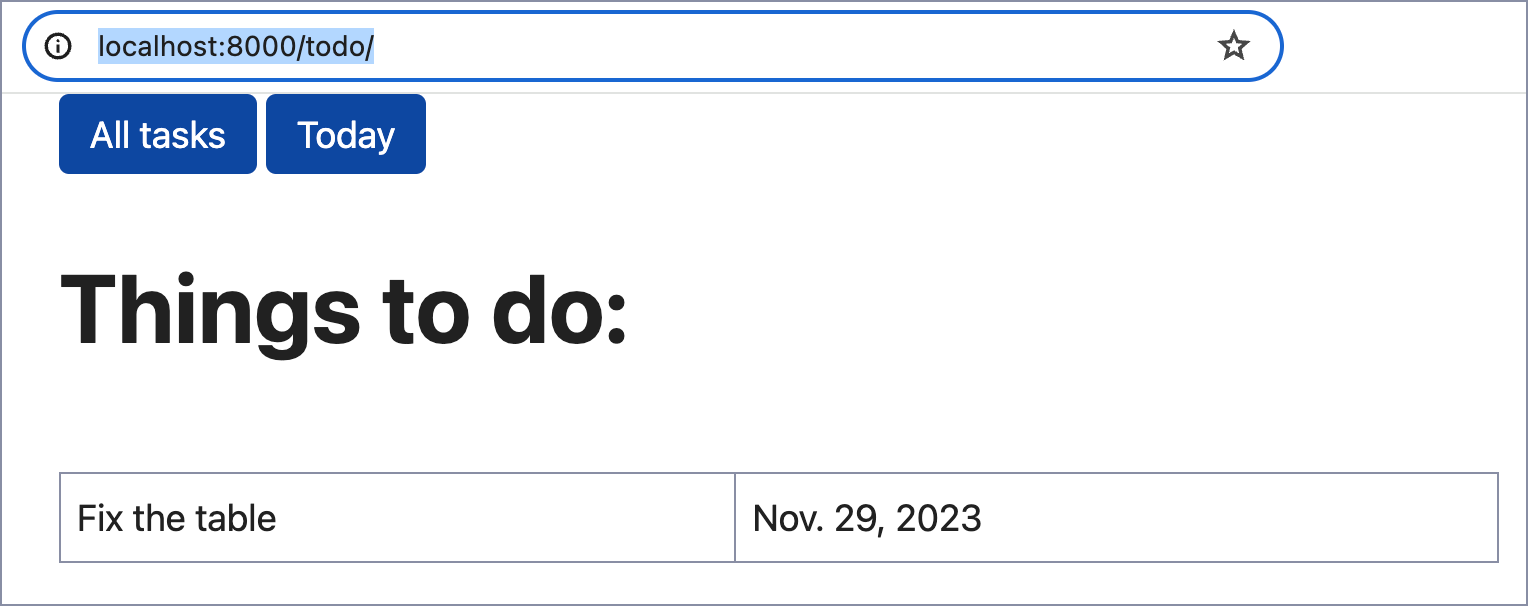
Congratulations! Your Django app is using MongoDB now!
Connect Django with MongoDB using PyMongo
PyMongo is the officially recommended low-level driver for MongoDB. It provides a direct and detailed way of interaction between Django and MongoDB. PyMongo is a great choice if you need to craft database queries for better performance and can do without the ORM-like experience in your codebase.
Install PyMongo and remove the model
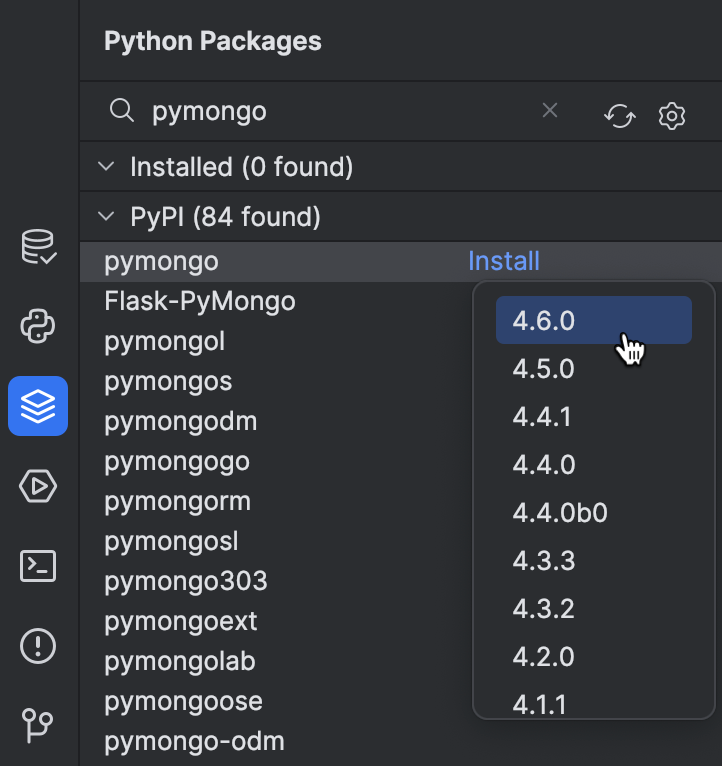
MongoEngine runs PyMongo under the hood. So, if you’ve just gone through the previous part of the tutorial, you already have pymongo installed in the project environment. Otherwise, install it in the Python Packages tool window.
Disable SQLite by commenting the DATABASES section in settings.py and remove ToDoItemAdmin from admin.py if you haven’t done so yet.
Finally, remove ToDoItem from models.py. You can use Recent Files (⌘E / Ctrl+E) for quick access.
Transform the views
As we are not using Django models anymore, we should change the view classes accordingly. Go to views.py and add a function that will be used to access the MongoDB database:
from pymongo import MongoClient


def get_db_handle():
    client = MongoClient(host="mongodb://localhost", port=27017)
    db_handle = client.djangoTutorial.to_do_item
    return db_handle
For MongoDB Atlas or a local database with authentication, you need to load environment variables and use the connection string. For example:
from pymongo import MongoClient
import os

USERNAME = os.getenv("USERNAME")
PASSWORD = os.getenv("PASSWORD")
HOST = os.getenv("HOST")


def get_db_handle():
    client = MongoClient(f"mongodb+srv://{USERNAME}:{PASSWORD}@{HOST}/?retryWrites=true&w=majority")
    db_handle = client.djangoTutorial.to_do_item
    return db_handle
The function returns the to_do_item MongoDB collection. One of MongoDB’s advantages is that even if this collection doesn’t exist yet, it will be created on the first insert.
As we don’t have the ToDoItem model anymore, we need to update the get_queryset methods of the view classes AllToDos and TodayToDos:
class AllToDos(ListView):
    template_name = "todo/index.html"

    def get_queryset(self):
        db = get_db_handle()
        results = db.find()
        return results


class TodayToDos(ListView):
    template_name = "todo/today.html"

    def get_queryset(self):
        db = get_db_handle()
        today = datetime.combine(date.today(), time())
        results = db.find({"due_date": today}).sort("due_date")
        return results
By changing the code in this way, we are overriding the default get_queryset method of Django’s ListView class. Here’s what this code does:
The AllToDos class:
- Calls
get_db_handleto get theto_do_itemcollection from thedjangoTutorialdatabase and assigns it todb(line 5). - Applies the
find()method of PyMongo’s collections to fetch all of the items in the collection (line 6).
The TodayToDos class:
- Sets the current date combined with the default time (midnight) as
today. We don’t need time in our application, but we can’t get rid of it because it is required by the BSON format (line 15). - Fetches all items whose
due_dateis today and sorts them bydue_date(line 16).
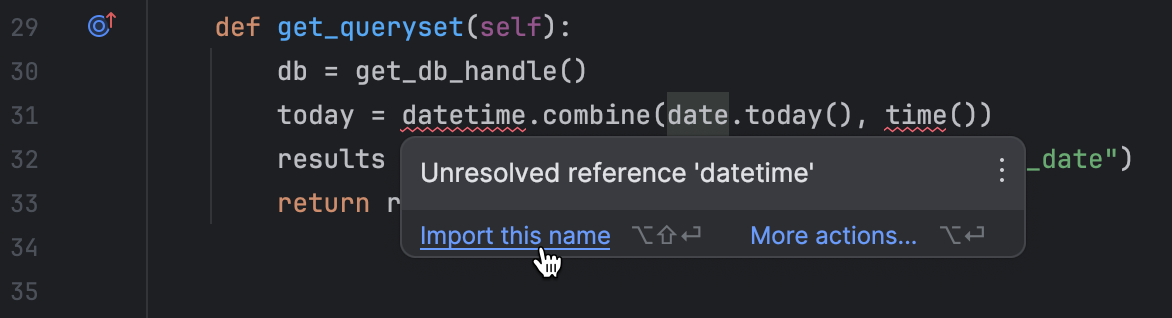
Don’t forget to update the imports. Hover over datetime and time(), which should be highlighted with a red squiggly line, and then select Import this name. Import from datetime in both cases.
If the Django server is not running, launch it, and then go to http://localhost:8000/todo/ in the browser to make sure that the application works.
Continue developing
At the moment we can add records to the database via the Python console. However, the console isn’t available for the users of our application. It looks like we should develop a view that will allow adding new records to the database in the browser.
Let’s start with writing a web form. Create a forms.py file in the application directory (todo) and fill it with the following code:
from django import forms
from datetime import datetime


class ToDoItemForm(forms.Form):
    text = forms.CharField(max_length=100)
    due_date = forms.DateField(initial=datetime.now)
The form consists of two fields: text and due_date. The latter defaults to the current date.
Now let’s add a view to views.py. At the beginning of this tutorial, we already mentioned that many Django shortcuts will no longer work if you decide to use Django with MongoDB. This time you’ll have to use a function-based view and manually define some basic logic (which would have been simply inherited via class-based views had we used a different database).
If you’ve connected Django to MongoDB with PyMongo, the function code should be as follows:
from django.shortcuts import redirect, render
from .forms import ToDoItemForm
...

def add_todo(request):
    if request.method == "POST":
        form = ToDoItemForm(request.POST)
        if form.is_valid():
            new_todo = {
                "text": form.cleaned_data["text"],
                "due_date": datetime.combine(form.cleaned_data["due_date"], time())
            }
            db = get_db_handle()
            db.insert_one(new_todo)
            return redirect('today')
    else:
        form = ToDoItemForm()

    return render(request, "todo/add.html", {"form": form})
Here’s the breakdown:
- If the
add_todoview receives a POST request, it assigns theToDoItemFormdata toform(lines 6–7). - It first ensures the posted form data is valid, and then creates a dictionary from the form data (lines 8–12).
- It connects to MongoDB via the
get_db_handlemethod, and inserts a new record into the database (lines 13–14). - If it’s not a POST request, it simply returns a blank form (line 16).
If you’re using MongoEngine, the code will be shorter as you can use the built-in save() method available in MongoEngine documents:
from django.shortcuts import redirect, render
from .forms import ToDoItemForm
...

def add_todo(request):
    if request.method == "POST":
        form = ToDoItemForm(request.POST)
        if form.is_valid():
            new_todo = ToDoItem(text=form.cleaned_data["text"], due_date=form.cleaned_data["due_date"])
            new_todo.save()
            return redirect("today")
    else:
        form = ToDoItemForm()

    return render(request, "todo/add.html", {"form": form})
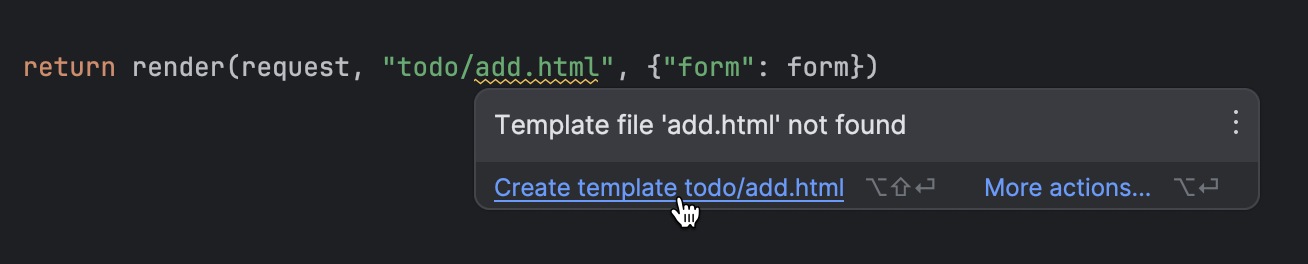
The reference to the template file add.html in the return statement should be highlighted with a yellow squiggly line. Hover over it and select Create template todo/add.html.
The template will open in the editor. Fill it with the following HTML code:
{% extends "base.html" %}
{% block content %}
    <h1>Add new to-do:</h1>
    <form method="post">
        {% csrf_token %}
        {{ form.text.label_tag }} {{ form.text }}
        <br>
        {{ form.due_date.label_tag }} {{ form.due_date }}
        <br>
        <button type="submit">Submit</button>
    </form>
{% endblock %}
Update base.html by adding a button for creating new tasks:
<div>
    <a class="button" href='{% url "index" %}'>All tasks</a>
    <a class="button" href='{% url "today" %}'>Today</a>
    <a class="button" href='{% url "add" %}'>Add</a>
</div>
Update todo/urls.py to allow yourself to access the page for adding tasks in the browser:
urlpatterns = [
    path("", views.AllToDos.as_view(), name="index"),
    path("today/", views.TodayToDos.as_view(), name="today"),
    path("add/", views.add_todo, name="add")
]
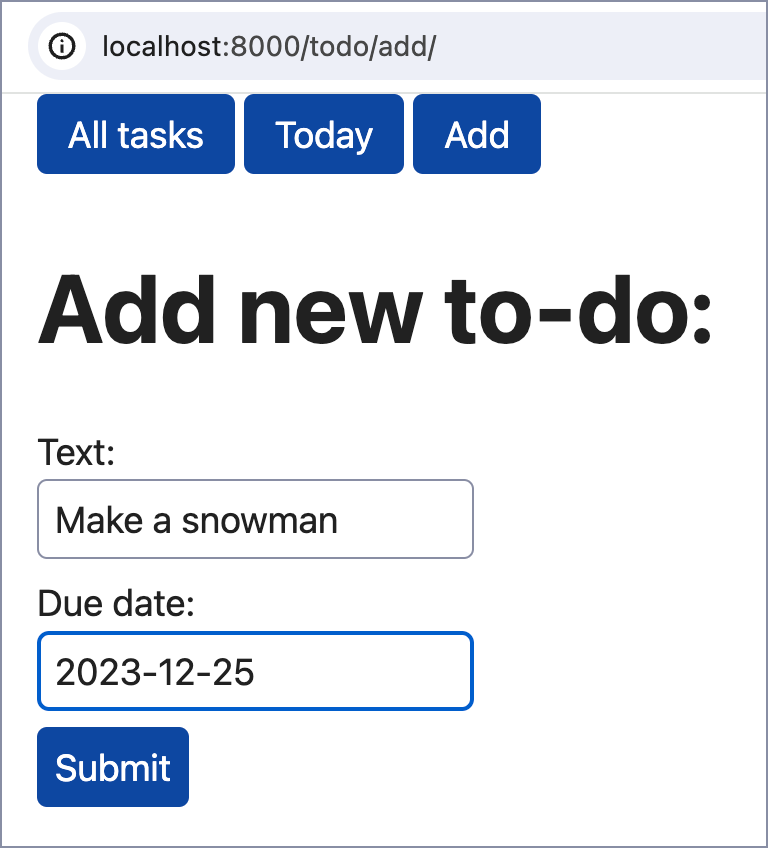
Finally, it’s time to test the new feature in the browser! Go to http://localhost:8000/todo/add/ and add a task:
Conclusion
If you’ve followed all of the steps in this tutorial, you have successfully connected a basic Django project with MongoDB by using two libraries: PyMongo and MongoEngine.
As you already know, MongoEngine is actually based on PyMongo. So, what’s the difference, and how do you choose the right way for your Django project? We’ve summarized the advantages and disadvantages of each method in the following table:
| MongoEngine | PyMongo | |
|---|---|---|
| Access to collections | Document classes are mapped to collections | Collections are accessed through MongoClient |
| Querying | Chained queries: ToDoItem.objects.filter(due_date=date.today()) | Dictionary style queries: db.find({"due_date": today}).sort("due_date") |
| Performance | Slightly slower because of Object-Document Mapping | Faster thanks to using Python dictionaries as data models |
| Usage complexity | Simplifies usage by adding an extra level of abstraction and providing an ORM-like experience | Requires a deeper understanding of MondoDB’s internal formats |
FAQ
What are Django and MongoDB?
Django and MongoDB are both used in web development but serve different purposes. Django is a high-level Python Web framework that follows the MVT (Model-View-Template) architectural pattern and the DRY (“Don’t Repeat Yourself”) principle.
Is MongoDB good with Django?
Django is optimized for SQL databases. While MongoDB, a NoSQL database, can be integrated through tools like MongoEngine or PyMongo, this can add complexity and limit some native Django features. On the other hand, MongoDB can bring benefits, like flexible data structures and good horizontal scalability. Choosing MongoDB for Django should be based on your specific project needs and readiness to manage potential additional development challenges.
Can you use NoSQL with Django?
Yes, you can use NoSQL databases like MongoDB with Django. However, this can add complexity and might limit some Django features that are optimized for SQL databases. The choice should be based on your specific project requirements and trade-offs.
Which is better, PyMongo or MongoEngine?
PyMongo is faster and offers more direct access to MongoDB, but requires a deeper understanding of MongoDB’s internals. MongoEngine provides a higher-level interface and fits well with Django, but may not support all MongoDB features and can be slower because of abstraction.
Why choose MongoDB over SQL with Django?
MongoDB’s schema flexibility, ability to handle large volumes of data, and unique features like nested objects make it a good fit for certain Django projects. It can scale efficiently across multiple servers. However, using it might limit some of Django’s built-in features that are optimized for SQL databases.
Useful links
PyCharm for Django development
Documentation
- Django support in PyCharm
- Django Structure tool window
- MongoDB documentation
- MongoEngine documentation
- PyMongo documentation
Tutorials
- Python and MongoDB: Connecting to NoSQL Databases
- Python MongoDB at W3Schools
- Create a Django App in PyCharm
Videos
Podcasts
Other