.NET Tools
Essential productivity kit for .NET and game developers
Configuring inspection severities with EditorConfig
In our previous post, we looked at how we can maintain a consistent code style with the newly added formatting inspections in ReSharper and Rider. In this post, we will look at the different ways to configure inspection severities.
In this series:
- Maintaining consistent code style with formatting inspections
- Configuring inspection severities with EditorConfig
- Code style settings from Roslyn conventions in EditorConfig
- StyleCop code style settings and inspections
Starting with ReSharper 2017.1 it was possible to define ReSharper formatting style settings directly inside the EditorConfig file. This allows us to keep our coding style settings in a central place, no matter what IDE other developers in our team are using.
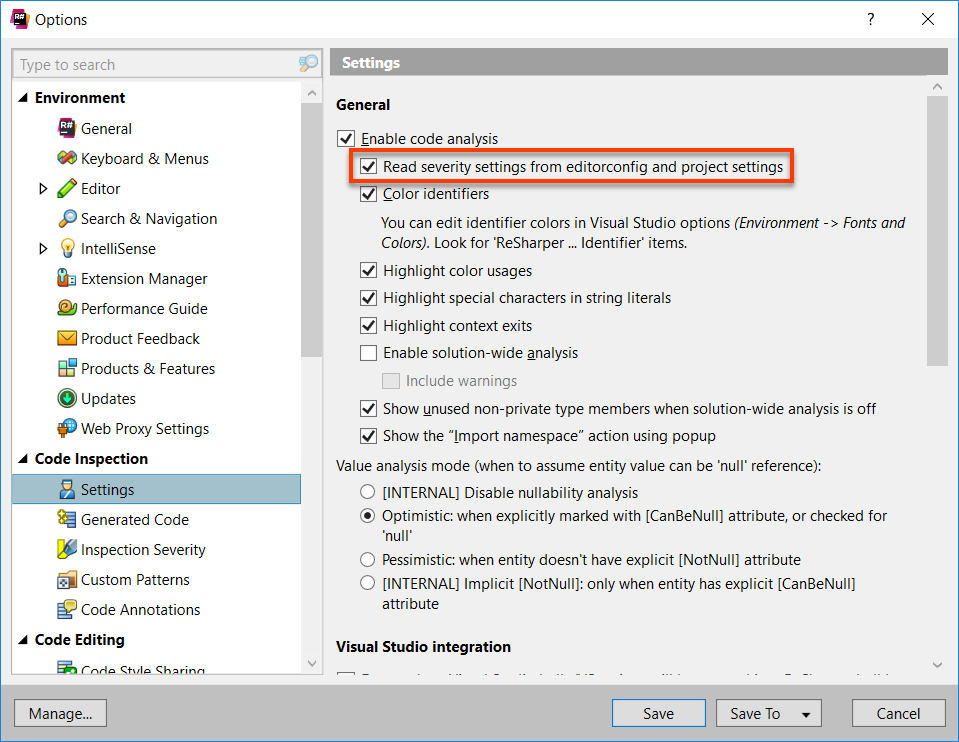
With ReSharper 2018.1 EAP and Rider 2018.1 EAP, we improve our support for EditorConfig to read even more ReSharper settings from the EditorConfig file, including inspection severities and non-formatter code style settings. First, we need to enable this feature in Options | Code Inspection | Settings:

Note: Especially in large solutions, enabling this option can have noticeable performance impact. We consider it an experimental feature with planned performance optimizations in future releases.
ReSharper inspection severities inside the EditorConfig file are defined as resharper_[id]_highlighting where the id must be lower_case_with_underscore. Depending on our needs, we can assign any value of do_not_show, hint, suggestion, warning or error.
resharper_incorrect_blank_lines_near_braces_highlighting = warning
resharper_arrange_this_qualifier_highlighting = error
An appropriate UI for saving these values is planned for future releases. Our web help provides an index of all EditorConfig properties, which is convenient for searching. We can also grab the highlighting id from the relevant DotSettings file and then use it in our EditorConfig file:
<wpf:ResourceDictionary
    xml:space="preserve"
    xmlns:x="http://schemas.microsoft.com/winfx/2006/xaml"
    xmlns:s="clr-namespace:System;assembly=mscorlib"
    xmlns:ss="urn:shemas-jetbrains-com:settings-storage-xaml"
    xmlns:wpf="http://schemas.microsoft.com/winfx/2006/xaml/presentation">
	<s:String x:Key="/Default/CodeInspection/Highlighting/InspectionSeverities/=ArrangeThisQualifier/@EntryIndexedValue">
        ERROR
    </s:String>
	<s:String x:Key="/Default/CodeInspection/Highlighting/InspectionSeverities/=IncorrectBlankLinesNearBraces/@EntryIndexedValue">
        WARNING
    </s:String>
</wpf:ResourceDictionary>
For some folks, it might be worth mentioning, that after we’ve enabled this setting, we will also get support for reading severities from per-project DotSettings. Unfortunately, we still don’t provide any UI for modifying per-project DotSettings, but there is an older blog post, which describes a workaround of temporarily loading the DotSettings file as an options layer.
Stay tuned for the next part of this series, in which we will see how ReSharper and Rider integrate with Roslyn conventions.
Download ReSharper 2018.1 EAP now! Or give Rider 2018.1 EAP a try. We’d love to hear your feedback!
Subscribe to a monthly digest curated from the .NET Tools blog:


