.NET Tools
Essential productivity kit for .NET and game developers
Entity Framework Core and Multiple Database Providers

While many software developers would prefer to sell software as a service (SaaS), there’s a market for offering your customers a self-hosted solution tailored to their infrastructure choices. Of course, one essential element of any modern software solution is the database, but in 2022 there are hundreds of battle-tested storage solutions. For example, the Entity Framework Core library supports over ten popular database engines, including Microsoft SQL Server, Oracle, PostgreSQL, MySQL, and SQLite. Sometimes, you may want to use more than one of the stated database providers.
This post will look at configuring your .NET projects to support multiple database providers while using the same models to access your underlying database.
Why Do I Want Multiple Database Providers?
There are plenty of reasons for working with multiple database providers in your application.
Maybe you are building an application distributed as a Software-as-a-Service (SaaS) product and a standalone product your customers can install in their data center. For example, your SaaS may use PostgreSQL, while your customers may have standardized on Microsoft SQL Server and require you to ship a version that matches their technology landscape.
Perhaps your customers want to deploy your application on their database of choice for other reasons, such as not having the capacity to manage additional database server types, licensing, or legal and compliance requirements. Some customers want the choice to make their decisions, and lacking support for multiple database options might ultimately be a deal breaker.
Requirements For Getting Started
Before jumping into code, you’ll need the following. Also, I’ve pushed a complete sample to a GitHub repository for those in a hurry.
- JetBrains Rider or Visual Studio with ReSharper
- .NET 7 preview
- PostgreSQL instance (local, remote, or container)
The approach described in this article will use Entity Framework Core 7 preview, but this approach should also work with Entity Framework Core 6 and .NET 6. You can modify the sample project to target previous versions.
Solution, Projects, and References
Database migrations are one of the best features of Entity Framework Core. A database migration allows you to change your object model and generate the steps to alter your database. We need to create migrations for each new database provider we include in our solution. Therefore, you must store each database provider’s migration in an independent project.
In this example, we’ll be using two different database providers: SQLite and PostgreSQL. Of course, you can choose any database providers supported by Entity Framework Core, but keep in mind that the more features overlap between providers, the easier it will be to maintain your solution.
A two-provider solution will require four projects in the most straightforward use case.
- Host Project (ASP.NET Core in this case)
- Models Project (
DbContextand models) - PostgreSQL Migrations Project
- SQLite Migrations Project
Using JetBrains Rider’s project dependency diagram, we can see how the final solution will look.
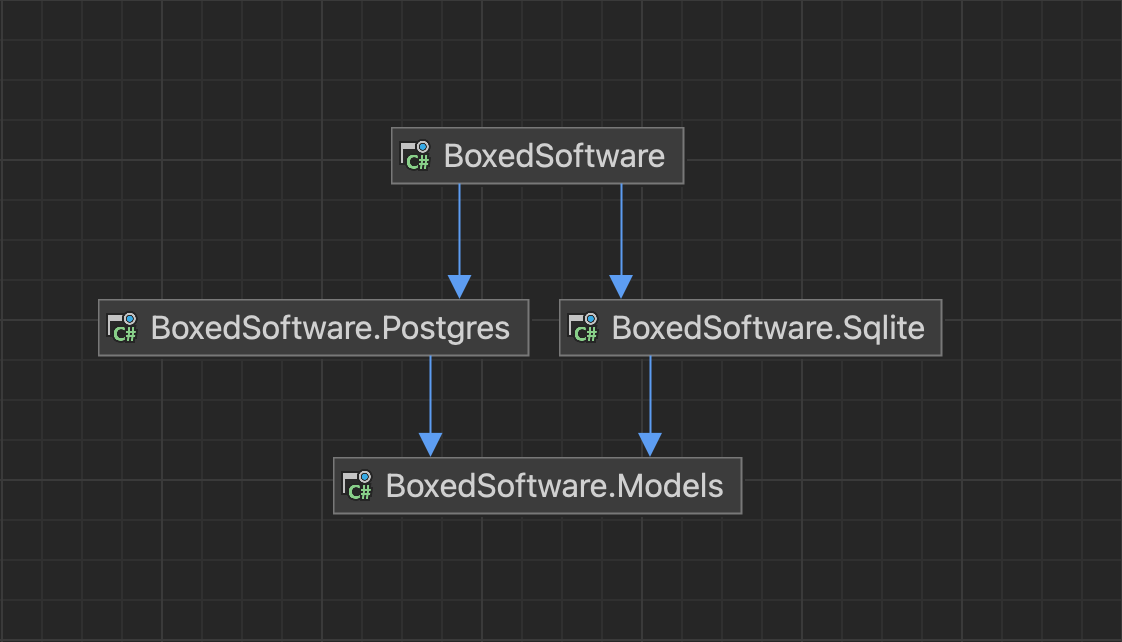
As you can see, our host depends on each migration project, while each project references the models project. With Entity Framework Core, the host project will also double as our entry point for the Entity Framework Core tools required to build, run, and generate our migrations.
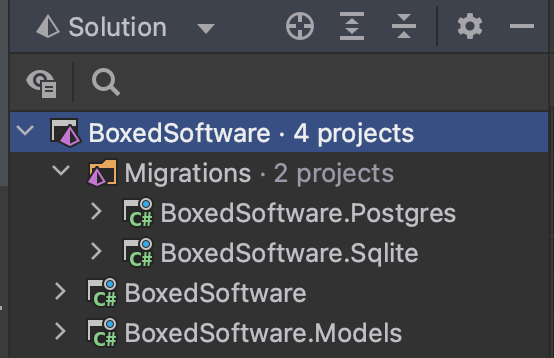
If you’re following along, please create a solution that emulates the previous diagram before continuing to the next section. When complete, you should have a solution with four projects. I’ve included my migration projects in a Migrations solution folder.
Entity Framework Core Tooling
An essential element to working with Entity Framework Core is the command-line tooling. To install the tooling, execute the following commands in the JetBrains Rider terminal.
dotnet new tool-manifest
dotnet tool install dotnet-ef --prerelease
The --prerelease flag is only necessary if Entity Framework Core 7 is still not released when you’re reading this post.
If you’ve successfully installed Entity Framework Core tooling, running dotnet ef –version terminal command in the root of your solution will yield the currently installed version number for Entity Framework Core.
Entity Framework Core .NET Command-line Tools
7.0.0-preview.6.22329.4
I highly recommend installing the tools locally. It can help you keep your tooling in sync with your solution.
NuGet Dependencies
Let’s get all of your NuGet dependencies installed on each project. We’ll start with the Models project, as dependent projects can transitively reference those dependencies in our migrations projects. That said, it doesn’t hurt to have more explicit dependencies for the especially cautious.
In your Models project, be sure you have the following Entity Framework Core Dependencies, making sure to match the same version as the tools.
- Microsoft.EntityFrameworkCore.Relational
- Microsoft.EntityFrameworkCore
Since each migration project targets a different database provider, we’ll need database-specific packages.
- Microsoft.EntityFrameworkCore.Relational
- Microsoft.EntityFrameworkCore.Design
- Npgsql.EntityFrameworkCore.PostgreSQL (Postgres migrations project)
- Microsoft.EntityFrameworkCore.Sqlite (SQLite migrations project)
Optionally, you can also explicitly reference these same packages in your host project, but as mentioned previously, .NET will reference them implicitly.
The essential package for generating migrations is Microsoft.EntityFrameworkCore.Design. It helps the Entity Framework Core CLI tooling generate the appropriate migrations. If you do forget to reference it, the CLI output will be kind enough to remind you to add it.
The Database Model
If you’re familiar with Entity Framework Core, you likely already know how to define and implement a DbContext class. However, I’ll show you a basic implementation for those who aren’t as familiar with the library.
using Microsoft.EntityFrameworkCore;

namespace BoxedSoftware.Models;

public class VehiclesContext : DbContext
{
    public VehiclesContext(DbContextOptions<VehiclesContext> options)
        : base(options)
    {
    }

    public DbSet<Vehicle> Vehicles { get; set; }
}

public class Vehicle
{
    public int Id { get; set; }
    public string VehicleIdentificationNumber { get; set; } = "";
    public string Model { get; set; } = "";
    public string Type { get; set; } = "";
    public string Fuel { get; set; } = "";
}
You can substitute any model you would like in place of this DbContext. However, you will need to add the code to your Models project.
I’ve also included an IntializeAsync implementation to seed the database with data, and I’m using the Bogus library to generate a random dataset.
   public static async Task InitializeAsync(VehiclesContext db)
    {
        await db.Database.MigrateAsync();

        // already seeded
        if (db.Vehicles.Any())
            return;

        // sample data will be different due
        // to the nature of generating data
        var fake = new Faker<Vehicle>()
            .Rules((f, v) => v.VehicleIdentificationNumber = f.Vehicle.Vin())
            .Rules((f, v) => v.Model = f.Vehicle.Model())
            .Rules((f, v) => v.Type = f.Vehicle.Type())
            .Rules((f, v) => v.Fuel = f.Vehicle.Fuel());

        var vehicles = fake.Generate(100);

        db.Vehicles.AddRange(vehicles);
        await db.SaveChangesAsync();
    }
This method will also run our migrations for demo purposes. The migration strategy you choose is entirely up to you. You can run migrations programmatically, generate scripts, or even generate a recently-added migration executable.
Adding Migrations For Each Provider
We’ve reached the most critical part of this entire article, the part where we can add migrations to each database provider. The Entity Framework Core CLI tooling needs a host project to build and execute to generate our migrations. In the case of this article, we have an ASP.NET Core application.
The first step is to add connection strings to our appsettings.json file for each database to our host project.
 "ConnectionStrings": {
        "Sqlite" : "Data Source=vehicles.db",
        "Postgres" : "User ID=postgres;Password=Pass123!;Server=localhost;Port=5432;Database=vehicles;"
 }
Remember, ASP.NET Core configuration providers stack. You can place values in multiple locations and override any previously defined value depending on the order of providers. So while for this article, we are using appsettings.json, you could as easily add connection string values to environment variables or user secrets.
We now need our host project to understand which database provider we want to use when running the application. This approach is one of many, but it works for our demo. If you want to modify or tweak the strategy, feel free to do so.
You’ll add the following code in our Program.cs file before calling builder.Build().
// include this namespace
// using static BoxedSoftware.Provider;

var config = builder.Configuration;

builder.Services.AddDbContext<VehiclesContext>(options =>
{
    var provider = config.GetValue("provider", Sqlite.Name);

    if (provider == Sqlite.Name)
    {
        options.UseSqlite(
            config.GetConnectionString(Sqlite.Name)!,
            x => x.MigrationsAssembly(Sqlite.Assembly)
        );
    }

    if (provider == Postgres.Name) {
        options.UseNpgsql(
            config.GetConnectionString(Postgres.Name)!,
            x => x.MigrationsAssembly(Postgres.Assembly)
        );
    }
});
You’ll also need this helper class, but you can use constant strings easily.
public record Provider(string Name, string Assembly)
{
    public static Provider Sqlite = new (nameof(Sqlite), typeof(Sqlite.Marker).Assembly.GetName().Name!);
    public static Provider Postgres = new (nameof(Postgres), typeof(Postgres.Marker).Assembly.GetName().Name!);
}
The Marker classes are empty types within each Migrations project used to get the assembly name more consistently and avoid refactoring errors later.
public abstract class Marker {}
Next, let’s run some CLI commands to generate migrations for each database. Again, you’ll run these commands from the root solution folder.
dotnet ef migrations add <Migration Name> --project ./Migrations/BoxedSoftware.Sqlite -- --provider Sqlite

dotnet ef migrations add <Migration Name> --project ./Migrations/BoxedSoftware.Postgres -- --provider Postgres
Note the use of “–” to pass in the provider name. Any CLI parameters after the “–” will be ignored by the current command and sent to your application. You can then pass the arguments to the call WebApplicationBuilder.CreateBuilder to parse and add those values to the IConfiguration instance. For example, the previous code we added to Program.cs, you can see the following call to our configuration to retrieve the provider value while offering a safe default of “Sqlite”.
var provider = config.GetValue("provider", Sqlite.Name);
After running the commands, you should see the Migrations folders in each database-specific project. We’re now ready to run our application.
Running Our Application with a Database Provider
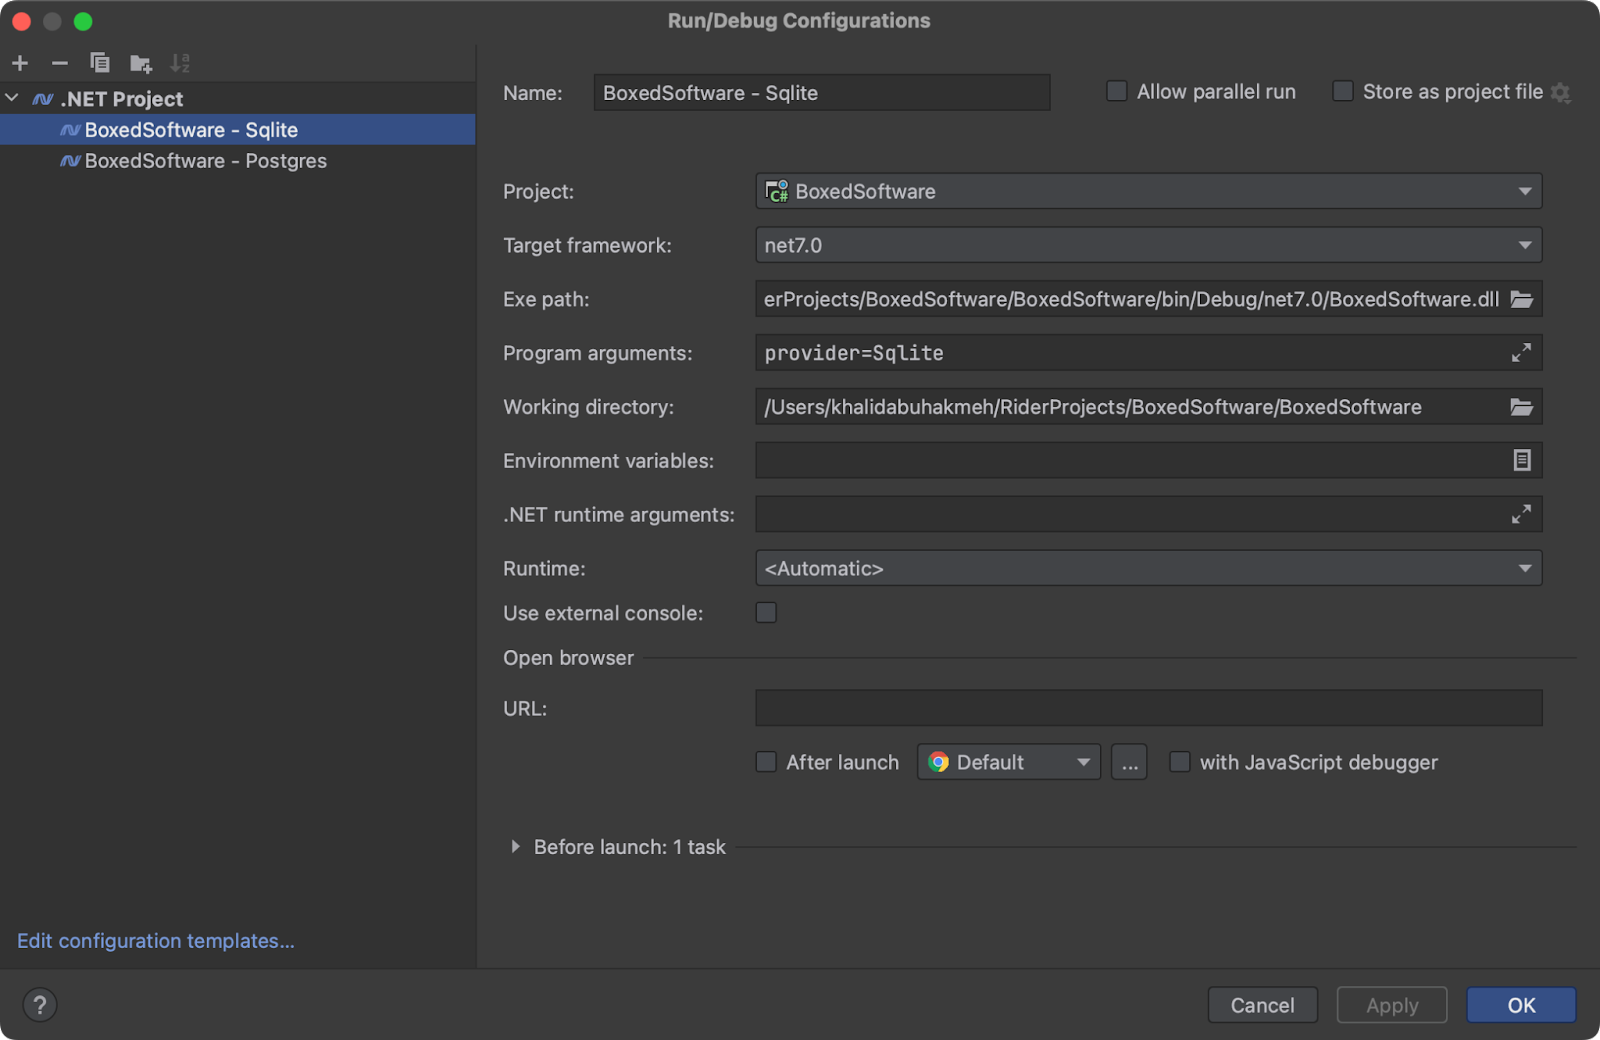
JetBrains Rider offers a straightforward way of running your application with additional program arguments. You’ll use run configurations to pass the correct provider for each provider-specific application instance.
Open your run configuration options by clicking the ellipsis in your run widget at the top of JetBrains Rider. Once opened, you’ll need to add “provider=Sqlite” to one run configuration and “provider=Postgres” to a duplicate of the original run configuration.
Finally, let’s add some ASP.NET Core endpoints to our application to test the functionality. I’ve included the entire application for clarity below.
using BoxedSoftware.Models;
using Microsoft.EntityFrameworkCore;
using static BoxedSoftware.Provider;

var builder = WebApplication.CreateBuilder(args);
var config = builder.Configuration;

builder.Services.AddDbContext<VehiclesContext>(options =>
{
    var provider = config.GetValue("provider", Sqlite.Name);

    if (provider == Sqlite.Name)
    {
        options.UseSqlite(
            config.GetConnectionString(Sqlite.Name)!,
            x => x.MigrationsAssembly(Sqlite.Assembly)
        );
    }

    if (provider == Postgres.Name) {
        options.UseNpgsql(
            config.GetConnectionString(Postgres.Name)!,
            x => x.MigrationsAssembly(Postgres.Assembly)
        );
    }
});

var app = builder.Build();

// initialize database
using (var scope = app.Services.CreateScope()) {
    var db = scope.ServiceProvider.GetRequiredService<VehiclesContext>();
    await VehiclesContext.InitializeAsync(db);
}

app.MapGet("/", (VehiclesContext db) =>
    db.Vehicles.OrderBy(x => x.Id).Take(10).ToList()
);

app.Run();
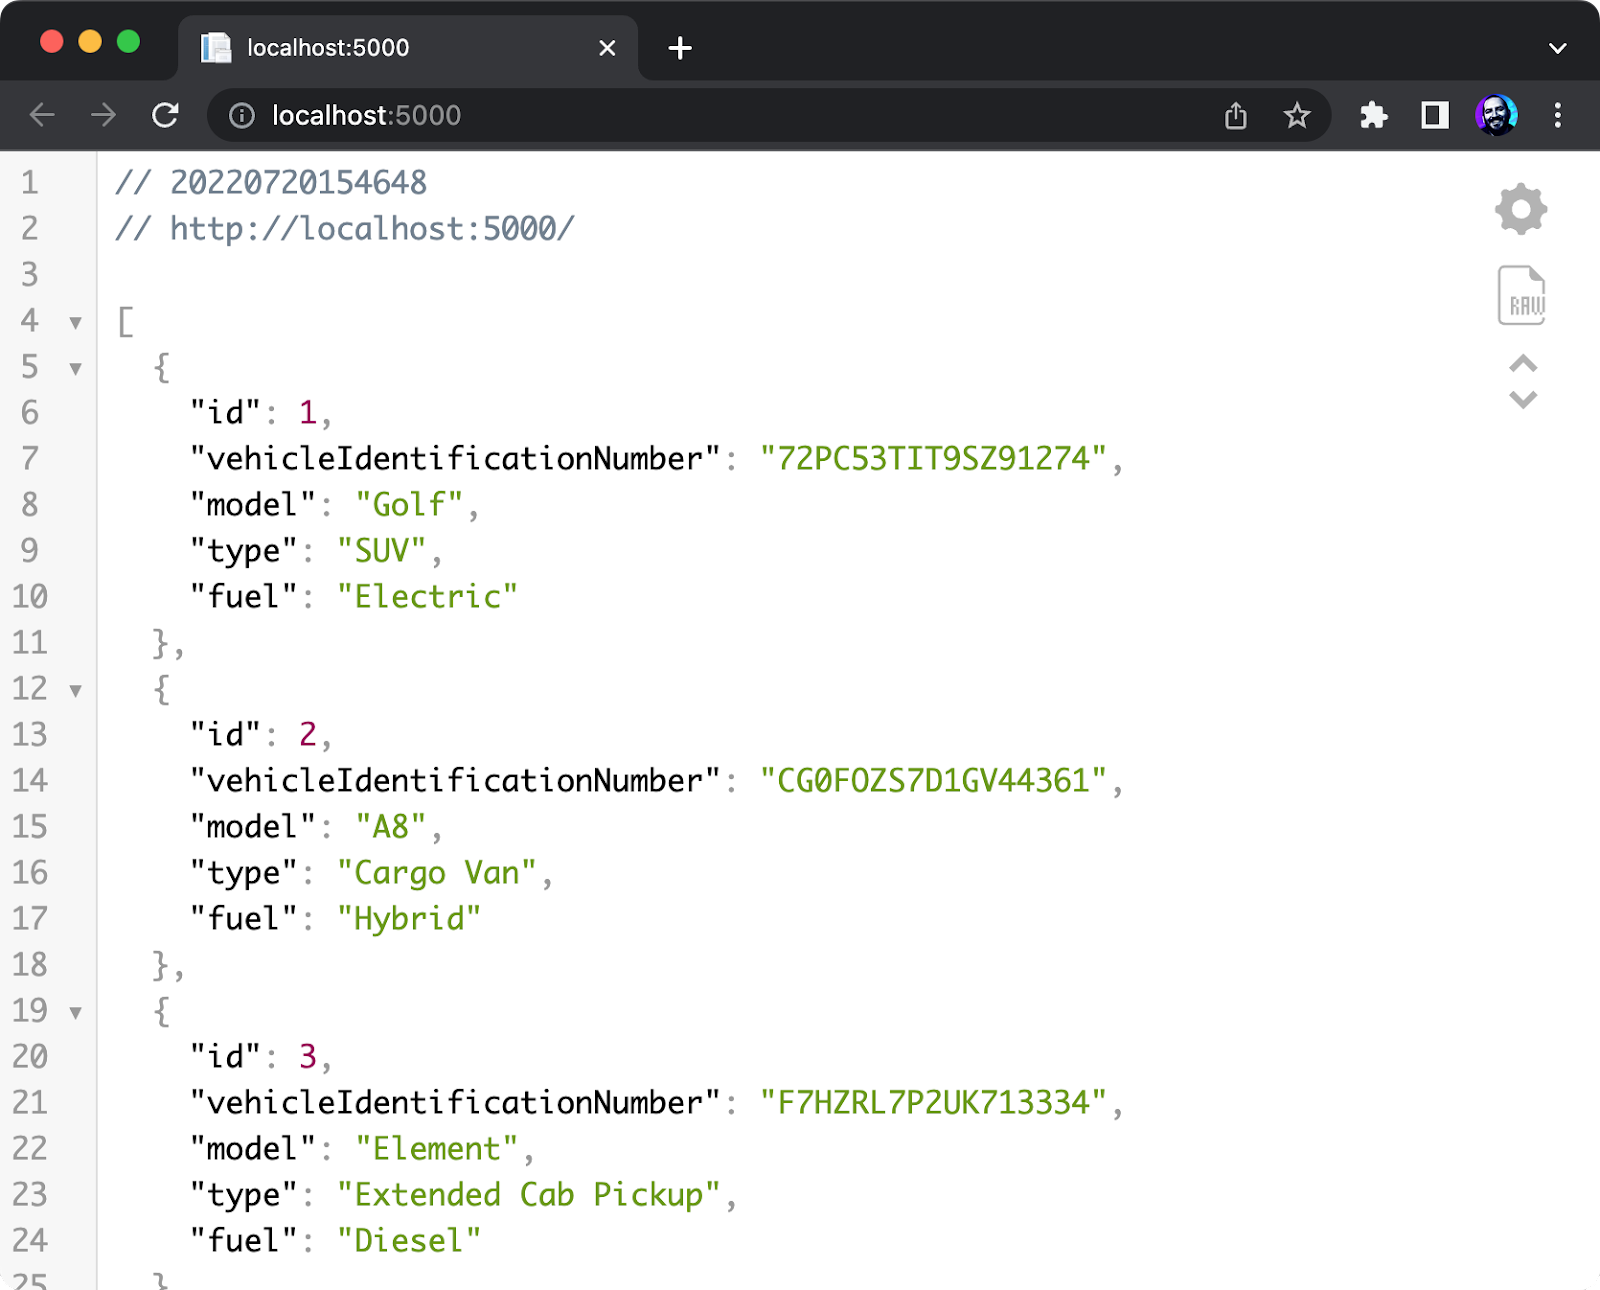
If you’ve used my initialization code, when you run the application, you’ll see a list of 10 random vehicles from the database provider of your choice.
Conclusion & Final Thoughts
While functional, this approach has plenty of room for improvement. For one, you can alter the switching mechanism to meet your needs. For example, while this approach sets the provider at start-up, you could switch providers per user or per request. I don’t know why you’d want to, but if you do, let me know in the comments. For green field projects, you can also add helper methods to generate scripts for all providers simultaneously.
While we started a new solution with multiple database providers, you could just as easily convert an existing solution to use the same approach. Remember that any new provider added will have different migrations than the previous providers. Any new provider added will include all of the changes up to that point in an all-encompassing migration. While not necessarily a “bad” outcome, seeing one provider has small incremental migrations may seem strange while another has fewer large migrations.
It’s also important to note that using multiple database providers means you have to strategize when and where to use particular features of each provider. For example, you can choose only to use a standard set of features, have branching logic in code, or use preprocessor directives to have multiple software builds. The strategy is really up to you and your capacity to maintain your software.
Using Entity Framework Core’s multiple database providers is an excellent option for folks selling on-premise software where customers demand solutions that fit their organizational expertise. You can expand your potential customer base while limiting the number of permutations of your codebase. Using the LINQ provider to generate database-specific queries and optimize when necessary can help reduce your operational costs and deliver solutions to your customers faster.
As always, thank you for reading. If you have any comments or questions, please feel free to leave them below. If you enjoyed this article, I’d appreciate it if you shared it with your friends and colleagues.
* featured image credit to Alp Duran