.NET Tools
Essential productivity kit for .NET and game developers
Accelerating Your Testing Workflow with Unit Test Creation and Navigation

Unit tests play an important role in our daily development workflow. They help us ensure our codebase’s correctness when writing new functionality or performing refactorings to improve readability and maintainability. In the process, we often create new test files that accompany the production code – whether strict test-driven development (TDD) or not. We will probably even more often navigate between test and production code to align our test specification and investigate bugs.
Both the creation of and navigation to/from unit tests can feel boilerplate and inefficient. Even though ReSharper provides file templates for your favorite test framework, they are prone to typos when class names are re-typed instead of copied (Calculator meets ClaculatorTests). But even beyond typos, finding related tests to a piece of production code may not always be straightforward (even with camel-humps search). Did this codebase use Specs or Tests? Was it used as a prefix or postfix? And what about integration tests, after all?
As a developer advocate, it’s always a pleasure to write about a highly-anticipated feature, and even more so when you personally spiked on it. But without further ado, let’s see how ReSharper 2023.2 improves your testing experience!
Navigating between Test and Production Code
For every pair of production and test code, you will find two new actions under the Navigate To menu to quickly navigate to the opposite type – Navigate to Production Code and Navigate to Test Code. The single shortcut Ctrl+U,F will take you to the other code respectively:
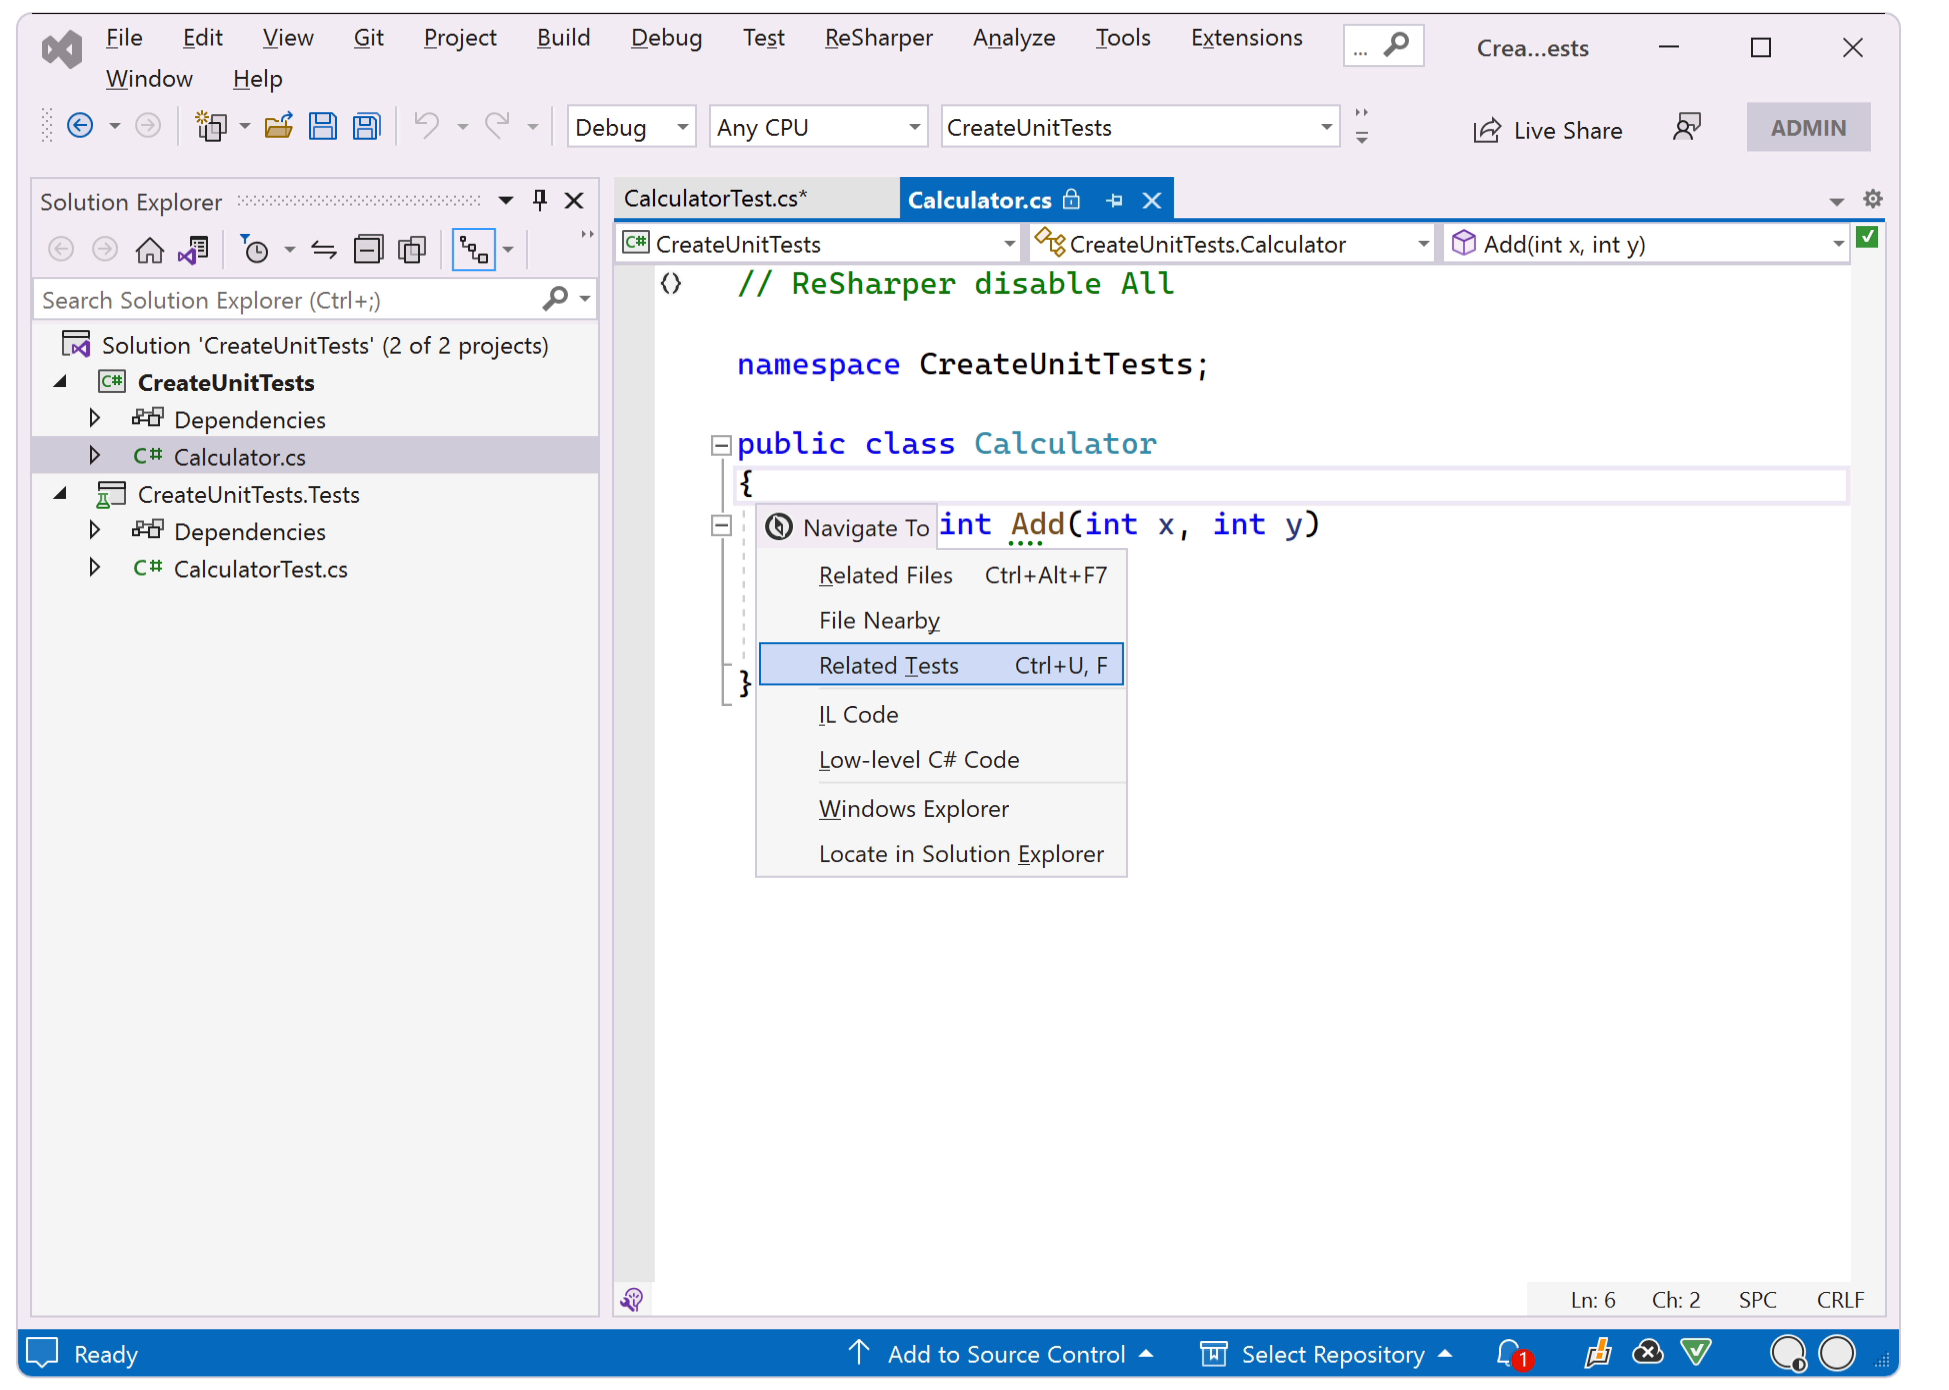
You can also manually assign the ReSharper_GoToLinkedTypesAction action under Options | Environment | Keyboard.
To make your testing experience as smooth as possible, the navigation to the production/test code preserves the previous caret position. Combined with ReSharper’s continuous testing, this should be a great productivity booster.
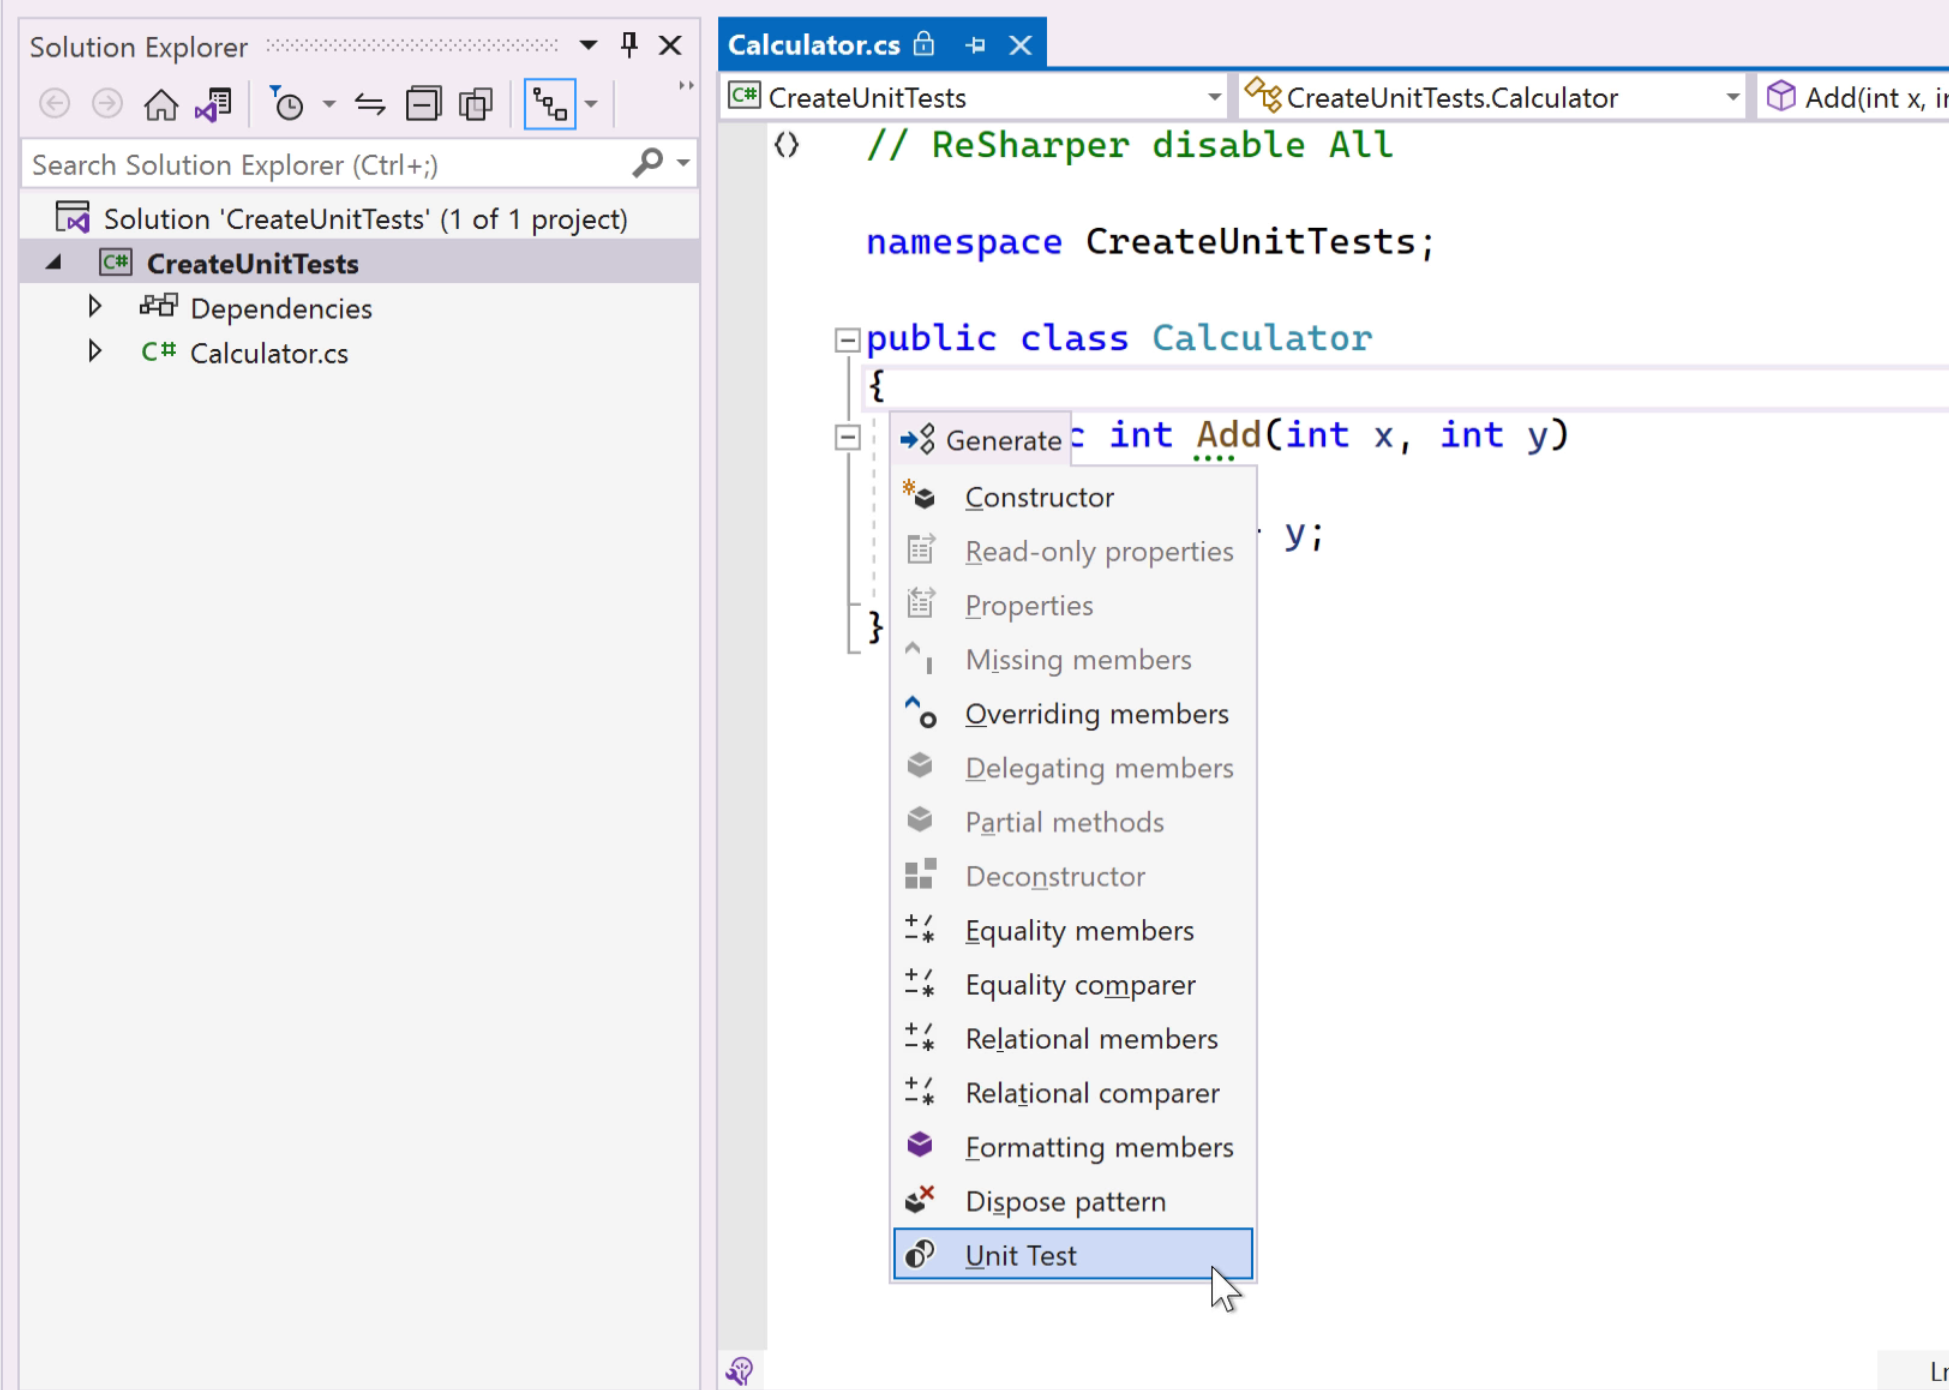
Creating Tests from Production Code
Another new feature introduced with ReSharper 2023.2 is the creation of new unit tests. From your production code, you can invoke the Generate popup and select Unit Test or hit Ctrl+U, C. This will open the Create Unit Test dialog with predefined options for the target test project (new or existing), the test class name, and your preferred unit test framework:
ReSharper automatically installs the required NuGet packages. It will also indicate frameworks (by their version) already used in the solution.
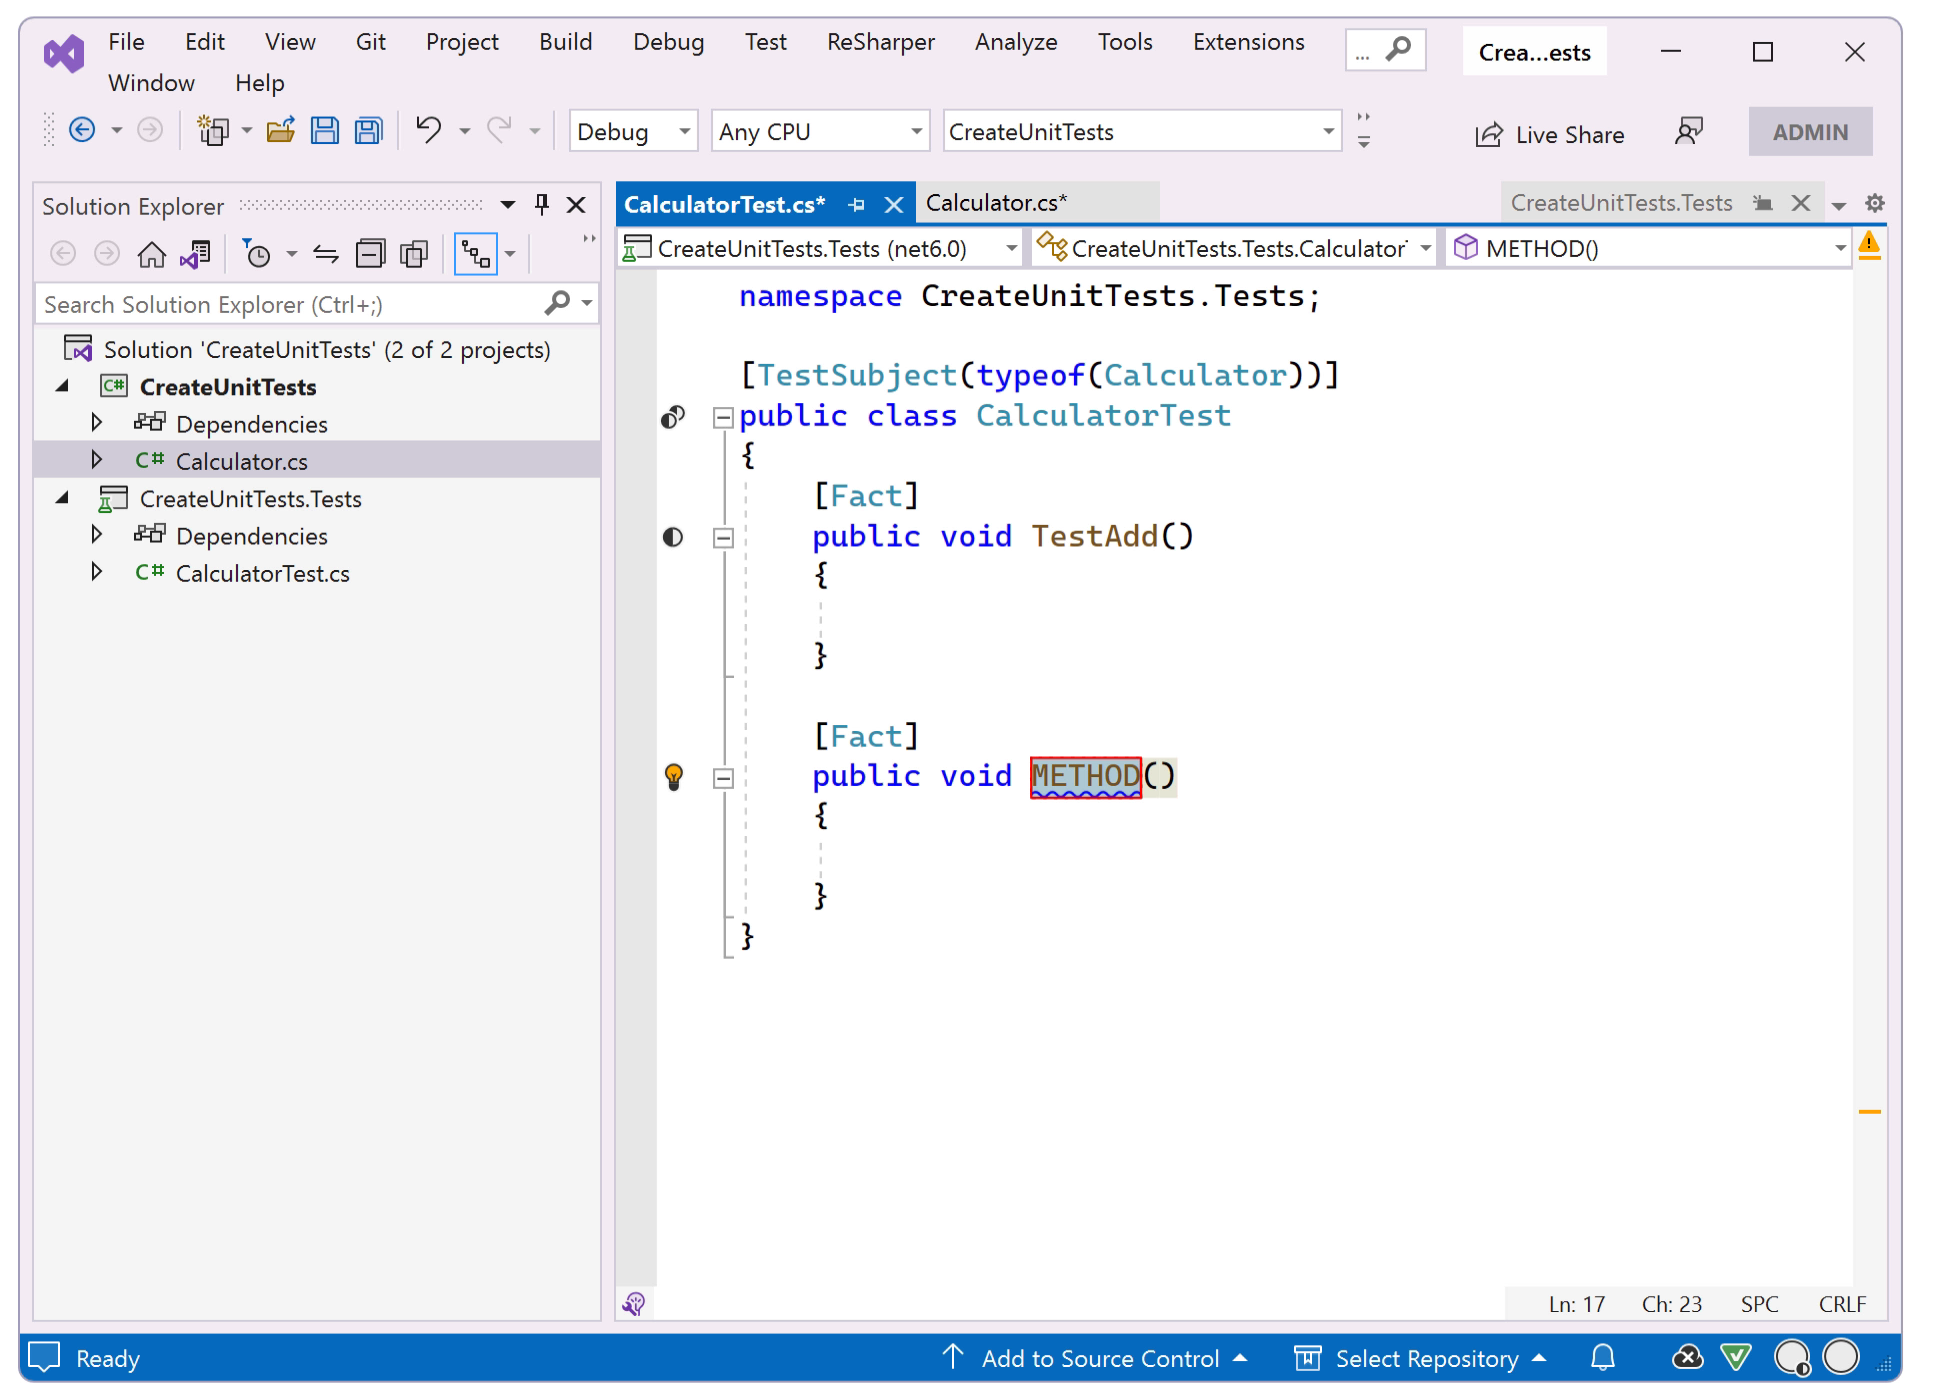
Once you invoke Create Unit Test action another time (i.e., when there already is a related test class), ReSharper will simply add another test method:
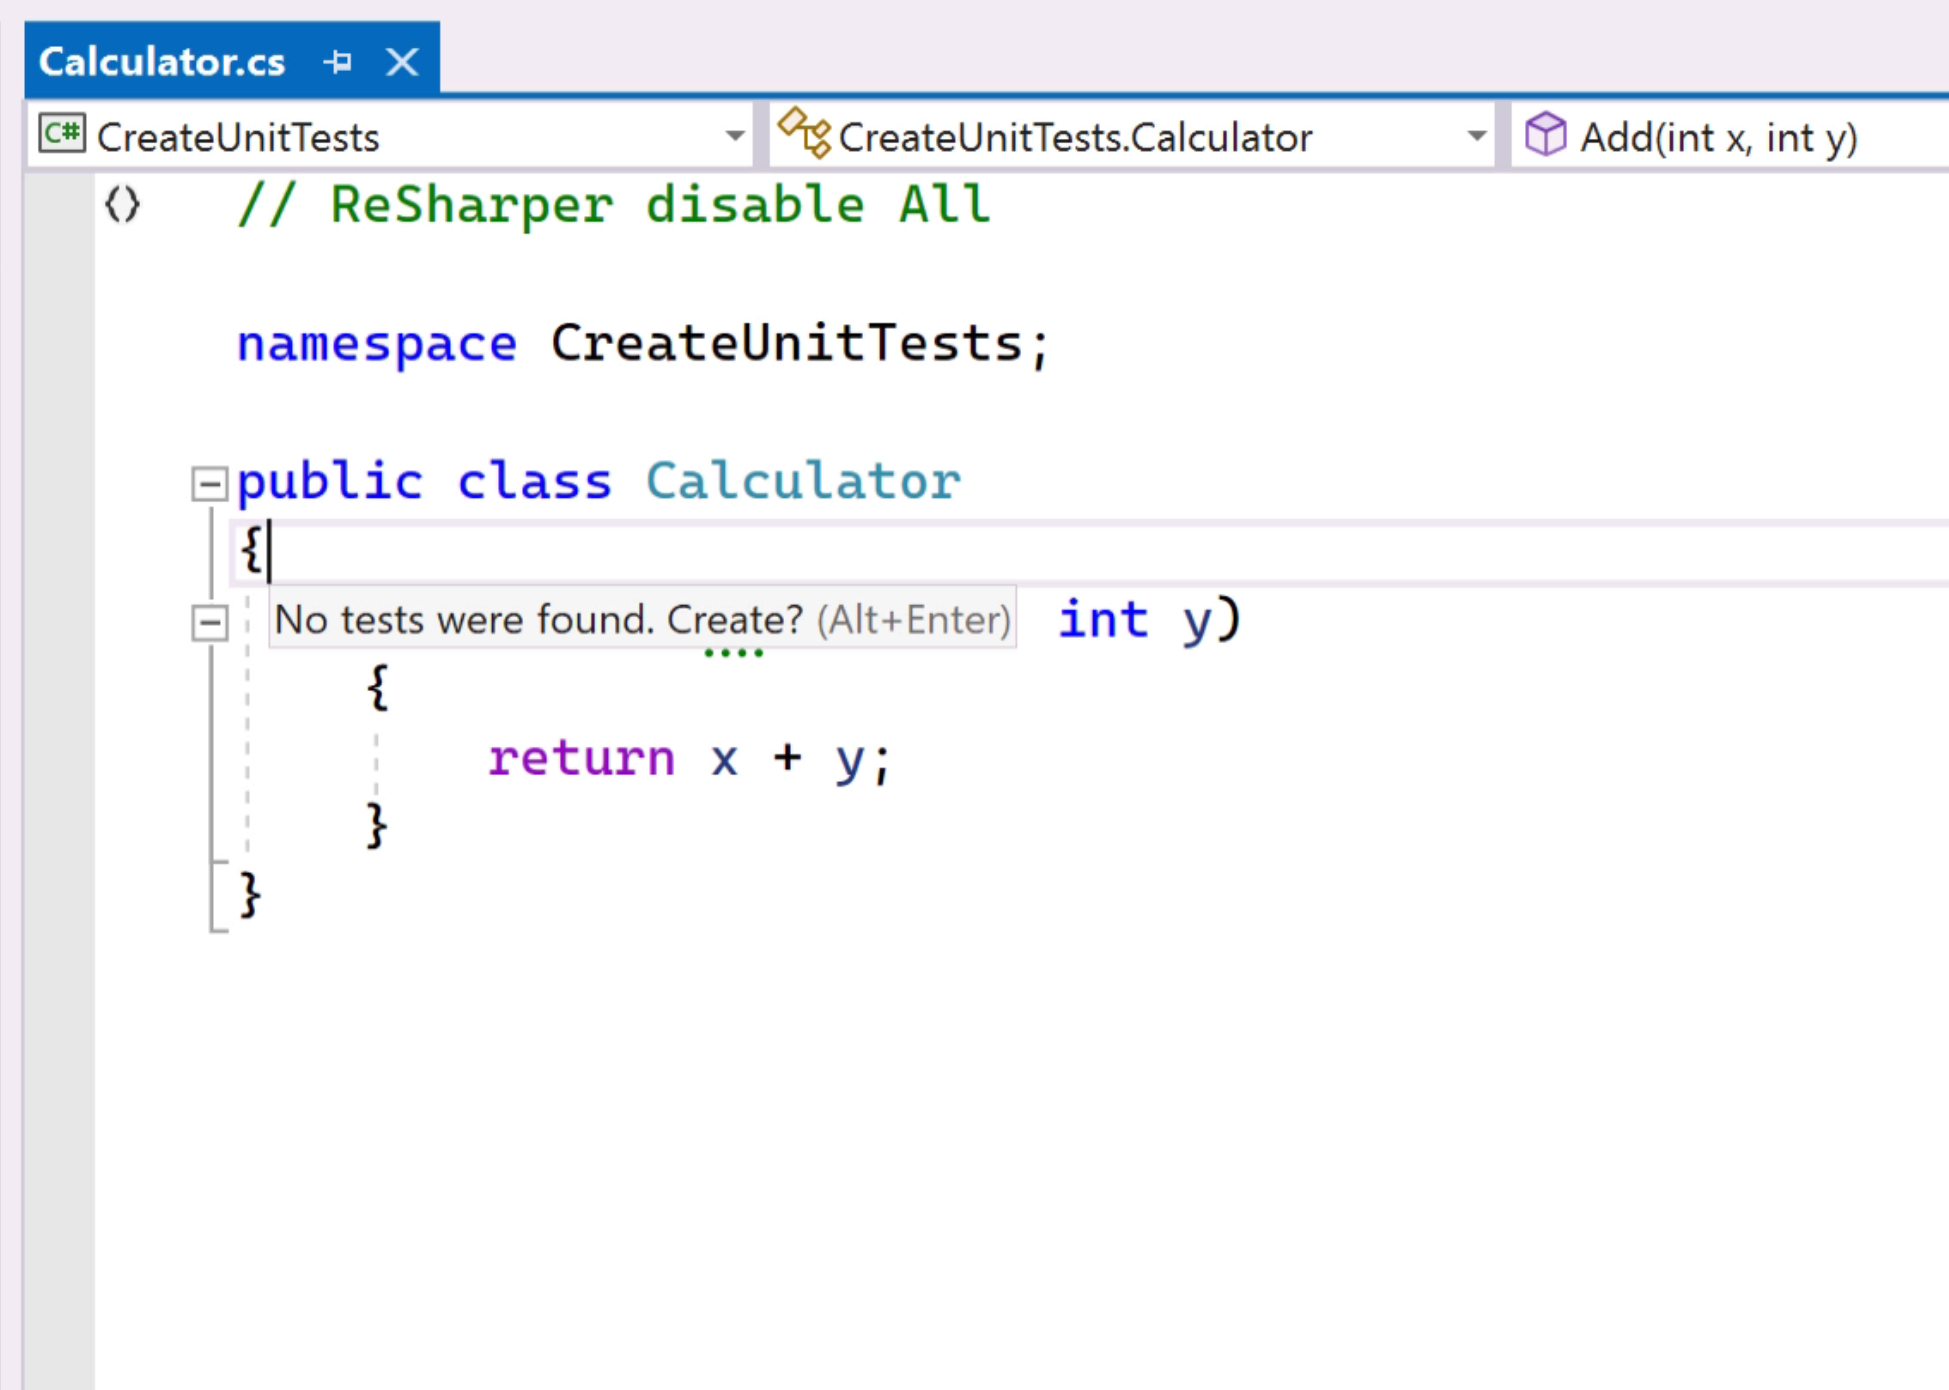
The creation of unit tests also integrates with the test/production code navigation. If a piece of production code doesn’t have an accompanying test class yet, ReSharper will show a notification that no tests were found and allow you to open the Create Unit Test dialog via Alt+Enter:
Keeping Production and Test Names in Sync
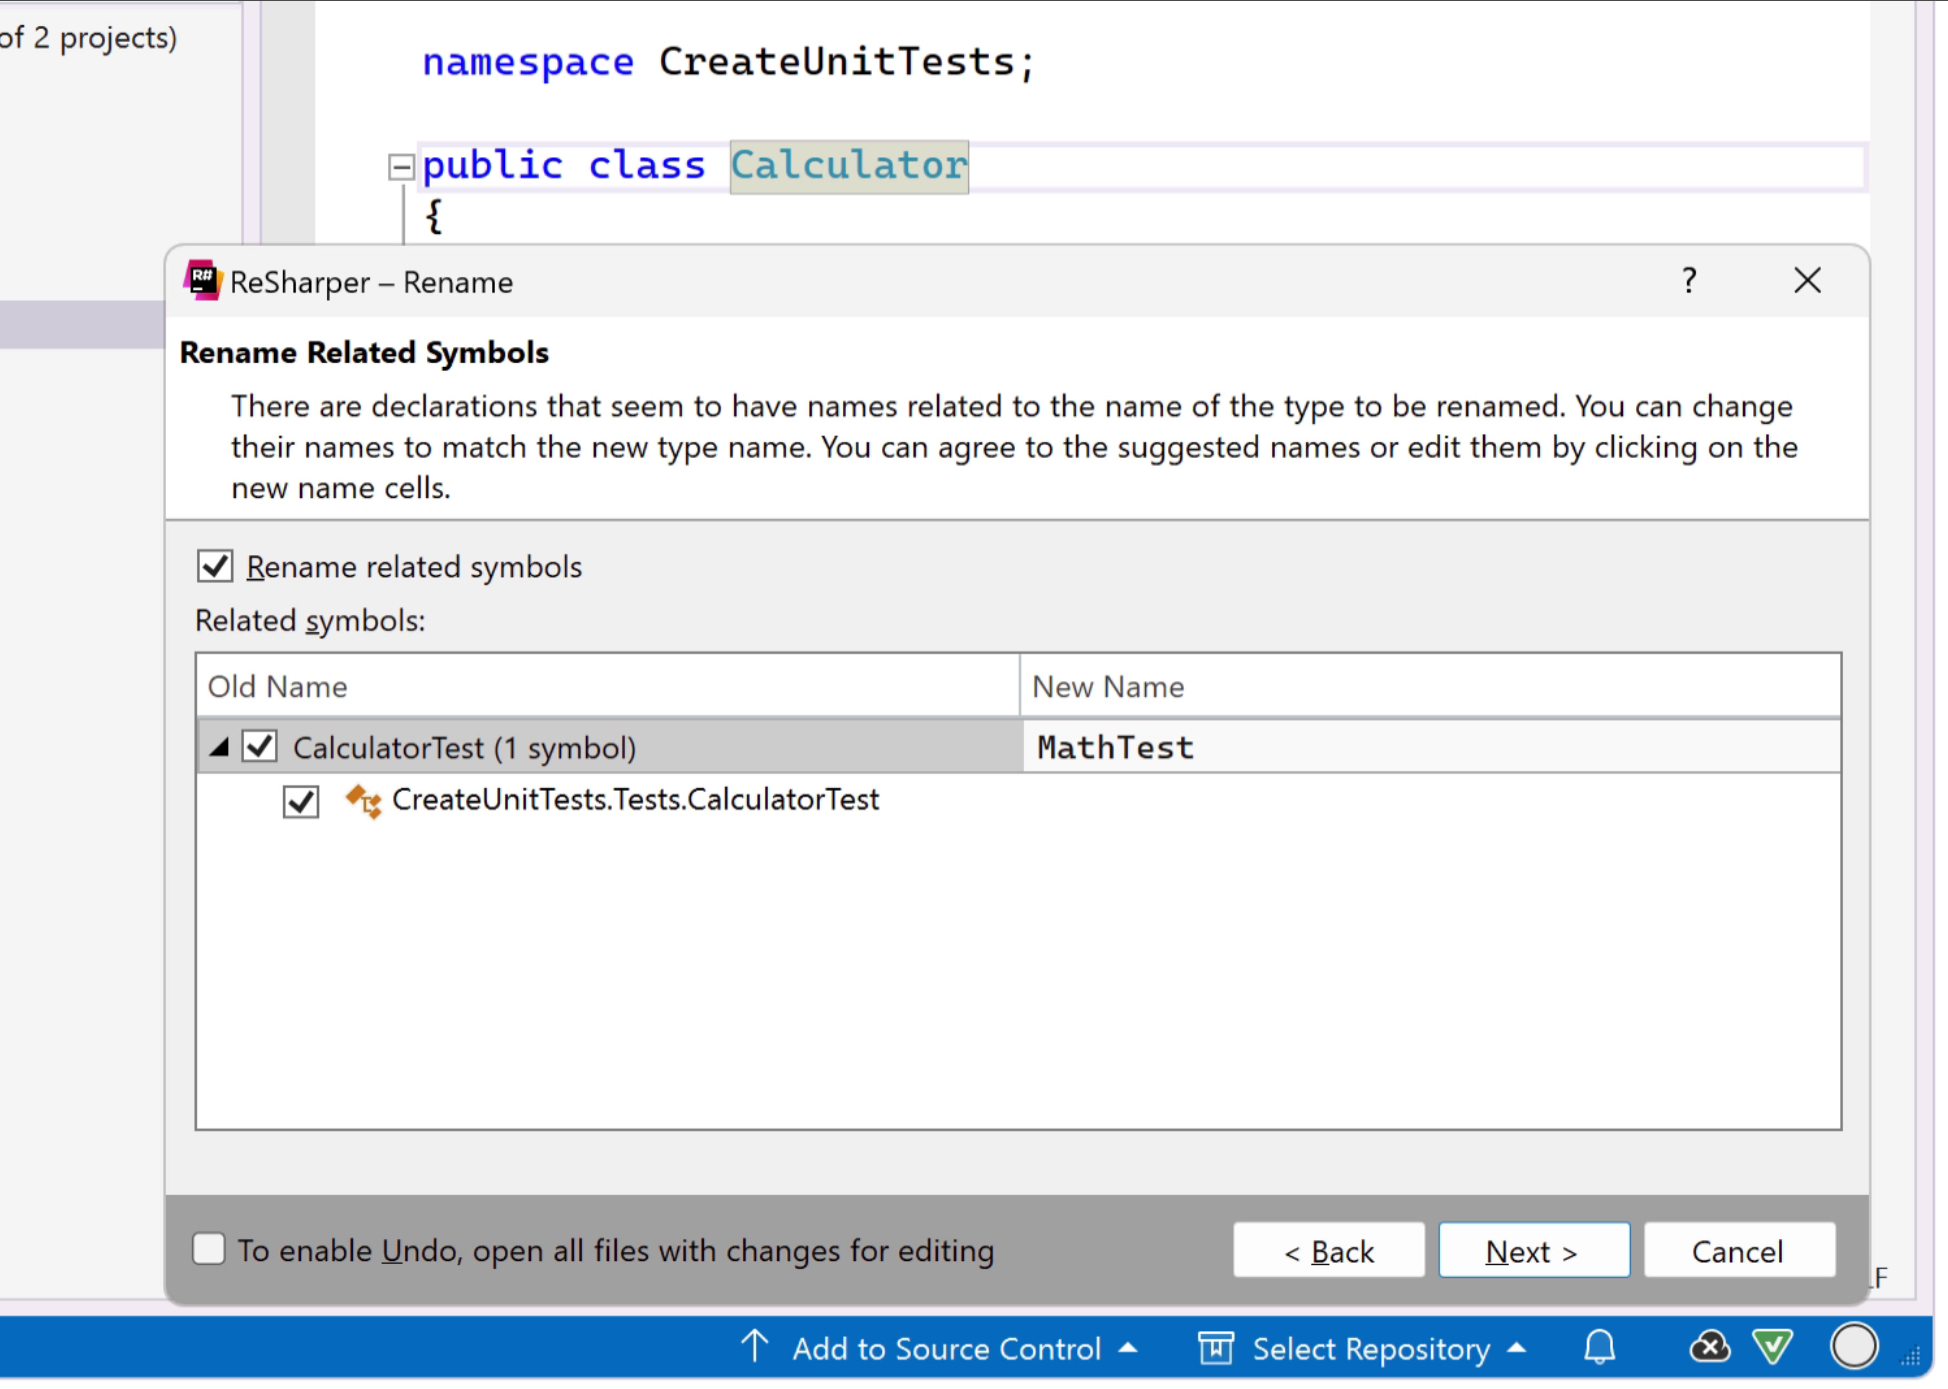
When you rename a production class, it’s rather easy to forget to rename the related test class as well. Nobody likes inconsistencies! ReSharper has always taken related names into account when performaing a rename refactoring. Through its knowledge about links between production and test code, it will now also add suggestions to rename test classes:
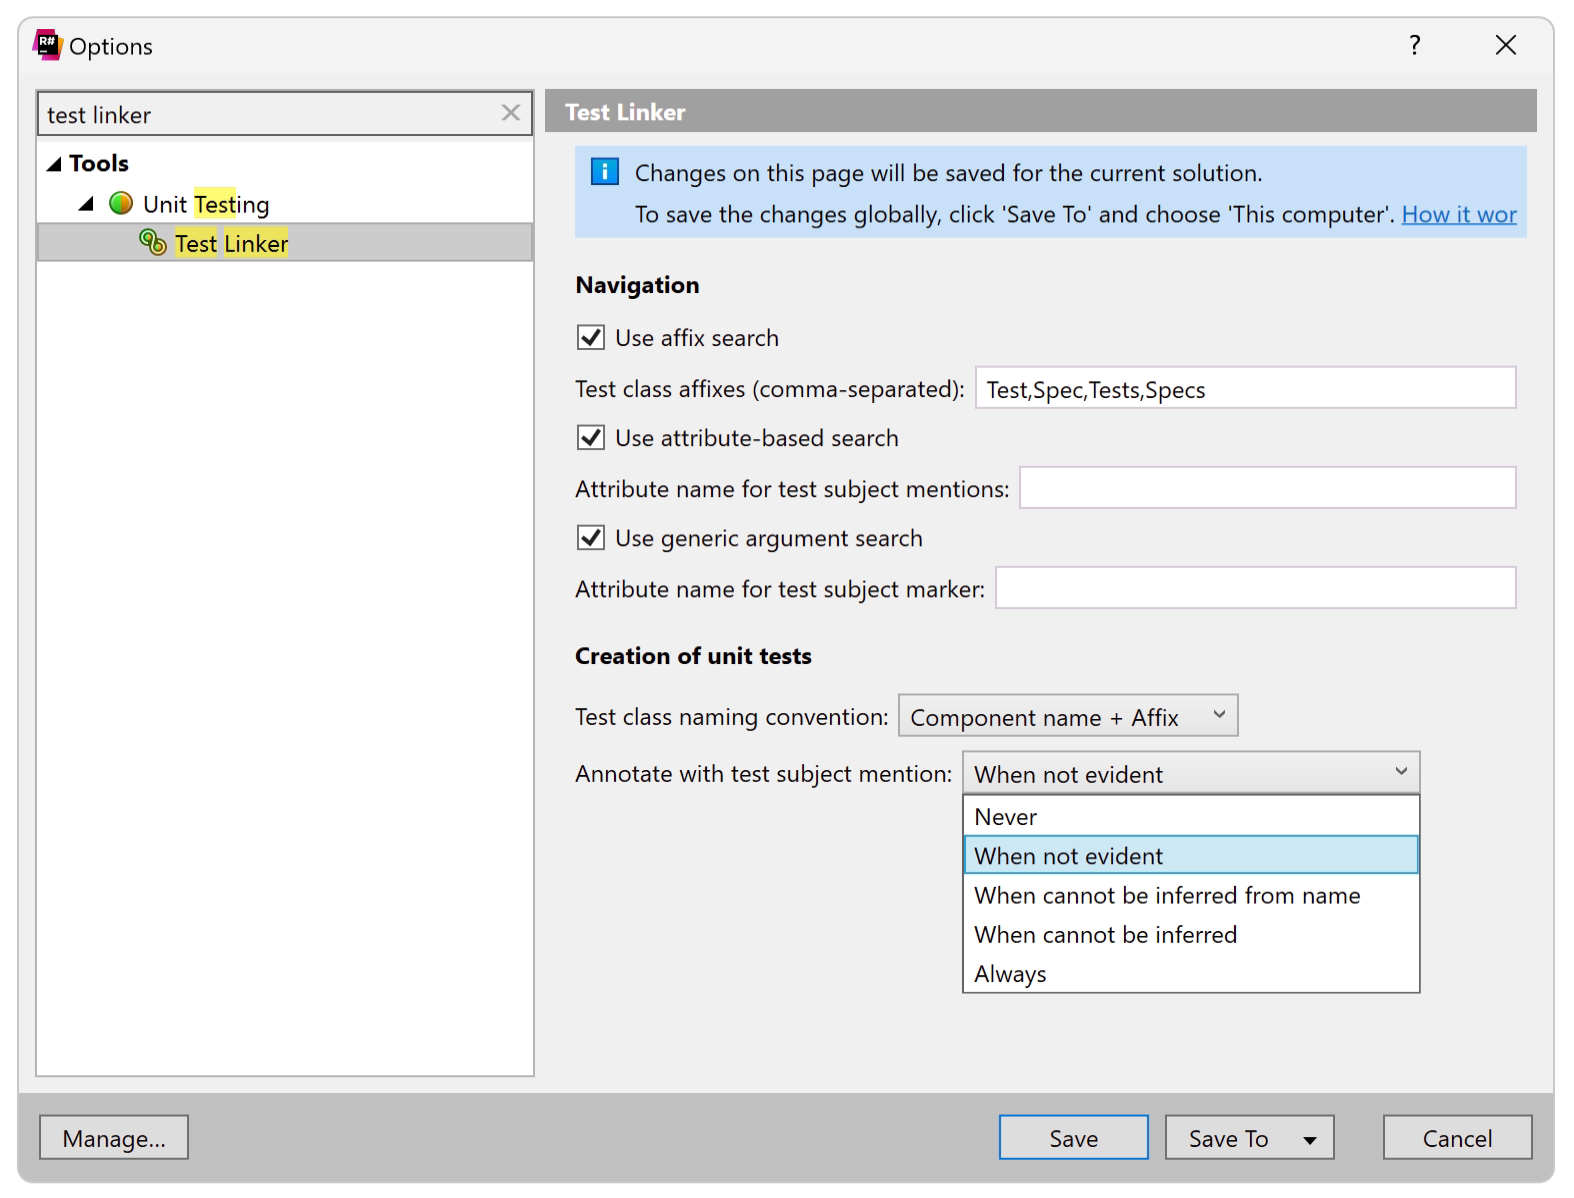
Test Linker Settings
Tests can be named and structured according to a variety of conventions. Probably the most popular convention is to use affixes like TestCalculator or CalculatorSpecs – as we’ve already seen. The Machine.Specifications test framework uses a SubjectAttribute that lets you mention the subject under test with a typeof reference (e.g., [Subject(typeof(Calculator))]). Another well-known approach is to have a test base class, where the subject types are passed as generic parameters (e.g., TestBase<Calculator>). Noteworthy, the attribute and generic-parameter approach can map to multiple subject types, while affix-named tests only map to a single one.
All of these conventions are supported and can be configured on the Test Linker options page:
As an avid plugin user, you might recognize similarities to the plugin mentioned earlier!
- The affix search works without any additional effort, and ReSharper allows you to customize the list of affixes taken into account.
- With the attribute-based search, ReSharper checks for usages of a particular attribute and treats any
typeofas a link. By default, it looks forTestSubjectAttributecoming fromJetBrains.Annotationsas well asTestOfAttributecoming from NUnit. - For the generic argument search, any generic argument that maps to a generic parameter with an attribute is considered a link. By default, ReSharper checks for the
MeansTestSubjectAttribute, also coming fromJetBrains.Annotations.
For a better understanding, let’s take a look at some concrete code examples:
// 1. Affix search

class CalculatorTest { }
class SpecsCalculator { }

// 2. Attribute-based search

[TestSubject(typeof(Calculator))]
class SomeTest { }

// 3. Generic argument search

class SomeTest : TestBase<Calculator> { }
class TestBase<[MeansTestSubject] T> { }
Lastly, we should quickly explain what the different options of Annotate with test subject mention mean for the creation of unit tests:
- Never, will never add an attribute mentioning the production class.
- When not evident, will add an attribute when the template is not defining the production class as a generic argument, for instance, with a
TestBase<T>base class. - When cannot be inferred from name, will add an attribute when the generated class is neither allowing to infer the subject from a generic argument nor from the test name, for instance, when you create an integration test.
- When cannot be inferred, takes an extension point for plugins into account (in addition to the above). A plugin can implement the
ITestSubjectExtractorinterface, and help ReSharper find test/production links. - Always, will always add the attribute.
Advanced Settings when Creating Unit Tests
Most likely, you didn’t miss that the Create Unit Test dialog has an Advanced options pane that can be expanded. This pane gives you additional information about the file destination and namespace the class will be put in. More importantly, it allows you to select a file template from a list of templates associated with the test framework:
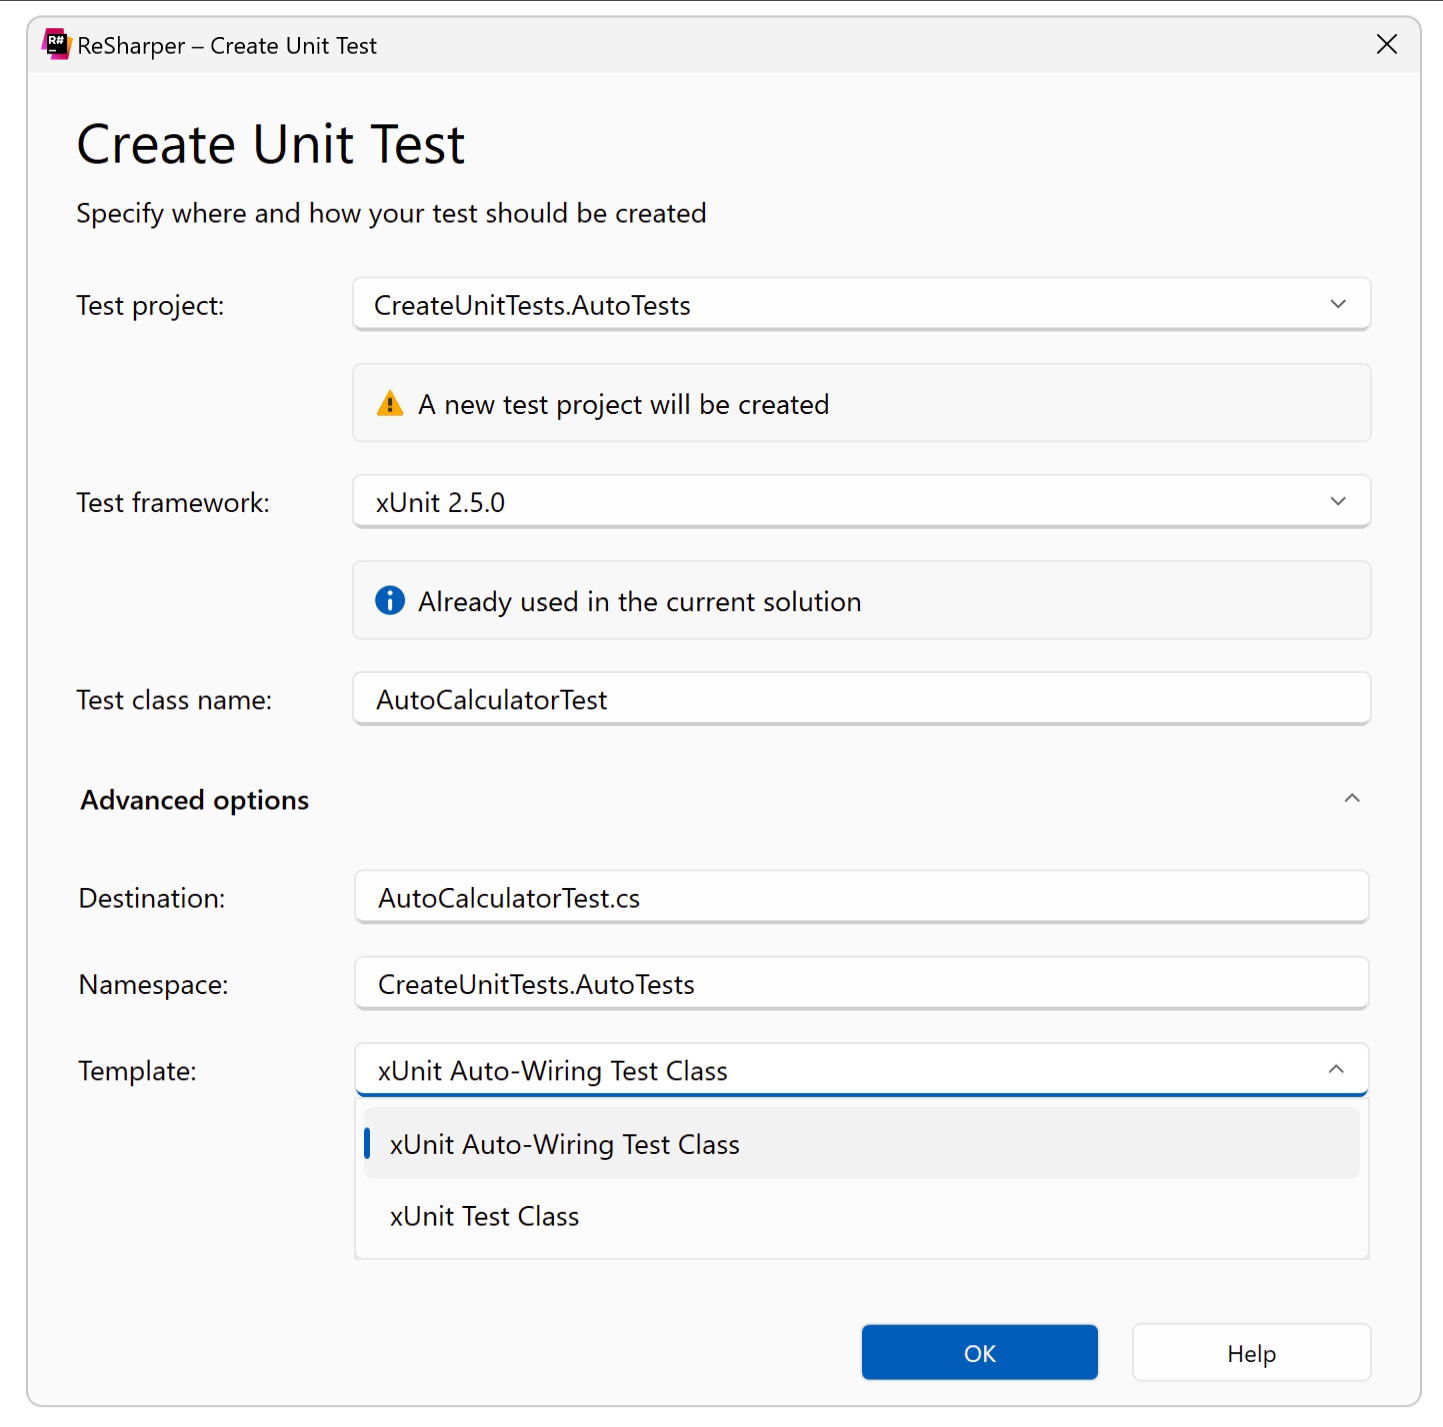
In the example above, the xUnit Auto-Wiring Test Class is a custom template that makes writing new unit tests less boilerplate. For instance, it will take care of preparing all the relevant mocks and creating the subject-under-test (assuming our calculator might require dependencies 🤭):
namespace CreateUnitTests.Tests;

public class CalculatorTest : AutoTestBase<Calculator>
{
    [Fact]
    public void TestAdd()
    {
        // Calculator is available as SUT property
        // and initialized with required mocks
    }
}
For more information about writing and sharing file templates, check out our previous blog posts on:
- Live templates and file templates in Rider 2018.2 (by Matthias Koch)
- Level Up with Live Templates in JetBrains Rider (by Khalid Abuhakmeh)
- Per Project Settings (by Hadi Hariri)
Future Work
Of course, we don’t want to stop here. In the future, we will evaluate and research the possibility of creating tests with our AI Assistant.
We will also try to improve our templates so that the created test method will suggest the name of the original production code method to keep you focused on formulating test scenarios instead of retyping.
Last but not least – the note that probably many of you were waiting for – this feature is planned to arrive in Rider 2023.3!
Conclusion
Even though creating unit tests was already rather easy – thanks to file templates – we brought the process to another level. The new Create Unit Test dialog lets you type less with more accuracy, and even renaming production classes will have their test counterparts auto-renamed. The added navigation between production and test code is highly configurable and makes it easy to find what you’re looking for with minimal keystrokes!
Give it a go with the latest ReSharper 2023.2 EAP, and let us know if you have any questions or suggestions in the comments section below.
Thanks for reading!
Image credit: Jesse Gardner