
ReSharper C++
The Visual Studio Extension for C++ Development
ReSharper C++: Keep Code Consistent with Syntax Style

One of the main benefits of using a developer tool such as ReSharper C++ is that it helps you maintain a consistent code style throughout your code. ReSharper C++ already provides a rich set of features, including a configurable code formatter, naming style settings, sorting of #include directives, and many others. ReSharper C++ 2021.1 adds another powerful tool to your code style toolbox – a new collection of syntax style settings.
Let’s take a look at the new syntax style settings in ReSharper C++ in detail. And please feel free to go ahead and try them out!
- Syntax style: what it is, and how to customize your preferences.
- Enforcing the chosen style: quick-fixes, the Apply syntax style action, and code cleanup.
-
Syntax style settings: a quick tour of syntax style settings.
- Usage of auto in variable declarations.
- Position of cv-qualifiers: “East const” vs. “West const”.
- Declaration style: regular or trailing return types, typedefs or type aliases, and the syntax for nested namespaces.
-
Overriding functions: usage of the
virtualandoverridespecifiers. - Braces around nested statements.
- Include directives: the order and style of include directives.
- Initialization: the order of member initializers.
Download the new EAP build from our website or via the Toolbox App, and give it a try.
DOWNLOAD RESHARPER C++ 2021.1 BETA
Syntax style
While the code formatting settings control only the way your code looks, the idea behind syntax style settings is to let you configure the aspects of code style that govern the use of various C++ language constructs, which often can be used interchangeably. You can find all the new options on the Code Editing | C++ | Syntax Style options page.
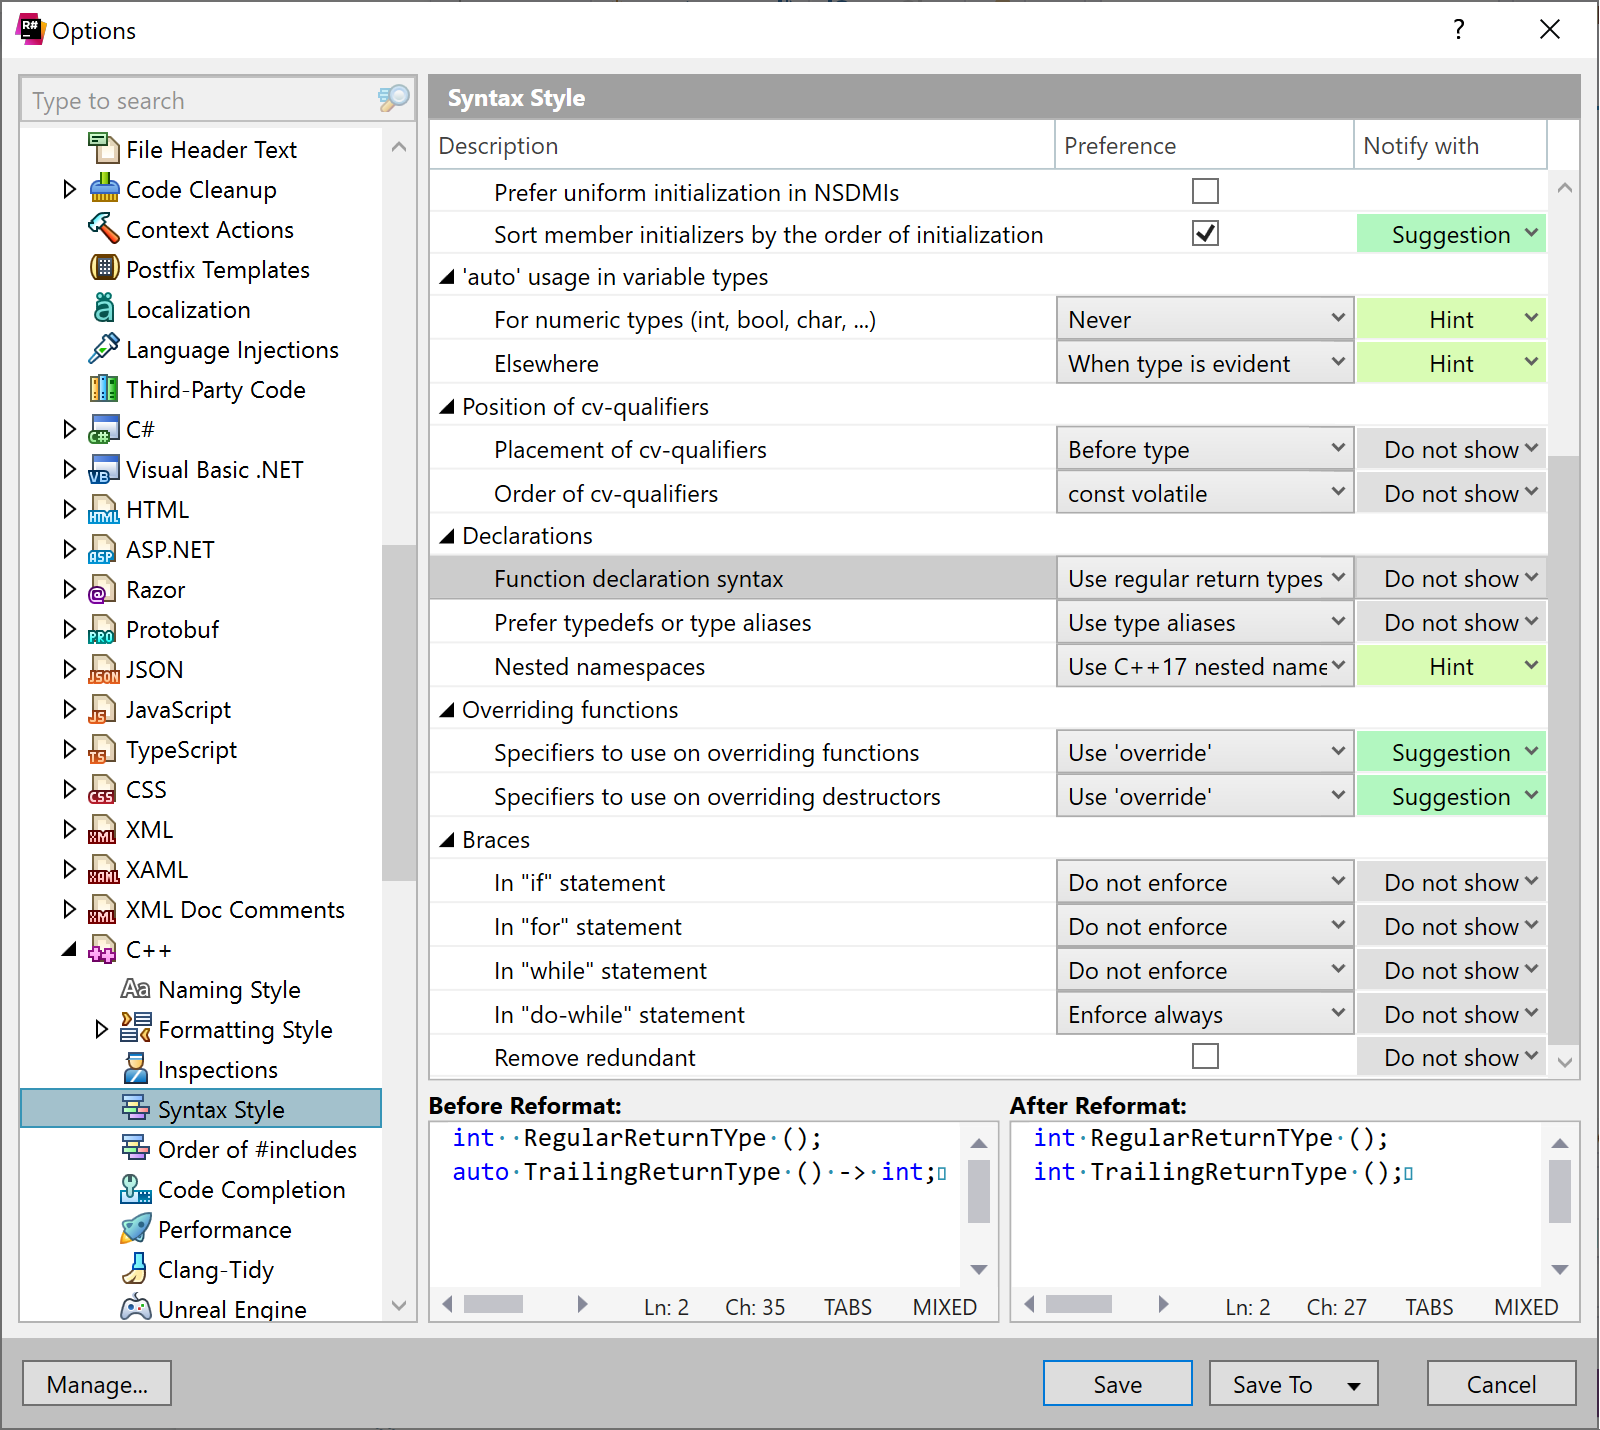
One typical example is the usage of the auto specifier. The choice of when to use auto is often a personal preference. Some people prefer to always have the explicit type in their code for better readability. Others are proponents of the Almost Always Auto style, which favors widespread auto usage. Regardless of which approach you take, it helps when all the members of the team are on the same page and use the chosen preference consistently throughout the entire codebase.
With syntax style settings, you can configure your code style preferences – just select the required option from the drop-down list on the Syntax Style options page. The preview panel immediately shows how the current value of the setting will affect your code.
Just like with other ReSharper settings, you can share your syntax style configuration with your team, thereby enforcing a style between all members of the team that is consistent.
For Unreal Engine projects, the default settings are adjusted to comply with the Unreal Engine coding standard. For example, it recommends using both the virtual and the override keywords on overriding functions.
Changing the value of a setting affects several ReSharper C++ features. First, the code generation features will use the syntax style settings when creating the new code. For example, the Prefer typedefs or type aliases setting also controls whether the Introduce Typedef refactoring creates a typedef or a type alias. Similarly, the Overriding functions settings determine what the declarations created by Generate overriding/missing members look like.
Secondly, ReSharper C++ will highlight the style violations inside the editor for most of the syntax style settings. You can change the severity of the highlighting with the Notify with property next to a syntax style setting.
If you do not want to be notified of style violations for a particular setting, you can always set its severity to Do not show. The inspection context menu lets you conveniently change the value of the syntax style property without having to open the options dialog.

Finally, syntax style settings are used by Code Cleanup and other code modification features, which are the topic of the next section.
Enforcing the chosen style
Inspections will notify you about syntax style violations, but the real power of ReSharper C++ lies in being able to automatically fix the found issues. Let’s look into how ReSharper C++ helps you enforce the chosen syntax style throughout your code.
As with the other inspections, you can use a quick-fix to eliminate a syntax style violation. All the syntax style quick-fixes can also be executed in a scope, including local scopes like function bodies or class definitions.
Enabling all the syntax style inspections can be overwhelming, so we’ve also made sure that you can use context actions to change your code, even if you’ve turned off the inspection for a particular setting.
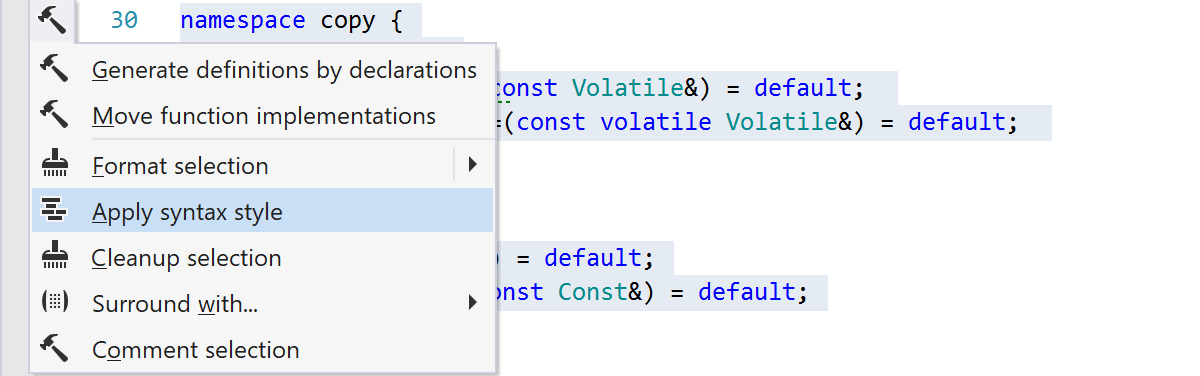
When you want to apply not just one but all the syntax style preferences in a particular scope, you can use the dedicated Apply Syntax Style command. In the editor, select a block of code where you want to apply the syntax style and choose Apply syntax style from the action list.
Want to apply the customizations in an even bigger scope? Just set the caret anywhere in the file to apply syntax style preferences to the entire file, or select one or more items in Solution Explorer to update them and their child items with Ctrl+Alt+S (ReSharper | Edit | Apply Syntax Style).
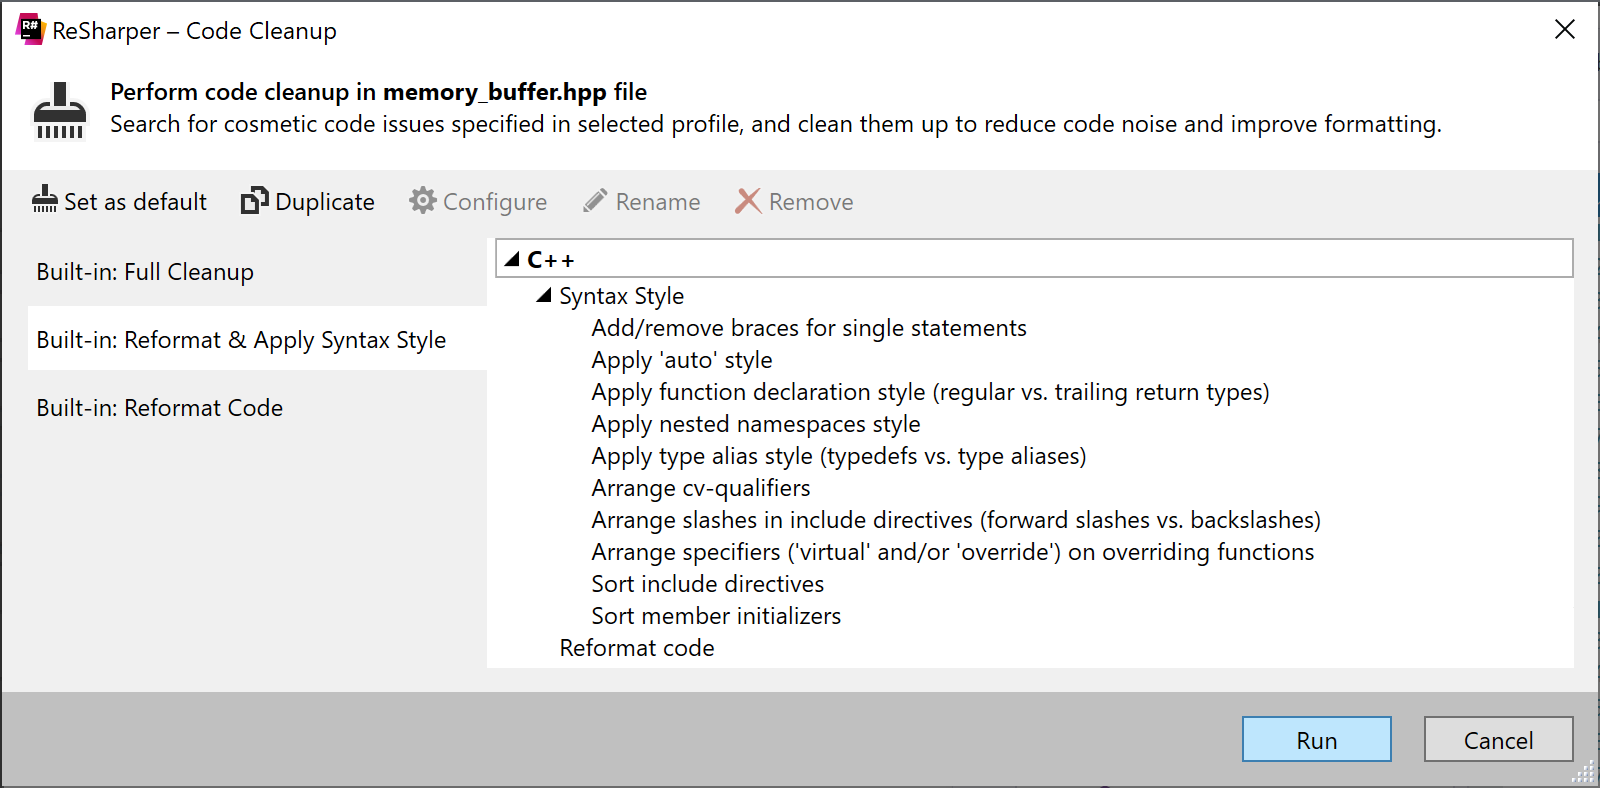
Another way to eliminate syntax style inconsistencies is by using code cleanup. The built-in code cleanup profiles Full Cleanup and Reformat & Apply Syntax Style already include fixes for all the syntax style violations. If you do not want to enforce some of the syntax style rules, you can create a custom profile with the desired subset of the rules.
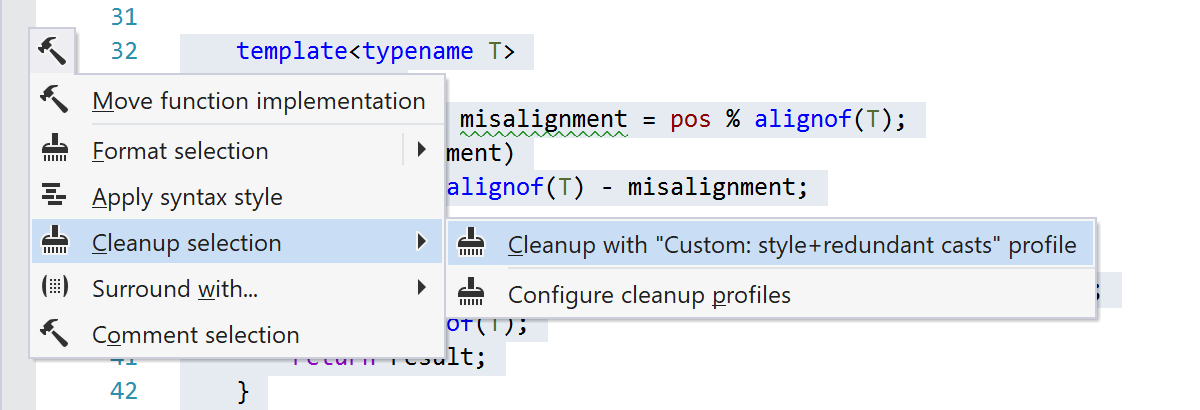
The new Cleanup selection context action lets you quickly run code cleanup on the selected code range. You can also choose one of the custom code cleanup profiles to use during the run.
You can also automatically run any cleanup tasks every time you save a file to make sure that your edits always comply with your code style. To configure automatic code cleanup, visit the Code Editing | Code Cleanup | General options page.
Syntax style settings
Let’s take a quick tour of the syntax style settings available in ReSharper C++ 2021.1.
Usage of auto
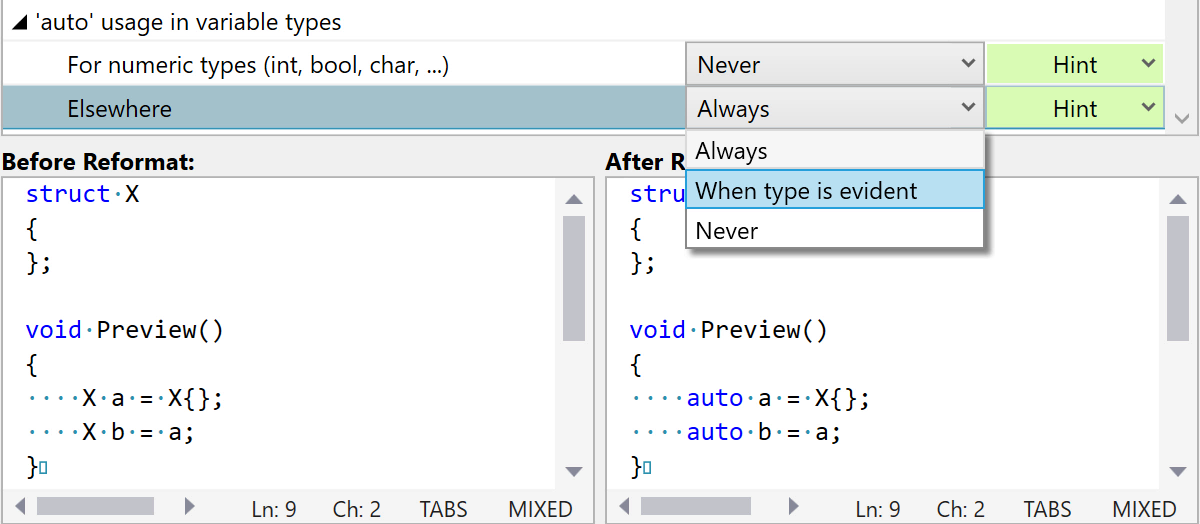
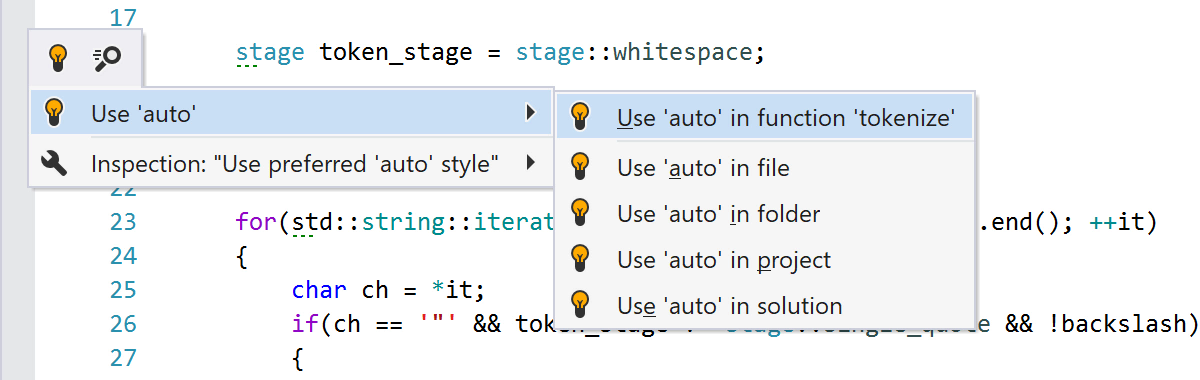
In previous releases, ReSharper C++ provided a single inspection for the explicit types in your code that could be replaced with the auto specifier. This led to a lot of highlighting in the editor, and based on your feedback we’ve replaced that inspection with two new syntax style settings.
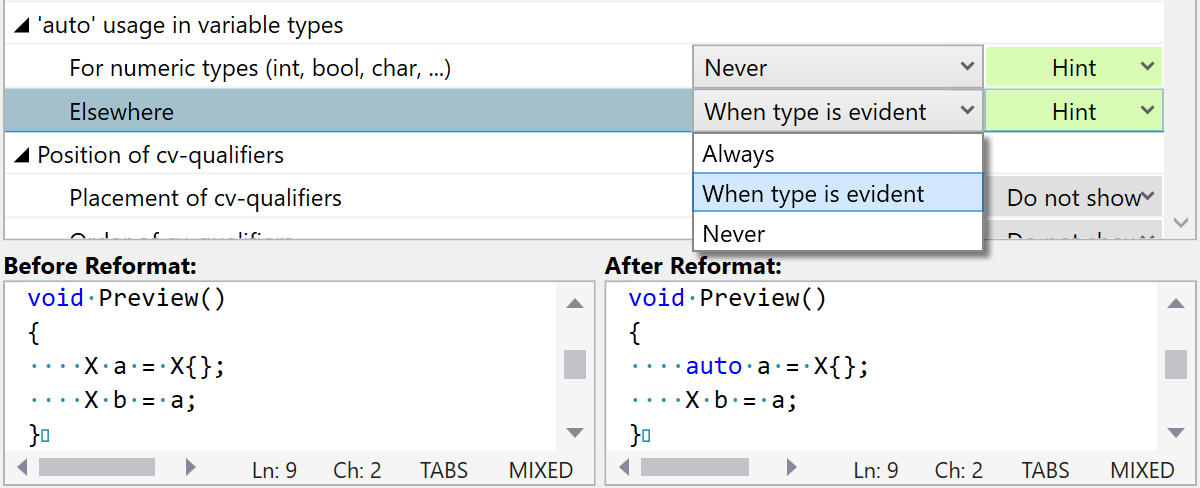
You can now configure for which types ReSharper C++ should enforce the usage of auto, and in other cases you can use a context action to manually replace an explicit type with auto. There are separate preferences for numeric and non-numeric types. The default for non-numeric types is When type is evident, which means that the auto specifier will only be introduced in the situations where the deduced type is evident from the initializer expression. In other words, ReSharper C++ will suggest using auto only when eliminating the explicit type would likely improve code readability. Of course, you can always set the syntax style setting to Never if you prefer explicit types, or to Always if you follow the Almost Always Auto style.

Please note that ReSharper C++ will not currently automatically replace auto with an explicit type if the usage of the auto specifier contradicts the configured syntax style.
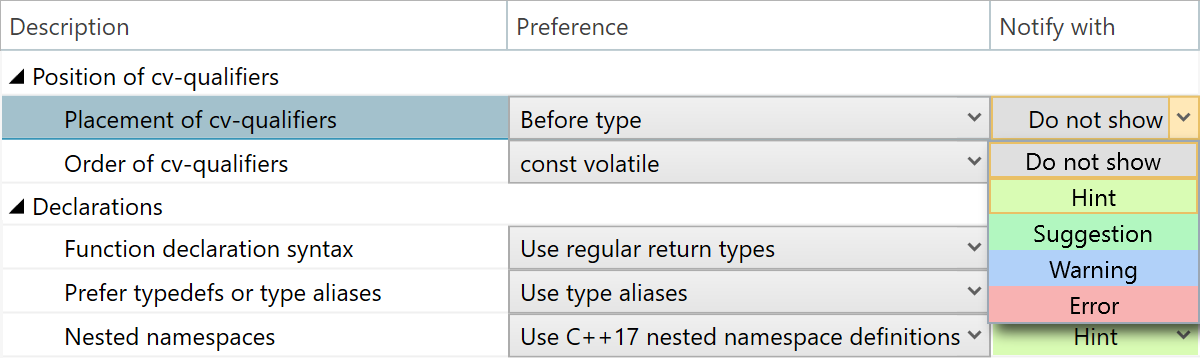
Position of cv-qualifiers
One aspect of the C++ code style on which many developers seem to disagree is whether the const keyword should be placed before or after the type it applies to. Traditionally, const is put before the type, in the style that is now colloquially known as “West const”. However, many people are convinced that the alternative “East const” style, where const is placed after the type, is more consistent. The reason for this is that the “East const” style always puts const on the right of what it modifies, including cases like constant pointer declarations and const member functions. If you’re interested in learning more about the benefits of “East const”, we recommend Jon Kalb’s East const Central page.
The choice between the “East const” and “West const” styles is a personal one – choose the option that works better for you and your team. To support both styles, ReSharper C++ provides two new syntax style settings. You can also choose whether to put const and volatile qualifiers before or after the type and which of the two qualifiers should go first.
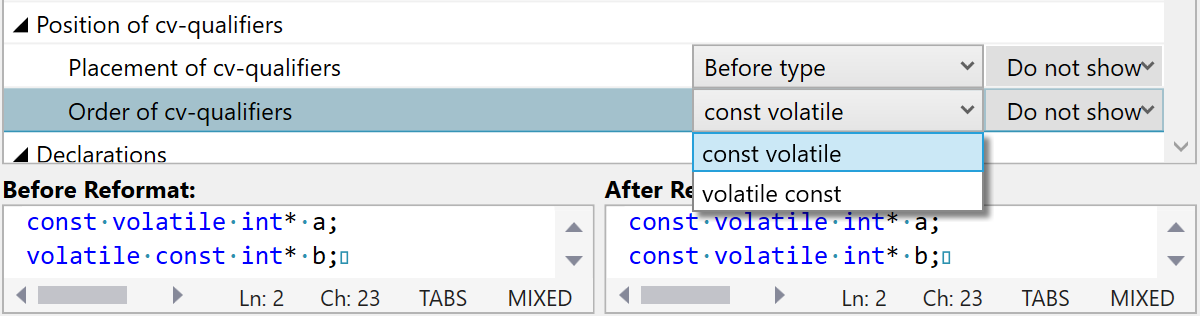
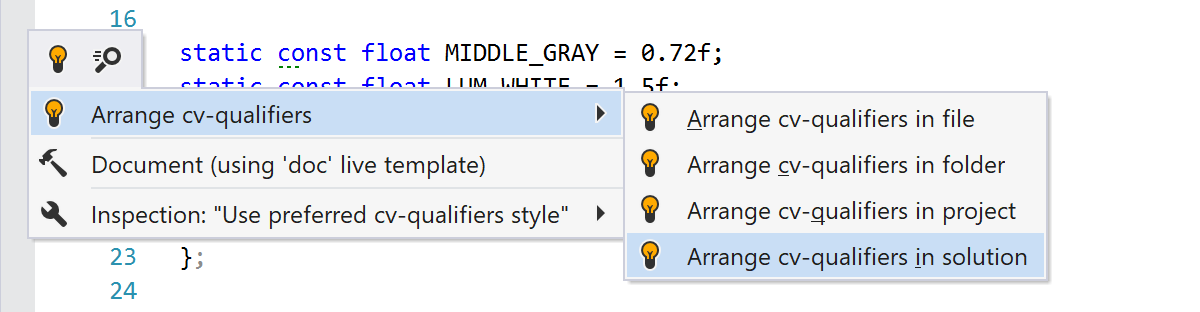
As with the other syntax style settings, ReSharper C++ gives you the power to apply the chosen style throughout your code and rearrange cv-qualifiers in the project or solution scope.
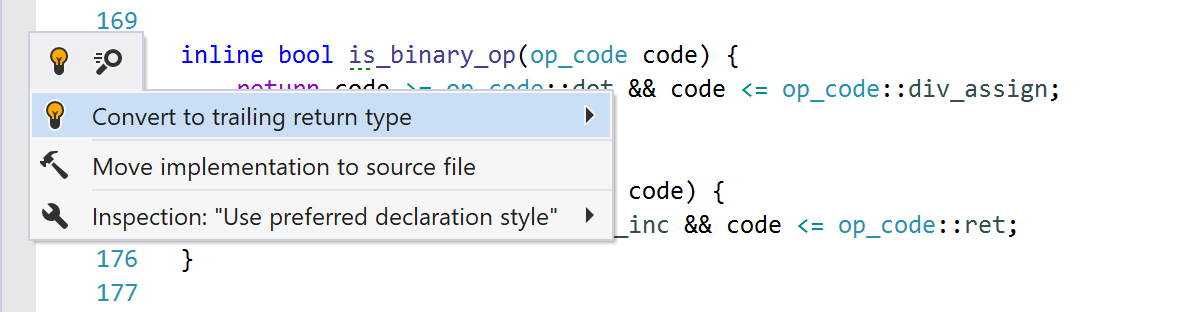
Declaration style
Several new syntax style settings let you choose between different interchangeable forms of C++ declarations.
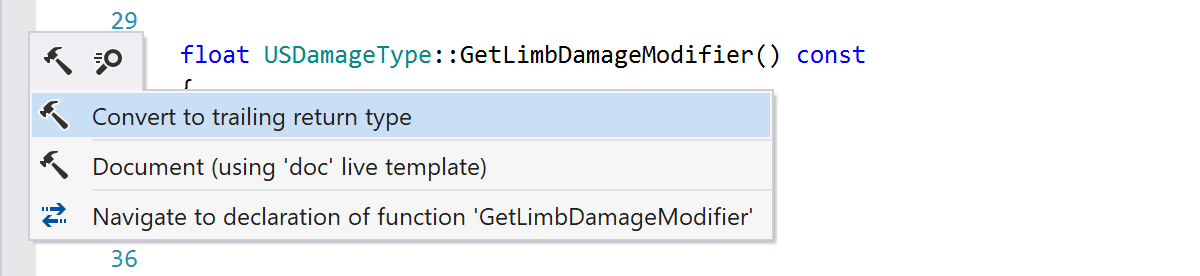
Trailing return types were introduced in C++11 to simplify function declarations, particularly in the case when the return type needs to refer to some of the function parameters. It’s also the only way to specify return types for lambdas. Since then, some people have made the argument that for consistency’s sake it might be worthwhile to use the trailing return type syntax for most function declarations (see East End Functions by Phil Nash for more background on this). With the Function declaration syntax setting, you can configure whether to use trailing or regular return types in function declarations and quickly update your code to follow the chosen style.
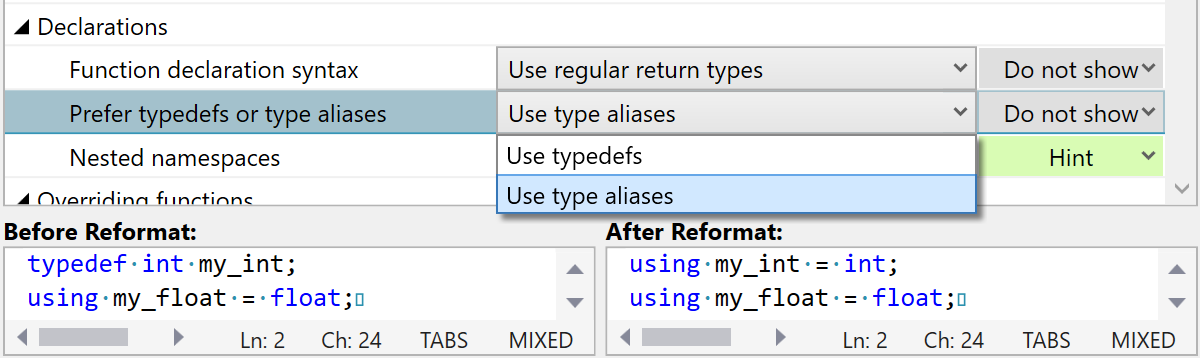
C++11 also added new ways to define type synonyms in the form of alias templates and type aliases. While alias templates were a new feature, type aliases were added only for consistency reasons and are effectively just another syntax for typedef declarations. The Prefer typedefs or type aliases setting lets you configure the preferred form of type synonyms. It also affects which syntax is used by the Introduce Typedef refactoring.

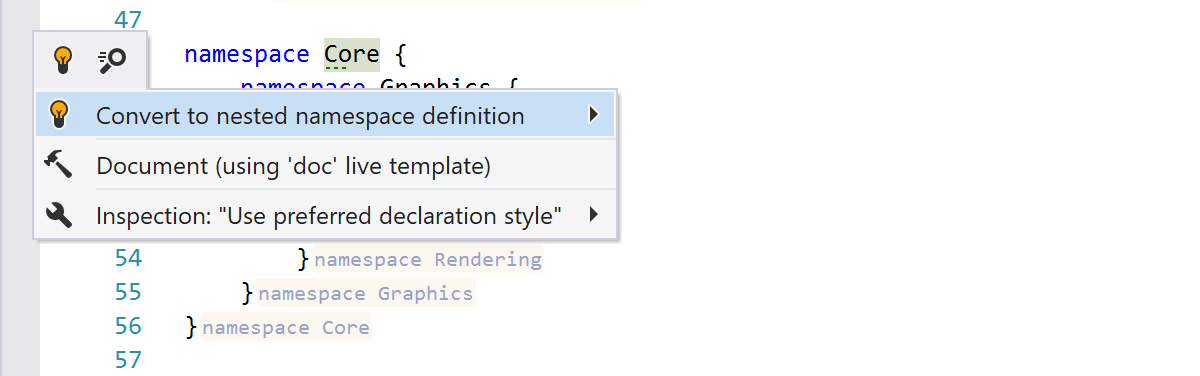
With the new C++17 syntax for nested namespaces, you can declare multi-level namespaces in a more concise manner. There’s practically no reason to avoid this feature, but if you don’t want to migrate your entire codebase to the new syntax and want all namespace declarations to use the same style, you can change the Nested namespaces setting.
Overriding functions
There are different schools of thought on which specifiers should be required on virtual functions that override a function from a base class. C++ Core Guidelines advise that overriding functions should have exactly one of the override and final specifiers and omit the virtual specifier. Unreal Engine’s Coding Standard, on the other hand, requires explicit virtual even though overriding functions are always implicitly virtual. With this approach, you have to use a redundant specifier, but it’s easier to spot virtual functions since the virtual specifier is located at the start of a function declaration.
Regardless of which style you adhere to, you can configure the required specifiers with syntax style settings for overriding functions.
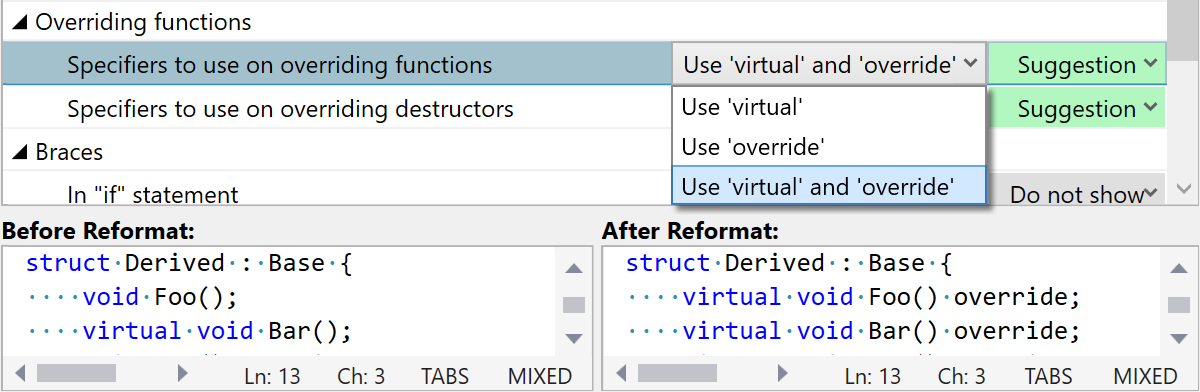
It is worth noting that there are separate settings for destructors and other functions. Until recently, the guidance in C++ Core Guidelines was to avoid declaring destructors in derived class virtual or override, but after some discussion it was decided that destructors should follow the same rules as other functions.
The dedicated inspection will remind you to add the missing specifiers or remove the redundant ones:

The syntax style settings for overriding functions also affect the new declarations created by Generate missing/overriding members and generative completion.
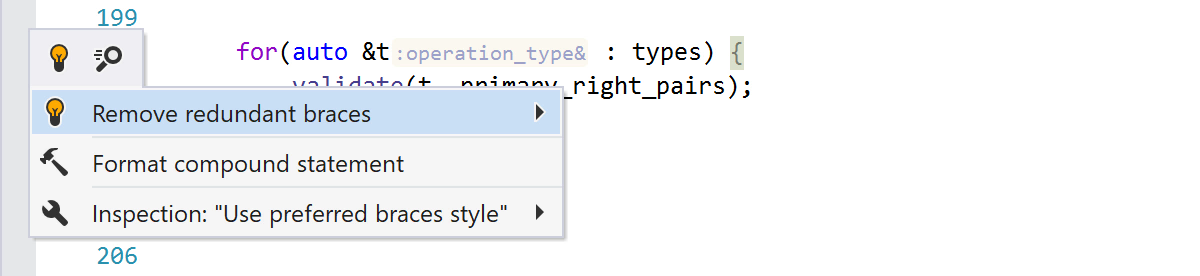
Braces
In C++, braces can be omitted around single nested statements under the if statement and different kinds of loop statements. However, code style guidelines may differ in this regard, and some of them require braces in certain cases to improve code readability. For example, Unreal Engine’s Coding Standard mandates braces around all single-statement blocks. A new set of syntax style settings allows you to configure exactly when nested statements should be wrapped in braces.
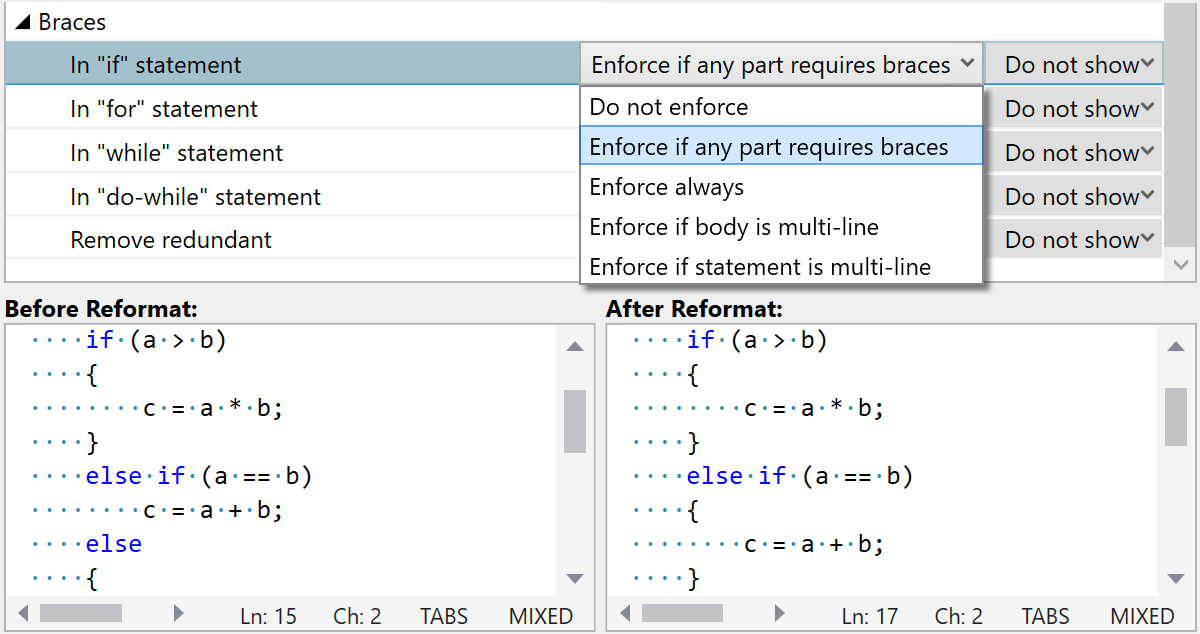
You can choose one of the provided options separately for each kind of control statement. In addition to the straightforward Do not enforce and Enforce always options, you can also opt to require braces only around statements that span several lines, or when the nested statement itself is multi-line. The Remove redundant setting controls whether ReSharper C++ should remove optional braces that do not comply with the chosen preference.
As usual, the settings are accompanied by the inspections and quick-fixes to add the missing braces and remove the redundant ones:
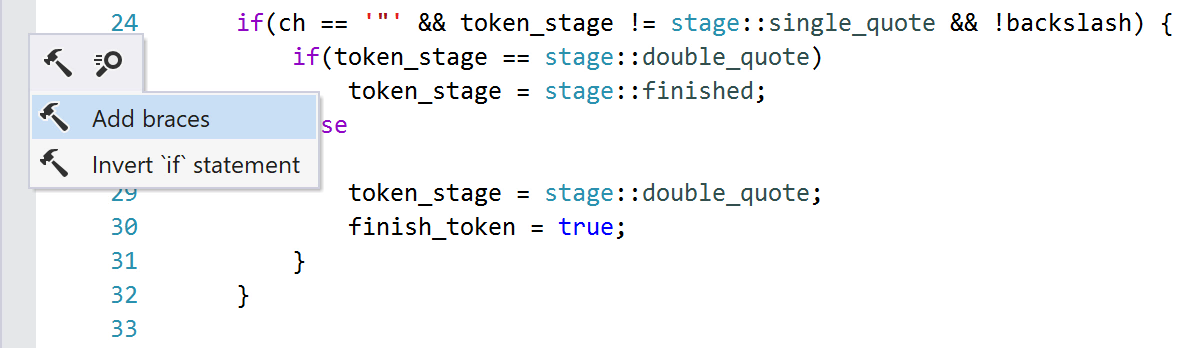
And just like for all other settings, if you do not want to enforce a particular rule, you can still use the context actions to add or remove any braces when needed:
Include directives
Several syntax style settings let you control the style of include directives.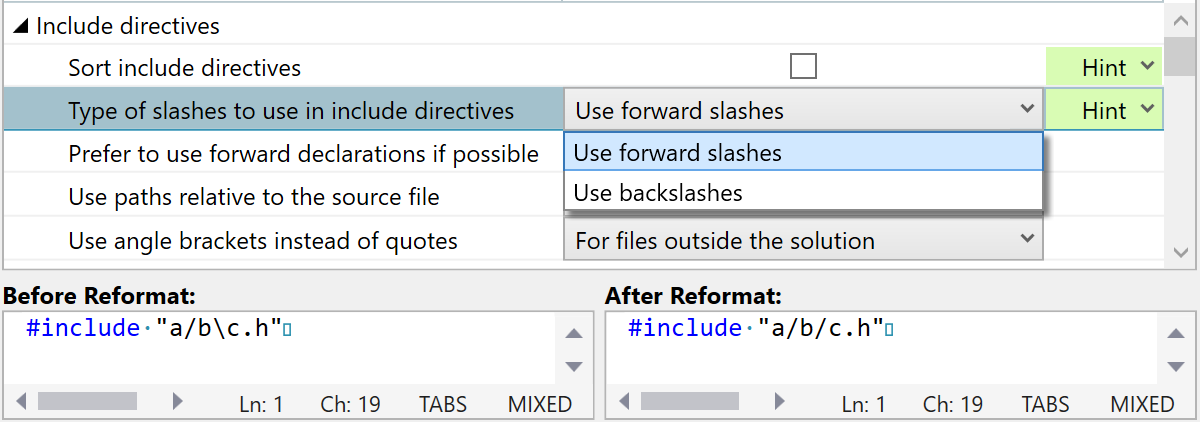
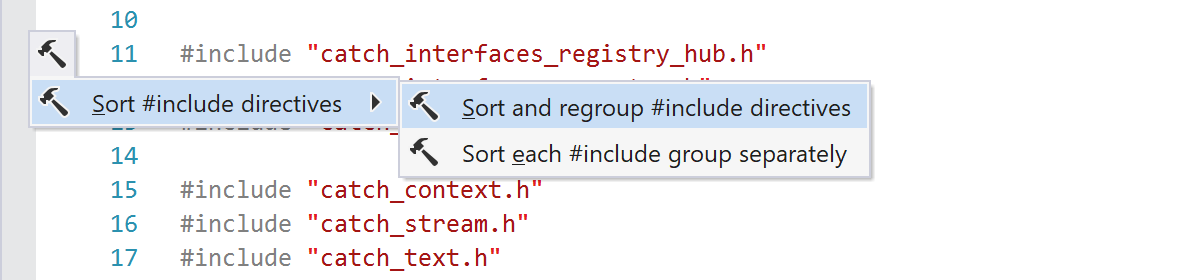
You can configure whether the order of include directives should be enforced with the Sort include directives setting. When this option is unchecked, include directives will not be reordered by code cleanup and the corresponding inspection will be turned off, but you can still use the provided context action to sort the directives in a file. The desired order can be configured on the Code Editing | C++ | Order of #includes options page.
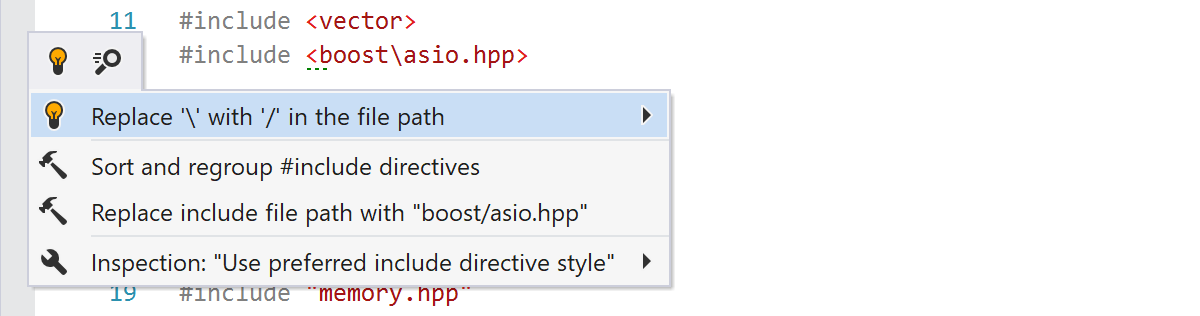
With Type of slashes to use in include directives you can choose whether path components in include directives should be separated with forward slashes or backslashes.
This section also includes several settings related to the handling of new include directives:
- Use paths relative to the source file and Use angle brackets instead of quotes determine the paths used inside the new include directives created by ReSharper C++.
- When Prefer to use forward declarations if possible is checked, Auto Import prefers to add a forward declaration instead of an include directive when possible.
Initialization
Initialization in C++ can be tricky. You can configure how ReSharper C++ handles various related language syntax.

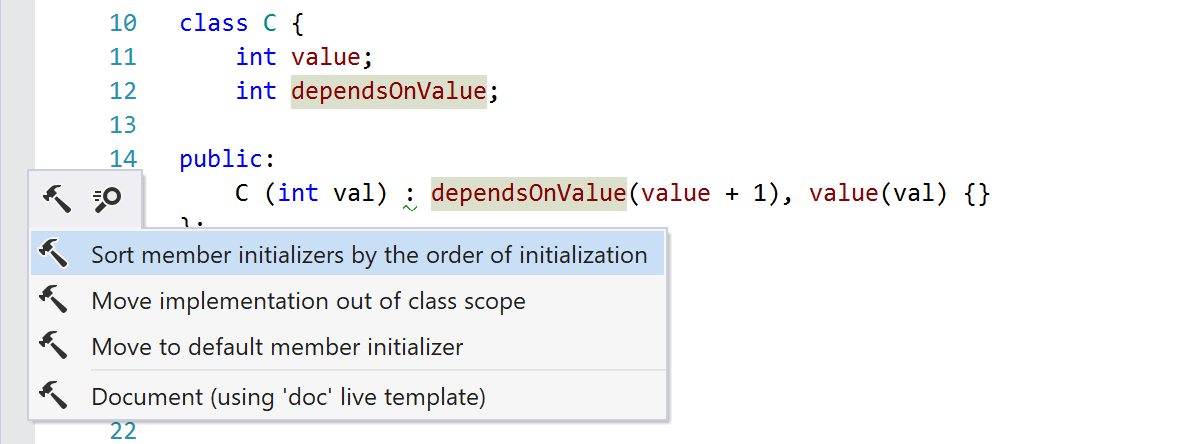
The Sort member initializers by the order of initialization setting lets you enforce the order of member initializers in constructor initializer lists. Class members are initialized in the order they are declared in their containing class, so to minimize confusion and errors the common practice is to keep member initializers in the same order.
With Default pointer initialization you can specify whether new pointers should be initialized with 0, NULL, or nullptr. When the latter option is used, ReSharper C++ will also notify you when nullptr can be used instead of the other null pointer constants.
The last two settings let you configure whether to use C++11 uniform initialization in new member initializers and in in-class member initialization.
That’s all the syntax style highlights we’d like to share with you today. But that’s only the beginning, as we plan to extend the set of available rules in future ReSharper C++ releases. Your feedback is very important to us to guide our work in this area – let us know which syntax style rules you’d like to see added next!
Download ReSharper C++, and find the perfect style for your code!
DOWNLOAD RESHARPER C++ 2021.1 BETA
Your ReSharper C++ team
JetBrains
The Drive to Develop


